


|
||||||
| Suspension | Chassis | Brakes -- Sponsored by 949 Racing Relating to suspension, chassis, and brakes. Sponsored by 949 Racing. |
 |
|
|
Thread Tools | Search this Thread |
 04-22-2013, 05:07 PM
|
#29 |
|
Senior Member
Join Date: Mar 2013
Drives: Sterling BRZ Ltd
Location: New England
Posts: 1,702
Thanks: 403
Thanked 1,389 Times in 671 Posts
Mentioned: 21 Post(s)
|
^^ really its pretty straight forward. My take on it. Dont hurt yourself, use safety as always. Just a guideline. Took me maybe an hour on the floor at a comfortable pace.
-Remove factory strut bar things over the engine, dont know if you have to but I did. -Safely raise and support the cars front end. -Remove both the aluminum and soft under panels. -Unbolt 2 14mm nuts holding old mounts to subframe. -Place wood on jack, lift on oil pan just enough to take the weight. -Undo the bolts at the front of each mount, you can see them easily near the exhaust ports. Use a long extension and 14mm socket. -Around back use a 14mm wrench to unbolt the rear mount bolts. Passenger side is just to the inside of the over pipe. Driver side is just inside of the steering shaft. -With bolts removed lift up the engine only high enough to pull the mounts out. (I put a block of wood between the motor and subframe to keep it from falling, highly suggest this.) -Passenger comes out over the rear of the sub frame. (This is with an aftermarket over pipe and catless front pipe.) -Driver has to twist and come out over the front of the sub frame. -Keep track of which mount goes on which side, compare to the STi mounts. -STI mounts go in just like the old ones came out. -Before lowering the motor down bolt on the new STI mounts to the engine. The STI mounts come with new bolts for the rear. Reuse the original bolts on the front. Take care not to cross thread these, they thread into aluminum. -Now slowly lower the engine back down keeping an eye to make sure the new mounts drop into the mounting holes in the subframe. -With the engines weight on the subframe reinstall the nuts on the new mounts. -Reinstall under panels. -Done
__________________
|

|

|
| The Following 10 Users Say Thank You to mrk1 For This Useful Post: | bhmax (05-07-2016), Calum (04-28-2013), chanomatik (04-22-2013), DustinS (02-12-2016), Hanakuso (04-22-2013), Initial_RD (06-15-2016), Racecomp Engineering (05-11-2013), Sleepless (08-18-2016), Trap63 (05-11-2013), unsurety (05-07-2014) |
|
04-22-2013, 05:08 PM
|
#30 |
|
Senior Member
Join Date: Mar 2013
Drives: Sterling BRZ Ltd
Location: New England
Posts: 1,702
Thanks: 403
Thanked 1,389 Times in 671 Posts
Mentioned: 21 Post(s)
|
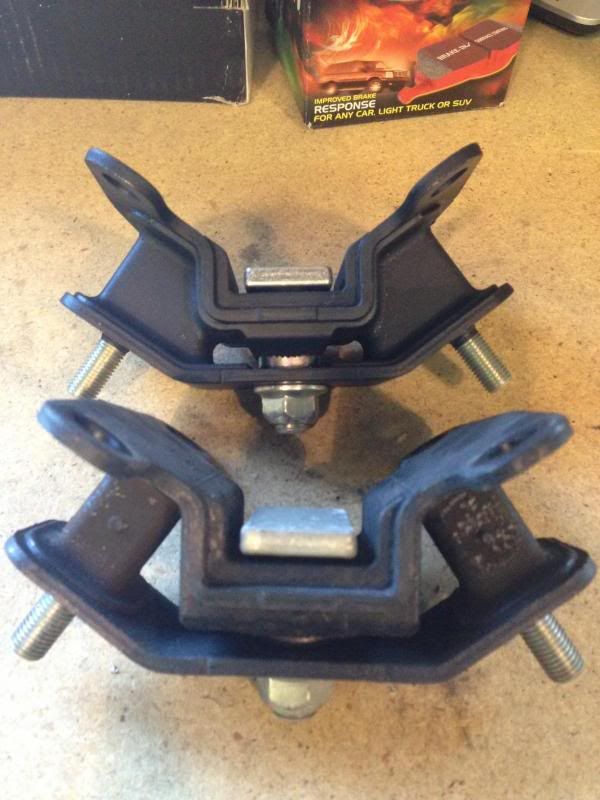
Factory compared to STI, the original part is so soft its unreal.
__________________
|
|
|
|
|
04-22-2013, 05:13 PM
|
#31 | |
|
Banned
Join Date: Jan 2012
Drives: Attitude
Location: MD
Posts: 10,046
Thanks: 884
Thanked 4,890 Times in 2,903 Posts
Mentioned: 123 Post(s)
|
Quote:
|
|
|
|
|
| The Following User Says Thank You to OrbitalEllipses For This Useful Post: | Lakitu (07-23-2018) |
|
04-22-2013, 05:13 PM
|
#32 |
|
Senior Member
Join Date: Mar 2013
Drives: Sterling BRZ Ltd
Location: New England
Posts: 1,702
Thanks: 403
Thanked 1,389 Times in 671 Posts
Mentioned: 21 Post(s)
|
^^ yup, wicked annoying.
__________________
|
|
|
|
|
04-22-2013, 05:21 PM
|
#33 | |
|
Senior Member
Join Date: Apr 2012
Drives: FR-S
Location: California
Posts: 1,956
Thanks: 294
Thanked 673 Times in 390 Posts
Mentioned: 11 Post(s)
|
Quote:
 mrk1 guide seems pretty straight forward. I'll probably go ahead and do this when the time comes. I already have the transmission bushing so this should complete it. |
|
|
|
|
|
04-22-2013, 05:31 PM
|
#34 | |
|
Senior Member
Join Date: Mar 2013
Drives: Sterling BRZ Ltd
Location: New England
Posts: 1,702
Thanks: 403
Thanked 1,389 Times in 671 Posts
Mentioned: 21 Post(s)
|
Quote:
Other then the under pans bolts I used. -3/8 Ratchet -6 inch extension -14mm deep socket, regular old style, doesn't even need to be deep -14mm box end wrench These cars are new, for the most part once you break the bolt loose it comes off by hand the rest of the way.
__________________
|
|
|
|
|
|
05-10-2013, 05:19 PM
|
#35 |
|
Pegasus White

Join Date: Jun 2012
Drives: 86
Location: Brisbane.
Posts: 973
Thanks: 646
Thanked 126 Times in 104 Posts
Mentioned: 8 Post(s)
|
Any pics of sti next to stock?
__________________
Driving: Pegasus White Manual GTS 86.
|
|
|
|
|
05-11-2013, 04:19 PM
|
#36 |
|
Senior Member

Join Date: Oct 2011
Drives: BRZ Limited 6MT, 02 AW, 03PSM WRX
Location: United States
Posts: 347
Thanks: 511
Thanked 153 Times in 63 Posts
Mentioned: 2 Post(s)
|
How is the NVH? I have the group N bushings in my WRX and thought it was a pretty easy and straight forward install.
|
|
|
|
|
05-11-2013, 10:13 PM
|
#37 |
|
Senior Member
Join Date: Nov 2011
Drives: 2013 Firestorm FR-S
Location: Houston
Posts: 506
Thanks: 18
Thanked 77 Times in 64 Posts
Mentioned: 10 Post(s)
|
These look to be rubber and not urethane which prolly keeps the nvh down.
__________________
2013 Firestorm FR-S, MTX, build date 1/13.
|
|
|
|
|
05-11-2013, 10:20 PM
|
#38 | ||
|
Senior Member
Join Date: Mar 2013
Drives: Sterling BRZ Ltd
Location: New England
Posts: 1,702
Thanks: 403
Thanked 1,389 Times in 671 Posts
Mentioned: 21 Post(s)
|
Quote:
Quote:
__________________
|
||
|
|
|
| The Following User Says Thank You to mrk1 For This Useful Post: | DriftEightSix (05-12-2013) |
|
05-11-2013, 11:42 PM
|
#39 | |
|
Join Date: Nov 2011
Drives: 2016 BRZ, 2012 Paris Di2 & 2018 STI
Location: Severn, MD
Posts: 5,520
Thanks: 3,542
Thanked 7,416 Times in 3,034 Posts
Mentioned: 311 Post(s)
 |
Quote:
 BTW we started importing STI parts back in 2003 ! (its what got us started actually) Good to see STI is making parts for this car. Myles |
|
|
|
|
|
05-12-2013, 01:44 AM
|
#40 |
|
Senior Member
Join Date: Sep 2012
Drives: 2010 BMW M3, 2013 Subaru BRZ
Location: Orange County
Posts: 376
Thanks: 32
Thanked 97 Times in 56 Posts
Mentioned: 5 Post(s)
|
In for review. Always like oem stuff better.
|
|
|
|
|
05-12-2013, 12:35 PM
|
#41 |
|
Senior Member
Join Date: Mar 2013
Drives: Sterling BRZ Ltd
Location: New England
Posts: 1,702
Thanks: 403
Thanked 1,389 Times in 671 Posts
Mentioned: 21 Post(s)
|
I really am not sure how to do a review on a part like this. Mine have been in for a few weeks and this is how the car should have come from the factory. I notice the improvement as I drove it before. My father drove the car for the first time and he commented that he felt very connected to the car. Neither him or my girl friend have complained of vibration or harshness. So they pass the girl friend test.
__________________
|
|
|
|
| The Following User Says Thank You to mrk1 For This Useful Post: | nix (06-12-2013) |
|
05-12-2013, 04:12 PM
|
#42 | |
|
Senior Member
Join Date: Oct 2012
Drives: Ultramarine FR-S 6MT
Location: Columbus, OH
Posts: 525
Thanks: 349
Thanked 204 Times in 121 Posts
Mentioned: 2 Post(s)
|
Quote:
I just wanna know exactly what this eliminates. Thinking of doing headers anyway so this would be easy while I was doing that!
__________________
 Car Received: 10/18. Break in ended: 10/28 Goal: Openflash UEL headers, Stage II 93 oct, TRD intake, arm rest :P |
|
|
|
|
|
|
|
|
|
|
 Similar Threads
|
||||
| Thread | Thread Starter | Forum | Replies | Last Post |
| Engine Mounts? | mrk1 | Engine, Exhaust, Transmission | 17 | 05-15-2016 04:31 PM |
| Whiteline Com-c top mounts | sw20kosh | Suspension | Chassis | Brakes -- Sponsored by 949 Racing | 349 | 05-27-2015 05:15 AM |
| What's the Purpose of WL Com C Top Mounts? | gbgracer | Tracking / Autocross / HPDE / Drifting | 16 | 03-27-2013 01:52 PM |
| upgraded mounts? | 7thgear | Engine, Exhaust, Transmission | 19 | 01-11-2013 11:31 PM |


