


|
||||||
| Engine, Exhaust, Transmission Discuss the FR-S | 86 | BRZ engine, exhaust and drivetrain. |
 |
|
|
Thread Tools | Search this Thread |
 04-28-2015, 09:43 AM
|
#15 | |
|
Senior Member

Join Date: Aug 2013
Drives: BRZ
Location: Denver, CO
Posts: 845
Thanks: 677
Thanked 397 Times in 264 Posts
Mentioned: 8 Post(s)
|
Quote:
|
|

|

|
|
04-28-2015, 09:45 AM
|
#16 | |
|
Senior Member

Join Date: Feb 2013
Drives: 13 BRZ Limited WRB
Location: Fargo, ND
Posts: 723
Thanks: 17
Thanked 296 Times in 195 Posts
Mentioned: 12 Post(s)
|
Quote:
Here's the story: http://www.ft86club.com/forums/showthread.php?t=87235
__________________
I plan to live forever. So far, so good.
My Build - http://www.ft86club.com/forums/showthread.php?t=31925  |
|
|
|
|
|
05-02-2015, 02:00 AM
|
#17 |
|
Senior Member
Join Date: Feb 2013
Drives: 13 BRZ Limited WRB
Location: Fargo, ND
Posts: 723
Thanks: 17
Thanked 296 Times in 195 Posts
Mentioned: 12 Post(s)
|
Holy. Shit.
After reading the manual on disassembling the engine, i about shit myself. Also, all the Special Service Tools are insane. this. Is. Going. to. Suck.
__________________
I plan to live forever. So far, so good.
My Build - http://www.ft86club.com/forums/showthread.php?t=31925 |
|
|
|
|
05-02-2015, 02:53 PM
|
#18 |
|
Senior Member

Join Date: Oct 2013
Drives: 2013 Subaru BRZ
Location: Norway
Posts: 111
Thanks: 29
Thanked 85 Times in 46 Posts
Mentioned: 3 Post(s)
|
Tok me 5 hours to remove my motor on my own.
A weekend to strip it down. I did not have any of the special tools.
__________________
English is my 2. language. Typos might occur.
 2013 BRZ, kraftwerks supercharged. Skunk2 Ultra radiator with oilcooler KW v3 - enkei 17x9 with PSS |
|
|
|
|
05-02-2015, 02:54 PM
|
#19 | |
|
Senior Member
Join Date: Feb 2013
Drives: 13 BRZ Limited WRB
Location: Fargo, ND
Posts: 723
Thanks: 17
Thanked 296 Times in 195 Posts
Mentioned: 12 Post(s)
|
Quote:
__________________
I plan to live forever. So far, so good.
My Build - http://www.ft86club.com/forums/showthread.php?t=31925 |
|
|
|
|
|
05-02-2015, 07:03 PM
|
#20 |
|
Senior Member
Join Date: May 2012
Drives: 2013 Scion FR-S, 1993 Lexus SC300
Location: Houston, TX
Posts: 411
Thanks: 284
Thanked 175 Times in 102 Posts
Mentioned: 5 Post(s)
|
I am in the middle of removing and dropping in a new motor myself.
I used this tool to disconnect the fuel lines: http://www.company23.com/545 It worked well enough. And is pretty much the only special tool I used. To lift the motor, I went to ACE and got a bolt that fit the front threaded hole in front of the throttle body that the service manual mentions rather than the $50 tool and $5 bolt (which cross references to like, a suspension a-arm on a 4runner or something). The procedure listed in the service manual ISO is pretty good, actually. I wasn't going to re-use my motor, but tore it down anyways to get a good look at it. Getting the timing cover off is about the hardest part. I used a plastic scraper/spudger to force the cover and motor apart and cut the silicone with a utility knife. You probably aren't going to need to remove the cam sprockets, since you can just remove the entire cam carrier section of the head. |
|
|
|
|
05-02-2015, 07:32 PM
|
#21 | |
|
Senior Member
Join Date: Feb 2013
Drives: 13 BRZ Limited WRB
Location: Fargo, ND
Posts: 723
Thanks: 17
Thanked 296 Times in 195 Posts
Mentioned: 12 Post(s)
|
Quote:
I'm down to the head bolts, had to go pickup 12pt sockets.
__________________
I plan to live forever. So far, so good.
My Build - http://www.ft86club.com/forums/showthread.php?t=31925 |
|
|
|
|
|
05-03-2015, 01:23 AM
|
#22 | |
|
Senior Member
Join Date: Oct 2013
Drives: 2013 Subaru BRZ
Location: Norway
Posts: 111
Thanks: 29
Thanked 85 Times in 46 Posts
Mentioned: 3 Post(s)
|
Quote:
I replaced the crank, rods and all bearings. Make sure to bag and tag all the parts. I had my girlfriend helping me when i stripped the motor. Just handed her the parts, she put them in plastic bags with a postit describing were it belonged. Building the motor took me longer, but I double checked everything.   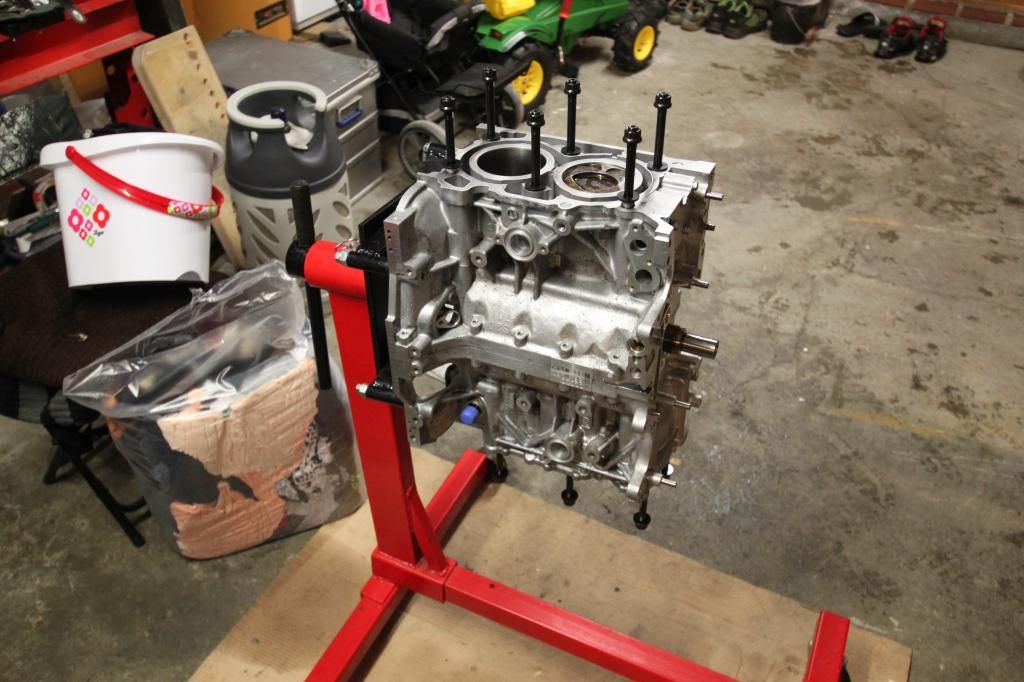     
__________________
English is my 2. language. Typos might occur.
2013 BRZ, kraftwerks supercharged. Skunk2 Ultra radiator with oilcooler KW v3 - enkei 17x9 with PSS |
|
|
|
|
| The Following User Says Thank You to Andreas83 For This Useful Post: | BRZ RN (03-23-2016) |
|
05-03-2015, 10:17 AM
|
#23 | |
|
Senior Member
Join Date: May 2012
Drives: 2013 Scion FR-S, 1993 Lexus SC300
Location: Houston, TX
Posts: 411
Thanks: 284
Thanked 175 Times in 102 Posts
Mentioned: 5 Post(s)
|
Quote:
|
|
|
|
|
|
05-03-2015, 03:47 PM
|
#24 | |
|
Senior Member
Join Date: Feb 2013
Drives: 13 BRZ Limited WRB
Location: Fargo, ND
Posts: 723
Thanks: 17
Thanked 296 Times in 195 Posts
Mentioned: 12 Post(s)
|
Quote:
I'm pretty comfortable tearing it all down (now that i've gotten to the pistons) but building it back up seems daunting. Did you clean all the parts before re-assembly? what kind of specialty tools did you need to complete that? Here's where i'm at now: http://www.ft86club.com/forums/showp...5&postcount=40
__________________
I plan to live forever. So far, so good.
My Build - http://www.ft86club.com/forums/showthread.php?t=31925 |
|
|
|
|
|
05-04-2015, 12:53 AM
|
#25 | |
|
Senior Member
Join Date: Oct 2013
Drives: 2013 Subaru BRZ
Location: Norway
Posts: 111
Thanks: 29
Thanked 85 Times in 46 Posts
Mentioned: 3 Post(s)
|
Quote:
Used a drill wire brush to remove gasket sealant. Brake cleaner and high pressure air to remove oil and other debris. Make sure that all oil gallys are clean. Used a tin can that squirts oil and applied it during assembly. I used almost a bag of rags during assembly. Plastigauge to check bearing clearence on crank, rods & camshafts. You need some "special" tools. Torque wrench, feeler gauges, piston ring compressor and some other tools. I had everything neded in my work shop.
__________________
English is my 2. language. Typos might occur.
2013 BRZ, kraftwerks supercharged. Skunk2 Ultra radiator with oilcooler KW v3 - enkei 17x9 with PSS |
|
|
|
|
|
05-04-2015, 01:02 AM
|
#26 | |
|
Senior Member
Join Date: Feb 2013
Drives: 13 BRZ Limited WRB
Location: Fargo, ND
Posts: 723
Thanks: 17
Thanked 296 Times in 195 Posts
Mentioned: 12 Post(s)
|
Quote:
__________________
I plan to live forever. So far, so good.
My Build - http://www.ft86club.com/forums/showthread.php?t=31925 |
|
|
|
|
|
05-04-2015, 01:45 AM
|
#27 | |
|
Senior Member
Join Date: Oct 2013
Drives: 2013 Subaru BRZ
Location: Norway
Posts: 111
Thanks: 29
Thanked 85 Times in 46 Posts
Mentioned: 3 Post(s)
|
Quote:
Replaced crank, rods and bearings.
__________________
English is my 2. language. Typos might occur.
2013 BRZ, kraftwerks supercharged. Skunk2 Ultra radiator with oilcooler KW v3 - enkei 17x9 with PSS |
|
|
|
|
|
05-04-2015, 01:46 AM
|
#28 | |
|
Senior Member
Join Date: Feb 2013
Drives: 13 BRZ Limited WRB
Location: Fargo, ND
Posts: 723
Thanks: 17
Thanked 296 Times in 195 Posts
Mentioned: 12 Post(s)
|
Quote:
__________________
I plan to live forever. So far, so good.
My Build - http://www.ft86club.com/forums/showthread.php?t=31925 |
|
|
|
|
|
|
|
|
|
|
 Similar Threads
|
||||
| Thread | Thread Starter | Forum | Replies | Last Post |
| FS: Password JDM Engine Covers and Gunmetal Engine Dress Up kit | PrimeMotoring | Engine, Exhaust, Bolt-Ons | 10 | 11-25-2014 11:38 PM |
| Check Engine light on @5.7k miles and engine stalling at 4,000 rpms? | djdrugga24 | Issues | Warranty | Recalls / TSB | 3 | 06-25-2014 06:06 AM |
| Will I get a check engine light on if the engine bay has a direct injection failure? | Astroboy | Engine, Exhaust, Transmission | 7 | 03-29-2014 06:16 PM |
| will polishing your car to remove swirls remove opti-coat? | bacon_cheese_beer | Cosmetic Maintenance (Wash, Wax, Detailing, Body Repairs) | 11 | 10-25-2012 10:41 PM |
| Engine sputtering while idling with check engine light flashing, WTF | speedy racer | Scion FR-S / Toyota 86 GT86 General Forum | 15 | 08-27-2012 06:50 AM |


