


 06-14-2014, 10:54 AM
|
#71 | |
|
Senior Member
Join Date: May 2012
Drives: MT WRB BRZ Limited, 2007 911s
Location: CT
Posts: 812
Thanks: 218
Thanked 381 Times in 181 Posts
Mentioned: 9 Post(s)
|
Quote:
|
|

|

|
|
06-26-2014, 08:37 PM
|
#72 | |
|
Senior Member

Join Date: Mar 2012
Drives: 2013 Subaru BRZ
Location: PA
Posts: 683
Thanks: 106
Thanked 248 Times in 133 Posts
Mentioned: 10 Post(s)
|
Here's from my post on DarrenDriven's DIY thread, about how I used a torque wrench on the front strut top nuts:
Quote:
|
|
|
|
|
|
08-23-2014, 02:43 PM
|
#73 |
|
Member

Join Date: Jun 2014
Drives: 2014 Whiteout FRS
Location: Tennessee
Posts: 49
Thanks: 1
Thanked 30 Times in 18 Posts
Mentioned: 1 Post(s)
|
I'm not sure what is going on with mine. Used the tips outlined in the first post to start installing TRD springs. The front was a piece of cake, the rear...
I've worked about 5 hours on the rear, only got the passenger side spring in and the strut isn't even going through the hole in the trunk. The driver's side I can't get the strut to swing out or come out at all, it is bound up in there good. I've taken every bolt out of the lower control arm. Next move is to completely take the lower control arm off, I know it will come out then. I just can't figure out why I'm having so much trouble with it. I've done this on other cars and it was rather simple. Another odd thing, when doing measurements before starting, the driver's side was about 3/4" higher than the passenger side. Never messed with the suspension prior to today and it has less than 2k miles on it. |
|
|
|
|
08-25-2014, 10:10 AM
|
#74 | |
|
Member
Join Date: Jun 2014
Drives: 2014 Whiteout FRS
Location: Tennessee
Posts: 49
Thanks: 1
Thanked 30 Times in 18 Posts
Mentioned: 1 Post(s)
|
Quote:
 Finally got the strut out of the driver's side by taking the LCA completely loose. Got the spring changed and put back in, then was having issues getting all the bolts back in. Noticed the E-brake cable was binding part of it, then remembered I had it pulled from jacking the car up. Released it and bam, everything back together without issue. So, everything would have been very simple if I didn't have it pulled through half of the install on the rear (passenger's side). I guess I now know that if need be, I can wrestle and power through having the emergency brake pulled. Not sure when that would ever be of benefit, but you gotta look on the bright side sometimes. 
|
|
|
|
|
| The Following User Says Thank You to Luke For This Useful Post: | MJones_RB (01-13-2017) |
|
09-26-2014, 10:08 AM
|
#75 |
|
Senior Member
Join Date: Jul 2012
Drives: GT86
Location: Northern Europe
Posts: 357
Thanks: 292
Thanked 190 Times in 103 Posts
Mentioned: 2 Post(s)
|
Further simplification: you can do front and rear springs without removing the sway bar end links.
Thanks you for this thread, very usefull, did this last night, in the dark on the driveway fiddling around with lights (no time during daylight). I ended not removing the endlinks because of necessity as I couldn't get the nut of the front link without causing permanent damage. So I worked around it and succeeded and did similar in the rear. So basically, if you don't want to swaybar to work against you, make it work with you, this is how I did it: Front: - Loosen wheel nuts - Remove the top nuts form the struts (with suitable counterhold) - Lift car and let both struts sink down - Remove wheels - Release the 12mm nut for the brake like and released on clip of the ABS cable. - Loosen the bolt of the rearward lower arm bushing, it has pretension and prevents you from lowering the struts fully. - Pull out struts, you should have room enough now, can be a slight struggle so watch you fenders. - Replace springs and bump stops as described before - Push both struts back in place, kinda. If you are two, both can push them up and position them in the spring perch simultaneously. Then one person keeps holding the strut (and the other through the swaybar) and the other person screws on the top nuts. If you are alone as me, carefully position both struts in the wheel wells, using a jack on one side and carefully raising it an inch at a time and then go to the other side that follows because of the sway and reposition there. Back and forth a few times and you can secure the top bolt on the jack side, then use the jack on the other side. - Retighten everything, the rearward control arm bushing only when the car is on the ground with its wheels (probably need a ramp to do that properly, I never released that bushing but then it was really fighting me). Rear: - Loosen wheel nuts - Remove the top nuts form the struts (with suitable counterhold) - Lift car and let both struts sink down - Remove wheels - Loosened but not remove the inner bolt of the lower control arm (pretentioned) - Removed outer bolt of the lower control arms - Push down control arm, the other will follow because of the sway bar. - Move outward the shocks, plenty of room here, and replace springs etc - Move shocks inward. - Same procedure as front, either with two pulling the control arm up and guiding the shock simultaneously, or raising one lower control arm incrementally with a jack and the other arm following because of the sway bar, going back and forth to guide both shocks and eventually getting the top nuts back on. - Retighten all parts, the inner lower control arm bushing only when the car is on the ground with its wheels, easy enough to reach without a ramp. Of course this is completely at your own risk, it might be the method with releasing the least bolts but it probably ain't the most professional or fastest method. But it worked for me, would have taken me approx two hours in daylight if I didn't spend almost the same amount of time cursing that endlink and looking for a solution... |
|
|
|
|
10-03-2014, 12:18 PM
|
#76 |
|
Senior Member

Join Date: Jun 2014
Drives: 2013 Scion Fr-s
Location: San Jose
Posts: 183
Thanks: 6
Thanked 58 Times in 42 Posts
Mentioned: 4 Post(s)
|
Just want to thank everyone involved in the DIY. This was very detailed and straight forward for someone like me who has never done anything like this. I only had issues when putting the strut back into the hole and having it come all the way through. Eventually I figured it out. I only got to do the front because I spent so much time and was starving. (my own fault for not having all the sockets organized and not doing a couple things right the first time. I will finish the rear today though. Looks easier.
Oh 1 question. I feel like i held the allen pretty good while using an open socket to tighten the nut but felt it turn the allen turn a bit while doing it. Would a little turn damage the strut? How would you know if something is wrong. The car drove fine. No weird noises or anything. |
|
|
|
|
03-22-2015, 02:03 PM
|
#77 |
|
Senior Member
Join Date: Oct 2013
Drives: 2013 Scion FR-S - Argento
Location: 805
Posts: 504
Thanks: 8
Thanked 217 Times in 143 Posts
Mentioned: 3 Post(s)
|
I just finished w this. The front wasn't bad but the rear was a pain in the ass!
I was swapping out LCA's also. The hard part was getting the struts/springs to compress enough to get the bolts back through the LCA. Driver's side was especially hard. About 1.5 hr for the front and 5 hr for the rear!!! I don't have a good way to torque the top nuts without spinning shafts. I marked one with a sharpie and tried it and it had rotated a quarter turn and I wasn't at 41lb yet. Not sure how to finish it??? |
|
|
|
|
03-22-2015, 03:43 PM
|
#78 | |
|
Senior Member
Join Date: Oct 2014
Drives: 2017 Cayman S
Location: Maryland
Posts: 341
Thanks: 41
Thanked 128 Times in 73 Posts
Mentioned: 3 Post(s)
|
Quote:
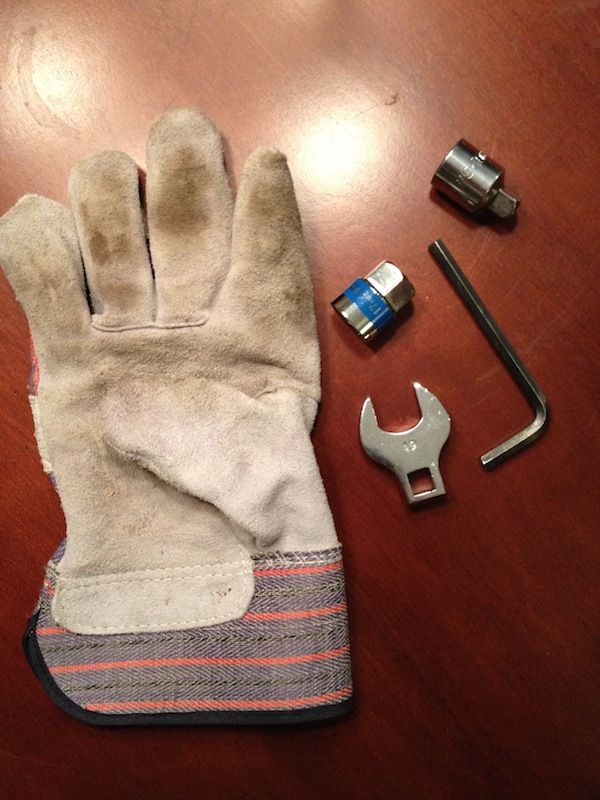
For torquing the top nuts without the shaft rotating I used a pass-through socket set with a "T" handle allen wrench. This won't get you the exact torque setting, but it shouldn't be to difficult to approximate. At Harbor Freight you can get both tool sets for less than $30. Not the highest quality tools, but IMO perfect for this task.
__________________
and loving it! Maxwell Smart
. Gone but not forgotten 2014 BRZ Limited - 2013 VW Golf R - 2010 Forester XT - 2006 Mazda 3 GT |
|
|
|
|
|
03-22-2015, 08:44 PM
|
#79 | |
|
Senior Member
Join Date: Oct 2013
Drives: 2013 Scion FR-S - Argento
Location: 805
Posts: 504
Thanks: 8
Thanked 217 Times in 143 Posts
Mentioned: 3 Post(s)
|
Quote:
Curious also if the shaft rotated by 1/4 turn, is that a problem? p.s. I didn't have enough height from my jack to get stands under the back end, so I couldn't use the jack to push up the LCA as it was holding up the car! (Yes, I had a spare wheel from my SUV under there in case the jack failed.) |
|
|
|
|
|
04-14-2015, 12:48 PM
|
#80 |
|
Member

Join Date: Feb 2014
Drives: 13' AVO Whiteout
Location: Maryland
Posts: 93
Thanks: 3
Thanked 34 Times in 26 Posts
Mentioned: 0 Post(s)
|
Don't you need to preload the top mount onto the strut?
Meaning either A) use a jack under the lca to lift the shock and compress the springs or B) use some coil compressors? I heard that not doing either of those could result in failure and clunking |
|
|
|
|
04-20-2015, 09:48 AM
|
#81 |
|
Senior Member

Join Date: Mar 2014
Drives: 2014 BRZ Premium - SWP
Location: Chicago
Posts: 159
Thanks: 0
Thanked 21 Times in 20 Posts
Mentioned: 3 Post(s)
|
Used this method and the original OP from Darren. Thanks to both OPs. Took about 3hr, rears took longer because I didn't have a long enough thru socket. Make sure you have a deeper length thru socket to get to the rear top strut bolt.
__________________
Vortech SC V3 // 3.12 Pulley // Moto-East Tune (93oct,e40-50,e85)
|
|
|
|
|
05-22-2015, 11:24 PM
|
#82 |
|
Senior Member

Join Date: Dec 2014
Drives: 2014 Subaru BRZ
Location: Halifax, NS
Posts: 270
Thanks: 11
Thanked 12 Times in 10 Posts
Mentioned: 0 Post(s)
|
Following this diy, i cant for the life of me, loosen the top nut of the struts!!! Anyway to loosen them? With all my force, wouldnt loosen. Looks like it has a locktite red on it.
|
|
|
|
|
05-22-2015, 11:32 PM
|
#83 |
|
Senior Member
Join Date: Dec 2014
Drives: 2014 Subaru BRZ
Location: Halifax, NS
Posts: 270
Thanks: 11
Thanked 12 Times in 10 Posts
Mentioned: 0 Post(s)
|
|
|
|
|
|
05-23-2015, 12:08 AM
|
#84 |
|
Manny

Join Date: Aug 2013
Drives: 13 WRB Brz
Location: San Jose, CA
Posts: 217
Thanks: 152
Thanked 52 Times in 40 Posts
Mentioned: 4 Post(s)
|
I think that nut will just keep spinning unless you have the allen wrench holding it in place through the center. It should spin off though. Maybe add some wd-40 and let it soak a few mins? Mine spun off right away. Use some leverage and a second set of hands if needed.
Sent from my iPhone using Tapatalk
__________________
 |
|
|
|
|
|
|
|
|
|
 Similar Threads
|
||||
| Thread | Thread Starter | Forum | Replies | Last Post |
| Alignment needed after front camber bolt install? | ayau | Suspension | Chassis | Brakes -- Sponsored by 949 Racing | 60 | 08-31-2013 12:13 AM |
| Exhaust MP/FP (flange/spring bolts) install help! | rbizzle004 | Engine, Exhaust, Transmission | 9 | 03-04-2013 11:34 AM |
| East bay shops for spring install? | WillBRZ | Northern California | 9 | 02-21-2013 02:03 AM |
| Selling stock strut/spring assembly | SleekMachine | Brakes, Suspension, Chassis | 16 | 12-13-2012 08:03 PM |
| vibration after spring install? | sajonf | Suspension | Chassis | Brakes -- Sponsored by 949 Racing | 5 | 08-30-2012 02:30 PM |


 2013 Scion FRS