


|
||||||
| Suspension | Chassis | Brakes -- Sponsored by 949 Racing Relating to suspension, chassis, and brakes. Sponsored by 949 Racing. |
 |
|
|
Thread Tools | Search this Thread |
 07-15-2014, 03:32 PM
|
#1 |
|
Senior Member
Join Date: Jul 2013
Drives: Toyobaru FRZ
Location: Home
Posts: 230
Thanks: 92
Thanked 179 Times in 99 Posts
Mentioned: 6 Post(s)
Tagged: 0 Thread(s)
|
Koni Yellow Rears - Top Hat Drill size
So I did one side of the Koni Yellow rears yesterday. Couldn't finish the other side as it was getting late. Anyway, one of the steps required is drilling the rear top hat. Koni says we should drill a 12mm hole. I don't have a metric set and I read somewhere that a 1/2" would work, so I just went with 1/2" without thinking of trying anything different. 1/2" is 12.7mm, so pretty close, the hole will have a larger radius by .35mm over the Koni shaft.
After reading more about the Konis this morning, I realize a few folks are going with slightly smaller bits, going with 31/64ths (12.3mm) or 15/32nds (11.9mm + some slight grinding/boring). Now I'm questioning whether the 1/2" bit was too large. It didn't really occur to me that the top hat would have any side load from the strut's shaft that would require an exact fit. I figured the hole was there just to get the thicker adjuster through. Anyway, what I did has been done and there is no turning back on this top hat, but I can certainly buy another if I had to. Need some input on whether this should be a problem or not. Also would like to hear if anyone else has done 1/2" and what their experience has been. Car seems to drive just fine, no weird noises or anything, but want to prevent any future problems. Thanks. |

|

|
|
07-15-2014, 05:03 PM
|
#3 | |
|
Senior Member
Join Date: Jul 2013
Drives: Toyobaru FRZ
Location: Home
Posts: 230
Thanks: 92
Thanked 179 Times in 99 Posts
Mentioned: 6 Post(s)
Tagged: 0 Thread(s)
|
Quote:
|
|
|
|
|
|
07-15-2014, 05:11 PM
|
#4 |
|
Join Date: Feb 2014
Drives: BRZ
Location: East
Posts: 820
Thanks: 18
Thanked 301 Times in 186 Posts
Mentioned: 9 Post(s)
Tagged: 0 Thread(s)
|
Just don't put the front lower perch on upside down.
|
|
|
|
|
07-15-2014, 05:30 PM
|
#5 | |
|
Senior Member
Join Date: Jul 2013
Drives: Toyobaru FRZ
Location: Home
Posts: 230
Thanks: 92
Thanked 179 Times in 99 Posts
Mentioned: 6 Post(s)
Tagged: 0 Thread(s)
|
Quote:
I installed it the way it came off the OEM strut with the rubber facing downward on the spring. Wider part towards the bottom. 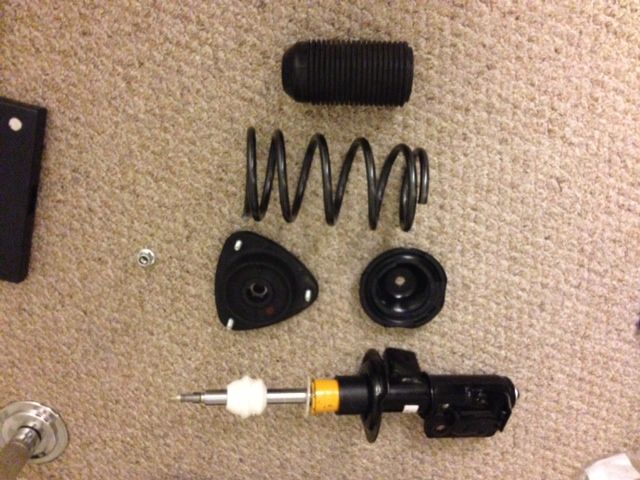 Funny enough, I actually put the rear spring perch in upside down. I'll have to uninstall tonight and flip them over. Explains why I had such a hard time with the spring last night. |
|
|
|
|
|
07-15-2014, 06:42 PM
|
#6 |
|
Join Date: Feb 2014
Drives: BRZ
Location: East
Posts: 820
Thanks: 18
Thanked 301 Times in 186 Posts
Mentioned: 9 Post(s)
Tagged: 0 Thread(s)
|
Oops, I meant rear. Too late lol.
|
|
|
|
|
07-15-2014, 10:05 PM
|
#8 |
|
Senior Member
Join Date: May 2014
Drives: 2013 Subaru BRZ
Location: Pontiac, MI
Posts: 313
Thanks: 187
Thanked 196 Times in 101 Posts
Mentioned: 2 Post(s)
Tagged: 0 Thread(s)
|
31/64" would have been slightly better, but those rubber bushings are going to deflect a hell of a lot more than the 15 thou difference between 31/64" and 1/2". You'll survive.
__________________
1jz salvaged brz build thread brought to you by visconti tuning --> Pipe dreams and poor life choices
|
|
|
|
|
07-16-2014, 09:18 AM
|
#9 | ||
|
Banned
Join Date: Jun 2014
Drives: Car
Location: Earth
Posts: 85
Thanks: 3
Thanked 34 Times in 29 Posts
Mentioned: 1 Post(s)
Tagged: 1 Thread(s)
|
Quote:
 You mean how it's illustrated in the Koni drawings? (though the front perch is part of the OEM shock-body, so I assume you meant rear) You mean how it's illustrated in the Koni drawings? (though the front perch is part of the OEM shock-body, so I assume you meant rear)Quote:
|
||
|
|
|
|
07-16-2014, 12:17 PM
|
#10 |
|
Join Date: Feb 2014
Drives: BRZ
Location: East
Posts: 820
Thanks: 18
Thanked 301 Times in 186 Posts
Mentioned: 9 Post(s)
Tagged: 0 Thread(s)
|
"Why is my car 2" higher in the back!?!??!"
It didnt handle very well thats for sure. |
|
|
|
|
07-16-2014, 03:23 PM
|
#11 | |||||
|
Senior Member
Join Date: Jul 2013
Drives: Toyobaru FRZ
Location: Home
Posts: 230
Thanks: 92
Thanked 179 Times in 99 Posts
Mentioned: 6 Post(s)
Tagged: 0 Thread(s)
|
Quote:
Quote:
Quote:
Quote:
Quote:
|
|||||
|
|
|
|
07-16-2014, 03:33 PM
|
#12 | |
|
Senior Member
Join Date: May 2014
Drives: 2013 Subaru BRZ
Location: Pontiac, MI
Posts: 313
Thanks: 187
Thanked 196 Times in 101 Posts
Mentioned: 2 Post(s)
Tagged: 0 Thread(s)
|
Quote:
__________________
1jz salvaged brz build thread brought to you by visconti tuning --> Pipe dreams and poor life choices
|
|
|
|
|
|
07-16-2014, 07:14 PM
|
#13 | |
|
Senior Member
Join Date: Jul 2013
Drives: Toyobaru FRZ
Location: Home
Posts: 230
Thanks: 92
Thanked 179 Times in 99 Posts
Mentioned: 6 Post(s)
Tagged: 0 Thread(s)
|
Quote:
Given how the strut sits in structured 'assembly' consisting of bushings, perches, springs, spring pressure, top hats, nuts, mounts, etc and the primary movement going up/down the control arm and strut, I'd just have to wonder how much lateral force actually leads up to the strut's shaft. And if so, what level of movement generates a meaningful side effect? Given they're two separate pieces, even from the factory there is always going to be some level of 'play' between a top hat and strut. Anyway, after seeing the responses here and doing a bit more research the 1/2" hole seems to be fine. Car was put together last night and went out for a test drive, felt good, no weird noises! |
|
|
|
|
|
07-16-2014, 07:15 PM
|
#14 |
|
Senior Member
Join Date: Jul 2013
Drives: Toyobaru FRZ
Location: Home
Posts: 230
Thanks: 92
Thanked 179 Times in 99 Posts
Mentioned: 6 Post(s)
Tagged: 0 Thread(s)
|
Off topic from the thread, but since I messed up...
Wrong way -  Right way - 
|
|
|
|
|
|
|
|
|
|
 Similar Threads
|
||||
| Thread | Thread Starter | Forum | Replies | Last Post |
| Koni Yellow Whoes :( | feldy | Suspension | Chassis | Brakes -- Sponsored by 949 Racing | 30 | 05-21-2014 11:02 AM |
| WTB: Koni yellow struts and RCE yellow springs | nlowell | Brakes, Suspension, Chassis | 2 | 05-20-2014 03:10 PM |
| koni yellow question | sweeney208 | Suspension | Chassis | Brakes -- Sponsored by 949 Racing | 39 | 02-03-2014 08:09 PM |
| FS: RCE Yellow, Koni struts and pre cut housing for Koni's. | Dinko | Brakes, Suspension, Chassis | 21 | 12-16-2013 10:32 AM |
| -Sold- FS: ASSEMBLED Koni Yellow + RCE Yellow combo; lightly used! | OrbitalEllipses | Mid-Atlantic | 21 | 06-14-2013 12:10 PM |


