


|
||||||
| CANADA Canada |
 |
|
|
Thread Tools | Search this Thread |
 05-28-2013, 06:18 PM
|
#29 | |
|
Member
Join Date: May 2013
Drives: 2013 BRZ WRB Sport Tech MT
Location: Toronto, ON, Canada
Posts: 22
Thanks: 2
Thanked 3 Times in 3 Posts
Mentioned: 1 Post(s)
|
Quote:
I was wondering if you also need to ground the handbrake wire too, or just this one pin? |
|

|

|
|
06-18-2013, 05:06 PM
|
#30 |
|
Senior Member
Join Date: May 2013
Drives: BRZ Sport-tech
Location: Canada
Posts: 347
Thanks: 77
Thanked 182 Times in 111 Posts
Mentioned: 0 Post(s)
|
Do you need a harness for this? Can you just crimp a female pin into a wire, slide it over the 'secrete bypass pin' and ground that to the radio?
Does the hardware bypass eliminate the nag screen? |
|
|
|
|
06-18-2013, 07:26 PM
|
#31 |
|
Engineer

Join Date: Jul 2012
Drives: WRB 2022 Subaru Brz
Location: Toronto/Michigan
Posts: 226
Thanks: 30
Thanked 55 Times in 32 Posts
Mentioned: 2 Post(s)
|
Not exactly sure how to ground the yellow/black wire. Isnt it connected to something else. Am i supposed to cut it out or something and then ground it to that screw.
|
|
|
|
|
06-19-2013, 05:32 PM
|
#32 | |
|
Senior Member

Join Date: Sep 2012
Drives: Subaru BRZ 2013 - SWP 6MT
Location: Toronto
Posts: 354
Thanks: 97
Thanked 42 Times in 25 Posts
Mentioned: 5 Post(s)
|
Quote:
Sent from my SGH-I317M using Xparent Skyblue Tapatalk 2
__________________
|
|
|
|
|
|
06-20-2013, 12:35 AM
|
#33 | |
|
Senior Member

Join Date: Jun 2012
Drives: 2013 SSM BRZ
Location: Toronto
Posts: 189
Thanks: 254
Thanked 189 Times in 71 Posts
Mentioned: 5 Post(s)
|
Quote:
 I forgot to take pics of my install at the time, but I might open her up this weekend and take a pic of how everything was connected. I forgot to take pics of my install at the time, but I might open her up this weekend and take a pic of how everything was connected.Once you "fix" the wire harness, you pretty much plug it in, attach the black/yellow wire to that screw on the back of the deck and then re-install the deck to your dash. Here are the steps I've taken: a) Remove the head unit from the dash. I followed steps 1-3 from this post: Link: http://www.ft86club.com/forums/showthread.php?t=8585 b) Bought an RCA Harness from amazon.ca Link: [ame="http://www.amazon.ca/gp/product/B0088HRFJG/ref=oh_details_o09_s00_i00?ie=UTF8&psc=1"]http://www.amazon.ca/gp/product/B0088HRFJG/ref=oh_details_o09_s00_i00?ie=UTF8&psc=1[/ame] -oddly, this harness does not come pre-installed from the factory. c) Moved the black/yellow wire 1 notch below it on the white plastic connector piece, as in this video: -from my experience, I didn't need a pick to "unlatch the lock". I simply took a staple, straightened it out and inserted it as per the video. The wire came off easily. Plugged it in the notch below and it locked itself in place. [ame="http://www.youtube.com/watch?feature=player_embedded&v=syl14gmIfSA"]Pioneer AVIC-X930BT Video Bypass - YouTube[/ame] d) Took a pair of pliers and stripped about 1.5cm off the loose end of the black/yellow wire. (this will expose the copper under it to get direct contact with the metal of the deck/screw) e) Plugged in the white plastic connector to the back of the NAV system. (see below pic ->RCA Harness): 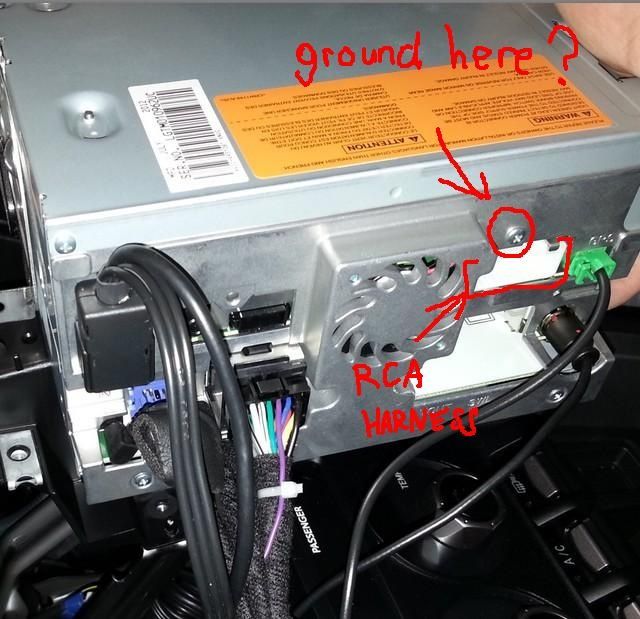 f) Loosened the screw on the NAV system just above the connector and wrapped the exposed copper to that screw as much as possible. Once wrapped, I tightened the screw to keep it secure. (see above pic ->Ground Here) The rest of the dangling wires from the harness are not needed at this point, so I tucked them out of the way when I re-installed the NAV system to the dash. Take note: -I DID NOT need to cut or splice the handbrake/e-brake wire. -This DOES NOT get rid of the initial "OK" nag screen. -This "hard mod" method simply gives you the option to use ALL of the functions of the NAV system while in motion or while the e-brake is down. ie: enter any address, dial phone numbers and play videos while in motion. IF you want to... a) get rid of the "OK" nag screen b) update your maps to 2012 c) do the bypass without taking out the deck or doing any wiring >>>Then I suggest taking time to follow the Soft Mod Link: http://www.ft86club.com/forums/showt...light=canadian You could technically avoid buying the harness altogether if you are willing to get a single wire with a female connection on one end and then ground the opposite end to the screw. You will also have to make sure you hooked it up to the correct pin. The RCA wire harness makes it plug and play once the black/yellow wire is in the correct notch. The harness also adds more connection options in the future (ie: like adding a rear view camera or something..) Despite the lack of pics, I hope this answers any unanswered questions.  Cheers. |
|
|
|
|
|
06-20-2013, 02:51 AM
|
#34 | |
|
Senior Member
Join Date: Sep 2012
Drives: Subaru BRZ 2013 - SWP 6MT
Location: Toronto
Posts: 354
Thanks: 97
Thanked 42 Times in 25 Posts
Mentioned: 5 Post(s)
|
Thanks again man!
But I was more interested in the method involving not buying a $50 harness. So I would grab a female connector and splice it to one of the existing harness' cable(which one would that be anyways)? Could you elaborate on this method some more. Thanks so much!!!!!! Quote:
__________________
|
|
|
|
|
|
06-20-2013, 12:48 PM
|
#35 | |
|
Member
Join Date: May 2013
Drives: 2013 BRZ WRB Sport Tech MT
Location: Toronto, ON, Canada
Posts: 22
Thanks: 2
Thanked 3 Times in 3 Posts
Mentioned: 1 Post(s)
|
Did you even read his post?? or the previous ones? He said that you don't need to splice any wires.
From what I understand, all you need to do is find the right pin from where the RCA harness is suppose to go in and ground it... it can be accomplished by getting ONE of these and sticking it on the pin: http://www.adafruit.com/images/medium/ffjumpers_MED.jpg You just need one of these wires that you should be able to get it from a computer store. As for which pin it is... Someone mentioned that it's the "TOP ROW, SECOND PIN IN". From what I saw in the video, I'm gonna assume that it's the 2nd pin in from the middle of the unit. I will try this on Monday after I pick up my new BRZ from the dealership. *drops mic* Out. Quote:
Last edited by 4pokguy; 06-20-2013 at 01:00 PM. |
|
|
|
|
| The Following User Says Thank You to 4pokguy For This Useful Post: | joergasm (06-21-2013) |
|
06-22-2013, 08:42 PM
|
#36 | |
|
Engineer
Join Date: Jul 2012
Drives: WRB 2022 Subaru Brz
Location: Toronto/Michigan
Posts: 226
Thanks: 30
Thanked 55 Times in 32 Posts
Mentioned: 2 Post(s)
|
Quote:
and can anyone confirm what pin is it exactly. i am also thinking of doing it with simple female wire (http://www.adafruit.com/images/medium/ffjumpers_MED.jpg) Last edited by vignesh; 06-22-2013 at 09:04 PM. |
|
|
|
|
|
06-23-2013, 02:43 PM
|
#37 |
|
Member
Join Date: May 2013
Drives: 2013 Subaru BRZ Sport-Tech
Location: Canada
Posts: 34
Thanks: 0
Thanked 1 Time in 1 Post
Mentioned: 0 Post(s)
|
Just did this hack and it literally took 5 minutes ... including finding a cable
All you have to do is take the deck out, grab a piece of cable with a connector that will fit on the pin ... connect it to the second from the left pin of the top row and then ground the other end on the screw in the pictures above. That's it ... don't need the RCA harness or to splice into anything existing. Just add the small little cable and you're good to go. Hope that helps!Cheers, Zoomby_U |
|
|
|
|
06-23-2013, 02:44 PM
|
#38 |
|
Member
Join Date: May 2013
Drives: 2013 Subaru BRZ Sport-Tech
Location: Canada
Posts: 34
Thanks: 0
Thanked 1 Time in 1 Post
Mentioned: 0 Post(s)
|
BTW ... I used a piece of cable from a computer 4 pin power connector and it worked perfectly.
Cheers, Zoomby_U |
|
|
|
|
06-26-2013, 12:21 AM
|
#39 | |
|
Senior Member
Join Date: Sep 2012
Drives: Subaru BRZ 2013 - SWP 6MT
Location: Toronto
Posts: 354
Thanks: 97
Thanked 42 Times in 25 Posts
Mentioned: 5 Post(s)
|
Quote:
__________________
|
|
|
|
|
|
06-26-2013, 08:47 AM
|
#40 |
|
Member
Join Date: May 2013
Drives: 2013 Subaru BRZ Sport-Tech
Location: Canada
Posts: 34
Thanks: 0
Thanked 1 Time in 1 Post
Mentioned: 0 Post(s)
|
I broke the connector and took just one wire with the smaller connector out ... I then used some pliers to make the connector a little bit smaller. It ended up plugging in perfectly ... if anyone needs some help locally, I'd be happy to show you how to do it.
Cheers, Zoomby_U |
|
|
|
|
06-26-2013, 03:23 PM
|
#41 | |
|
Senior Member
Join Date: Sep 2012
Drives: Subaru BRZ 2013 - SWP 6MT
Location: Toronto
Posts: 354
Thanks: 97
Thanked 42 Times in 25 Posts
Mentioned: 5 Post(s)
|
Quote:
Sent from my SGH-I317M using Xparent Skyblue Tapatalk 2
__________________
|
|
|
|
|
| The Following User Says Thank You to joergasm For This Useful Post: | tobin (10-01-2013) |
|
06-26-2013, 05:07 PM
|
#42 |
|
Senior Member
Join Date: Sep 2012
Drives: Subaru BRZ 2013 - SWP 6MT
Location: Toronto
Posts: 354
Thanks: 97
Thanked 42 Times in 25 Posts
Mentioned: 5 Post(s)
|
Btw. Anyone with the canadian pioneer unit using a usb for music know how to make playlistss/what pkaylist format it reads?
Also video playback. I have 1080p 720p vids that don't play, mix of avi mp4 etc. Thanks ^_& Sent from my SGH-I317M using Xparent Skyblue Tapatalk 2
__________________
|
|
|
|
|
|
|
|
|
|
 Similar Threads
|
||||
| Thread | Thread Starter | Forum | Replies | Last Post |
| BRZ Back-up Camera and NAV Bypass SOLVED | Flat Black VW | Electronics | Audio | NAV | Infotainment | 167 | 02-13-2018 12:45 AM |
| DIY Nav unit in FRS with e-brake bypass and iPhone cable by cupholders | Nitro | DIY (Do-It-Yourself) Guides | 42 | 07-02-2016 11:10 AM |
| BRZ NAV/DVD bypass | Scooby South | Electronics | Audio | NAV | Infotainment | 88 | 02-24-2014 03:41 PM |


