


|
||||||
| DIY (Do-It-Yourself) Guides For all DIYs. |
 |
|
|
Thread Tools | Search this Thread |
 10-09-2012, 08:35 PM
|
#1 |
|
Senior Member

Join Date: Sep 2012
Drives: Whiteout FR-S
Location: Mizzou
Posts: 110
Thanks: 34
Thanked 28 Times in 18 Posts
Mentioned: 1 Post(s)
|
Painting Stock Emblems
I've been dying to start modifications on this car, but I decided to stick with a few simple and cheap cosmetic changes first.
I would love to have Toyota badges, but seeing as a set of two costs around $60, I decided to paint my stockies  To remove your emblems, follow this DIY. http://www.ft86club.com/forums/showthread.php?t=7296 Anyways, here it goes. Materials Needed Scion Emblem (in this example, I'm doing the rear emblem.) Acrylic paint (I went with plain white to redo the black lettering.) Painter's tape 3M Double Sided automotive tape All Surface primer Your choice of plastic bonding paint. I went with a glossy black finish. Clear coat. Trust me, don't pass up on this. Will protect your paint job and give your handy work that "professional" look. Everything in the list can be purchased at any Wal-Mart or Auto parts store. 1. After removing the emblems, I used a small brush to paint the black SCION lettering white. In this step you don't have to be too careful to stay within the lines since you will be masking the lettering and spraying the rest of the emblem. Basically, I coated the brush about halfway with paint. Wiped off the excess, and began blotting the paint on. The first coat works best if you "dot" the color on rather than "brush" it. 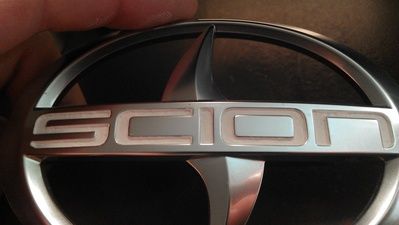 2. After your first "blot" coat dries, apply a second coat. This time, you can fill in all the little black bits showing through and make the paint job much smoother. After 2 coats I was satisfied with my results, but you may want to do more. Mine looks pretty good here, so I moved onto the next step. 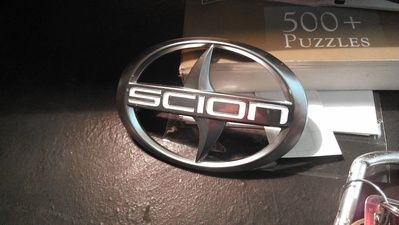 3. After the lettering dries, it's time to mask them off. I took painters tape and laid it over the lettering. I then to a razor blade and cut out the depressions of the lettering. Be sure to cover the ENTIRE letter, and leave enough room to cover the edging. 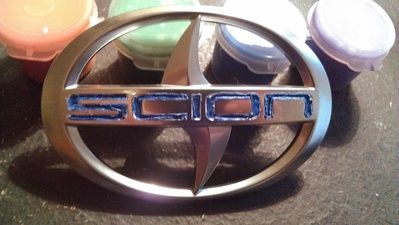 This step is the most important if you are looking for quality white letters. You have to be meticulous in the position of the tape, and think about where the white color will end, and the black will begin. IDK if someone has a better way of doing this...if so, let me know  4. Once the emblem is masked, you can apply the primer. I went with 3 coats just to be safe. 5. After the primer dries, apply your gloss. 2 coats should be fine. 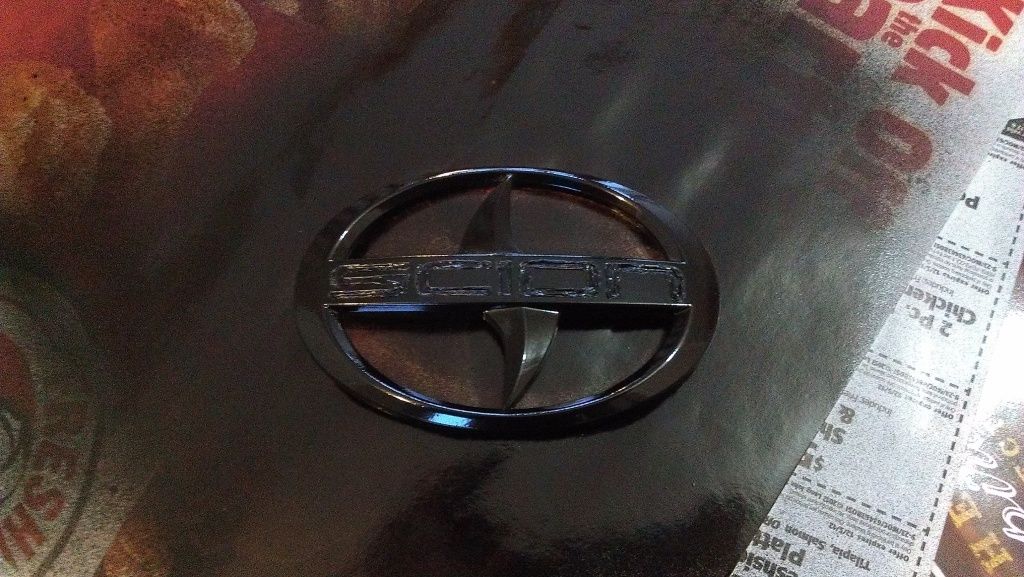 After your gloss dries, CAREFULLY remove the tape. Make sure the paint is ABSOLUTELY dry. I used a small knife to pry up the corners of the tape, then peeled it off slowly with my fingers. At this point you want to go back and touch up any of the white lettering you aren't satisfied with. 6. Apply your clear coat. 1-2 coats depending on preference. 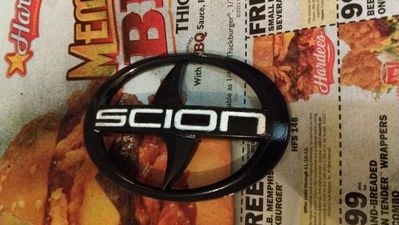 I know this pic looks rough. This is before I went back and touched up a few spots. 7. Re-attach your emblems using the 3m double sided tape. Easy to do considering the rear emblem has 2 holes to position the badge correctly. 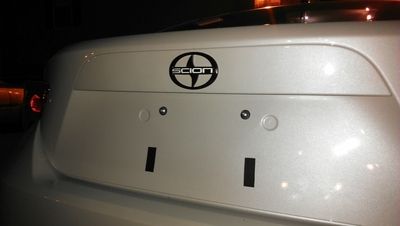 Sorry about the light, I was too anxious to put the badge back on to wait until tomorrow morning. May be silly, but I personally enjoy the way it looks. Particularly on the Whiteout  Enjoy! If you decide to use this DIY post some pics up of your results |

|

|
|
10-09-2012, 10:55 PM
|
#2 |
|
Senior Member
Join Date: Sep 2012
Drives: 2013 FR-S Whiteout
Location: Cleveland Ohio
Posts: 264
Thanks: 12
Thanked 28 Times in 22 Posts
Mentioned: 0 Post(s)
|
Looks good man some guys on have serious skills. I wouldnt try 99 percent of this stuff on my own
__________________
2013 Whiteout
2013 XB black pearl. |
|
|
|
| The Following User Says Thank You to Mrqb22 For This Useful Post: | ipothas (10-10-2012) |
|
10-10-2012, 02:12 AM
|
#3 |
|
Senior Member

Join Date: Sep 2012
Drives: '13 BRZ Ltd WRB
Location: Vista, CA
Posts: 1,351
Thanks: 508
Thanked 570 Times in 412 Posts
Mentioned: 15 Post(s)
|
Nice job! Looks good on the car, although I REALLY like that 2nd pic of the grey emblem and white lettering.
You could also paint all the black, then let it dry and stick a piece of tape over the lettering and use the razor to cut out the "SCION" and then brush/spray your white on. I would think this might be easier than trying to stuff tape into the depressions. I've also heard of using Vaseline to cover parts you don't want painted (with a Q-tip or something), then just rub it off (after paint dries, duh). It would work well in this type of application. Bigger photos would be great, especially of the finished product.
__________________
|
|
|
|
|
10-10-2012, 02:20 AM
|
#4 |
|
Senior Member
Join Date: Sep 2012
Drives: Whiteout FR-S
Location: Mizzou
Posts: 110
Thanks: 34
Thanked 28 Times in 18 Posts
Mentioned: 1 Post(s)
|
Thanks for the feedback. I might try repainting them with the method you described, it definitely sounds like the way to go.
I was tempted to stick with the white on silver after I saw it. I'll post up links to bigger photos tomorrow, I kept them small to keep the thread looking clean haha.
__________________
 2013 Whiteout 6MT |
|
|
|
|
10-12-2012, 02:42 PM
|
#6 |
|
Senior Member
Join Date: Sep 2012
Drives: Whiteout FR-S
Location: Mizzou
Posts: 110
Thanks: 34
Thanked 28 Times in 18 Posts
Mentioned: 1 Post(s)
|
Thanks!
Sent from my ADR6410LVW using Tapatalk 2
__________________
2013 Whiteout 6MT |
|
|
|
|
10-12-2012, 02:45 PM
|
#7 |
|
Senior Member

Join Date: Jun 2012
Drives: Scion FRS Asphalt
Location: Bay Area
Posts: 307
Thanks: 39
Thanked 150 Times in 71 Posts
Mentioned: 2 Post(s)
|
How come you didnt just paint it black then filled the lettering white? I think it would have been easier..
__________________
  |
|
|
|
|
10-17-2012, 03:19 PM
|
#8 |
|
Senior Member
Join Date: Sep 2012
Drives: Whiteout FR-S
Location: Mizzou
Posts: 110
Thanks: 34
Thanked 28 Times in 18 Posts
Mentioned: 1 Post(s)
|
It probably would have been. I wasn't sure how to approach it, and I figured I could make the lettering look a bit "cleaner" by doing it first
Sent from my ADR6410LVW using Tapatalk 2
__________________
2013 Whiteout 6MT |
|
|
|
|
10-30-2012, 08:27 PM
|
#9 |
|
Member

Join Date: Oct 2012
Drives: Ultramarine FR-S
Location: Melissa, TX
Posts: 37
Thanks: 0
Thanked 3 Times in 3 Posts
Mentioned: 1 Post(s)
|
Does anyone know where i can find a DIY on making the words scion light up on the trunk instead of the badge being there. I know it probably has some fabrication involved but I'm just making a list of the thing's i want to do before i get started. I've seen the lighted up scion word once.
|
|
|
|
|
10-31-2012, 09:26 AM
|
#10 |
|
Senior Member

Join Date: Feb 2012
Drives: '13 FR-S (#3 of 1st 86)
Location: Powder Springs, GA
Posts: 20,120
Thanks: 39,702
Thanked 25,478 Times in 11,613 Posts
Mentioned: 187 Post(s)
|
DadHawk Approved!
Looks great. I fell in love with this particular combo in Long Beach. They had it on the "Speed Racer FR-S Convertible" thingy there. I want to do this exactly and have been trying to figure out the best way to do it. Problem solved. I may do my letters in Firestorm (paint match) though, haven't decided.
__________________
Olivia 05/03/2012 - 01/06/2024. 231,146 glorious miles.
Visit my Owner's Journal where I wax philosophic on all things FR-S Post your 86 or see others in front of a(n) (in)famous landmark. What fits in your 86? Show us the "Junk In Your Trunk". |
|
|
|
|
10-31-2012, 03:02 PM
|
#11 | |
|
Senior Member
Join Date: Sep 2012
Drives: Whiteout FR-S
Location: Mizzou
Posts: 110
Thanks: 34
Thanked 28 Times in 18 Posts
Mentioned: 1 Post(s)
|
Quote:
__________________
2013 Whiteout 6MT |
|
|
|
|
|
10-31-2012, 11:10 PM
|
#12 | |
|
Senior Member
Join Date: Feb 2012
Drives: '13 FR-S (#3 of 1st 86)
Location: Powder Springs, GA
Posts: 20,120
Thanks: 39,702
Thanked 25,478 Times in 11,613 Posts
Mentioned: 187 Post(s)
|
Quote:
__________________
Olivia 05/03/2012 - 01/06/2024. 231,146 glorious miles.
Visit my Owner's Journal where I wax philosophic on all things FR-S Post your 86 or see others in front of a(n) (in)famous landmark. What fits in your 86? Show us the "Junk In Your Trunk". |
|
|
|
|
|
11-01-2012, 01:31 PM
|
#13 | |
|
Senior Member
Join Date: Sep 2012
Drives: Whiteout FR-S
Location: Mizzou
Posts: 110
Thanks: 34
Thanked 28 Times in 18 Posts
Mentioned: 1 Post(s)
|
Quote:
__________________
2013 Whiteout 6MT |
|
|
|
|
|
11-01-2012, 01:32 PM
|
#14 | |
|
Senior Member
Join Date: Sep 2012
Drives: Whiteout FR-S
Location: Mizzou
Posts: 110
Thanks: 34
Thanked 28 Times in 18 Posts
Mentioned: 1 Post(s)
|
Quote:
__________________
2013 Whiteout 6MT |
|
|
|
|
|
|
|
|
|
|
 Similar Threads
|
||||
| Thread | Thread Starter | Forum | Replies | Last Post |
| Painting calipers GTA | wbradley | CANADA | 50 | 05-08-2013 02:42 AM |
| WTB: Stock Scion front & rear emblems | JoeBoxer | Exterior Parts (Aero, Lighting, Etc.) | 9 | 10-01-2012 10:52 PM |
| Helmet painting? | Mitch | Tracking / Autocross / HPDE / Drifting | 1 | 09-02-2012 03:44 PM |
| Painting the Emblems | bigbroimc | Cosmetic Modification (Interior/Exterior/Lighting) | 11 | 08-31-2012 10:00 PM |
| Who has toyota emblems****in stock right meow!**** | NeedsmoreCowbell | Scion FR-S / Toyota 86 GT86 General Forum | 0 | 07-16-2012 06:45 PM |


 Morgan
 Bella
Bella
