


 10-04-2013, 08:54 AM
|
#393 | |
|
Senior Member

Join Date: Jan 2012
Drives: '13 GBS Subaru BRZ
Location: Minneapolis, MN
Posts: 2,030
Thanks: 680
Thanked 664 Times in 382 Posts
Mentioned: 26 Post(s)
Tagged: 1 Thread(s)
|
Quote:
__________________
-Fortes fortuna adiuvat (Fortune favors the bold)
|
|

|

|
|
10-04-2013, 04:42 PM
|
#394 |
|
Member
Join Date: Sep 2013
Drives: GBS BRZ
Location: USA
Posts: 57
Thanks: 3
Thanked 18 Times in 13 Posts
Mentioned: 1 Post(s)
Tagged: 0 Thread(s)
|
I'm fine with tinkering with new ideas; I was just curious if you had hit upon a hidden advantage of the axial compressor. I suppose "stealth" can be a useful advantage.
|
|
|
|
|
10-23-2013, 01:00 PM
|
#395 |
|
Senior Member
Join Date: Jan 2012
Drives: '13 GBS Subaru BRZ
Location: Minneapolis, MN
Posts: 2,030
Thanks: 680
Thanked 664 Times in 382 Posts
Mentioned: 26 Post(s)
Tagged: 1 Thread(s)
|
Sorry I haven't posted any updates for a while. I came down with a case of Shingles (very painful) and wasn't in the mood to do much.
But I'm over that now and have had lots of ideas swirling around in my head. I've mostly been focused on how to reduce the machining required to build the compressor. This will save time, money, and make this a more achievable project for more people. The first step was changing the base compressor I was using for my base design from a Mitsubishi TD05/06 to a Garrett T70. The Garrett style compressor uses a backplate that is separate from the center portion of the turbo so it doesn't have to be recreated for the E-Charger. Second I looked at how to connect the compressor wheel to the motor with a minimum amount of custom made parts. The end result is a design which requires only one custom made mounting plate which is basically just a square with some holes drilled in it. Two of the turbo parts need to be reused and modified slightly but I have also made that as simple as possible. The CAD Design:  After acquiring a T70 turbo and disassembling it we modify the parts we will be reusing as needed. First we will need to reuse the shaft attached to the turbine wheel.  We only need the skinny portion so the rest can be cutoff and tossed. It's a hardened shaft so you have to grind it off. I did this in two steps in a lathe with a die grinder, but if you're careful you could easily do it with an angle grinder in one step. Just remember you need to keep all of the skinny portion so there can be little to no waste in your cut. 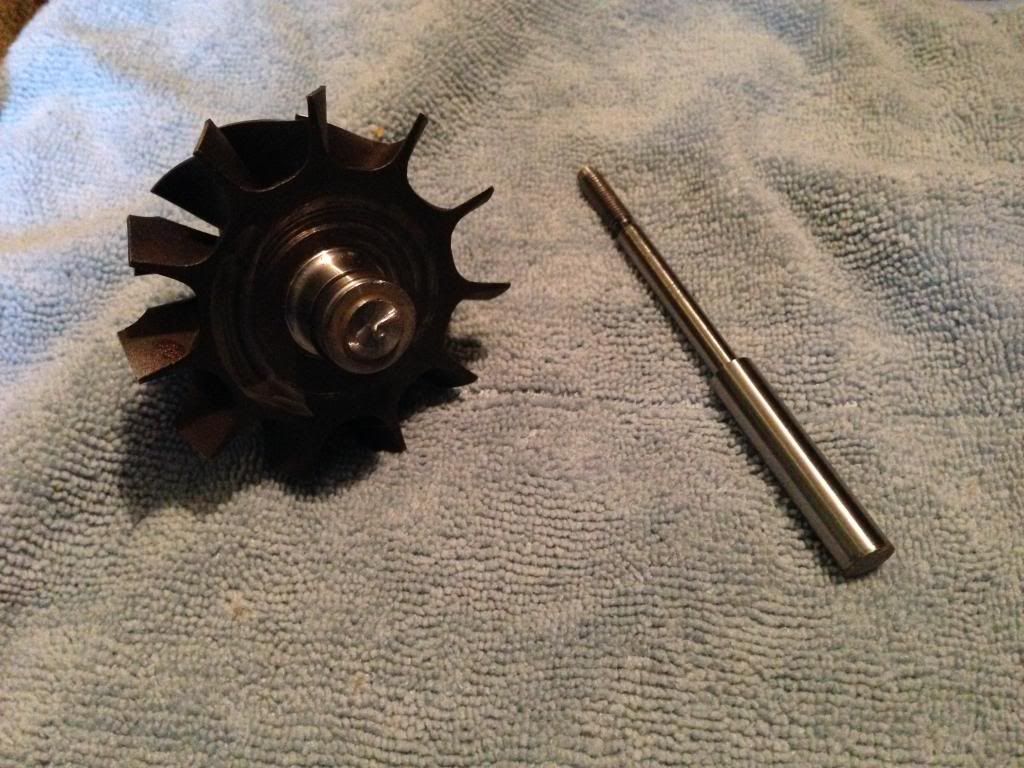 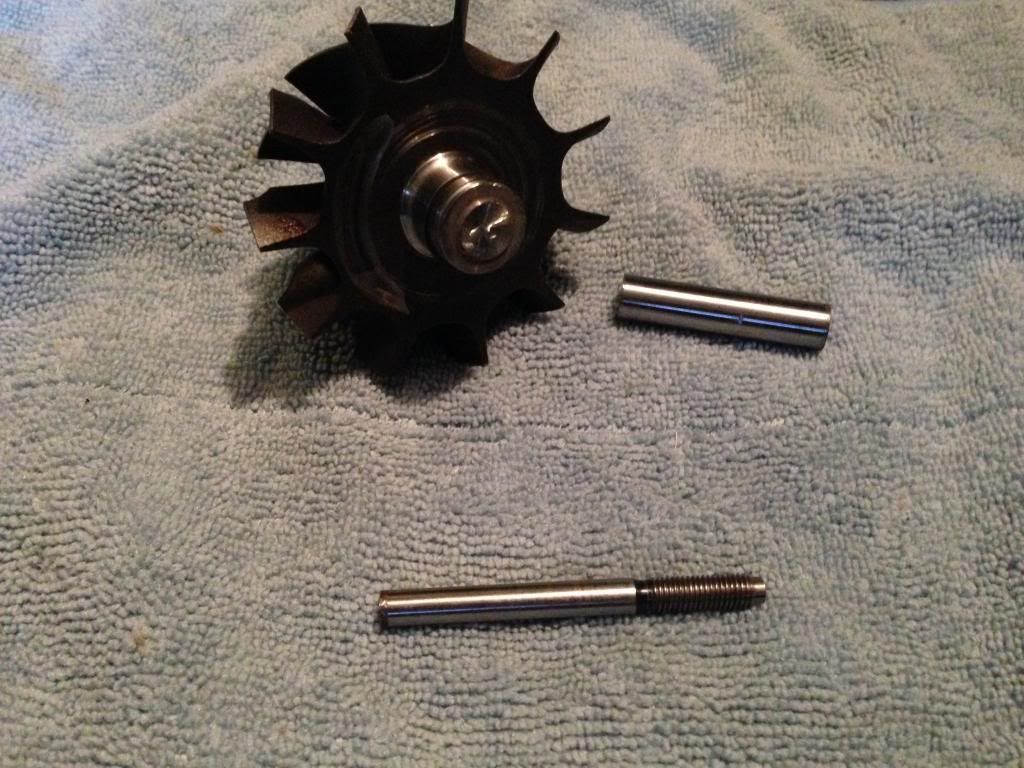 I did also have to de-burr the remaining portion and even out the diameter just a tiny bit. 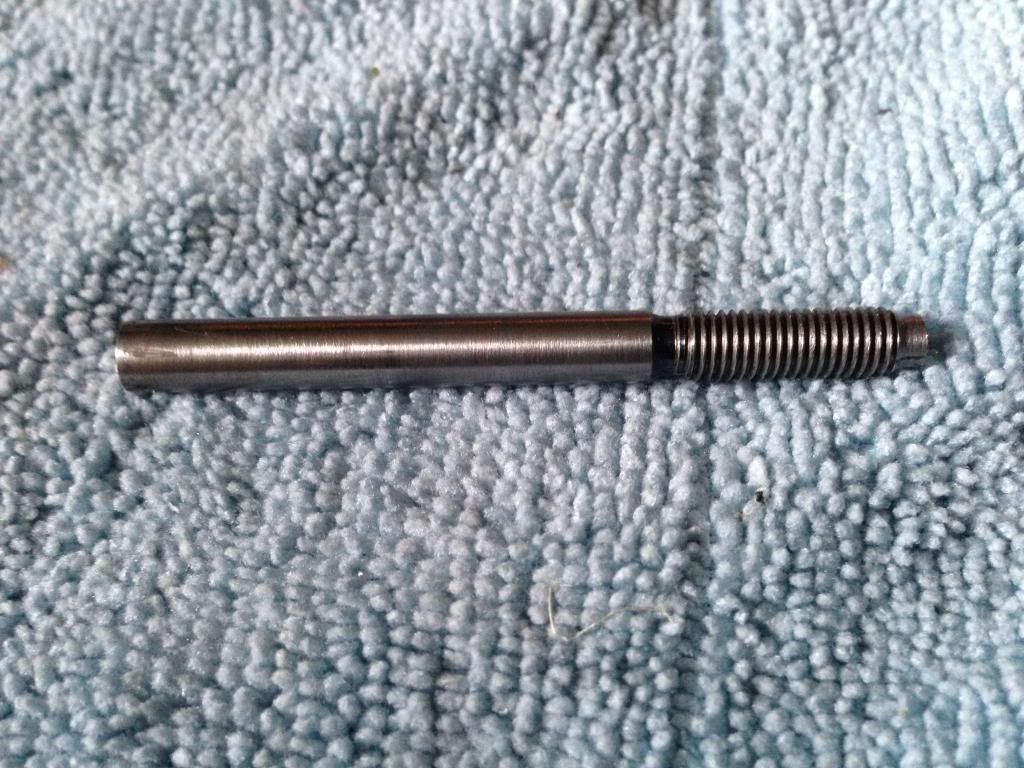 Next a coupler is added. It comes 1/4" in inch on the compressor side which is what we need. The motor side is 5/8" which is too small for the 5mm motor shaft. I used a 5mm reamer on the lathe to enlarge it. I suggest clamping the compressor side to something (I used a 1/4" drill bit) and then chucking that into the lathe. 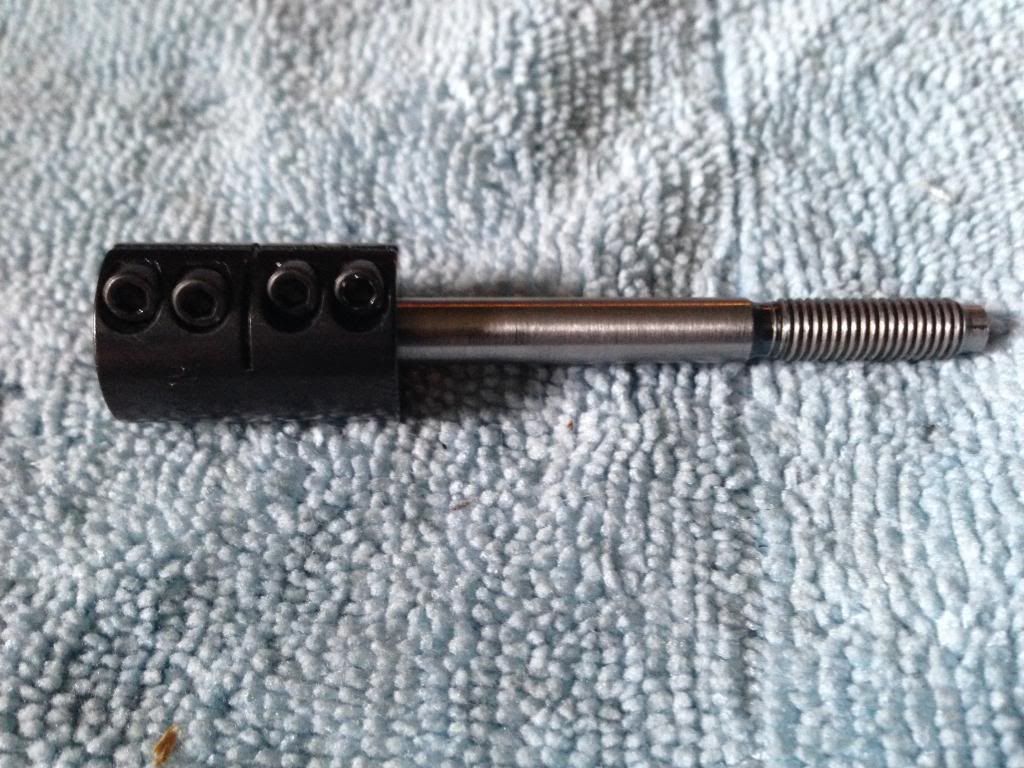 Well then need to add a 1/4" spacer (1/4" ID, 3/8" OD). 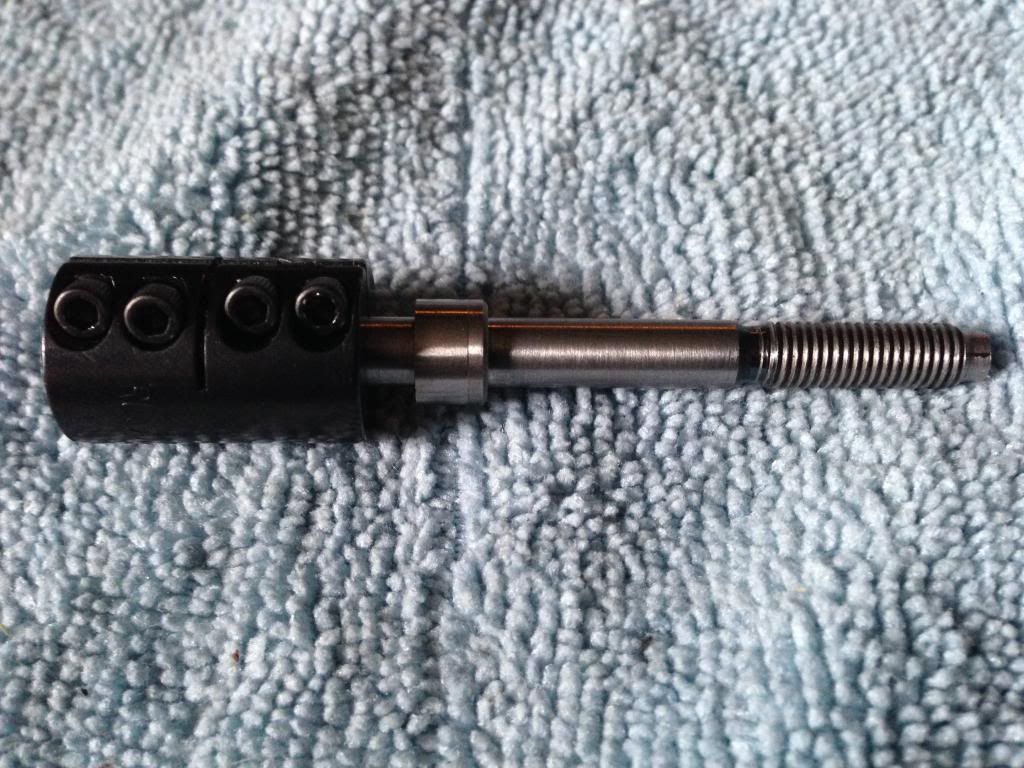 And a bearing (1/4" ID, 1/2" OD) 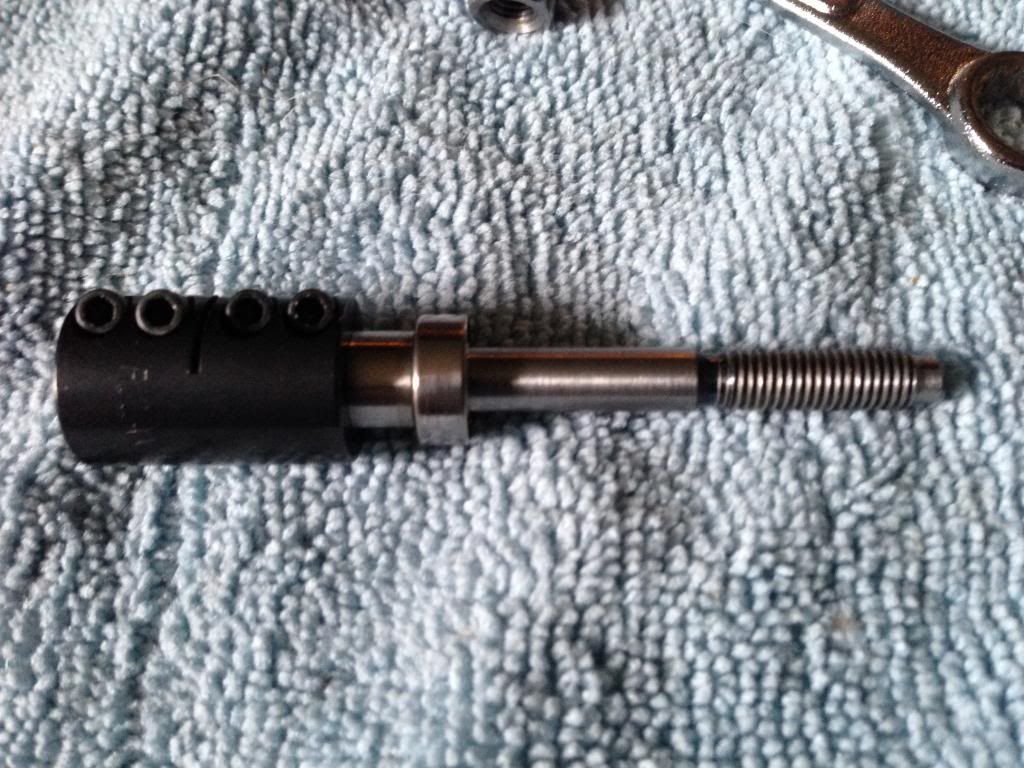 This is probably the trickiest step. You need to have the compressor wheel stand off of the bering so it touches the center hub, but not the outer edge. I did this by turning a small lip around the back of the compressor wheel. a washer of the right diameters could also be used but I had no luck finding one. This is tricky you really need a lathe and some experience. If you want some tips let me know. 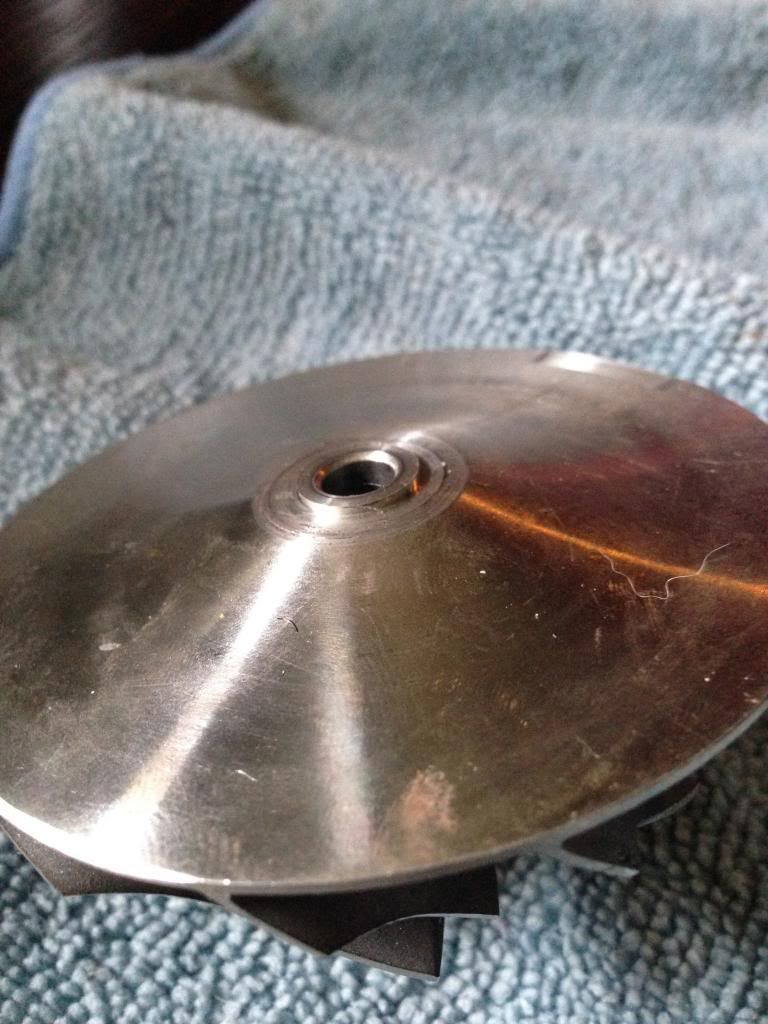 You'll need to add the compressor backplate before the compressor wheel goes on the shaft but here is a pic to show how the wheel/shaft assembly looks outside of the compressor housing. 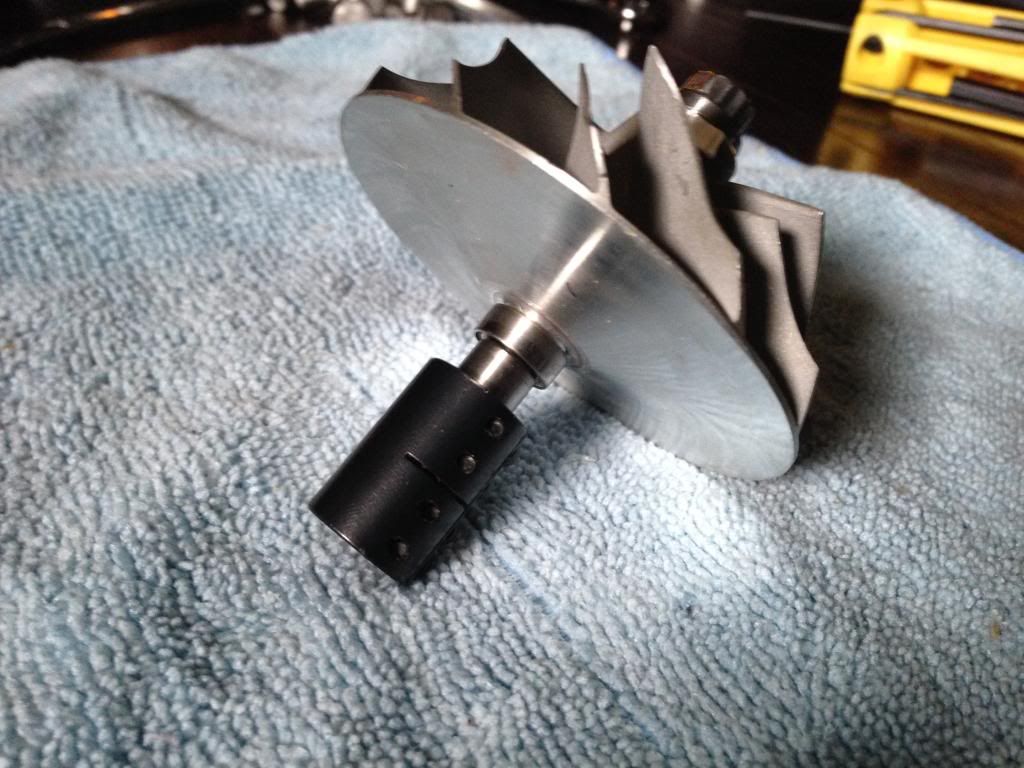 Now the shaft goes through the backplate. The 1/2" OD bearing fits perfectly in the center hole of the backplate providing support for the shaft as close to the compressor wheel as possible. 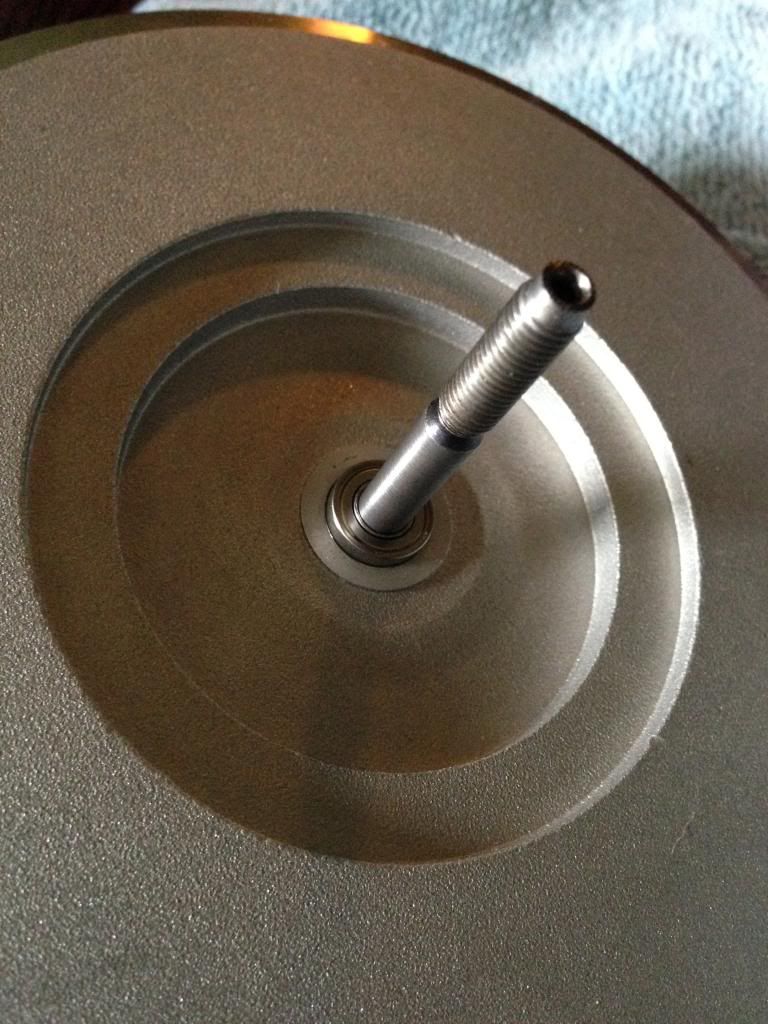 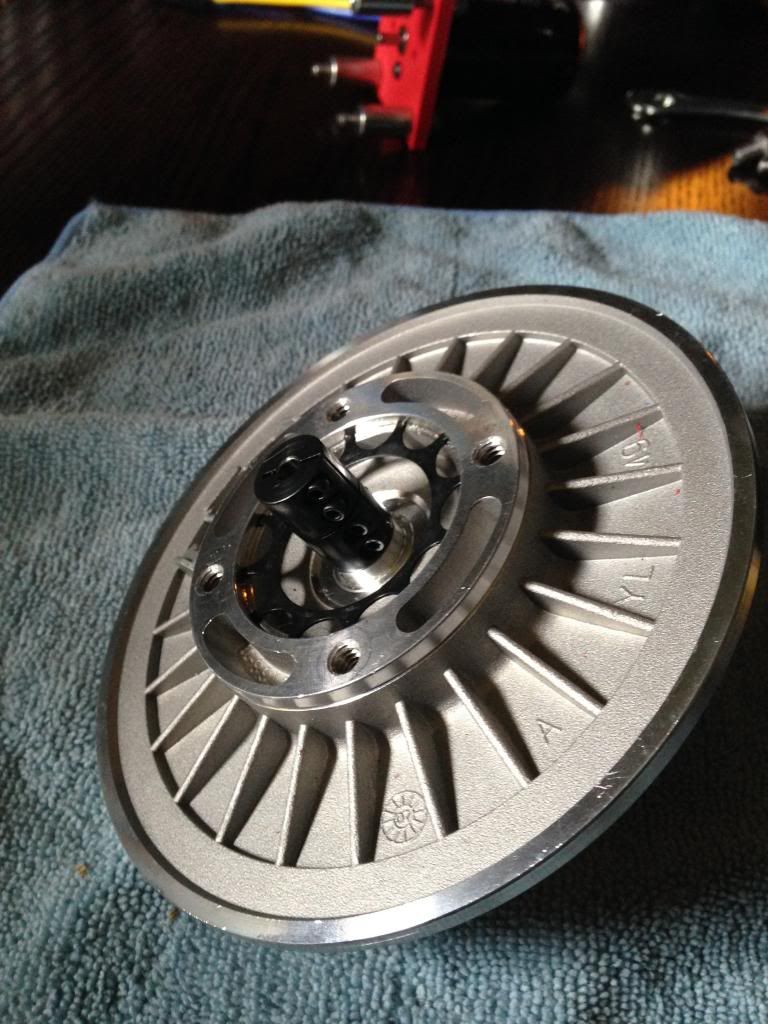 And then the compressor wheel is attached. 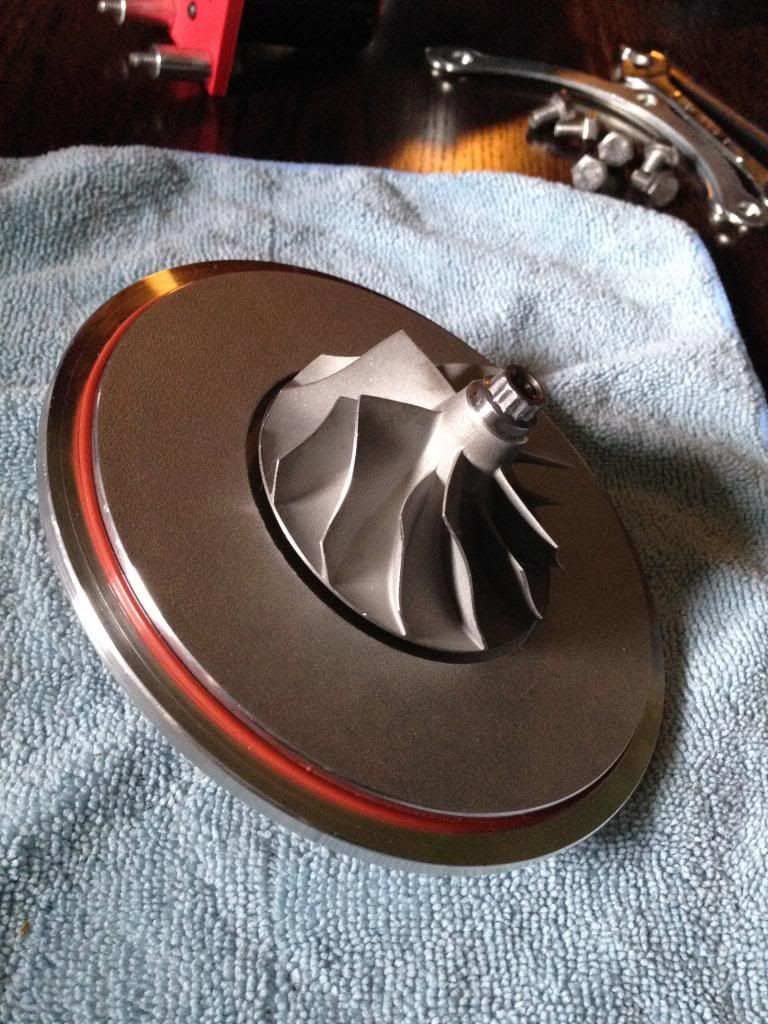 Now comes the custom part, the motor mounting plate. It's a simple 2.5" x 2.5" x 0.5" square. There is a center hole made to have a bearing pressed into it. I'm not sure it's needed but I thought it was better to have it. There are four holes at the corners for mounting to the compressor back plate. I included two sets of holes for mounting the motor to give some flexibility on motor choice. One is 25mm and the other 30mm spacing. I still need to machine this piece but for now I have 3D printed it. Once I make the metal version and check all my dimensions I'll post the design. 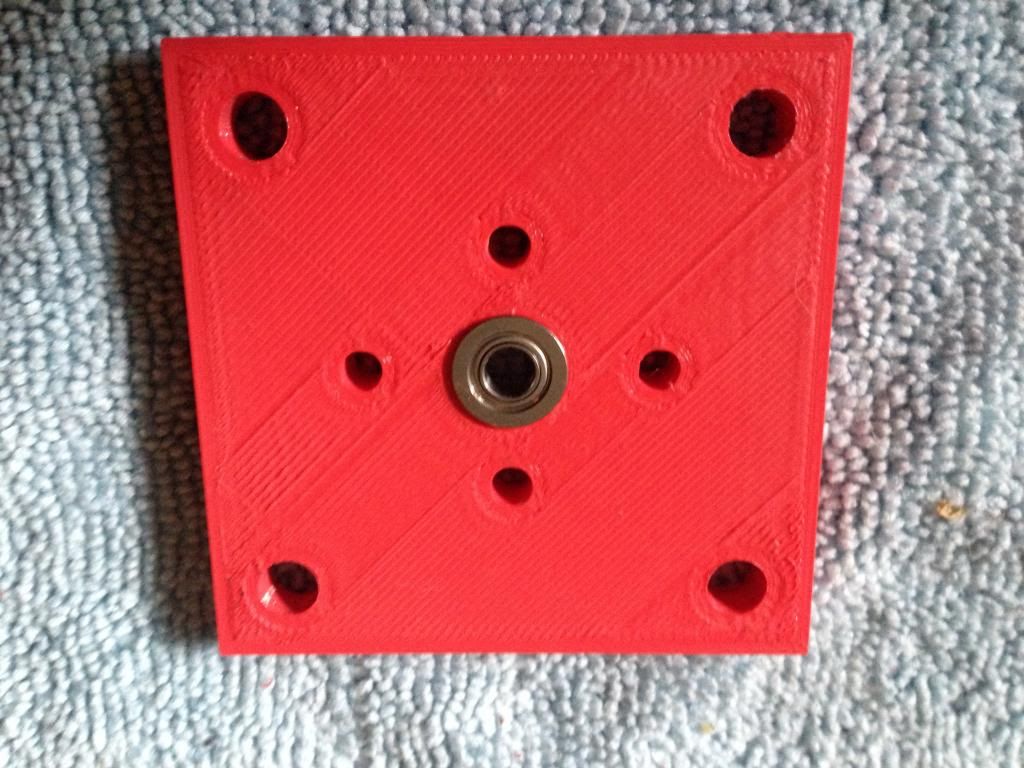 You'll need 1/4"x20 screws and 7/8" OD spacers to attach the mount to the backplate and whatever screws are appropriate for mounting your chosen motor to the plate. In my case I used 1.5" long screws, and 7/8" long spacers to attach to the back plate but you may need to go longer depending on your motor shaft length. You can't go shorter because the shaft coupler won't fit. 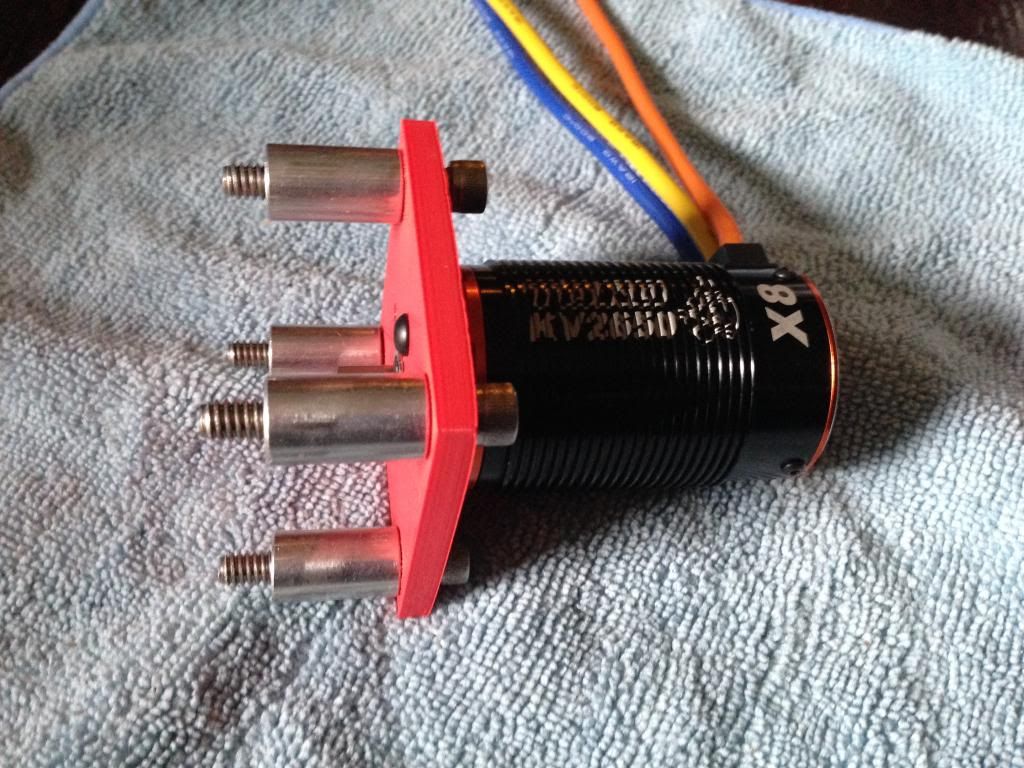 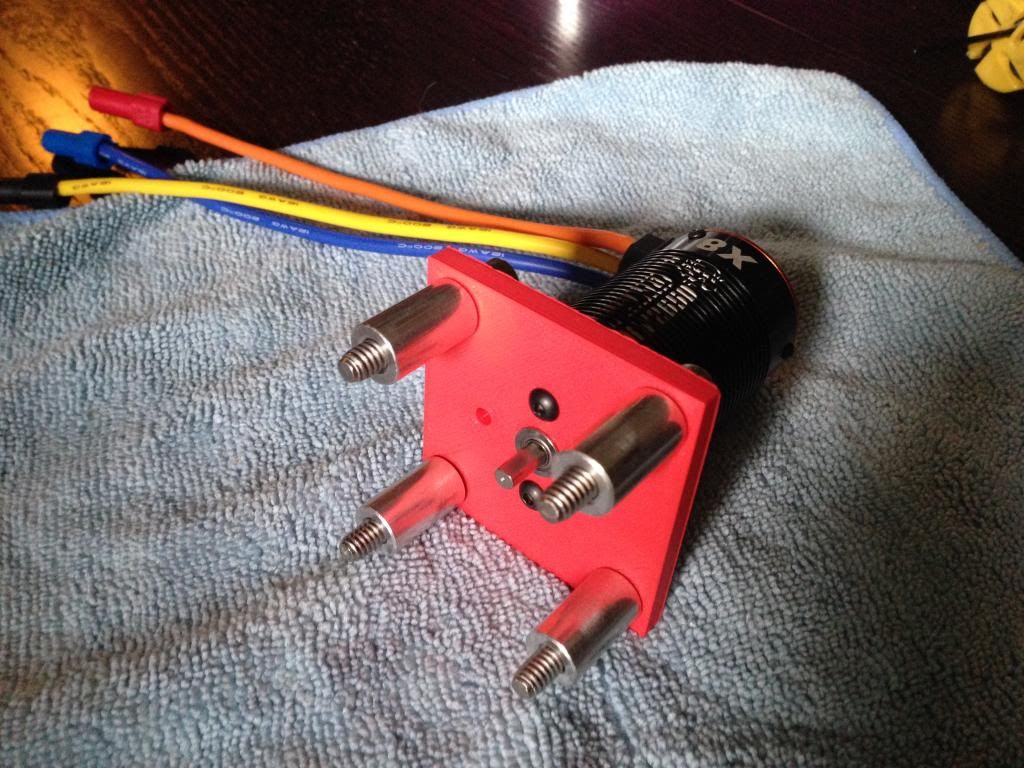 The last step is simple to attach the motor assembly to the backplate and tighten the coupling on the motor shaft. Keep in mind that you will need to adjust the position of the coupling on the motor shaft to set the position of the compressor wheel in the back plate. 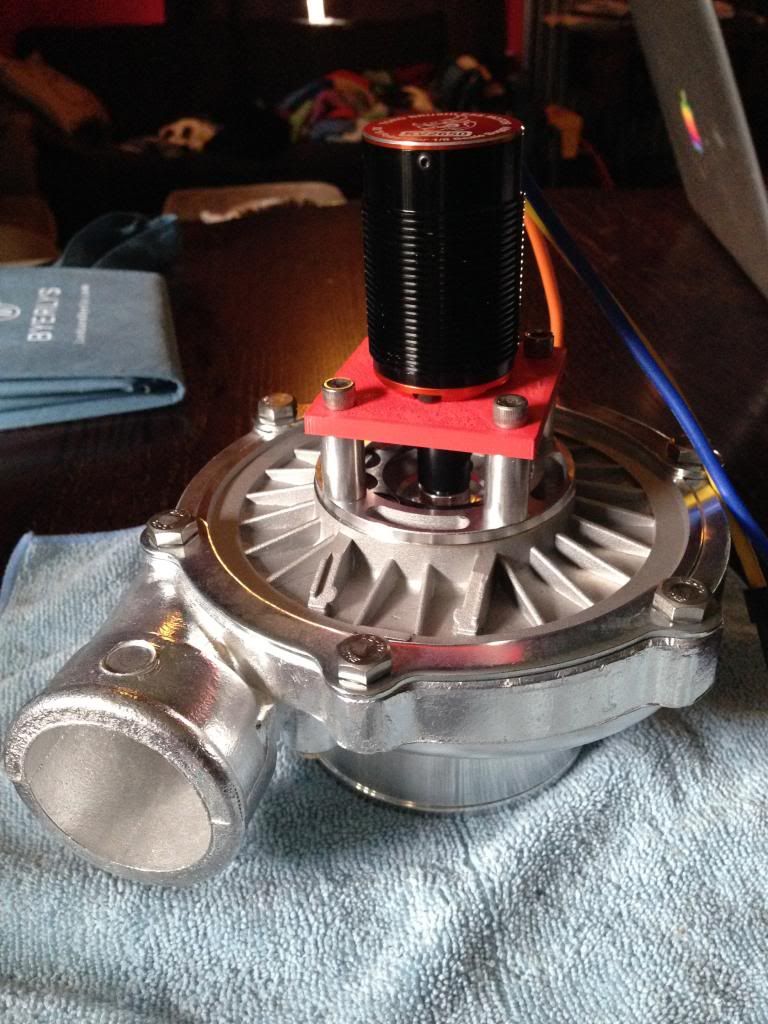 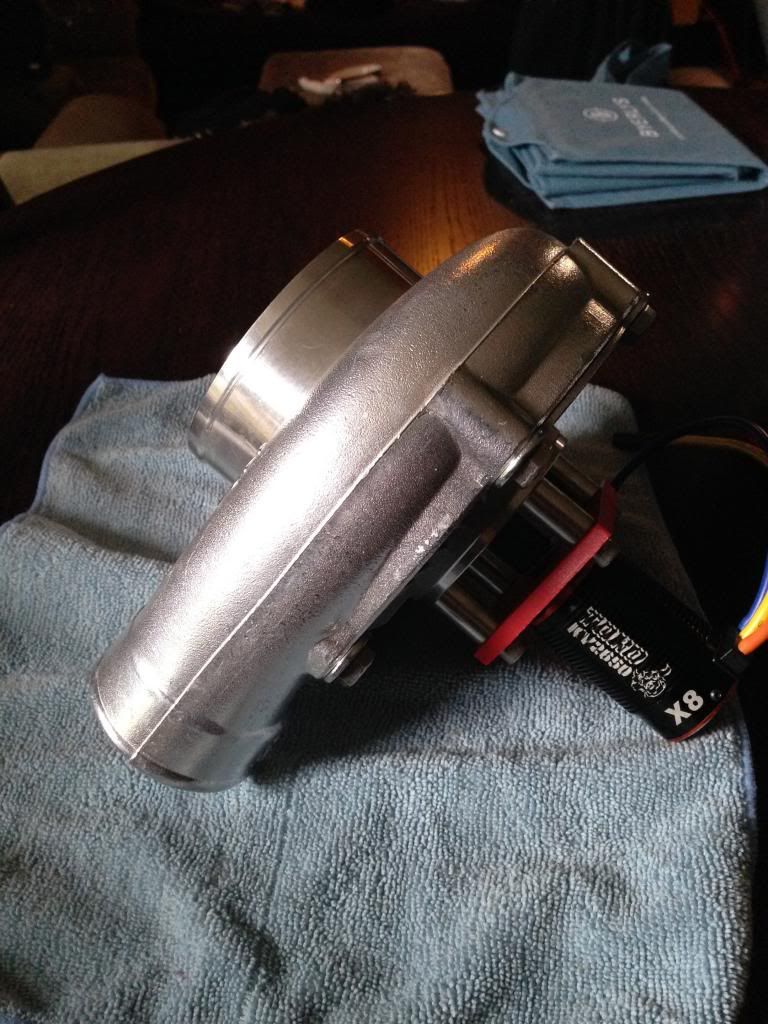 And that's it. I've only bench tested it at a minimum speed right now. I need to finish making the real motor mounting plate before I give it a real test. I also have some concerns about the coupling. It's not designed for the kinds of speeds I'll be using it for, and I'm thinking it will need to be balanced so it doesn't shake the whole thing to bits. Thoughts? Comments?
__________________
-Fortes fortuna adiuvat (Fortune favors the bold)
|
|
|
|
|
10-23-2013, 01:20 PM
|
#396 |
|
Junior Member
Join Date: Jul 2013
Drives: seat ibiza sport Coupé
Location: Israel
Posts: 5
Thanks: 0
Thanked 2 Times in 2 Posts
Mentioned: 0 Post(s)
Tagged: 0 Thread(s)
|
Great Progress!! waiting for the real test!

|
|
|
|
|
10-23-2013, 01:38 PM
|
#397 |
|
Senior Member
Join Date: Aug 2013
Drives: 2007 Impreza, 2013 BRZ
Location: Vernon, CT
Posts: 314
Thanks: 240
Thanked 119 Times in 78 Posts
Mentioned: 2 Post(s)
Tagged: 0 Thread(s)
|
That looks intriguing. I wonder if a simple weld sleeve would work better (if both sides are the same OD) Heat up the sleeve, quickly slide both sides in, and quench it. (wd-40 works great, low flammability) The only problem I forsee is getting both sides in evenly.
|
|
|
|
| The Following User Says Thank You to boxer 2.5 For This Useful Post: | neutron256 (10-23-2013) |
|
10-23-2013, 01:42 PM
|
#398 | |
|
Senior Member
Join Date: Jan 2012
Drives: '13 GBS Subaru BRZ
Location: Minneapolis, MN
Posts: 2,030
Thanks: 680
Thanked 664 Times in 382 Posts
Mentioned: 26 Post(s)
Tagged: 1 Thread(s)
|
Quote:
The other concern for me there is getting it apart if you have to do any changes or servicing.
__________________
-Fortes fortuna adiuvat (Fortune favors the bold)
|
|
|
|
|
|
10-23-2013, 01:47 PM
|
#399 | |
|
Senior Member
Join Date: Aug 2013
Drives: 2007 Impreza, 2013 BRZ
Location: Vernon, CT
Posts: 314
Thanks: 240
Thanked 119 Times in 78 Posts
Mentioned: 2 Post(s)
Tagged: 0 Thread(s)
|
Quote:

|
|
|
|
|
|
10-23-2013, 01:54 PM
|
#400 | |
|
Senior Member
Join Date: Jan 2012
Drives: '13 GBS Subaru BRZ
Location: Minneapolis, MN
Posts: 2,030
Thanks: 680
Thanked 664 Times in 382 Posts
Mentioned: 26 Post(s)
Tagged: 1 Thread(s)
|
Quote:
Edit: plus you're still dealing with coupling two different diameters which means it's not just a sleeve, one side would need to be bored to the larger diameter.
__________________
-Fortes fortuna adiuvat (Fortune favors the bold)
|
|
|
|
|
|
10-23-2013, 05:21 PM
|
#401 |
|
Senior Member
Join Date: Jun 2012
Drives: DGM BRZ limited
Location: Indiana
Posts: 366
Thanks: 98
Thanked 147 Times in 95 Posts
Mentioned: 8 Post(s)
Tagged: 0 Thread(s)
|
I like where you went with this.
If you had to turn the compressor wheel because you couldn't find the washer size you needed, why not turn your own washer instead of the wheel? Seems like it may be easier. How out of balance is the coupler? You might could possibly get it close enough in balance using an aircraft prop balancer or something. Additionally you could use a coupler that uses a grub screw to secure the shafts, this might do a bit better of a job of being naturally balanced. (like the typical pinion gear does)
__________________
 |
|
|
|
|
10-23-2013, 07:01 PM
|
#402 | |
|
Senior Member
Join Date: Jan 2012
Drives: '13 GBS Subaru BRZ
Location: Minneapolis, MN
Posts: 2,030
Thanks: 680
Thanked 664 Times in 382 Posts
Mentioned: 26 Post(s)
Tagged: 1 Thread(s)
|
Quote:
I agree a set screw couple would be closer to balanced, but I'm worried about how well it will handle the torque. It also has to resist the compressor wheel trying to pull itself forward as it spins which set screws are particularly bad at. The coupler is heavy on the side opposite the screws so I think the best bet would be to remove some material on that side. Exactly where and how much would be trial and error. Some sort of stick-on balancing weight would be great but I'm not sure it would hold up long at 50K RPM and there isn't that much surface area on the light side to stick them too.
__________________
-Fortes fortuna adiuvat (Fortune favors the bold)
|
|
|
|
|
|
10-23-2013, 07:30 PM
|
#403 | |
|
Senior Member
Join Date: Jun 2012
Drives: DGM BRZ limited
Location: Indiana
Posts: 366
Thanks: 98
Thanked 147 Times in 95 Posts
Mentioned: 8 Post(s)
Tagged: 0 Thread(s)
|
Quote:
Also, I see they have couplers like yours but are split on both sides so that there is the gap on both sides. This would be a lot better balanced than the one you have now. However I'm not finding anything rated for even half of the rpm you need, so you are probably going to be operating out of suggested limits no matter what.
__________________
|
|
|
|
|
|
10-23-2013, 07:56 PM
|
#404 | |
|
Senior Member
Join Date: Jan 2012
Drives: '13 GBS Subaru BRZ
Location: Minneapolis, MN
Posts: 2,030
Thanks: 680
Thanked 664 Times in 382 Posts
Mentioned: 26 Post(s)
Tagged: 1 Thread(s)
|
Quote:
I think my best bet is to balance the coupler I'm using. I just ordered a magnetic balancer used for RC props. That should do the trick and I'll just have to take my time and tediously grind off a little at a time until it's as close to balanced as possible.
__________________
-Fortes fortuna adiuvat (Fortune favors the bold)
|
|
|
|
|
|
11-11-2013, 06:29 PM
|
#405 |
|
Senior Member
Join Date: Jan 2012
Drives: '13 GBS Subaru BRZ
Location: Minneapolis, MN
Posts: 2,030
Thanks: 680
Thanked 664 Times in 382 Posts
Mentioned: 26 Post(s)
Tagged: 1 Thread(s)
|
I accidentally posted this on The other thread, but for those who didn't see it there:
A quick update. Thanks to having veteran's day off I was able to get some shop time in and completed the mounting plate for my compressor. I did some bench testing and mechanically it's working great. The brushless controller I'm currently using is giving me a little trouble. Stalling on startup and cutting out at higher RPM. I suspect it just isn't up to the task. I knew that I would be pushing its limits though so no surprise there. It does move a lot of air and seems to create some decent pressure when the outlet is restricted. I've ordered a 200 amp ESC hopefully it will be what's needed so I can continue testing. The next step for me will be finding all the right connectors to fit it to the intake. 
__________________
-Fortes fortuna adiuvat (Fortune favors the bold)
|
|
|
|
|
11-11-2013, 09:42 PM
|
#406 |
|
Senior Member
Join Date: Jun 2012
Drives: DGM BRZ limited
Location: Indiana
Posts: 366
Thanks: 98
Thanked 147 Times in 95 Posts
Mentioned: 8 Post(s)
Tagged: 0 Thread(s)
|
Can you better describe the stalling at startup? It is reasonably common for unsensored brushless motors to have a bit of issue starting moving from a standstill, commonly referred to as "cogging". Try giving it only enough throttle to have it spin and then going wide open and see if that makes a difference.
The high rpm stuff may very well be an ESC issue, but don't be too mad if the low rpm isn't any different.
__________________
|
|
|
|
|
|
|
|
| Tags |
| hairdyerperformance, only pulls hard one gear |
|
|
 Similar Threads
|
||||
| Thread | Thread Starter | Forum | Replies | Last Post |
| Full throttle Electric Supercharger Build Thread | fenton | Forced Induction | 11315 | 04-07-2025 06:42 PM |
| DUP THREAD MODZ PLZ DELETE KTHX | SloS14 | Forced Induction | 0 | 07-09-2013 05:41 PM |
| Electric Turbocharger | Shankenstein | Forced Induction | 91 | 06-24-2013 02:47 PM |
| Electric 86 | frosty86 | Scion FR-S / Toyota 86 GT86 General Forum | 8 | 11-10-2012 02:16 PM |
| WRX Electric turbo | Neilus | Engine, Exhaust, Transmission | 42 | 05-03-2012 09:20 PM |


