


 08-13-2013, 10:18 PM
|
#127 |
|
Senior Member

Join Date: Mar 2013
Drives: 2013 FR-S 2003 SRT-4 1964 Impala SS
Location: Charlotte N.C.
Posts: 113
Thanks: 108
Thanked 46 Times in 25 Posts
Mentioned: 2 Post(s)
|
Roughly how much lower did it make the car? I ended up going with the tein s-tech springs which I think is about the same a your sportlines and wheel and tire combo is pretty close too .. 18x8.5 +44 and 18x9.5 +44 with 225/40 and 255/35 . Also car came from dealer with the mudguards which I didn't care for at first but now that I have black wheels I was gonna shoot for a white and black color scheme .. To have the lip kit they would need to go .. But with the wheels I feel like they are saving me from rock chips .. Thoughts ?? And did you have to have any work done to them before paint ?
|

|

|
|
08-13-2013, 10:35 PM
|
#128 | |
|
Red wine
Join Date: Oct 2012
Drives: Subaru BRZ(R.I.P)
Location: Denied
Posts: 1,176
Thanks: 1,268
Thanked 342 Times in 240 Posts
Mentioned: 13 Post(s)
|
Quote:
__________________
 |
|
|
|
|
|
08-13-2013, 11:01 PM
|
#129 | |
|
Senior Member

Join Date: Oct 2012
Drives: 2013 Subaru BR-Z Limited
Location: Fort Lauderdale, Florida
Posts: 883
Thanks: 407
Thanked 562 Times in 294 Posts
Mentioned: 42 Post(s)
|
Quote:
__________________
|
|
|
|
|
|
08-13-2013, 11:30 PM
|
#130 |
|
Senior Member
Join Date: Mar 2013
Drives: 2013 FR-S 2003 SRT-4 1964 Impala SS
Location: Charlotte N.C.
Posts: 113
Thanks: 108
Thanked 46 Times in 25 Posts
Mentioned: 2 Post(s)
|
Yea I agree didn't really care for the mudflaps they just kinda grew on me .. But for the price of that kit , and not having to paint it ! That's a huge plus !! So I can deal with losing them .. Thanks again !! Awesome progress on your ride btw .. I've been keeping up with it ..
|
|
|
|
| The Following User Says Thank You to Ndgreely For This Useful Post: | chadstyle (08-14-2013) |
|
08-14-2013, 07:46 AM
|
#131 | |
|
Senior Member
Join Date: Oct 2012
Drives: 2013 Subaru BR-Z Limited
Location: Fort Lauderdale, Florida
Posts: 883
Thanks: 407
Thanked 562 Times in 294 Posts
Mentioned: 42 Post(s)
|
Quote:
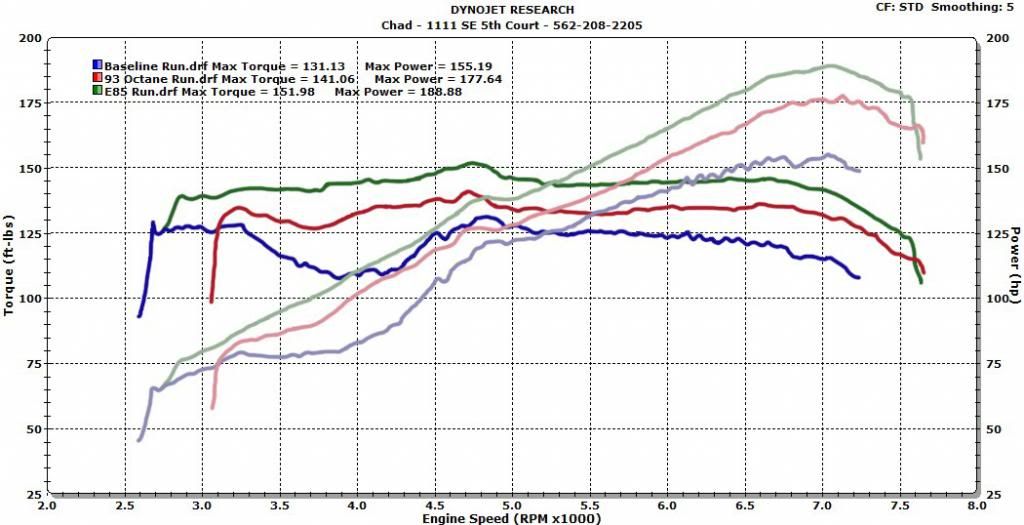
Borla UEL Perrin Overpipe Perrin Front pipe with high flow cat Perrin resonated 2.5" catback Perrin CAI with Silicone intake tube Perrin crank pulley (doubt it made a difference in power) FA20Club.com 93/E85 tunes
__________________
|
|
|
|
|
|
08-14-2013, 07:56 AM
|
#132 | |
|
Senior Member

Join Date: Jul 2012
Drives: GR86 / Supra MK5 MT / MR-S / Z4
Location: Switzerland
Posts: 836
Thanks: 593
Thanked 725 Times in 342 Posts
Mentioned: 8 Post(s)
|
Quote:
__________________
 My GR86 Car Journal: https://www.ft86club.com/forums/showthread.php?t=153879 My old GT86 Car Journal: http://www.ft86club.com/forums/showthread.php?t=22222 |
|
|
|
|
| The Following User Says Thank You to Killerbee For This Useful Post: | chadstyle (08-14-2013) |
|
08-14-2013, 08:11 AM
|
#133 | |
|
Senior Member
Join Date: Oct 2012
Drives: 2013 Subaru BR-Z Limited
Location: Fort Lauderdale, Florida
Posts: 883
Thanks: 407
Thanked 562 Times in 294 Posts
Mentioned: 42 Post(s)
|
Quote:

__________________
|
|
|
|
|
| The Following User Says Thank You to chadstyle For This Useful Post: | Killerbee (08-14-2013) |
|
08-14-2013, 08:20 AM
|
#134 |
|
Senior Member
Join Date: Apr 2013
Drives: 2001 ZX2, WRBP BRZ (soon hopefully)
Location: Port Arthur Tx
Posts: 182
Thanks: 111
Thanked 23 Times in 23 Posts
Mentioned: 0 Post(s)
|
Chad your style is killer like my own... looking at your car makes me want a BRZ even more!
|
|
|
|
| The Following User Says Thank You to Sbeezy For This Useful Post: | chadstyle (08-14-2013) |
|
08-14-2013, 08:13 PM
|
#135 | |
|
Senior Member
Join Date: Oct 2012
Drives: 2013 Subaru BR-Z Limited
Location: Fort Lauderdale, Florida
Posts: 883
Thanks: 407
Thanked 562 Times in 294 Posts
Mentioned: 42 Post(s)
|
Quote:
__________________
|
|
|
|
|
| The Following User Says Thank You to chadstyle For This Useful Post: | Sbeezy (08-15-2013) |
|
08-15-2013, 10:36 AM
|
#136 | |
|
Banned
Join Date: May 2013
Drives: on cruise control
Location: Long Island
Posts: 618
Thanks: 234
Thanked 145 Times in 109 Posts
Mentioned: 6 Post(s)
|
Quote:

|
|
|
|
|
|
08-18-2013, 04:56 AM
|
#137 |
|
2013 BRZ

Join Date: Mar 2013
Drives: BRZ
Location: Dubai, UAE
Posts: 126
Thanks: 100
Thanked 60 Times in 33 Posts
Mentioned: 3 Post(s)
|
I was strongly considering a supercharger but I'm having second thoughts similar to your reasons to decide on turbo, also we have here hot and humid weather I'll be very interested to know how it goes from your side. Thanks for the updates and I hope it will work out as you wanted.
|
|
|
|
| The Following User Says Thank You to Alfalasy For This Useful Post: | chadstyle (08-18-2013) |
|
08-18-2013, 11:50 AM
|
#138 |
|
Senior Member
Join Date: Oct 2012
Drives: 2013 Subaru BR-Z Limited
Location: Fort Lauderdale, Florida
Posts: 883
Thanks: 407
Thanked 562 Times in 294 Posts
Mentioned: 42 Post(s)
|
Ok, so I did a really simple mod yesterday that I have wanted to do for a while and never got around to it. Last week I saw that a vender has 4th brake light kits for sale on the forums. The prices were high but he said to PM him for actual pricing shipped. I asked out of curiosity and he replied "$126 shipped"...THAT'S ROBBERY!! I almost fell over. I'm all for making a buck but that is just wrong. I did the same exact mod and I'd be willing to bet that mine looks even more OEM than the kit he sells and the entire project cost less than $20 and took less than 2 hours time to complete. All parts can be found at Pep Boys. This isn't intended to be the full DIY but I wanted to share the parts I used so hopefully others can save some $$ too.
First, I bought two Honda 194 sockets from Pep Boys as they're readily available and properly sized for the project. You CAN use a dual filament setup instead of using two smaller bulbs like I did but you may have to order a socket/bulb as my local Pep Boys didn't have them in stock. I then soldered and heat shrunk the wires and made a 6 foot harness to run up to the drivers side brake light. Here is a picture of the harness before tape.  As you can see, I used two bulb sockets so I have tail/running lights as well as brake lights. I then taped up the harness so it looks nice and clean and is easy to insert into some split loom once installed on the car. Here is a pic of it all taped up.  Next, using a UniBit (stepped drill bit), I drilled two holes large enough for the center part of the sockets to fit in. I then used a file to make the four notches on each hole for the socket to turn and lock in place. Take your time..it took me about 20-30 minutes to do all 8 notches but the sockets lock in place nice and snug just like an OEM connection. You don't want any moisture or water droplets getting in the housing. My housing is smoked so it wouldn't be as noticeable but the clear housing will show all the moisture. I used an air compressor to blow out all the plastic shavings that fell inside the housing while drilling and filing. Here is a pic of both of the holes and the locations I drilled them.  Lastly, here is a picture of the bulbs mounted in the housing for final fitment before installing in the car.  After mounting in the car I ran the wires along the factory reverse light harness towards the drivers side tail light. I removed the drivers side tail light and reached down behind the carpet panel to feel for the grommet where the wires enter the car. I removed the grommet and sliced it just enough for the 3 wire harness I made to come in through it snugly. After running the wires through the grommet I pushed it back in place. I then connected all three wires near the brake light plug. I used the Red and Green wires for tail light and brake light signals and the black wire as ground. I then put everything back together making sure to plug in the brake light harness and not to over torque the bolts that hold the brake light in place. I tested it out and it works perfect. I will most likely order some LED bulbs to replace the standard bulbs but only for the longevity of them. I saved over $105 by doing it myself. The kit would still have you drill the holes for the sockets and run all the wires so I imagine the install time would be almost exactly the same. Hopefully this helps a few of you save some $$ and enjoy a fun and easy project on your 86. 
__________________
|
|
|
|
| The Following 5 Users Say Thank You to chadstyle For This Useful Post: | ftc~brz (08-22-2013), Hyper4mance2k (02-21-2018), RidetheTran (08-22-2013), stock (04-10-2014), zAnSh1n (05-03-2014) |
|
08-18-2013, 12:16 PM
|
#139 |
|
Member

Join Date: Dec 2012
Drives: 2013 MT FS FR-S / 07 GT500
Location: Nederland
Posts: 86
Thanks: 9
Thanked 50 Times in 34 Posts
Mentioned: 1 Post(s)
|
Mad near OEM notching skillz there Chad, Bravo!!! now that you've set the bar I'll have to follow suit. Thanks for this one, I've been wanting to do this, just needed the right catalyst...
__________________
Stage 1 V2 .57trim Turbo Kit, ACT HD6P Clutch w/Streetlite Flywheel, Greddy EVO3
391whp/295tq 13psi 96 pump 335whp/260tq 10psi 93 pump |
|
|
|
| The Following User Says Thank You to FR-S FI For This Useful Post: | chadstyle (08-18-2013) |
|
08-18-2013, 12:17 PM
|
#140 |
|
Senior Member
Join Date: Aug 2012
Drives: Too heavy
Location: Columbus
Posts: 788
Thanks: 91
Thanked 288 Times in 186 Posts
Mentioned: 7 Post(s)
|
just happened to check on your built page Chad ...awesome !! nice car , nice lift and nice wifey too :P
I wished I live close by FA20Club too , I would've sent my car straight from the dealership ..lol |
|
|
|
|
|
|
|
|
|


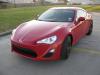 2013 Scion Fr-s