


 07-02-2013, 10:19 AM
|
#57 |
|
Senior Member

Join Date: Aug 2012
Drives: FR-S
Location: IL
Posts: 2,857
Thanks: 519
Thanked 2,998 Times in 1,095 Posts
Mentioned: 159 Post(s)
|
Also in terms of temps it takes my car nearly 14 minutes to reach 175F with the cooler. at the 12 to 14 minute mark go on boost to 5000rpms wot twice or 3x and watch it go to 185F rather quickly.
__________________
|

|

|
|
07-04-2013, 06:17 PM
|
#58 | |
|
Photo Specialist

Join Date: Feb 2012
Drives: 2013 Toyota 86 DGM 6MT
Location: Texas
Posts: 1,152
Thanks: 587
Thanked 1,805 Times in 420 Posts
Mentioned: 94 Post(s)
|
Quote:
 20130704-HomeBrewOilCoolerSandwichPlate-001 by VictorN07, on Flickr The zip tie hits the airbox. I'm not that concerend by it.  20130704-HomeBrewOilCoolerSandwichPlate-002 by VictorN07, on Flickr I had to go back to the OEM filler cap   20130704-HomeBrewOilCoolerSandwichPlate-003 by VictorN07, on Flickr The thermostat does make contact with that steel/aluminium line  20130704-HomeBrewOilCoolerSandwichPlate-004 by VictorN07, on Flickr
__________________
|
|
|
|
|
| The Following User Says Thank You to F1point4 For This Useful Post: | charged86 (07-04-2013) |
|
07-08-2013, 12:41 PM
|
#59 |
|
Senior Member

Join Date: Nov 2011
Drives: Subaru BRZ Limited 6MT
Location: Winston-Salem, NC
Posts: 2,432
Thanks: 712
Thanked 955 Times in 545 Posts
Mentioned: 47 Post(s)
|
Someone make this a kit! I'm too lazy to piece together even with this incredible amount of detail.
__________________
Innovate Supercharged Black Limited BRZ 6-Speed MT(Build Thread)
2010 Cadillac CTS-V Sedan M6 w/550whp (Build Thread)  |
|
|
|
|
07-08-2013, 12:46 PM
|
#60 | |
|
TEQSPORT Brand Manager

Join Date: Jun 2012
Drives: '24 GR86 + '16 FR-S
Location: Atlanta
Posts: 3,666
Thanks: 3,725
Thanked 4,137 Times in 1,707 Posts
Mentioned: 90 Post(s)
|
Quote:
Still major props to @F1point4 and anyone else who goes the homebrew route, you are all much braver than I. Saving money is also a great thing. |
|
|
|
|
|
07-08-2013, 12:57 PM
|
#61 | |
|
Photo Specialist
Join Date: Feb 2012
Drives: 2013 Toyota 86 DGM 6MT
Location: Texas
Posts: 1,152
Thanks: 587
Thanked 1,805 Times in 420 Posts
Mentioned: 94 Post(s)
|
Quote:
This. The extra hundred bucks is totally worth it for the mounting brackets and support. I totally would have went this way myself. However at the time, the silver core killed it for me. I can take apart a car but paint? no thanks. 
__________________
|
|
|
|
|
| The Following User Says Thank You to F1point4 For This Useful Post: | ATL BRZ (07-08-2013) |
|
07-08-2013, 01:00 PM
|
#62 |
|
Senior Member
Join Date: Jul 2012
Drives: 2013 SWP BRZ
Location: New York
Posts: 2,240
Thanks: 458
Thanked 878 Times in 556 Posts
Mentioned: 34 Post(s)
|
lol I can paint but a 100 bucks is a 100 bucks...why waste it when you don't have to. If it was like 20 i'd be more inclined to just buy the kit.
What I like about piecing it together is you can choose whatever you want to use. Still nice to just be able to buy something and have everything to install it without worry  I say this yet knowing me will end up buying some type of kit 
|
|
|
|
|
07-08-2013, 02:54 PM
|
#63 |
|
Senior Member
Join Date: Nov 2011
Drives: 2013 Firestorm FR-S
Location: Houston
Posts: 506
Thanks: 18
Thanked 77 Times in 64 Posts
Mentioned: 10 Post(s)
|
I'll be installing my home brew oil cooler kit on a naturally aspirated car this Saturday with Victor's help. I'll be sure to post some pics as well as test results in humid high 90s / low 100s Houston summer weather
__________________
2013 Firestorm FR-S, MTX, build date 1/13.
|
|
|
|
| The Following User Says Thank You to brillo For This Useful Post: | F1point4 (07-08-2013) |
|
07-08-2013, 03:52 PM
|
#64 | |
|
Member
Join Date: Apr 2013
Drives: Black 2013 BRZ Limited Automatic
Location: Southern California
Posts: 84
Thanks: 5
Thanked 51 Times in 25 Posts
Mentioned: 3 Post(s)
|
Quote:
|
|
|
|
|
|
07-13-2013, 06:51 PM
|
#65 | |
|
Photo Specialist
Join Date: Feb 2012
Drives: 2013 Toyota 86 DGM 6MT
Location: Texas
Posts: 1,152
Thanks: 587
Thanked 1,805 Times in 420 Posts
Mentioned: 94 Post(s)
|
Local Homebrew Oil Cooler Install
Quote:
I'll make some basic comments, but leave the detailed feedback to him. Was trying to go for a dreamy feel to the photos Let's go! We were testing fitment of the cooler. He wanted to keep something similar to my placement so we went with offside. Note the tape is there to mark how far over to the drivers side we can go.  20130713-ADOilCoolerInstall-002 by VictorN07, on Flickr We drilled the holes using a Unibit and started placing the bolts and polyurethane. @brillo cut the polyurethane using a dremel.  20130713-ADOilCoolerInstall-006 by VictorN07, on Flickr Closeup of the polyurethane standoffs. I purchased material that fit together well. Note the polyurethane and bolts were a perfect fit  20130713-ADOilCoolerInstall-018 by VictorN07, on Flickr Here is the cooler mounted to the plastic tray  20130713-ADOilCoolerInstall-026 by VictorN07, on Flickr We cut the polyurethane spacers too short so we were running out of thread. He had these flat cap nuts around so we used them as spacers. It works.  20130713-ADOilCoolerInstall-031 by VictorN07, on Flickr @brillo went with Aeroquip fittings instead of Mocal largely because he has a firestorm. It looks mostly the same to me except colour  20130713-ADOilCoolerInstall-044 by VictorN07, on Flickr My favorite picture of the lot. Oil Cooler Dreams! I find its best to install all the fittings and hose onto the cooler before remounting the plastic tray. The pushlok style fittings are not easy to place on in tight quarters.  20130713-ADOilCoolerInstall-049 by VictorN07, on Flickr You can see the lines run inside the crash beam  20130713-ADOilCoolerInstall-057 by VictorN07, on Flickr This picture kinda shows the very tight clearance between OEM airbox and the fittings. I think he has to undo the filter and rotate the sandwich each time he wants to check his air filtre.  20130713-ADOilCoolerInstall-078 by VictorN07, on Flickr Last one. He ended up adding another quart of 0w-20 to his machine.  20130713-ADOilCoolerInstall-079 by VictorN07, on Flickr
__________________
|
|
|
|
|
|
07-13-2013, 06:51 PM
|
#66 | |
|
Photo Specialist
Join Date: Feb 2012
Drives: 2013 Toyota 86 DGM 6MT
Location: Texas
Posts: 1,152
Thanks: 587
Thanked 1,805 Times in 420 Posts
Mentioned: 94 Post(s)
|
Local Homebrew Oil Cooler Install
Quote:
I'll make some basic comments, but leave the detailed feedback to him. Was trying to go for a dreamy feel to the photos Let's go! We were testing fitment of the cooler. He wanted to keep something similar to my placement so we went with offside. Note the tape is there to mark how far over to the drivers side we can go. 20130713-ADOilCoolerInstall-002 by VictorN07, on Flickr We drilled the holes using a Unibit and started placing the bolts and polyurethane. @brillo cut the polyurethane using a dremel. 20130713-ADOilCoolerInstall-006 by VictorN07, on Flickr Closeup of the polyurethane standoffs. I purchased material that fit together well. Note the polyurethane and bolts were a perfect fit 20130713-ADOilCoolerInstall-018 by VictorN07, on Flickr Here is the cooler mounted to the plastic tray 20130713-ADOilCoolerInstall-026 by VictorN07, on Flickr We cut the polyurethane spacers too short so we were running out of thread. He had these flat cap nuts around so we used them as spacers. It works. 20130713-ADOilCoolerInstall-031 by VictorN07, on Flickr @brillo went with Aeroquip fittings instead of Mocal largely because he has a firestorm. It looks mostly the same to me except colour 20130713-ADOilCoolerInstall-044 by VictorN07, on Flickr My favorite picture of the lot. Oil Cooler Dreams! I find its best to install all the fittings and hose onto the cooler before remounting the plastic tray. The pushlok style fittings are not easy to place on in tight quarters. 20130713-ADOilCoolerInstall-049 by VictorN07, on Flickr You can see the lines run inside the crash beam 20130713-ADOilCoolerInstall-057 by VictorN07, on Flickr This picture kinda shows the very tight clearance between OEM airbox and the fittings. I think he has to undo the filter and rotate the sandwich each time he wants to check his air filtre. 20130713-ADOilCoolerInstall-078 by VictorN07, on Flickr Last one. He ended up adding another quart of 0w-20 to his machine. 20130713-ADOilCoolerInstall-079 by VictorN07, on Flickr
__________________
|
|
|
|
|
|
07-13-2013, 11:06 PM
|
#67 |
|
Senior Member
Join Date: Nov 2011
Drives: 2013 Firestorm FR-S
Location: Houston
Posts: 506
Thanks: 18
Thanked 77 Times in 64 Posts
Mentioned: 10 Post(s)
|
Couple of initial impressions as I've only drove around a bit and haven't been able to warm the car up truly cold.
car warmed up about the same as before with daily driving, oil never got over 186 degrees in 90 temps. Car felt the same, no strange noises or NVH. I had a slight oil leak drip on one of the aeroquip fittings near the sandwich earlier, after some additional tightening it appears to have gone away, although I felt a hint of oil on the fitting after driving this evening. Oil level is stable. Do the aeroquip fittings take time to seal? We used lock tight on all the threads, I don't want to over tighten them. Ill monitor the car over the week as I drive it but I'm assuming I'm good to go. No noticeable leaks or issues with the core.
__________________
2013 Firestorm FR-S, MTX, build date 1/13.
|
|
|
|
|
07-14-2013, 02:36 PM
|
#68 |
|
Senior Member
Join Date: Nov 2011
Drives: 2013 Firestorm FR-S
Location: Houston
Posts: 506
Thanks: 18
Thanked 77 Times in 64 Posts
Mentioned: 10 Post(s)
|
Couple of other thoughts / notes:
1. Oil cooler fittings / lines near the sandwich will block access to the stock air box in terms of filter changes. You will have to remove the sandwich to change the filter. 2. Washer fluid bottle - hoses run right by it, not sure if the heat will be an issue with the neck, hopefully not, I'll be watching it. 3. Poly mounts - victor bought a cylinder of poly to cut for the mounts, cutting it is a bitch, I would suggest having a very sharp bandsaw or a dermel handy (we used a dermel). 4. Hose length - end up ordered 12ft but only using about 6 ft total. I would say 8 feet is plenty assuming a side mount (I mounted as close to the right side as I could to keep the lines short). 5. Thermostat Sandwich Hex Nut - you may need to file down one side of this nut to clear the high pressure fuel line and provide additional flexibility in terms of position and orientation.
__________________
2013 Firestorm FR-S, MTX, build date 1/13.
Last edited by brillo; 07-17-2013 at 10:45 AM. |
|
|
|
| The Following User Says Thank You to brillo For This Useful Post: | F1point4 (07-14-2013) |
|
07-14-2013, 04:43 PM
|
#69 |
|
Senior Member
Join Date: Nov 2011
Drives: 2013 Firestorm FR-S
Location: Houston
Posts: 506
Thanks: 18
Thanked 77 Times in 64 Posts
Mentioned: 10 Post(s)
|
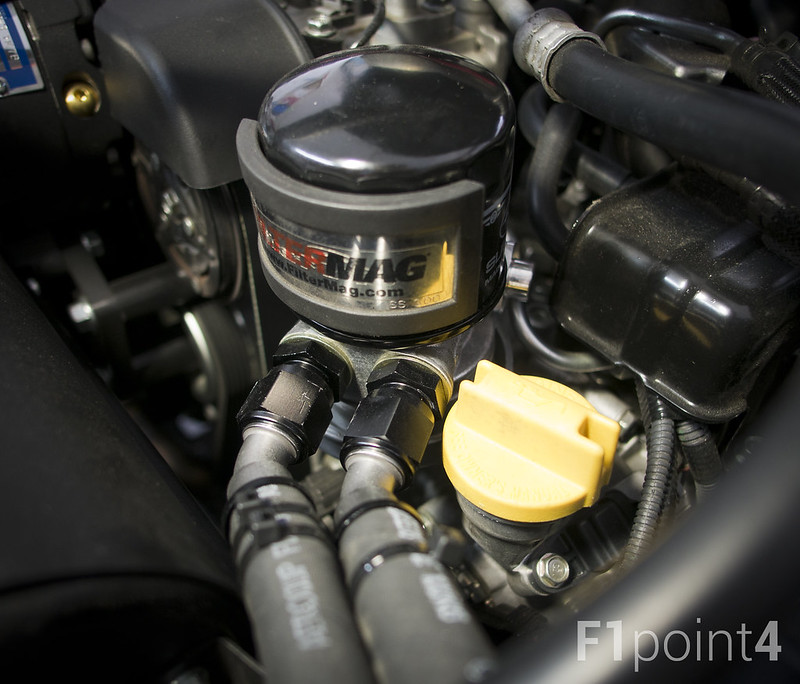
The picture below shows the thermostat sandwich. with the stock oil filler cap part of the sandwich touches the metal line in the picture. I'm not sure what this metal line is. I'm going to get a lower profile oil cap to allow me to rotate the sandwich away from the line to be safe. Not sure what extended vibration/touching may do.
__________________
2013 Firestorm FR-S, MTX, build date 1/13.
|
|
|
|
| The Following User Says Thank You to brillo For This Useful Post: | F1point4 (07-14-2013) |
|
07-15-2013, 11:04 PM
|
#70 |
|
Senior Member
Join Date: Nov 2011
Drives: 2013 Firestorm FR-S
Location: Houston
Posts: 506
Thanks: 18
Thanked 77 Times in 64 Posts
Mentioned: 10 Post(s)
|
It's raining in Houston most of this week so I haven't had time to finish the install and test my cooler as I can't figure out how to get the sandwich to not touch that metal line (which I think is a high pressure fuel line) due to the air box and the stock oil cap. I can move the sandwich into a position where I get about a papers width of clearance but I'm not sure that's enough if stuff moves or shifts.
More to come....
__________________
2013 Firestorm FR-S, MTX, build date 1/13.
|
|
|
|
|
|
|
|
|
|
 Similar Threads
|
||||
| Thread | Thread Starter | Forum | Replies | Last Post |
| ARC Oil Cooler | ill86 | Engine, Exhaust, Transmission | 19 | 10-18-2014 04:30 PM |
| Apexi Oil Temp Meter, and Setrab Oil Cooler | Moto-P | Scion FR-S / Toyota 86 GT86 General Forum | 5 | 07-09-2013 01:58 PM |
| Mocal Oil Cooler | swift996 | Engine, Exhaust, Transmission | 11 | 07-01-2013 04:00 PM |
| Best oil cooler | whitefrs | Engine, Exhaust, Transmission | 4 | 02-21-2013 11:36 PM |


