


|
||||||
| DIY (Do-It-Yourself) Guides For all DIYs. |
 |
|
|
Thread Tools | Search this Thread |
 08-10-2015, 10:42 PM
|
#1 |
|
Member
Join Date: Jun 2015
Drives: 2013 Asphalt Fr-s,91 240sx missle
Location: Las Vegas
Posts: 73
Thanks: 30
Thanked 18 Times in 16 Posts
Mentioned: 0 Post(s)
|
DIY - Gauge cluster removal
So last Sunday I swapped my gauge leds. I couldn't find a written tutorial on how to remove the gauge cluster so I decided to make one.
To start off, your going to need a Phillips, a mini Phillips, 10mm wrench and a old credit card.  Next your going to pop the hood and disconnect the battery. Use your 10mm wrench to remove the negative off the battery.  Then your going to remove the passenger panel shown below. Use both hands and pull it towards you.  Then your going to remove the trim around the radio. Where both my fingers are pointing, use both hands and pull the trim towards you.  Then remove this screw.  After that, remove the screw above your gauges  Then your going to remove the part above the gauge cluster trim. To remove it, simply pull it towards you and it unclips.  After you removed that part, gently slide your old credit card on the left side of the gauge cluster trim.  Then slide your old credit card up. You need to push down on the credit card towards the carpet until the gauge trim unclips on the left side.  Then pull the right side of the gauge trim towards you and it will unclip. 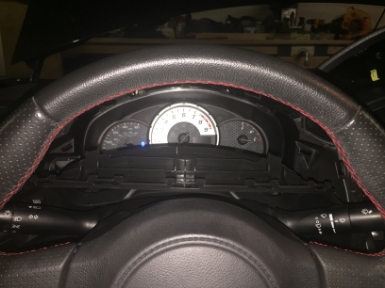 Then lower your steering wheel to make it easier to remove the gauge cluster. The gauge cluster trim will not completely come out but it will move enough to be able to remove the gauge cluster. Then your going to remove 2 screws above the gauge cluster.  Then there will be 2 clips behind the gauge cluster so carefully pull it towards you so it unclips. After that, your going to remove the wire harness connecting to the gauge cluster.  There's a push clip on the top side of the wire harness your going to press your finger on. While holding your finger down on the clip, pull the wire harness out.  Then your all done! Your gauge cluster is now removed and ready to be modded. Please leave comments and suggestions as this is my first tutorial I've ever made. 
Last edited by Slammedsteve; 08-11-2015 at 05:12 AM. |

|

|
|
08-10-2015, 10:43 PM
|
#2 |
|
Member
Join Date: Jun 2015
Drives: 2013 Asphalt Fr-s,91 240sx missle
Location: Las Vegas
Posts: 73
Thanks: 30
Thanked 18 Times in 16 Posts
Mentioned: 0 Post(s)
|
reserved
Last edited by Slammedsteve; 08-11-2015 at 01:05 AM. |
|
|
|
|
08-11-2015, 05:50 AM
|
#3 |
|
Member
Join Date: Aug 2014
Drives: 2015 Halo FRS Automatic
Location: Georgia
Posts: 74
Thanks: 0
Thanked 22 Times in 16 Posts
Mentioned: 1 Post(s)
|
Great tutorial, I do not need it yet but will add it to my file for future reference.
Thanks for taking the time and documenting! |
|
|
|
|
|
|
|
|
|
|
 Similar Threads
|
||||
| Thread | Thread Starter | Forum | Replies | Last Post |
| GlowShift Guage Cluster | pseudo | Electronics | Audio | NAV | Infotainment | 0 | 10-21-2014 07:25 AM |
| Guage face | MemphisR | Cosmetic Modification (Interior/Exterior/Lighting) | 12 | 07-22-2014 03:53 PM |
| All in one guage? | FR-S89 | Engine, Exhaust, Transmission | 3 | 03-18-2014 01:04 PM |
| Guage Cluster Lights... | Pwolf | Northern California | 12 | 01-26-2014 06:07 PM |


