


|
||||||
| DIY (Do-It-Yourself) Guides For all DIYs. |
 |
|
|
Thread Tools | Search this Thread |
 01-30-2013, 02:41 AM
|
#1 |
|
Senior Member
Join Date: Nov 2012
Drives: '14 Hot Lava FR-S w/Flappy Paddles
Location: Highland, CA
Posts: 141
Thanks: 106
Thanked 231 Times in 59 Posts
Mentioned: 45 Post(s)
Tagged: 0 Thread(s)
|
DIY: Turn In Concepts Solid Aluminum Steering Rack Bushing Install (and review)
Before you get started, there are a couple things to note.
You will need an alignment after the install (you may be able to mark the rack to keep it aligned when you reinstall the rack, but it would still be a good idea to get an alignment afterwards). You will need a C-Clamp, ball joint puller or similar tool to remove the stock bushings. If using a C-Clamp, you will need a section of 1.5” OD Steel Tube (0.065” wall) and a solid piece of aluminum or steel bar plate to spread the load between one end of the C-Clamp and the steel tube. The length of the steel tube depends on the size of the C-Clamp being used. For a 6” C-Clamp, use a 2 - 3” section of tube. You can probably pick up a short section at your local auto parts store in the exhaust section. Step 1: Get the car up in the air with either a lift or jack and jack stands (make sure the jack can lift the car up high enough for you to get under the car). Step 2: Remove the fiberglass under cover. 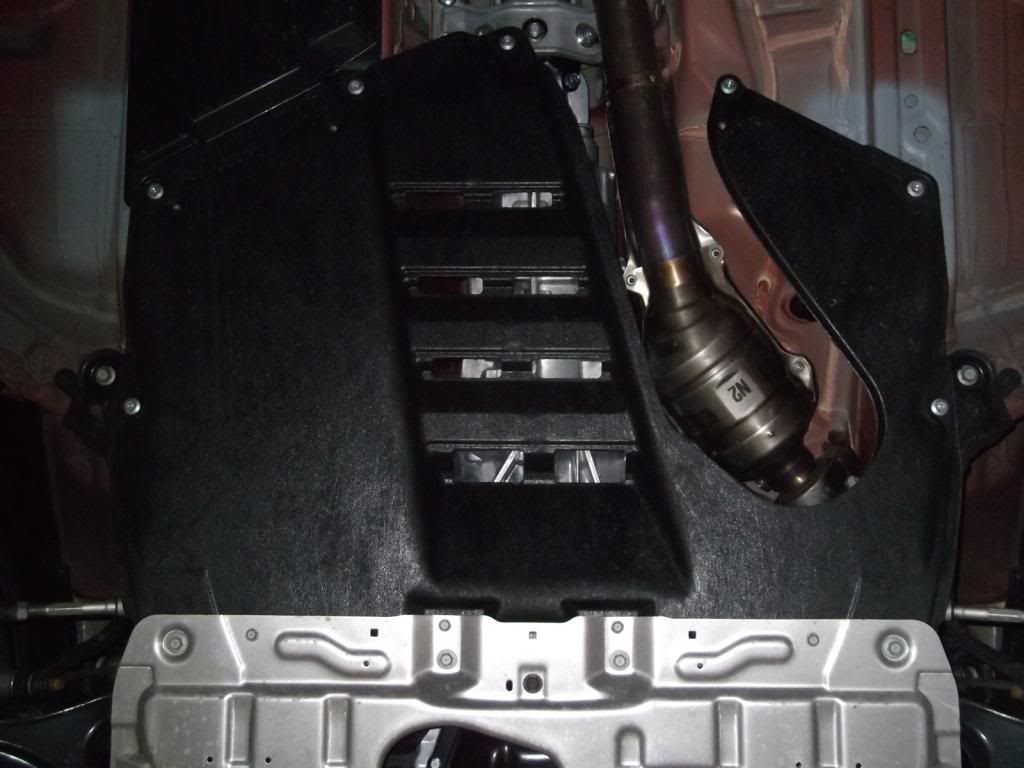 Step 3: Remove the aluminum under cover. 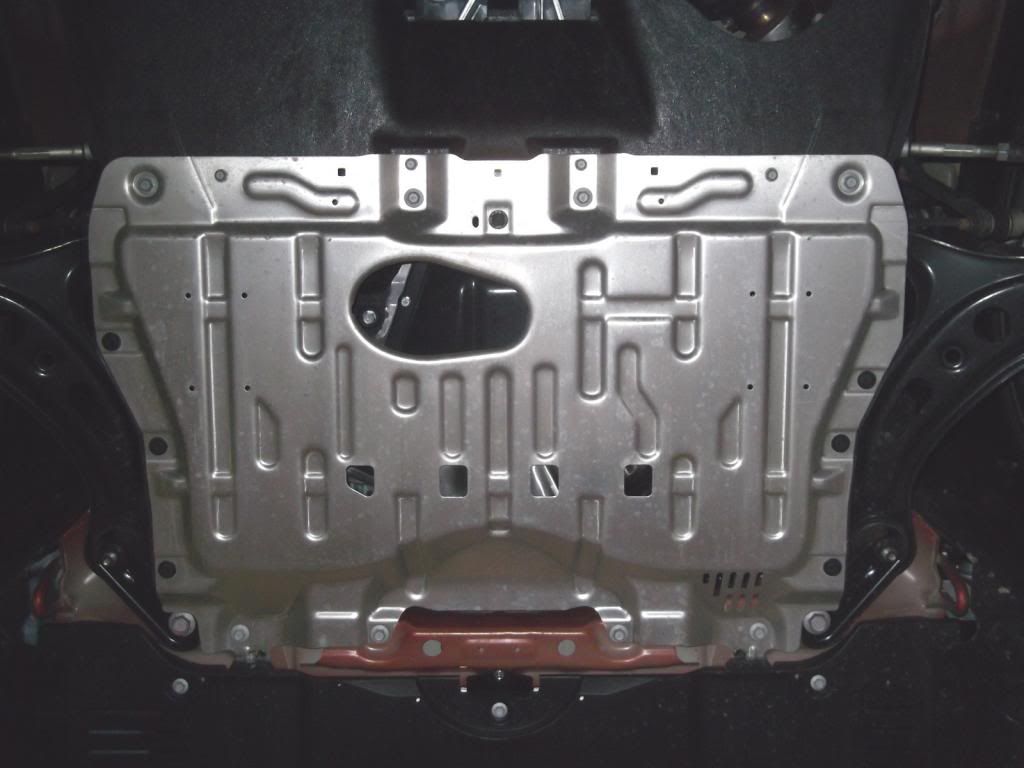 Step 4: Remove the two bolts for the steering rack. 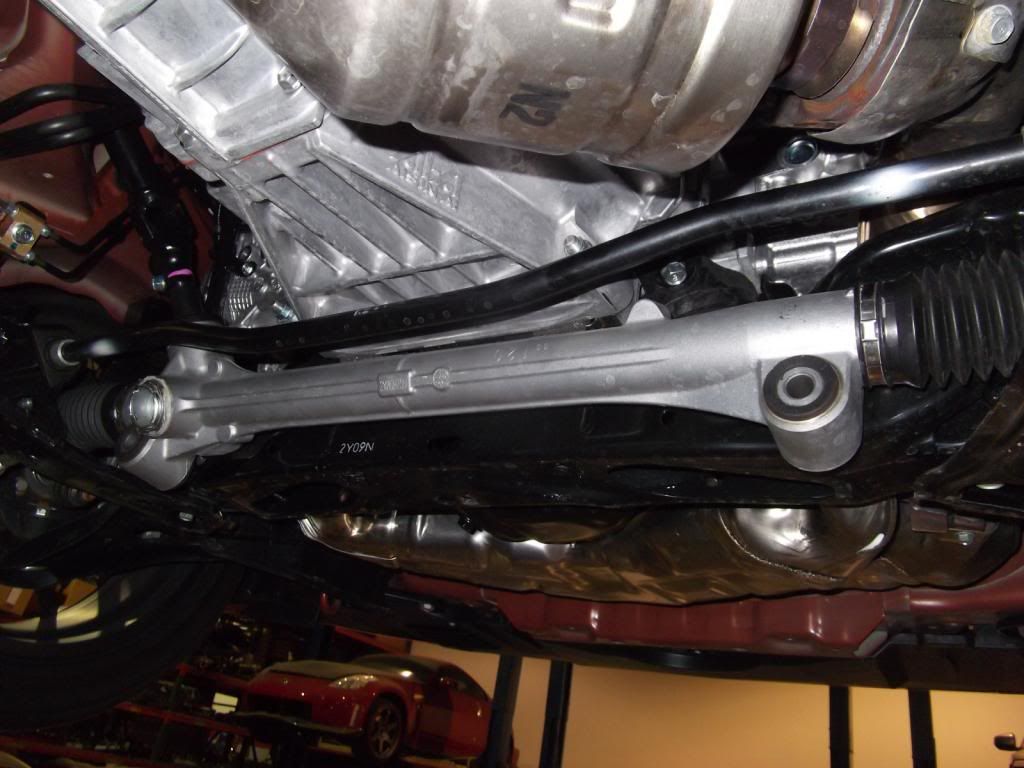 Step 5: Using a C-Clamp or similar tool, press out the stock bushings. Note: on either side of the lower subframe, it sweeps up slightly. Position the steering rack so that the bushing is as low and towards this cutout as possible so you can get a straight shot at the bushing with your removal tool. You do not need to undo the steering coupler at the rack or the tie rod ends to do this. It will take some effort to position it just so, but there is just enough play in the steering coupler and tie rods to accomplish this job. 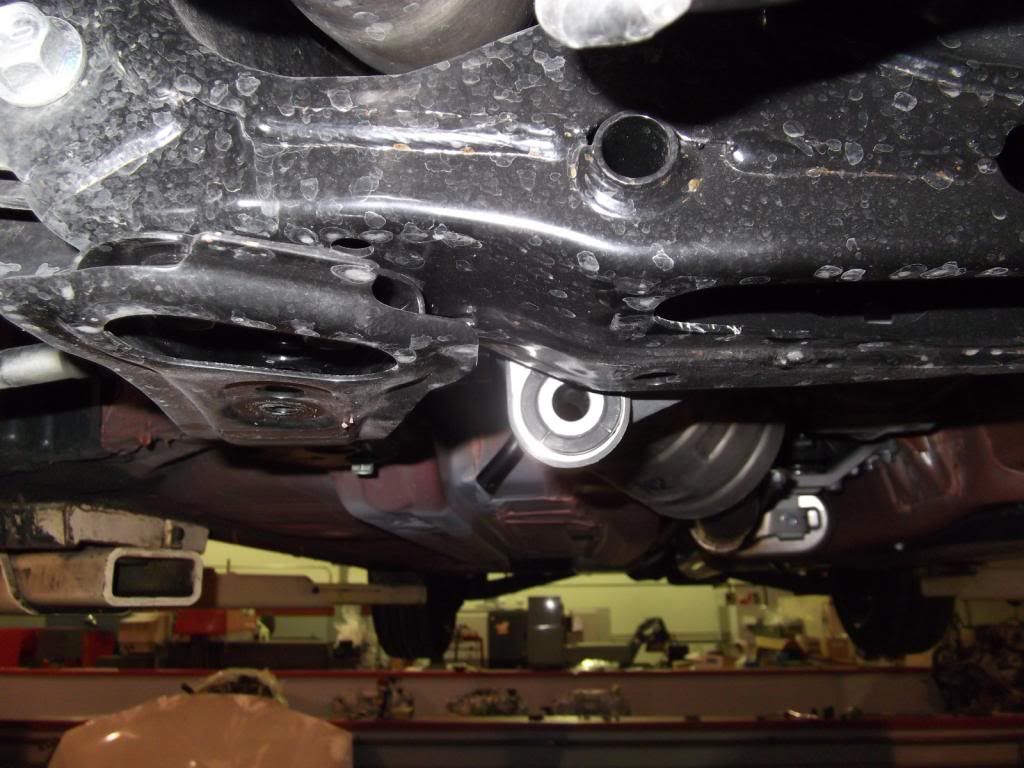 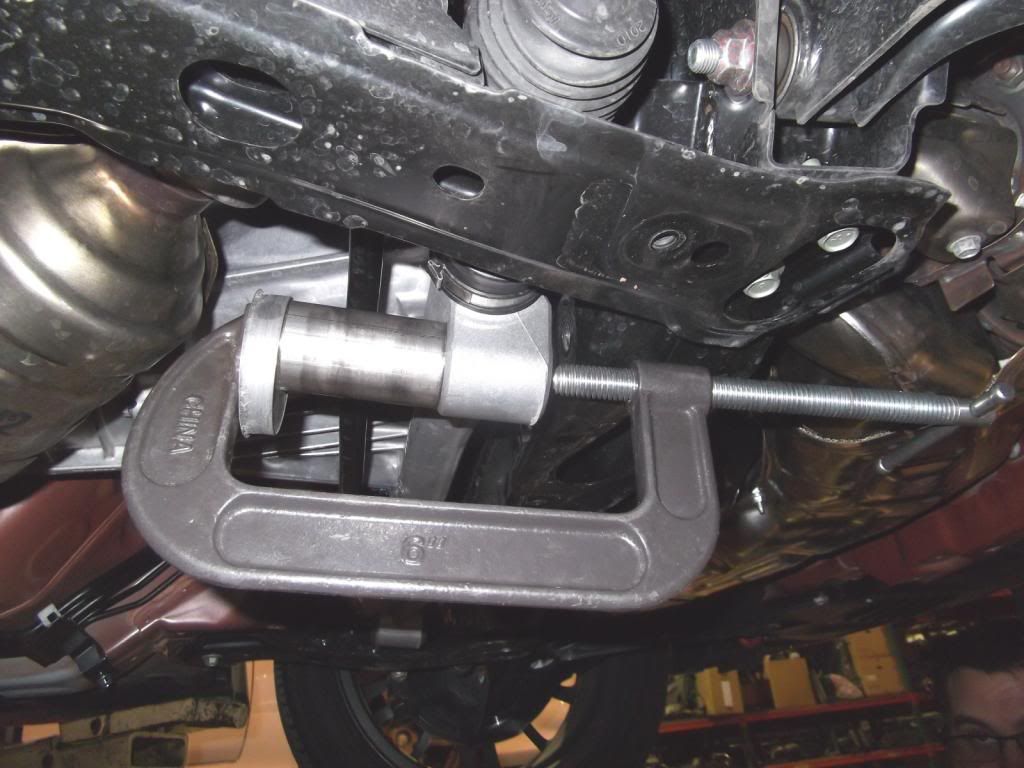 Stock bushings compared to TiC Solid Aluminum bushings:  Step 6: Lubricate the o-rings on the TiC bushings with a non-petroleum based lubricant (soap and water works). Petroleum based lubes will damage the o-rings. I had some transmission assembly goop on hand formulated specifically for rubber o-rings. 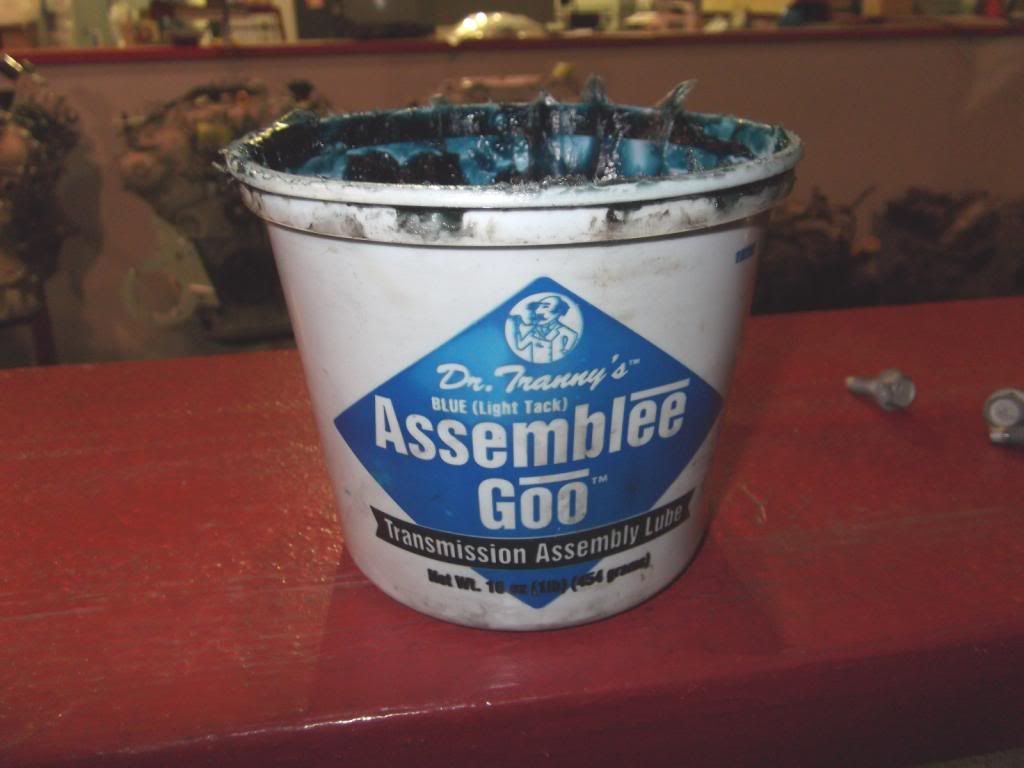 Step 7: Slip one end of each of the TiC steering rack bushings into the bores of each of the steering rack mounting ears. The forward bushing halves will have to go in at a slight angle at first, so be sure to move the steering rack as far away and down from the subframe as possible to get the most clearance to get them into the bores. Use those cutouts again to help get as much clearance as possible. 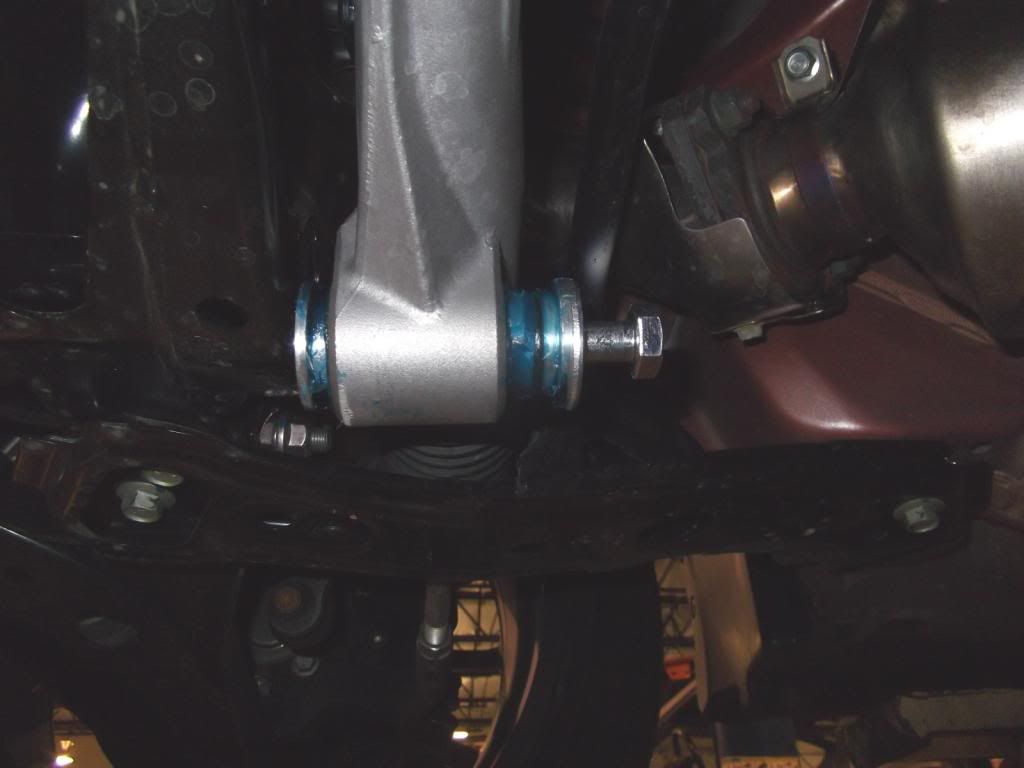 Step 8: Line up the steering rack with the subframe and hand thread the bolts in a little. If you encounter some resistance with threading it in, you may need to wiggle the rack a little to take some of the load off the bolt while threading it in. Step 9: Torque the bolts to 55ft-lbs. Step 10: Re-install the undercovers, lower the car back down you’re ready for your first drive. J Background: Since my first day of owning the FR-S, I’ve felt that the steering is a little laggy on the input/response. There’s a nice little chicane on my way home from work that I always enjoyed taking in my old WRX. Granted that car had some pretty serious suspension work and would take that chicane very nicely. The stock FR-S doesn’t quite have the same snappiness that my old car did and I really missed that. Now, I have to admit that I was a bit hesitant about running solid aluminum bushings on the steering rack since I didn’t want to add a bunch of NVH. Rest assured, however, there is no discernible increase in NVH with these bushings. I paid close attention to how the steering felt before installing these and noted the feedback from the stock bushings. With these aluminum bushings, the amount of vibration in the steering wheel feels about the same as stock even over uneven bumps in the road. The response, however, is a whole different ball game. When you turn the steering wheel, the car turns…at the same time, like it ought to! Through my favorite little chicane, the car now snaps right and left with precision and crisp response. The FR-S can still use more steering response IMO, but there are other compliant parts in the system that will need to be replaced to get the response higher (like better tires and coilovers). This mod is a good step in the right direction. Bottom Line: this is a fantastic mod and very appropriate for how this car was meant to be driven. It’s pretty easy to do in an hour or two with the right tools, and it’s pretty inexpensive as well. Good job TiC for getting work done! Update: Took the FR-S out to Laguna Seca this last weekend and had a blast. With these bushings, the car is much more point and shoot than it was before. With the stock bushings, I'd find myself correcting slighty since the bushing would flex (deflection takes time) before the car settled in. Now, the car goes in the direction you point it the first time and is much more precise. I do have to make a disclaimer though. I did have the RS-3's on the car and a fantastic alignment from Robispec. Just for reference, my best time was 1:58.248 on an otherwise stock car. Last edited by Sithspawn; 02-07-2013 at 01:37 AM. Reason: Update |

|

|
| The Following 17 Users Say Thank You to Sithspawn For This Useful Post: | axelo (01-10-2016), Bonburner (01-30-2013), Calum (01-30-2013), chanomatik (02-04-2013), cobrabyte (02-04-2013), CSG Mike (01-30-2013), DAEMANO (07-17-2015), empower-auto (01-03-2017), FrX (01-30-2013), Grateful Dave (04-30-2014), Hanakuso (02-24-2013), joe strummer (04-22-2015), normancw (12-10-2013), sittinSideways (08-10-2014), Spartan65 (07-16-2013), unsurety (06-18-2014), whataboutbob (01-30-2013) |
|
01-30-2013, 03:18 AM
|
#2 |

Join Date: Jul 2012
Drives: S2000 CR
Location: Orange County
Posts: 14,564
Thanks: 8,942
Thanked 14,213 Times in 6,856 Posts
Mentioned: 970 Post(s)
Tagged: 14 Thread(s)
|
Great DIY! We'll be putting our set in Tomorrow evening

|
|
|
|
| The Following User Says Thank You to CSG Mike For This Useful Post: | Sithspawn (01-31-2013) |
|
01-30-2013, 04:02 AM
|
#3 |
|
Senior Member
Join Date: Oct 2012
Drives: Black frs project
Location: Socal
Posts: 960
Thanks: 189
Thanked 886 Times in 381 Posts
Mentioned: 190 Post(s)
Tagged: 1 Thread(s)
|
I want some too!
|
|
|
|
|
01-30-2013, 10:10 AM
|
#4 | |
|
Banned
Join Date: Jan 2012
Drives: Attitude
Location: MD
Posts: 10,046
Thanks: 884
Thanked 4,890 Times in 2,903 Posts
Mentioned: 123 Post(s)
Tagged: 4 Thread(s)
|
Quote:
I was worried about NVH, good to hear that there's little discernible difference. |
|
|
|
|
|
01-30-2013, 11:17 AM
|
#5 |
|
Senior Member

Join Date: Oct 2012
Drives: BRZ
Location: Cincinnati, OH
Posts: 336
Thanks: 15
Thanked 123 Times in 68 Posts
Mentioned: 23 Post(s)
Tagged: 0 Thread(s)
|
A couple of things to note - with a smaller puller you should not need to disconnect the steering linkage.
Should you need to it is imperative that you mark the splines. Additionally, you must be very careful to keep from spinning the rack or the steering column while disconnected. If by some chance you do, and then line up the marks you can be off a turn or two on the steering. This will flip out the steering angle sensor and cause a TC module problem because the clockspring and steering angle sensor will be all confused. The reset is you have to figure out which way you're off a turn on the steering, disconnect the linkage, center the wheel and tires, and then reconnect. Really not that bad if it happens, but still something to be aware of. |
|
|
|
|
01-30-2013, 11:40 AM
|
#6 |
|
Banned
Join Date: Jan 2013
Drives: 13 DGM BRZ Ltd
Location: Williamsburg, VA
Posts: 974
Thanks: 294
Thanked 470 Times in 255 Posts
Mentioned: 17 Post(s)
Tagged: 4 Thread(s)
|
Maybe TiC can think about including the bushing pulling cup/pipe the way Whiteline does with their WRX/STI steering rack bushing upgrade? That was a fairly simple install on my STI, but I did have to disconnect the steering linkage.
|
|
|
|
|
01-30-2013, 12:16 PM
|
#7 |
|
Banned
Join Date: Nov 2012
Drives: whiteout FRS
Location: Virginia Beach
Posts: 270
Thanks: 104
Thanked 105 Times in 68 Posts
Mentioned: 3 Post(s)
Tagged: 2 Thread(s)
|
I've successfully used a two jaw puller and a socket for pressing out soft bushings like this. Since the puller is just about flat it will give the proper clearance to the frame (when used horizontally) and also allows the use of a wratchet/socket to do the twisting (verses by hand) Or if you have them, air tools. Just remember not to go too fast or the puller will keep sliding off center.
I might have to consider a set of these bushings.. but I'll wait for more feedback before I pull the trigger. |
|
|
|
|
01-30-2013, 01:05 PM
|
#8 | |
|
Senior Member
Join Date: Oct 2012
Drives: BRZ
Location: Cincinnati, OH
Posts: 336
Thanks: 15
Thanked 123 Times in 68 Posts
Mentioned: 23 Post(s)
Tagged: 0 Thread(s)
|
Quote:
|
|
|
|
|
|
01-30-2013, 01:49 PM
|
#9 | |
|
Site Moderator

Join Date: Dec 2010
Drives: Stuff
Location: Florida
Posts: 10,317
Thanks: 955
Thanked 5,965 Times in 2,689 Posts
Mentioned: 262 Post(s)
Tagged: 8 Thread(s)
|
Quote:
__________________
-Dave
Track cars: 2013 Scion FRS, 1998 Acura Integra Type-R, 1993 Honda Civic Hatchback DD: 2005 Acura TSX Tow: 2022 F-450 Toys: 2001 Chevrolet Corvette Z06, 1993 Toyota MR2 Turbo, 1994 Toyota MR2 Turbo, 1991 Mitsubishi Galant VR-4 Parts: 2015 Subaru BRZ Limited, 2005 Acura TSX Projects: 2013 Subaru BRZ Limited track car build FS: 2004 GMC Sierra 2500 LT CCSB 8.1/Allison with 99k miles |
|
|
|
|
|
01-30-2013, 03:42 PM
|
#10 |
|
Banned
Join Date: Nov 2012
Drives: whiteout FRS
Location: Virginia Beach
Posts: 270
Thanks: 104
Thanked 105 Times in 68 Posts
Mentioned: 3 Post(s)
Tagged: 2 Thread(s)
|
I use the socket so that it doesn't push the sleeve out of the bushing, often especially on older cars (not that we really have to worry about age yet) the rubber is deteriorated and pushing on the edges vs the center works better for wedging the bushing out.
That and in some cases the smaller pullers have a shaft that isn't large enough to seat properly in the bushing sleeve.. socket helps center and seat the puller. Lots of different ways to use those things though, that's why I have a couple 
|
|
|
|
|
01-30-2013, 05:14 PM
|
#11 |
|
Senior Member

Join Date: Jun 2012
Drives: 2013 BRZ, 2002 WRX
Location: Houston, TX
Posts: 710
Thanks: 978
Thanked 246 Times in 158 Posts
Mentioned: 33 Post(s)
Tagged: 0 Thread(s)
|
Thanks for the review and DIY... just ordered a set and look forward to using your instructions for install. Hoping I won't need an alignment afterwards -- most alignment shops don't even have our cars in their systems yet.
__________________
|
|
|
|
| The Following User Says Thank You to cobrabyte For This Useful Post: | Dustin (11-19-2013) |
|
01-30-2013, 05:21 PM
|
#12 | |
|
Senior Member
Join Date: Oct 2012
Drives: BRZ
Location: Cincinnati, OH
Posts: 336
Thanks: 15
Thanked 123 Times in 68 Posts
Mentioned: 23 Post(s)
Tagged: 0 Thread(s)
|
Quote:
Meh. Good alignment shops don't need the car in the system. In fact, unless you're doing an "in the green" alignment to stock specs (and the green range it fits into) I would find a more performance oriented alignment shop and get one that's actually good for performance driving. |
|
|
|
|
| The Following User Says Thank You to Turn in Concepts For This Useful Post: | EvoXDD (02-06-2013) |
|
01-30-2013, 11:59 PM
|
#13 | |
|
Senior Member
Join Date: Nov 2012
Drives: '14 Hot Lava FR-S w/Flappy Paddles
Location: Highland, CA
Posts: 141
Thanks: 106
Thanked 231 Times in 59 Posts
Mentioned: 45 Post(s)
Tagged: 0 Thread(s)
|
Quote:
FYI, I did not disconnect the steering coupler or the tie rod ends so there's no need to mark the splines. The act of removing the two bolts that retain the rack to the subframe will put the alignment off slightly. I know it sounds silly and I didn't believe my boss at first who told me it was a bad idea since I couldn't see how it would possibly change the alignment. But when I noticed my steering wheel was off a couple degrees from center, I realized he was right. No biggie. Regardless, I'm really enjoying the bushings and I've got some RS3's coming tomorrow since my stock tires have been heat cycled one too many times. |
|
|
|
|
|
01-31-2013, 12:12 AM
|
#14 | |
|
Senior Member
Join Date: Nov 2012
Drives: '14 Hot Lava FR-S w/Flappy Paddles
Location: Highland, CA
Posts: 141
Thanks: 106
Thanked 231 Times in 59 Posts
Mentioned: 45 Post(s)
Tagged: 0 Thread(s)
|
Quote:
Haha, yes, it was pretty done up. Let's see it was an '03 Wagon and here's what I did to it: STi front subframe and steering rack (15:1 ratio was a great upgrade) STi lower control arms all the way around Whiteline Steering Rack Bushings Hotchkis Competition Sway Bar Kit (1" hollow bars front and rear) Kartboy Endlinks all the way around Turn In Concepts SST Coilovers (AST 4100's custom valved by TiC with Swift Springs) MSI Front Street Camber Plates Vorshlag Rear Camber Plates Whiteline Roll Center Correction Kit Kito Auto Sport anti lift spacers eBay front strut tower brace Whiteline Quick Disconnect rear strut tower brace Now, here's the kicker. At my local track, the bone stock FR-S is only 1 second slower on a 50sec course than the WRX was. My WRX had Continental ExtremeContact DW tires while the FRS was on the stock Bridgestone Turanzas. Yeah, about the NVH, I was pleasantly surprised that I didn't notice a difference in NVH between the stock bushings and the solid aluminum ones. |
|
|
|
|
|
|
|
|
|
|
 Similar Threads
|
||||
| Thread | Thread Starter | Forum | Replies | Last Post |
| Perrin Rear Shifter Bushing Install | F1point4 | DIY (Do-It-Yourself) Guides | 55 | 10-21-2021 03:39 PM |
| Whiteline rear subframe bushing install... | fl_speed001 | Suspension | Chassis | Brakes -- Sponsored by 949 Racing | 35 | 07-11-2020 01:29 AM |
| DIY__twincamRob's 5min Whiteline Positive Shift bushing install | twincamRob | DIY (Do-It-Yourself) Guides | 30 | 06-30-2017 11:27 AM |
| Bushing install gone wrong | FRSFirestorm | Suspension | Chassis | Brakes -- Sponsored by 949 Racing | 32 | 11-13-2013 11:58 PM |
| Whiteline transmission bushing and Perrin shifter bushing review. | Superhatch | Suspension | Chassis | Brakes -- Sponsored by 949 Racing | 1 | 12-09-2012 09:40 PM |


 2013 scion FRS