


|
||||||
| DIY (Do-It-Yourself) Guides For all DIYs. |
 |
|
|
Thread Tools | Search this Thread |
 11-14-2012, 01:02 PM
|
#1 |
|
Senior Member
Join Date: Jul 2012
Drives: 2013 SWP BRZ
Location: New York
Posts: 2,240
Thanks: 458
Thanked 878 Times in 556 Posts
Mentioned: 34 Post(s)
|
DIY - Password:JDM Strut Tower Brace & Lower Tie Bar Install
Tools you will need:
Socket Wrench 12mm Socket Adjustable Wrench 5mm Hex Key or Socket Extension (optional, just like to keep the wrench away from the part i'm working on) Magnet extension in case you drop anything 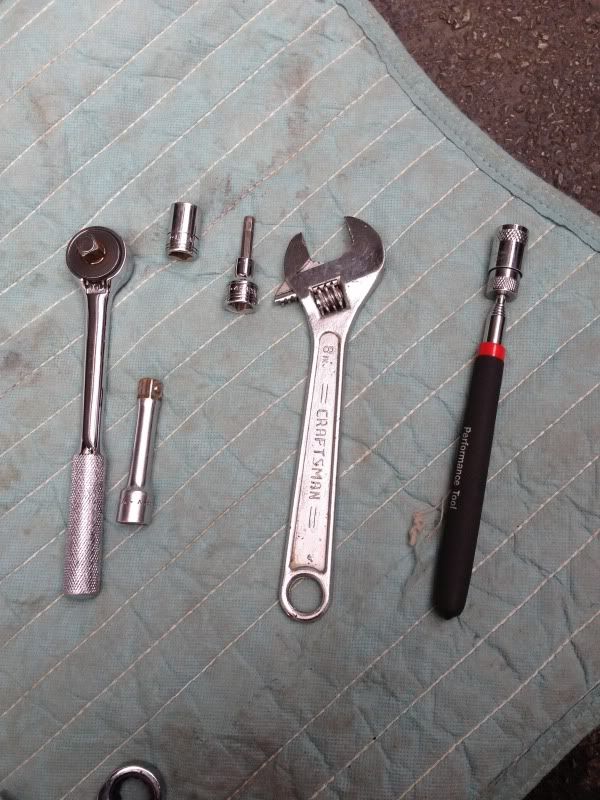 Step 1: Remove stock Lower Tie Bars - Grab your 12mm socket and remove the 3 nuts and 1 bolt to each side of the tie bars. These 2 on each side: 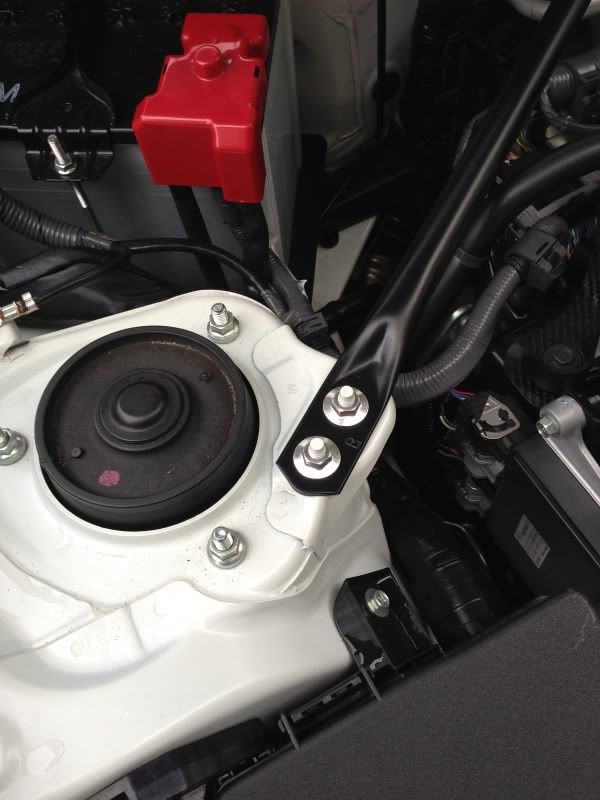 Then these, one side removed, other side in tact: 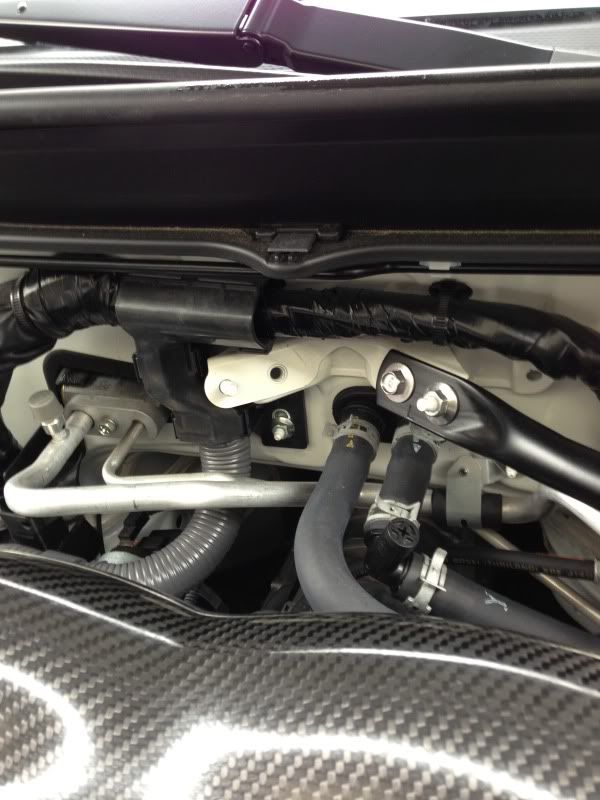 Once you have these removed, set them to the side, and grab your shiny new PW:JDM ones. Step 2) Install PW:JDM Tie Bars - These bars are adjustable. You will have to unloosen the nut at the end of each side, and then you can twist the bar to adjust the ends in and out. I had to adjust mine out a bit in order to line them up with the studs. Simply just adjust and lay them down onto the body studs. Once you get them fitted, re-install the stock bolts you removed. 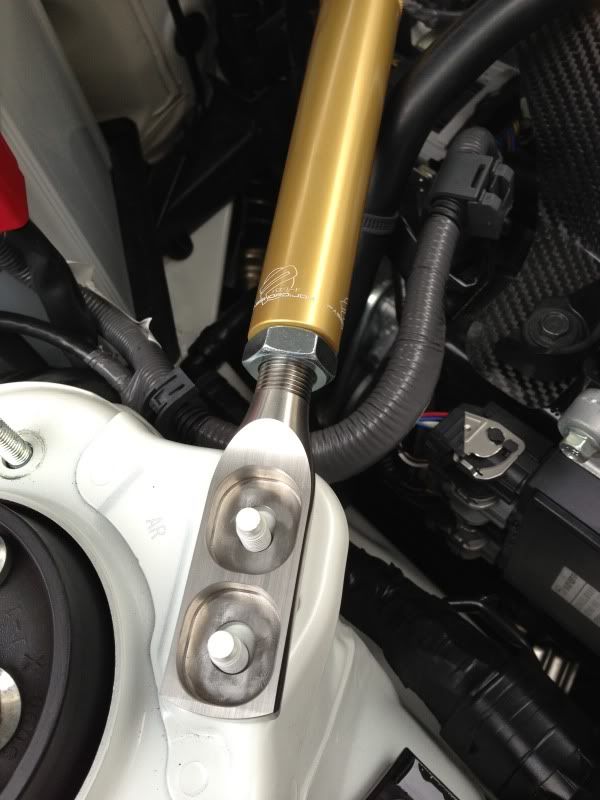 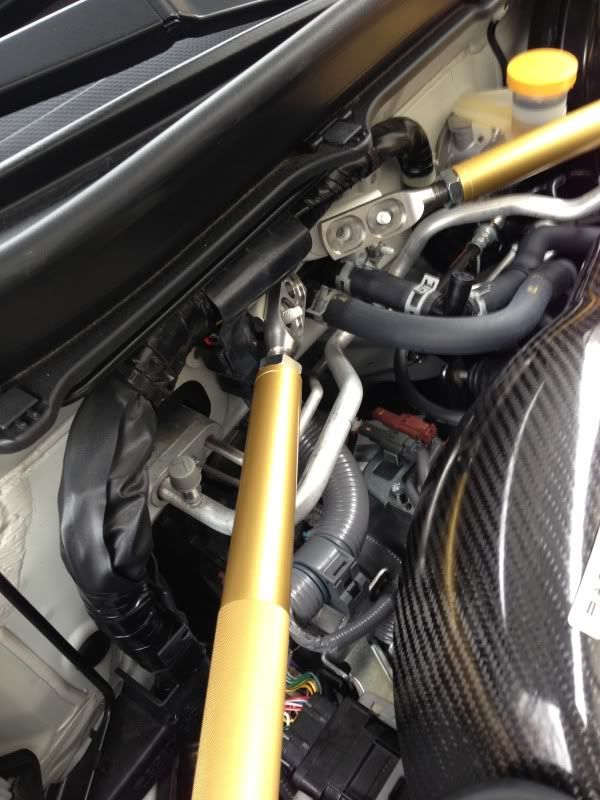 Bolts installed:   Bars installed: we are half way there! 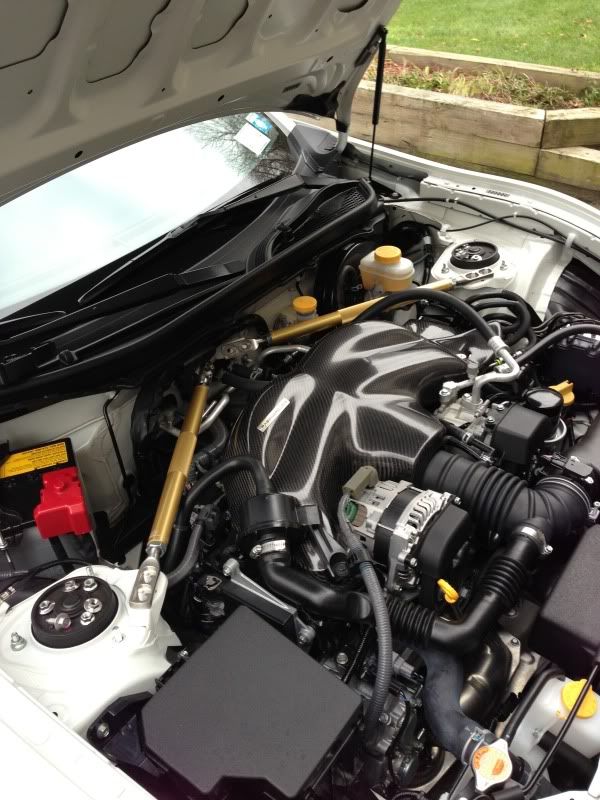 Step 3) Install Strut Tower Braces - In order to install these, you must first make sure you tighten down the lower tie bars, because if you don't, you cannot get a tool in between the brace to tighten the bolts down. Diagonal brace nuts - 12ft-lb Remove the two inner strut top bolts.  Place the brace over the two studs, and re-install the bolts you just removed (Tighten down but not all the way just in case you need to adjust it). Note, the brace with the PWJDM logo goes on the passenger side. Do this to both sides *NOTE* You probably can install the Strut bar to the brace first, then install it as one, but this is just the way I did it. It might be easier to install it off the car but there was no issues doing it this way as well. 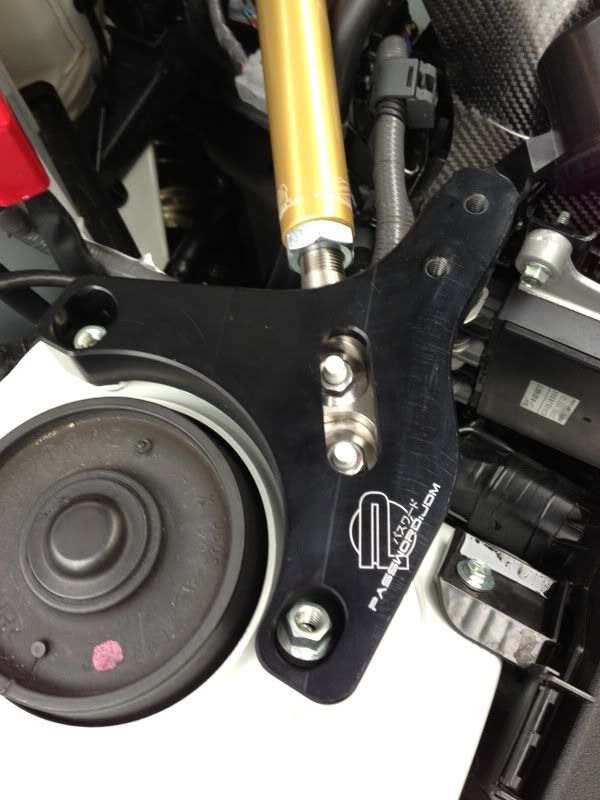
Last edited by xxscaxx; 11-14-2012 at 01:30 PM. |

|

|
|
11-14-2012, 01:02 PM
|
#2 |
|
Senior Member
Join Date: Jul 2012
Drives: 2013 SWP BRZ
Location: New York
Posts: 2,240
Thanks: 458
Thanked 878 Times in 556 Posts
Mentioned: 34 Post(s)
|
Step 4) Install strut bar - Grab the 4 bolts with washers that were supplied with your kit. Again, the bar is adjustable so you will have to loosen the two end bolts with the adjustable wrench, and then adjust the bar inwards or outwards to line it up with the holes on the braces. Once you adjust it, install the supplied bolts into the brace using the 5mm hex key or socket. Do this on both sides. I installed them a little bit loose again just to make sure everything lined up (which it does fine).
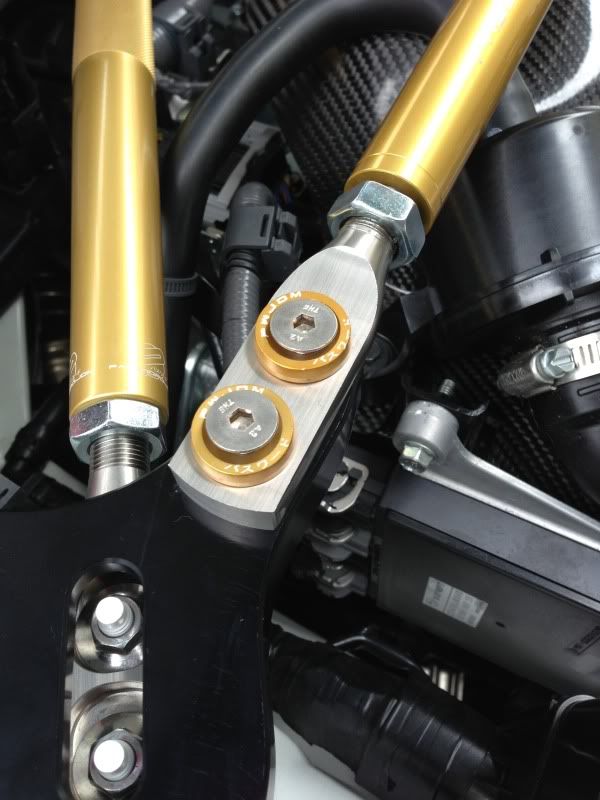 Step 5) Tighten! - Tighten down the 4 bolts for the strut tower bar, and the 4 bolts on the braces. Strut nuts - 17ft-lb Now, you are going to adjust the strut bar and lower tie bars to your liking with the adjustable wrench. I pretty much just spun the bar with my hands to line up the logos and get it tight, and then tightened the bolts on the end of the bars. You can leave one nut loose and tighten the other side down more if you want to further stiffen up the bars. 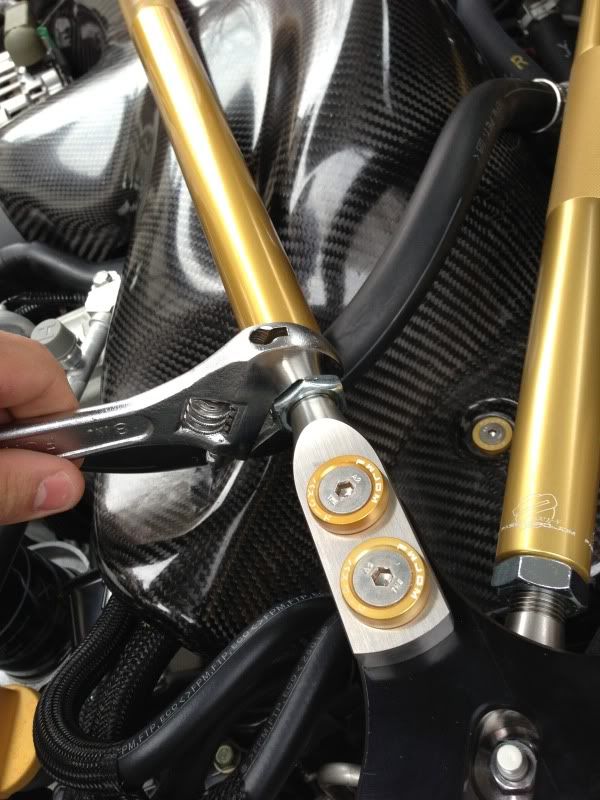 Step 7) Stand back and drool - You are done! Enjoy your new strut bar setup. 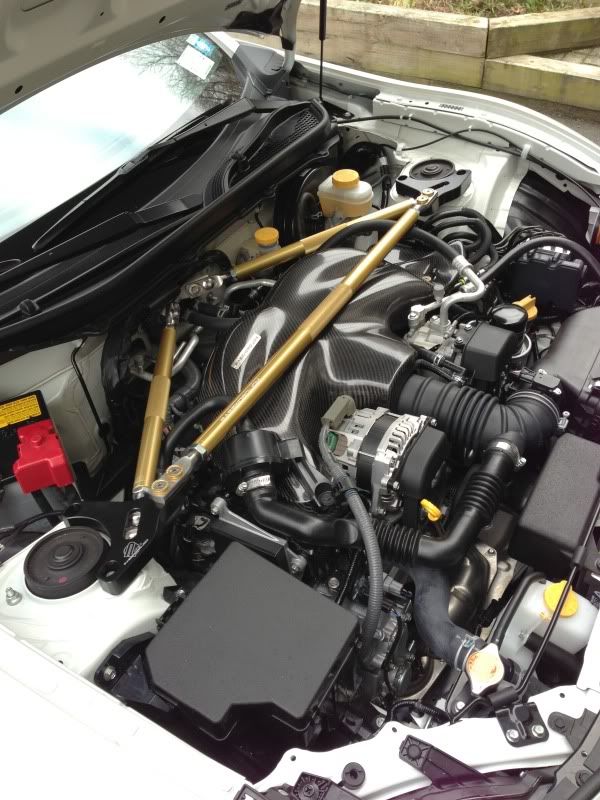 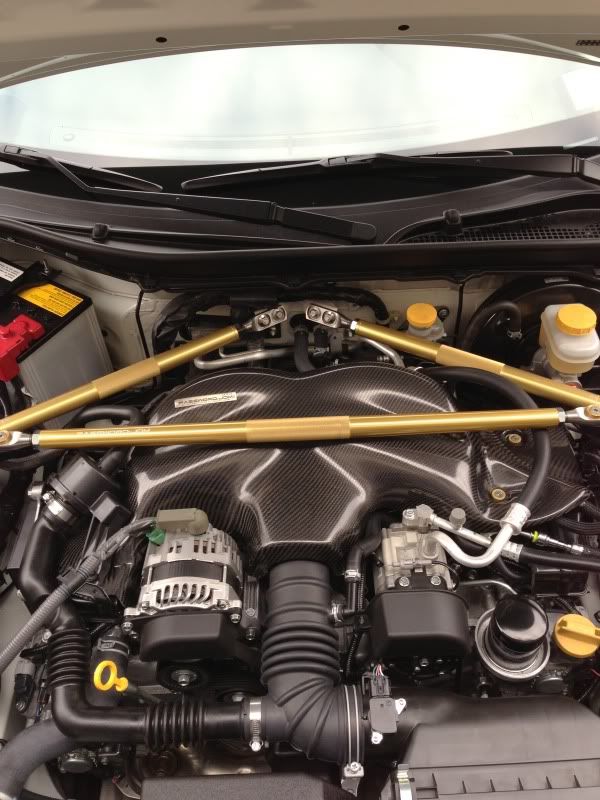 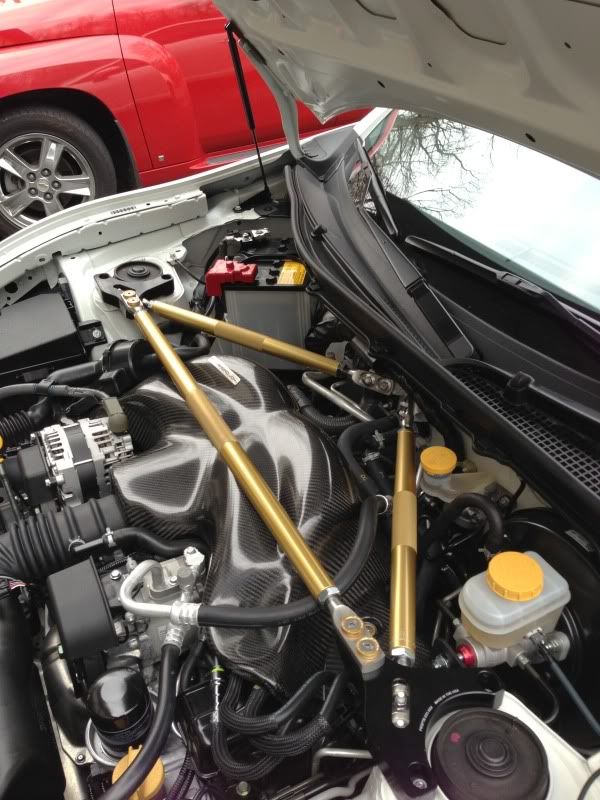 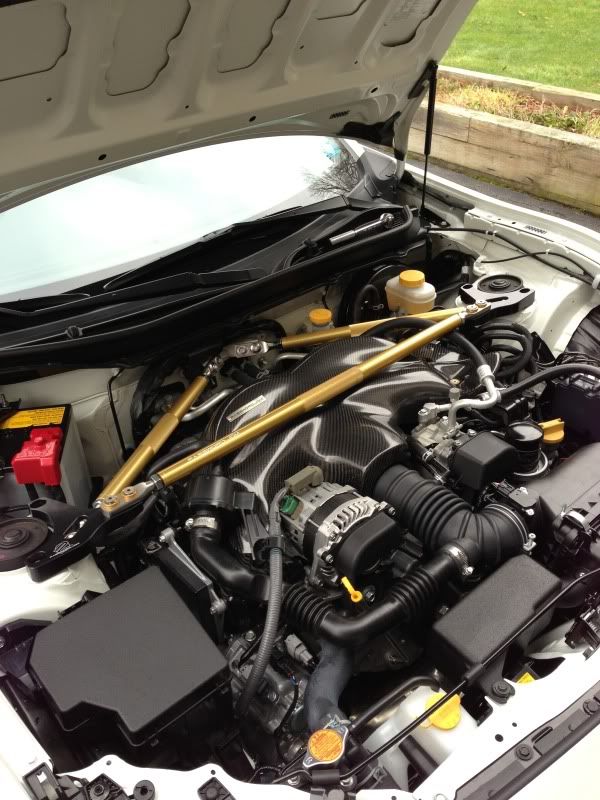
Last edited by xxscaxx; 11-14-2012 at 01:31 PM. |
|
|
|
| The Following 2 Users Say Thank You to xxscaxx For This Useful Post: | Black Tire (06-03-2013), calis5nest (05-13-2013) |
|
11-14-2012, 01:02 PM
|
#3 |
|
Senior Member
Join Date: Jul 2012
Drives: 2013 SWP BRZ
Location: New York
Posts: 2,240
Thanks: 458
Thanked 878 Times in 556 Posts
Mentioned: 34 Post(s)
|
reserved 2
Note: not sure why that one photo isn't showing up, but photobucket has been stupid today so hopefully it will pop up. The link isn't broken. |
|
|
|
|
11-14-2012, 01:28 PM
|
#4 |
|
Member

Join Date: Oct 2012
Drives: BRZ - Dark Grey
Location: Orlando, FL
Posts: 71
Thanks: 7
Thanked 31 Times in 20 Posts
Mentioned: 5 Post(s)
|
@xxscaxx I installed mine the same way but dug through some other DIY posts to get the torque settings. I'm sure someone might ask about them.
Diagonal brace nuts (3), bolt (1) - 12ft-lb Strut nuts (2) - 17ft-lb Only thing I don't know is the torque settings for the PWJDM bolts for the lateral bar since they attach to their mounting bracket and not the actual car. |
|
|
|
| The Following User Says Thank You to Toxic78 For This Useful Post: | xxscaxx (11-14-2012) |
|
11-14-2012, 01:29 PM
|
#5 | |
|
Senior Member
Join Date: Jul 2012
Drives: 2013 SWP BRZ
Location: New York
Posts: 2,240
Thanks: 458
Thanked 878 Times in 556 Posts
Mentioned: 34 Post(s)
|
Quote:
|
|
|
|
|
| The Following User Says Thank You to xxscaxx For This Useful Post: | password:jdm (11-14-2012) |
|
11-14-2012, 01:36 PM
|
#7 |
|
Member
Join Date: Oct 2012
Drives: BRZ - Dark Grey
Location: Orlando, FL
Posts: 71
Thanks: 7
Thanked 31 Times in 20 Posts
Mentioned: 5 Post(s)
|
Now after seeing yours, I think I should of waited the 2-3 weeks for the blue instead of the black that I have. I was thinking the blue would of been way too much; I like subtle looks but yours looks really good.
|
|
|
|
|
12-22-2012, 11:03 PM
|
#8 | |
|
Senior Member
Join Date: Jun 2012
Drives: n/a
Location: Boston
Posts: 558
Thanks: 215
Thanked 126 Times in 94 Posts
Mentioned: 2 Post(s)
|
Quote:
Where did you get that badass carbon fiber engine cover? |
|
|
|
|
|
12-23-2012, 01:40 AM
|
#9 |
|
Senior Member

Join Date: Jun 2012
Drives: GT86
Location: Australia
Posts: 110
Thanks: 31
Thanked 56 Times in 36 Posts
Mentioned: 2 Post(s)
|
That's a Password JDM cover ^
__________________
 PROJECTGT86 |
|
|
|
|
05-13-2013, 10:16 PM
|
#10 |
|
Senior Member

Join Date: Jul 2012
Drives: scion frs firestorm
Location: hawthorne ca
Posts: 457
Thanks: 1,135
Thanked 251 Times in 136 Posts
Mentioned: 7 Post(s)
|
thanks for the write up
__________________
-Alan
|
|
|
|
|
05-13-2013, 10:26 PM
|
#11 |
|
Senior Member
Join Date: Jul 2012
Drives: 2013 SWP BRZ
Location: New York
Posts: 2,240
Thanks: 458
Thanked 878 Times in 556 Posts
Mentioned: 34 Post(s)
|
no problem!
|
|
|
|
|
05-13-2013, 10:28 PM
|
#12 |
|
Love Boost!!!!!!!!

Join Date: Jun 2012
Drives: Whiteout Scion FR-S
Location: Long Island NY
Posts: 3,612
Thanks: 429
Thanked 902 Times in 606 Posts
Mentioned: 87 Post(s)
|
love them but too expensive
__________________
༼ つ ◕_◕ ༽つ I LOVE BOOST ༼ つ ◕_◕ ༽つ
|
|
|
|
|
05-13-2013, 11:21 PM
|
#13 |
|
Senior Member

Join Date: Nov 2011
Drives: Firestorm 6MT
Location: Texas
Posts: 456
Thanks: 435
Thanked 115 Times in 94 Posts
Mentioned: 6 Post(s)
|
So many different brands to choose from but I've been looking at these and like the design. Did you notice a difference in handling? Thanks.
|
|
|
|
|
05-14-2013, 12:44 AM
|
#14 |
|
Senior Member

Join Date: Aug 2012
Drives: FR-S
Location: IL
Posts: 2,857
Thanks: 519
Thanked 2,998 Times in 1,095 Posts
Mentioned: 159 Post(s)
|
Looks good thanks for DIY, love the cover but... No ventilation means extra heat trapped into intake manifold.
__________________
|
|
|
|
|
|
|
|
|
|
 Similar Threads
|
||||
| Thread | Thread Starter | Forum | Replies | Last Post |
| Password:JDM Ultimate Strut Tower Brace Subaru BRZ / Scion FR-S *Group Buy* | password:jdm | Groupbuys | 265 | 01-28-2015 03:15 PM |
| FT-86 SpeedFactory Strut Tower Brace Review | F1point4 | Suspension | Chassis | Brakes -- Sponsored by 949 Racing | 35 | 01-07-2013 04:31 AM |
| DIY - Strut Tower Brace - FT-86 SpeedFactory | F1point4 | DIY (Do-It-Yourself) Guides | 4 | 10-28-2012 04:30 PM |


