


|
||||||
| Suspension | Chassis | Brakes -- Sponsored by 949 Racing Relating to suspension, chassis, and brakes. Sponsored by 949 Racing. |
 |
|
|
Thread Tools | Search this Thread |
 08-02-2012, 01:39 PM
|
#1 |
|
NW Region Moderator

Join Date: Mar 2010
Drives: FR-S No More
Location: Portland OR
Posts: 5,156
Thanks: 1,134
Thanked 3,187 Times in 1,091 Posts
Mentioned: 300 Post(s)
Tagged: 4 Thread(s)
|
D2 RS/K-Sport Kontrol Pro Coilover Review
Well, I managed to wriggle my way into the first set of production D2 RS Coilovers in the US
and installed them the other night. I am not going to write a complete installation DIY because @GrimmSpeed beat me to it here: http://www.ft86club.com/forums/showthread.php?t=12864 JM Auto Racing was my contact for obtaining these D2 coilovers. They arranged for my set to be shipped to me directly from the Taiwanese factory. I have to say, I was not impressed with JM's communication or customer service. When I placed my order in June I was under the impression that my coilover set was going to ship immediately. After payment the shipment was delayed several times, and at two different times I was told that the order had shipped out and tracking information was to follow immediately -- but the tracking number never arrived. The package from Taiwan that eventually showed up nearly six weeks later was a pleasant surprise, but not so much when you thought it would only take about a week. About half of my emails would go unanswered, I was overcharged (by $16) for my set and then it took them five weeks to process the refund while telling me that they processed it a long time ago, and now that they have the coilovers in stock they are selling them for $947.32, which is $77 less than the "promotional" price that I negotiated in return for promoting the product and their business. It's good news for you, though, because you can get these coilovers shipped out to you for under a grand right now! http://www.jmautoracing.com/2012-sci...s-p-85586.html  It has been brought to my attention that the D2 RS coilovers are nearly the same exact product as the K-Sport Kontrol Pro coilovers, although they might have different spring rates. This topic will also be used to review those brands as well. Official D2/K-Sport manufacturer links: http://www.d2racing.com/content/products/RS_coilovers (FR-S & BRZ) http://www.ksportusa.com/b2c/proddet...prod=CSC080-KP (FR-S) http://www.ksportusa.com/b2c/proddet...prod=CSB200-KP (BRZ) (The K-Sport part numbers are actually the same identical product)  I'm going to start by comparing the D2 RS coilovers against the current highest-end coilovers available: the KW Racing Variant 3. The retail price of the D2s sits at about $1500 while the KW retail price is about $2300. You will end up paying near retail for the KWs, while the D2s will probably be available at a discount from the retail price... so there is essentially a difference of over $1000 in these two products. I have not installed the KWs, so I cannot attest to the difference in performance, but the following photos will show you the physical difference in the components.  Boxes are about the same size and both are kind of heavy, but the D2 box is slightly heavier.  Front: The D2s are noticeably heavier than the KWs by about a pound.  Front: You can tell that the brake mount tab is rotated slightly differently, but other mounting points are the same.  Front Top: The KWs reuse the OEM strut caps while the D2 comes with pretty camber plates.  Rear: The rear struts are about the same weight.  Rear: Lower bushing on the D2 can fall out while the KW is a little higher quality  Rear: KWs have helper springs while the D2s use only a single spring What do you get with your coilovers? The KWs came with a small package that contained only the adjustment tools. The D2s come with LOTS of stuff!  Look at all the stuff you get! The four brake brackets (lower left) and four rubber grommets (upper left) didn't get used. Although you only need one shock adjustment tool, they provide four so you could just leave them in. Nice touch!  Comparison of the old endlinks to D2's adjustables.  The camber plate at the top of the front struts is one reason that I chose these coilovers. The included rustproofing gel should be applied to the exposed pillowball up here.  Uh oh! The bracket that holds the brake line is slightly out of alignment for a perfect fitment. I haven't fully tightened the brake line here, but you can see that the rotation of the bracket favors the inside of the car, which causes some tension on the brake line from the bracket to the caliper. Also, you have to twist the brake line slightly so that you can get the brake line bolt to line up to the bracket. This applies some torsional pressure to the line as well, as you can see in the slight kink at the top of the image. It was fairly simple to bend the bracket slightly with some pliers to relieve some of this stress (not pictured) but I hope that in future production they can solve this slight error. On the plus side, the mounting area for the ABS line was perfect and the plastic ABS line snapped right into the holes as if it were OEM.  Another issue that I experienced was some confusion over mounting the strut to the hub assembly. The OEM bolts are used and the top bolt has a larger collar than the bottom. Easy to match the bolts with the holes that way! As you can barely see in the image because of my thumb, the upper bolt hole is larger. The upper bolt hole in the back of the coilover, which you can also barely see because of the angle of the photo, is slotted instead of round. Hmmm....  Because the top/back hole is slotted the hub assembly can wiggle in and out when the nuts are loose. There was no instruction on the proper installation technique, so I contacted D2 and they told me that this is to allow additional camber adjustment and that I should push the hub assembly in toward the center of the car and then torque the bolts. This is a nice touch because although there is an upper camber adjustment plate, this will allow for even more extreme camber if it is needed. I would like to see a cam bolt provided that would allow for a more secure fitment, but with the bolts properly torqued I shouldn't see any movement from this setup. @Calum chimed in to let me know this slotted hole is so that an alignment shop can accurately match the true alignment of the front wheels with the marks on the camber plate.  The adjustable swaybar endlinks are a nice touch, but there was no instruction on how to install them. Obviously you just bolt them in on each end like the old ones, but how long should you adjust the endlinks? I guessed with 7.5" front the center of each bolt. I figure as long as each side is equal and there is no mechanical contact between the swaybar itself and the suspension components then it shouldn't really matter what the endlink length is adjusted to. (oops, ended a sentence with a preposition. Bad grammar!) ...shouldn't really matter to what length to which the endlink is adjusted? @Calum noted that the adjustable endlinks are to prevent preloading the swaybar when you corner balance the car. Another nice touch is that the new endlinks come with Nylock 19mm nuts to replace the regular OEM 17mm nuts. In the photo above I accidentally installed the OEM nut, but I pull it back off in a sec.  Here is the new nut going onto the top of the endlink. Because the bearing in the endlink spins, you must use an Allen wrench in the end of the stud while applying a wrench to the nut. Unfortunately, this is very time consuming and there isn't enough room around the nut to use my Gearwrench ratcheting 19mm wrench, so...  ...an easier way is to use an Allen socket in an air ratchet set on reverse (loosen) This causes the non-rotating nut to quickly tighten onto the rotating stud and then you can give your final torque with the regular Allen wrench again.  The bottom nut seems harder because you can't see it, but it was actually easier.  The ratcheting wrench fit onto the nut this time so combined with the regular Allen wrench you could quickly tighten this combo together.  I installed the passenger side first, so the image of the camber plate earlier showed that the D2 logo was nicely aimed so that anyone standing along side of the car could see the branding. Unfortunately, the driver's side was a different story. It confused me at first, but when I realized that you can only install the camber plate in one obvious direction it caused the D2 logo to be upside down, readable only if you were standing on the engine. Oops, seems like a slight manufacturing glitch, but not one that will affect anything except your OCD twitching. Also, the included rustproofing gel should be applied to the exposed pillowball up here.  I finished up the installation by tightening the two lower spring perch collars at the point where they just make contact with the spring (no pretension, no slack) and the lower collar that secures the bottom of the strut from rotating, which is how you adjust the height of the coilover. It is important that you use a hammer and flat-tipped screwdriver to tighten the collars, not just the fancy little wrenches that are supplied. You don't want these coming loose and making noises! If you want to change the height of your car, you just have to loosen the lowest adjustment collar and then rotate the strut assembly and re-tighten the collar. So my initial settings for the front strut was 1.5" of lower threaded shaft exposure which lowered the car 1 3/4". For the rear struts I measured 8 5/8" from the bottom of the top plate to the top of the lower mounting component (or the bottom of the lower adjustment collar, same thing) for a lowering amount of 1 1/2". The lowering amounts mentioned here are after the springs settled for 24 hours. 
__________________
Last edited by DarrenDriven; 08-21-2012 at 12:32 AM. Reason: Added clone brand info |

|

|
|
08-02-2012, 01:40 PM
|
#2 |
|
NW Region Moderator
Join Date: Mar 2010
Drives: FR-S No More
Location: Portland OR
Posts: 5,156
Thanks: 1,134
Thanked 3,187 Times in 1,091 Posts
Mentioned: 300 Post(s)
Tagged: 4 Thread(s)
|
DOCUMENTATION
   [IMG]http://i.imgur.com/S***C.jpg[/IMG]  NOTE E says there is supposed to be a rubber component between the bottom of the spring and the perch, but there was none. I contacted D2 and they said it was a misprint. No rubber component is supposed to be there.       
__________________
Last edited by DarrenDriven; 08-03-2012 at 12:03 AM. |
|
|
|
| The Following User Says Thank You to DarrenDriven For This Useful Post: | Choco (01-21-2015) |
|
08-02-2012, 01:40 PM
|
#3 |
|
NW Region Moderator
Join Date: Mar 2010
Drives: FR-S No More
Location: Portland OR
Posts: 5,156
Thanks: 1,134
Thanked 3,187 Times in 1,091 Posts
Mentioned: 300 Post(s)
Tagged: 4 Thread(s)
|
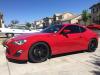
So how does the car look now? Here are some before and after shots.
 Non-lowered 4x4-mode with my 19x7.0 +30 Rota Torques installed  Non-lowered showing the wheel poke in the front, quite a bit  Lowered on D2 coilovers with about an inch of additional adjustment left if I want lower  Poke has been nearly eliminated by cambering the wheel to the maximum amount
__________________
Last edited by DarrenDriven; 08-02-2012 at 02:25 PM. |
|
|
|
| The Following 2 Users Say Thank You to DarrenDriven For This Useful Post: | Choco (01-21-2015), deucethemoose (08-02-2012) |
|
08-02-2012, 02:26 PM
|
#4 |
|
NW Region Moderator
Join Date: Mar 2010
Drives: FR-S No More
Location: Portland OR
Posts: 5,156
Thanks: 1,134
Thanked 3,187 Times in 1,091 Posts
Mentioned: 300 Post(s)
Tagged: 4 Thread(s)
|
EXPERIENCE AT ~50 MILES (August 3rd 2012):
Well, 50 miles is not a lot of seat time to get to know the personality of my new D2 coilovers, but it's long enough to report that nothing bad has happened yet. I've got the front end dropped pretty low and the rear not as low, so the issues that I am running into have more to do with the low front bumper and lower cross-member making contact with the ground than with anything else. It's nice to know that even though the car is nicely stanced, I still have another INCH that I could drop it on the front! I have the compression settings at full stiffness for now so I can feel the road -- and man can I feel it! The stiffer springs and tight compression have the car a little bouncy at the moment, but when I get a few more miles on the car I am going to adjust the compression to the softest setting so I can compare the two. I have no strange noises, no clunks, no rattles, no rubbing at all... overall I am very happy with the value that this product has provided and as long as there are no annoying hiccups (or catastrophic failures for that matter) I will consider this a successful modification. EXPERIENCE AT ~200 MILES (August 20th 2012): All is still well. With 7.4kg/mm rates at the front and 5.0kg/mm at the rear (vs 2.3kg/mm and 3.8kg/mm for the stock springs) you can definitely feel every nuance of the road for better or for worse. Combined with a 40-series front tire, I can tell you if I drove over a penny! This doesn't bother me and it was totally expected based on the specs of the coilover and my previous experience driving lowered cars. Because the car was so low I ran it with the adjustable compression settings at maximum stiffness in order to avoid bottoming the bumper (or lower cross-member) on speed bumps and potholes. I will run at maximum stiffness for another 100 miles or so until I get used to the feel and then move to maximum "softness" in order to feel the other extreme setting, before deciding where in the spectrum I would like to keep it for daily driving. Changing the compression rate is as easy as popping the hood and inserting one of the four included custom allen wrenches. I have been driving with the front end lowered 2 1/4" until I raised it 1/2" yesterday to avoid chewing up my bottom bumper on driveways. Raising the car was a simple affair. I removed the two front wheels, loosened the lowest locking collar and then used the included wrench to turn the entire spring/strut assembly. It took me about five minutes for each side and when I was done I could actually make it out of my driveway without leaving an Asphalt-colored stripe. EXPERIENCE AT ~1000 MILES (September 14th 2012): Still no issues or complaints. I adjusted the compression settings on the front pair to full softness for a trip from Portland OR to Lewiston ID and it's tough to say if there was much of a difference. The springs are very stiff, so the ride is fairly stiff simply because of that -- does the compression setting make much of a difference in a daily driving situation? I do notice that when I go over speed bumps I can barely make out the quiet wooshing sound of the shock oil squeezing through the adjustable orifice... but I really need to drive some back-to-back runs on a bumpy road while playing with the settings to see if much of a difference can be detected. The car sits great and although my maximum camber settings up front can't be doing great things for the performance, I think that my tire choice affected handling more than the suspension. Grippier tires keep the car stuck to the ground better around corners, but the release point of the contact patch is much more abrupt than when I had the car at stock height on stock tires. I think that the car is slightly less predictable as far as when it might let go, but getting to that point (and I try almost daily) has become much harder. Both the suspension and the tires combine to change the handling dynamics, but since I did both at about the same time it's hard to say which had a greater effect. I visual inspection of the coilovers shows them to still look brand new. There are no apparent defects or damage from 1000+ miles of driving. No strange noises, creaks, rattles or thumps. No leaking fluids or loose fittings. All appears well. EXPERIENCE AT ~8000 MILES (September 8th 2013): Well, I still haven't made the time to adjust the coilovers since originally setting the ride height at installation. Visually the coilovers still look virtually new and ride the same as when I installed them. No problems, no issues at all. EXPERIENCE AT ~10,000 MILES (January 2nd 2014): I FINALLY dropped the car even lower recently, which was an easy task because there was no corrosion or damage to the threads on the coilover body. Before attempting to adjust the collars, I soaked the threaded parts of the body down with WD40, wiped them with a rag and blew the threads clean with the air compressor -- just to insure that no foreign matter would have the chance to contaminate the threads. I had zero issues with adjustment and at this point the coilovers ride as well as they did when I first installed them.
__________________
Last edited by DarrenDriven; 01-02-2014 at 03:03 PM. |
|
|
|
| The Following 4 Users Say Thank You to DarrenDriven For This Useful Post: |
|
08-02-2012, 02:34 PM
|
#5 |
|
Senior Member

Join Date: Nov 2011
Drives: Legacy GT
Location: compton
Posts: 534
Thanks: 9
Thanked 368 Times in 206 Posts
Mentioned: 11 Post(s)
Tagged: 0 Thread(s)
|
Did you happen to measure the travel of each? the KWs are much longer and use helpers because they have more travel.
|
|
|
|
|
08-02-2012, 02:46 PM
|
#6 |
|
Functionally Retarded

Join Date: Jan 2012
Drives: LinkECU V6 MR2 - MKVII Golf R
Location: PNW
Posts: 709
Thanks: 81
Thanked 425 Times in 205 Posts
Mentioned: 6 Post(s)
Tagged: 0 Thread(s)
|
Nice write-up, but I don't think you need to unbolt the hub to make the adjustments. Simply back the collar off and twist the entire threaded sleeve/coil assembly left or right to the desired location and tighten the collar back up to the lower mount. This is how I adjust my coilovers.
__________________
1991 MR2 - T-tops - Crimson Red - 1MZ-FE 3.0L - Other Stuff
 I'm not really an asshole, but I play one on the internet. |
|
|
|
|
08-02-2012, 02:55 PM
|
#7 |
|
NW Region Moderator
Join Date: Mar 2010
Drives: FR-S No More
Location: Portland OR
Posts: 5,156
Thanks: 1,134
Thanked 3,187 Times in 1,091 Posts
Mentioned: 300 Post(s)
Tagged: 4 Thread(s)
|
jamal, I'm not sure how I would measure the full travel of each. Can you explain that a little better? Do you mean minimum and maximum lowering amounts? Those specs are in the Suspension Options List sticky in this forum area.
duecethemoose... DUH! Why didn't I think of that? Haha... I haven't changed the height yet so I didn't really puzzle it out. I will change my writeup to include that info.
__________________
|
|
|
|
|
08-02-2012, 03:00 PM
|
#8 |
|
Functionally Retarded
Join Date: Jan 2012
Drives: LinkECU V6 MR2 - MKVII Golf R
Location: PNW
Posts: 709
Thanks: 81
Thanked 425 Times in 205 Posts
Mentioned: 6 Post(s)
Tagged: 0 Thread(s)
|
Certainly beats trying to eyeball camber every time!
__________________
1991 MR2 - T-tops - Crimson Red - 1MZ-FE 3.0L - Other Stuff
I'm not really an asshole, but I play one on the internet. |
|
|
|
|
08-02-2012, 03:14 PM
|
#9 |
|
Join Date: Nov 2011
Drives: 2016 BRZ, 2012 Paris Di2 & 2018 STI
Location: Severn, MD
Posts: 5,520
Thanks: 3,542
Thanked 7,415 Times in 3,033 Posts
Mentioned: 311 Post(s)
Tagged: 9 Thread(s)
 |
Quick easy way to measure travel:
Measurement A - the amount the piston rod that can go into the strut body. Measurement B - center of hub to fender lip at your ride height with car on the ground. Measurement C - center of hub to fender lip with the car in the air (both wheels up in the air) total stroke = a droop travel = c - b bump travel = a - droop travel The rear is a little more complicated...you have to use the motion ratio since 1 inch of damper travel does not equal 1 inch of wheel travel. But I'm more interested in the front anyway right now. I suspect you'll find the KW's have a ton of travel, even though they are "only" single height adjustable.... - andrew |
|
|
|
| The Following 3 Users Say Thank You to Racecomp Engineering For This Useful Post: |
|
08-02-2012, 03:17 PM
|
#10 |
|
Senior Member
Join Date: Jul 2012
Drives: B9 S4/ND2
Location: Fullerton, CA
Posts: 522
Thanks: 190
Thanked 182 Times in 106 Posts
Mentioned: 21 Post(s)
Tagged: 0 Thread(s)
|
Man look at the stroke on that KW!
Also D2 is another BC/Fortune/Stance style coilover right? |
|
|
|
|
08-02-2012, 05:02 PM
|
#11 |
|
Has to poop

Join Date: Jul 2012
Drives: Queen size bed w/4WD
Location: Evansville, IN/ Metairie, LA
Posts: 7
Thanks: 0
Thanked 1 Time in 1 Post
Mentioned: 0 Post(s)
Tagged: 0 Thread(s)
 |
so on the last picture, you state that the poke is eliminated by setting the camber to the max amount, does that include the slotted hub assy being pushed back as far as it will go, or is the camber max'd out on just the camber plates?
also another q not related to this topic, did u paint ur h/l black?
__________________
Andy=20yo 99 Taco TRD 3.4 4x4 -"Terra"- trail rig95 F250 7.3 PSD 4x4-"Gertrude"- tow rig Soon- Asphalt/6MT |
|
|
|
|
08-02-2012, 05:15 PM
|
#12 |
|
Senior Member

Join Date: Jun 2012
Drives: 2013 Scion FR-S - Firestorm
Location: Central California
Posts: 405
Thanks: 472
Thanked 216 Times in 124 Posts
Mentioned: 56 Post(s)
Tagged: 1 Thread(s)
|
Interested in your review! looking forward to hearing more about your impressions compared to stock.
|
|
|
|
|
08-02-2012, 06:21 PM
|
#13 |
|
Vtec Jesus

Join Date: Jul 2012
Drives: 13 BRZ, 13 Golf R, 15 Audi S4
Location: LSD
Posts: 1,165
Thanks: 623
Thanked 243 Times in 153 Posts
Mentioned: 5 Post(s)
Tagged: 0 Thread(s)
|
in for review.
|
|
|
|
|
08-02-2012, 11:53 PM
|
#14 | |
|
NW Region Moderator
Join Date: Mar 2010
Drives: FR-S No More
Location: Portland OR
Posts: 5,156
Thanks: 1,134
Thanked 3,187 Times in 1,091 Posts
Mentioned: 300 Post(s)
Tagged: 4 Thread(s)
|
I think I would have to pull the coilover back off to properly measure the stroke. If/when I pull it off I will take that measurement.
Quote:
Yes, I painted my headlights black. Follow the DIY link in my signature to read more about it.
__________________
|
|
|
|
|
|
|
|
|
|
|
 Similar Threads
|
||||
| Thread | Thread Starter | Forum | Replies | Last Post |
| DG-5 Coilover | harajukukei | Suspension | Chassis | Brakes -- Sponsored by 949 Racing | 17 | 06-27-2014 03:42 PM |
| Coilover suspension | oxygen | Suspension | Chassis | Brakes -- Sponsored by 949 Racing | 1 | 07-27-2012 04:04 PM |
| NW Coilover Shootout | DarrenDriven | Northwest | 14 | 07-24-2012 02:12 AM |
| KSport Kontrol Pro for FR-S/BRZ *PRE-ORDER* from Jordan Innovations! | Jordan Innovations | Brakes, Suspension, Chassis | 4 | 07-11-2012 06:43 PM |
| KSport Kontrol Pro!!- Deft Motion | StarsGarrador | Brakes, Suspension, Chassis | 0 | 07-06-2012 06:42 PM |


 Fiona
Fiona
