


|
||||||
| Electronics | Audio | NAV | Infotainment Anything related to in-car electronics, navigation, and infotainment. |
 |
|
|
Thread Tools | Search this Thread |
 11-18-2012, 07:15 PM
|
#1 |

Join Date: Jul 2012
Drives: 2013 BRZ, 2020 KTM Super Duke 1290R
Location: Denver
Posts: 1,788
Thanks: 714
Thanked 1,141 Times in 624 Posts
Mentioned: 49 Post(s)
|
SQ Audio Build w/ Custom 8" Enclosures (Updated 12/12)
Here's my Audio build. Simple and clean. Always in progress. Next I plan to add more sound deadening to the doors. I prefer Second Skin for acoustic damping, great quality stuff. Sub enclosure build thread is here.
Head Unit: Pioneer DEH-80PRS Fantastic head unit, replaced my older Alpine CDA-9887. I considered the DEH-99PRS, but the 80PRS is very close SQ wise, and the 99PRS lacked a few features I wanted. Anyways, the 80PRS has some critical features for any audio build focusing on sound quality. First and foremost, it has a 3-way active "network" mode and three separate Burr Brown DACs, one for each pair of stereo channels. It also has great DSP that performs auto time alignment and equalization with an included microphone placed on the headrest. We all know cars are terrible acoustic environments, so these features sort of level the playing field. What may be a perfectly flat signal from the head unit suddenly sounds terrible when reproduced within the car's cabin. The Auto EQ generates a baseline EQ that creates a flat EQ curve to what you actually hear. You can still customize the sound by using two custom user EQ's, they can add seasoning to adjust the taste of the baseline EQ. The time alignment works exceptionally well. Instead of taking physical measurements or trying to fine tune by ear like I had to do with the 9887, the auto TA measures the time from when the signal is generated in the head unit to when the mic actually hears it. This means it calculates for electronic and DSP delays, acoustics and reflections, etc. For example, it calculated the subs to be 160" (over 13 feet!) away, in reality they're maybe 60" from my ears. The result is that everything sounds clear and focused directly in front of me, and the subs sound like they're mounted to the dash as well. They simply cannot be audibly located behind you in the trunk, which is where they actually are. The front panel feels a little cheap, and I wish the screen had better contrast, but it's what's behind the facade that really counts. 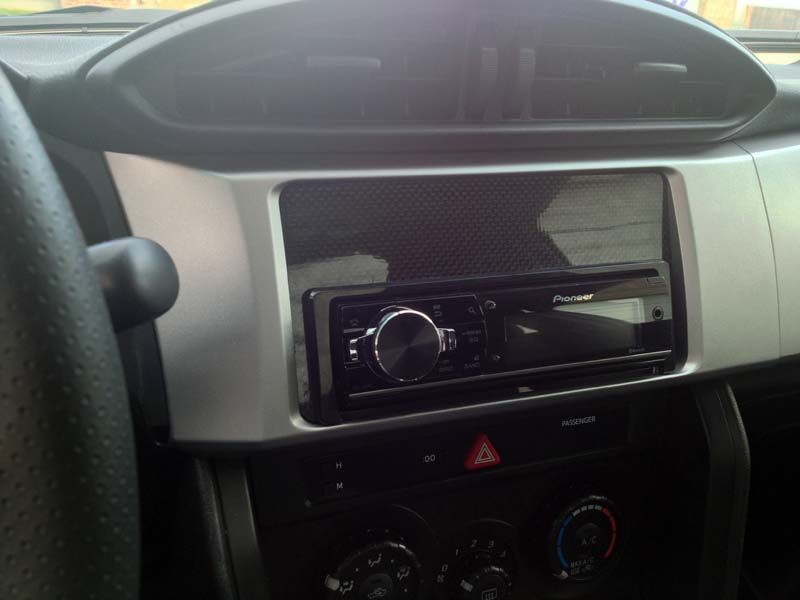 Main drivers: Pioneer Premier TS-C720PRS Man I love these little guys; such rich, warm, beautifully articulate sound comes from them. They can produce remarkable powerful bass, but the 80PRS's auto EQ thinks otherwise, which is fine. The mid driver is cut at 125Hz and 2KHz, tweeter at 4KHz. Tweeters have been mounted with custom brackets to the dash location. I wanted to do pods for the tweeters but didn't have the time or energy to fabricate anything else, and I wanted to see what the auto EQ/TA could do with them in this location. The result was impressive! The mid drivers are mounted using @phenryiv1 PVC spacers. The doors only have about 3-4 ft² of Second Skin's Damplifier, and an additional patch of Overkill Pro behind the speaker to kill reflections from the door skin. When I have some additional time, I want to go back into the doors and add some more material. I killed about 90% of the noise so far, but a dead door is a good door... 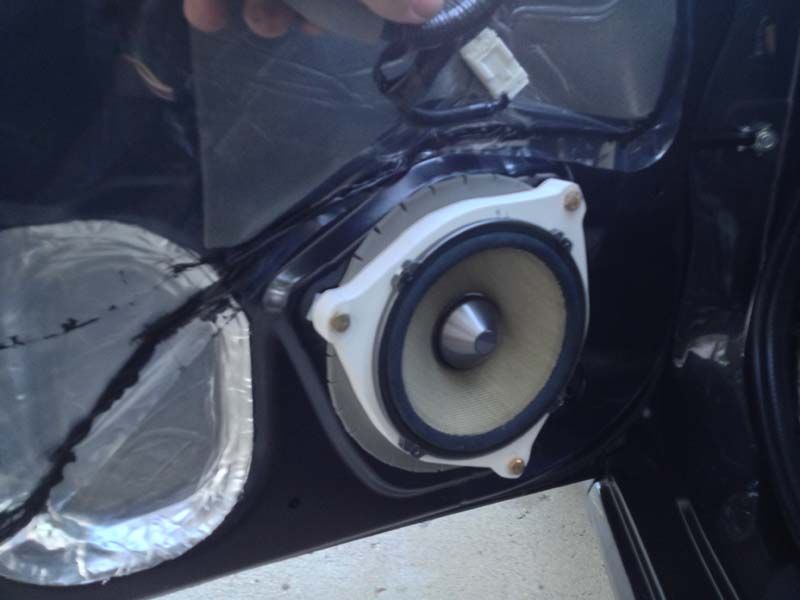  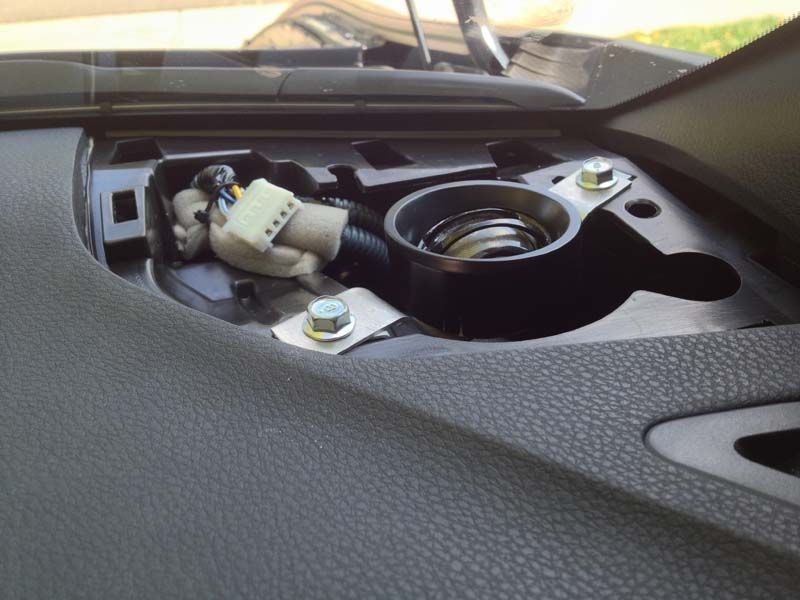 Amplifiers: Alpine PDX 4.100 and PDX 1.600 These little guys rock! They're incredibly efficient (I believe close to 90%), which means they don't generate much heat at all and they don't strain the electrical system. I have plans to replace both with a single Alpine PDX-V9 for space savings, a lot of capability, and much improved sound quality and much better signal to noise ratio. Most of the features built into the amp are disabled since all the DSP is done through the head unit, so they operate as straight amps. I have them mounted to a small shelf underneath the rear deck lid. I wanted them accessible but still out of the way. The back of the shelf is hinged so they swing down for accessibility. The wiring isn't tidy enough for me, but it's temporary so whatever. Once the PDX-V9 goes in, everything will be cleaned up. 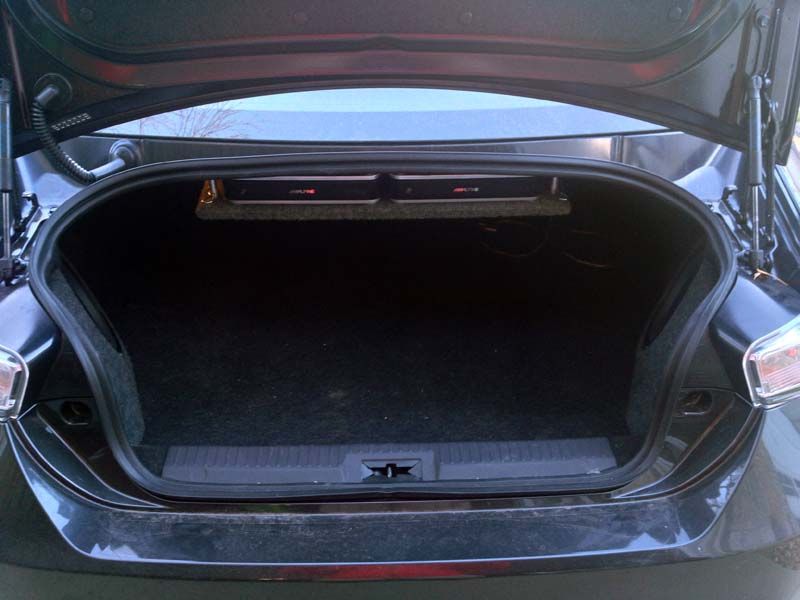 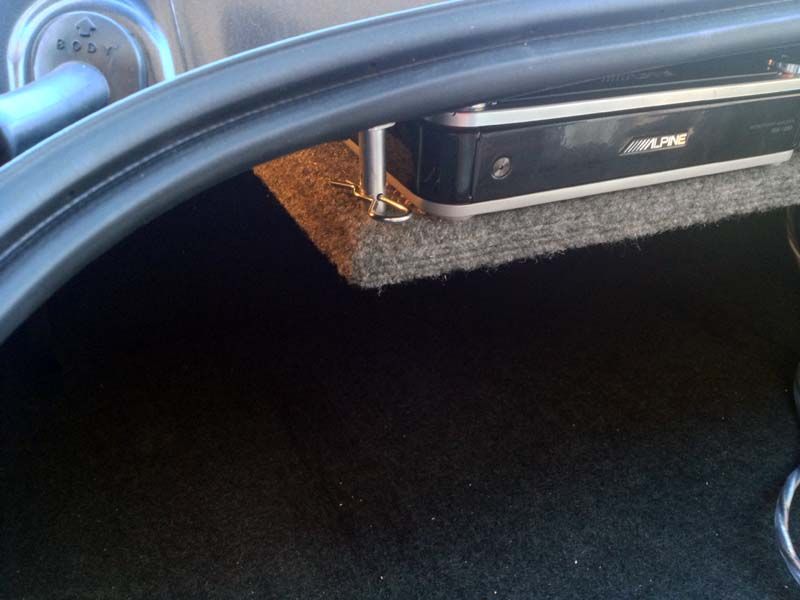 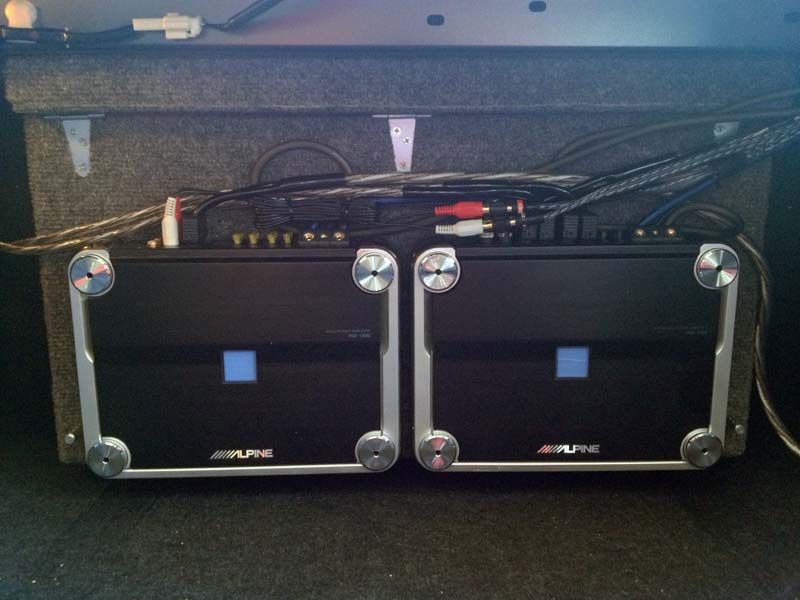 Subs: JL 8W3V3-4 Wow, wow, wow. I JUST finished fabricating two matching custom fiberglass enclosures today (approximately 0.35 cubic ft) and fired them up after reinitializing the auto EQ/TA. (I conveniently forgot just how much of a PITA it is to make these things...) I was worried the 8's wouldn't get very low and would lack the punch my original JL 10W3-D4's had since they're only 60% the surface area, but they sound even better! Clean, accurate, tight, rich bass. MMMmmm.. And they're not even broken in yet. They are cut at 80Hz and wired parallel at 2Ω. I originally was going to purchase an enclosure from The Speakerbox, but decided I wanted two matching enclosures, so off I went. I'm very happy with the results, and ecstatic with how they sound! (FYI for anyone looking to do this, it's quite a commitment to time and materials). I pulled the interior panels out of the car which made it much easier, but it's still a huge PITA timesink. 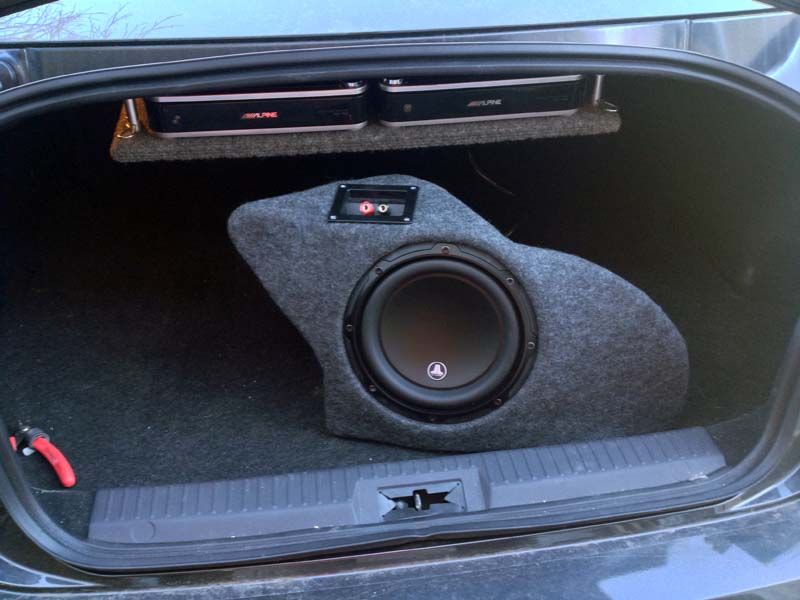 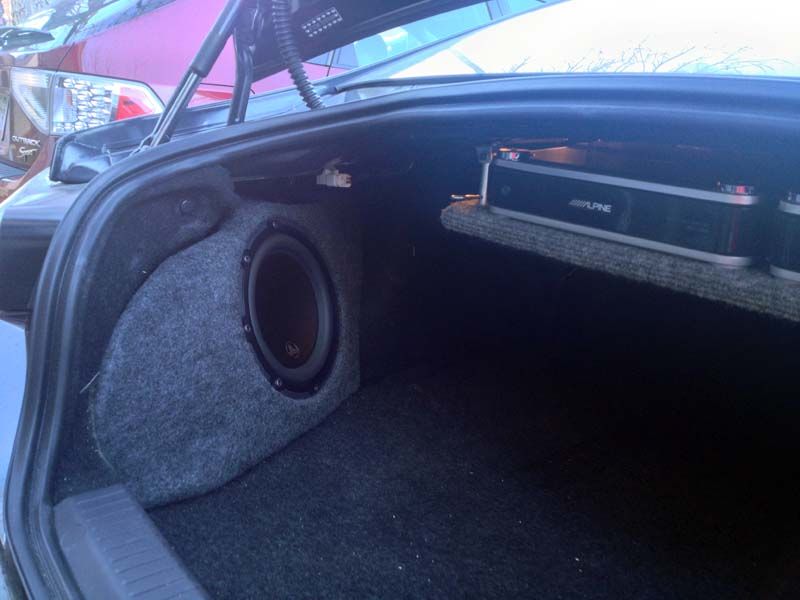 So there you have it. I'm gonna go for a drive now...  Follow up December 2012: I finally finished the amp rack revision and upgraded to the single PDX V9. I must say I'm happy with the results, both for the amp rack itself and the improvement in sound quality. The V9 has much better SN ratio and lower THD overall, enough to be audible. Anyways, here's some more pics of the amp rack v2.0: Final design and installation. 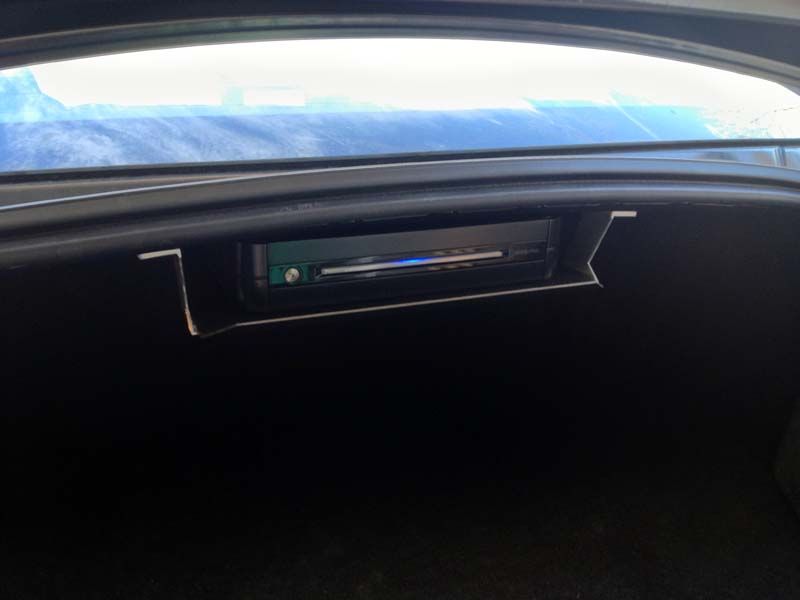 Here's the hinge riveted to the underside of the deck lid.  The amp rack itself is made from carbon fiber and aluminum, and then sprayed with a urethane to provide some protection. Everything was made from leftovers and scrap material from work. I cut the aluminum struts and hand shaped them with a band saw and hand files, and they were bonded to the carbon using the same aerospace adhesive used for the head unit trim ring. The carbon was laid up on an aluminum sheet bent to form the front and back lips.  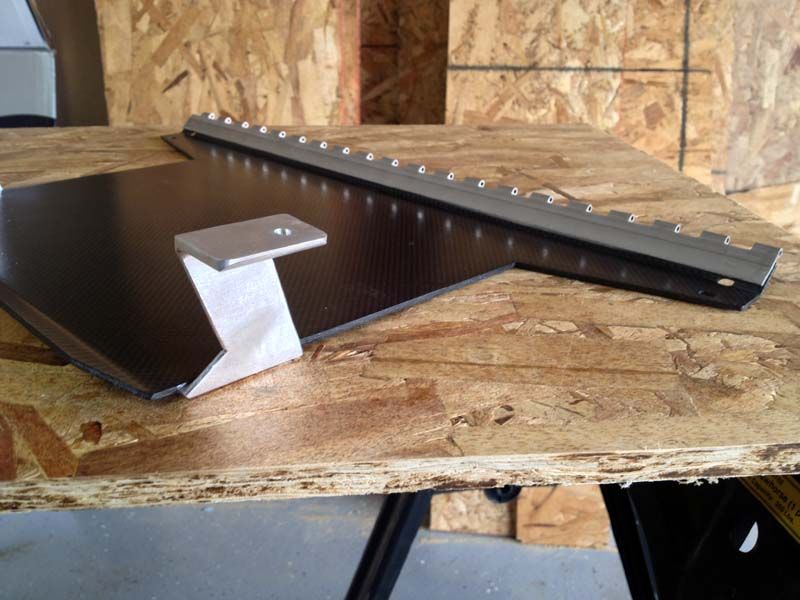 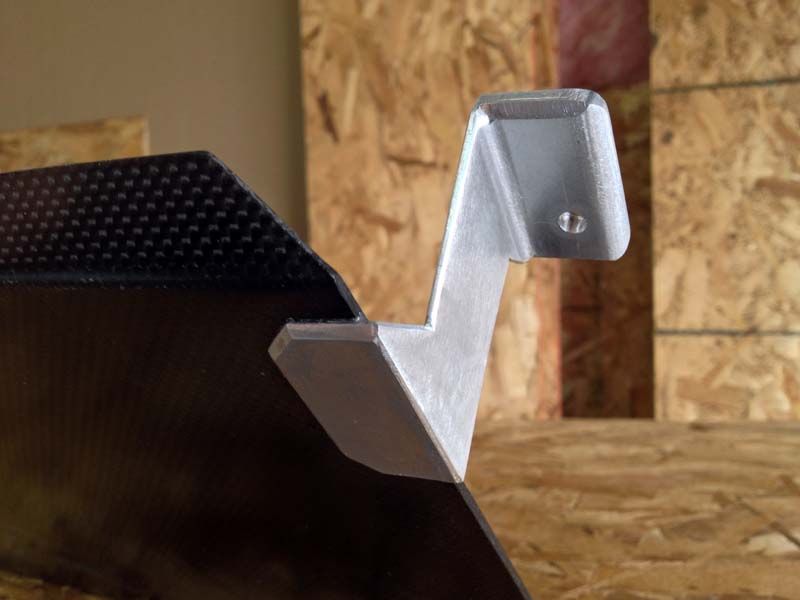 Notice the aluminum struts have been tweaked outward so the upside down "foot" rests square against the underside of the deck lid. 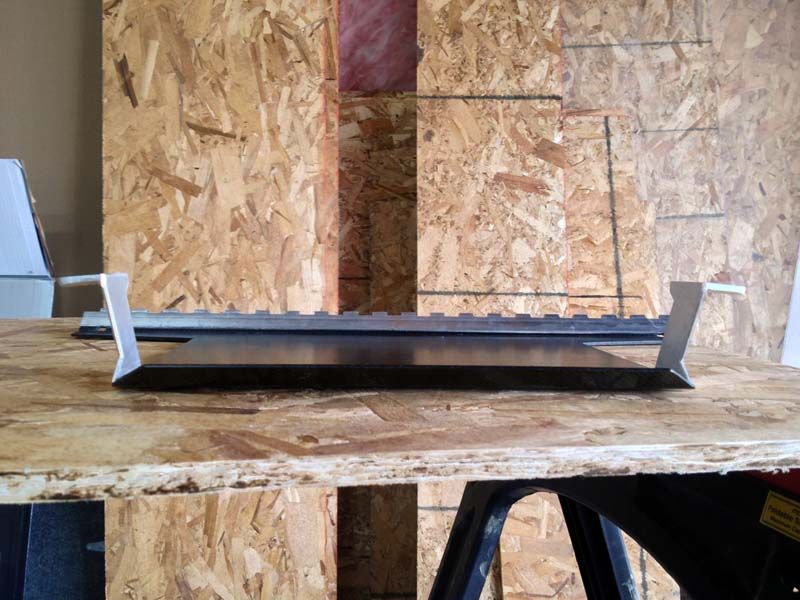 Here's the hardware used to attach the struts to the deck lid, stainless steel 10-24? hardware. I wanted metric, but couldn't find a metric thread setter anywhere, so I resorted to using SAE. 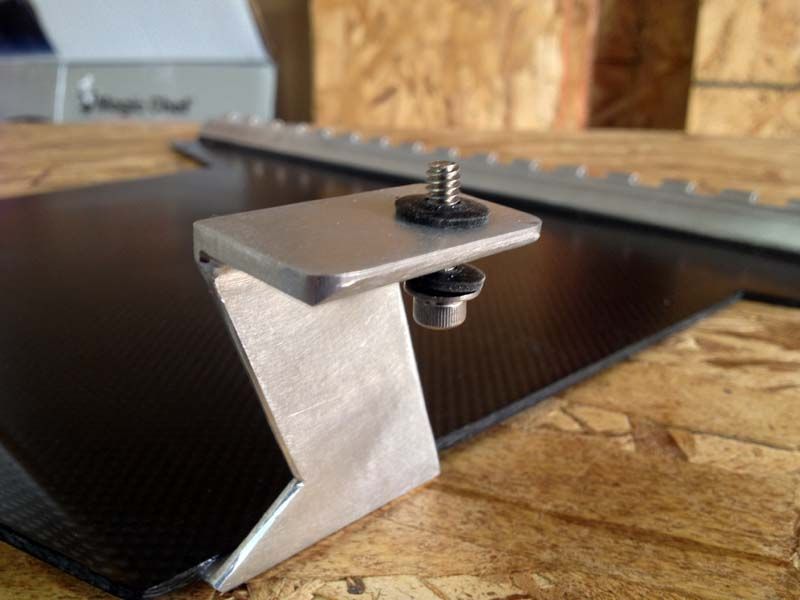 Here's the threaded rivet installed in the deck lid. It was located after installing the rack to the hinge, and swinging it into place to locate the holes for the rivet. 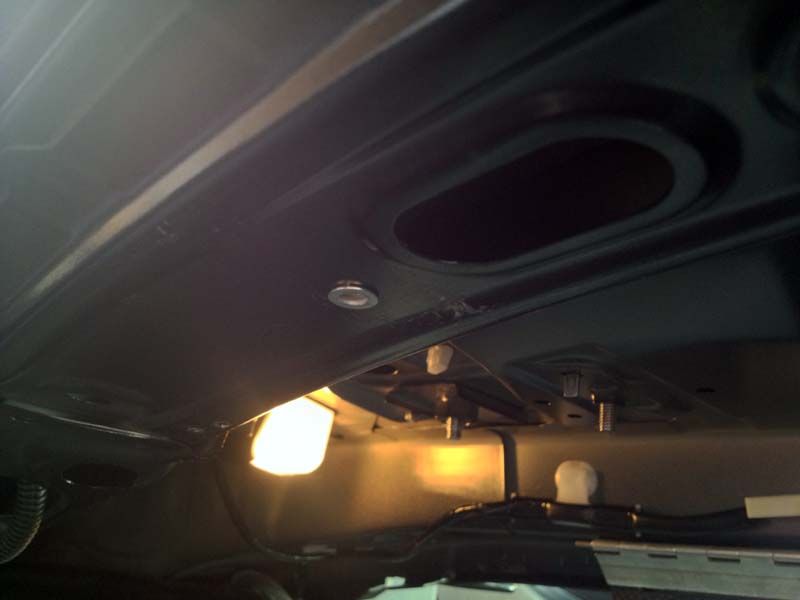 Here's the amp installed with some "servo tape" from the local RC hobby shop. It's a tenacious double-sided thin foam tape, didn't want to bother with drilling or installing hardware, thin tape seemed the best idea for now; vibration damping, thin, etc. Plenty secure to allow the assembly to swing down for accessibility.  Swung up and secured. It turned out to be an extremely rigid shelf, I expected a bit more flex but wow, when it's bolted into place, it's firm! 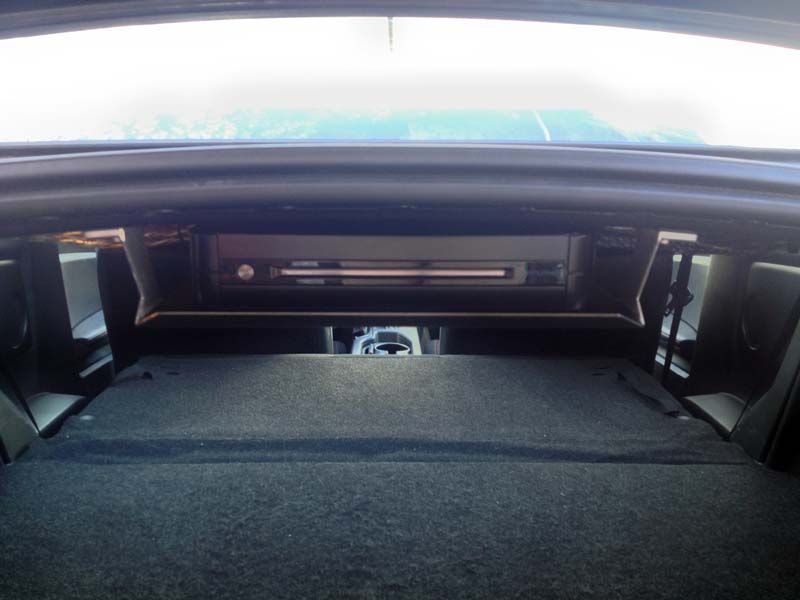 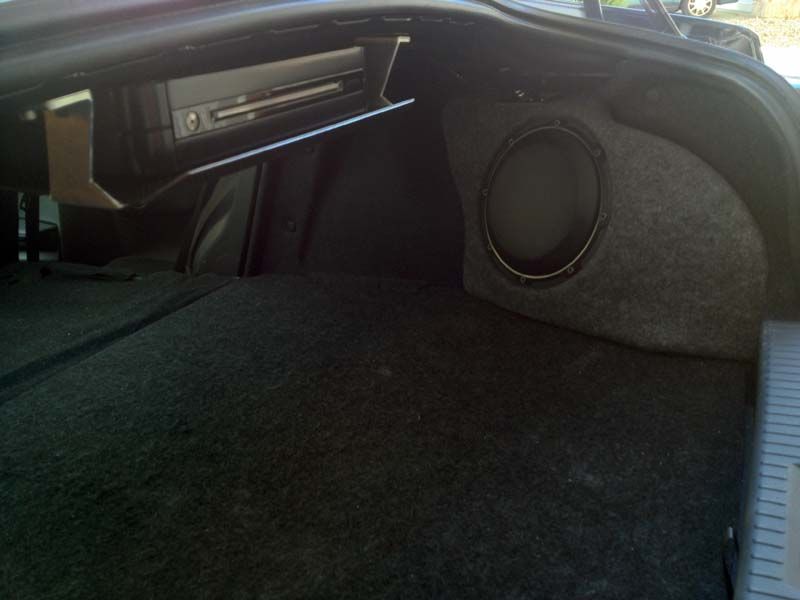 and a view from the underside. It doesn't protrude any lower than the front edge of the deck lid, so it doesn't impede trunk space much at all. 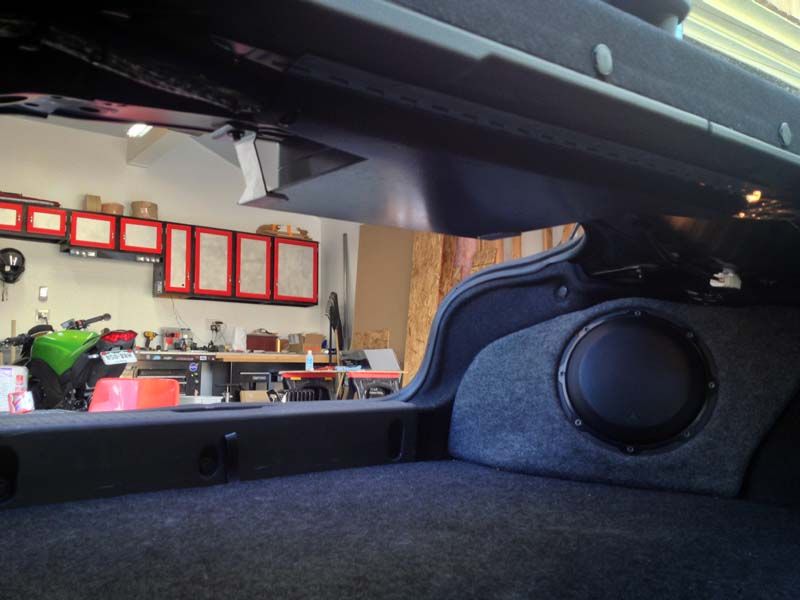
Last edited by wheelhaus; 12-24-2012 at 07:38 PM. Reason: updated content. |

|

|
| The Following 12 Users Say Thank You to wheelhaus For This Useful Post: | Andreas83 (04-16-2015), Calum (11-18-2012), civicdrivr (05-28-2015), DAEMANO (04-17-2015), driftking96 (05-06-2016), jazztennor (12-29-2012), MaXimus (12-29-2012), nix (12-27-2012), PatrickSAN (01-08-2013), Revmatch (11-20-2012), S2kphile (11-18-2012), Xeerohour (07-08-2013) |
|
11-18-2012, 08:45 PM
|
#2 |
|
First 86 Driver Baby!

Join Date: Jan 2012
Drives: FR-S, Flex
Location: Williamsburg, VA
Posts: 1,760
Thanks: 520
Thanked 525 Times in 356 Posts
Mentioned: 32 Post(s)
|
Looks great! I can't wait to do my install!
|
|
|
|
| The Following User Says Thank You to kmbkk For This Useful Post: | wheelhaus (04-03-2013) |
|
11-18-2012, 08:50 PM
|
#3 |
|
Resident HoneyBadger

Join Date: Nov 2011
Drives: Toyota Tacoma TRD Off-Road
Location: The City
Posts: 1,345
Thanks: 678
Thanked 680 Times in 339 Posts
Mentioned: 2 Post(s)
|
Smart idea with the amp location. I love it

__________________
 Walk like a King, Be like a Sir, Swag it out like a Boss |
|
|
|
| The Following User Says Thank You to S2kphile For This Useful Post: | wheelhaus (04-03-2013) |
|
11-18-2012, 09:13 PM
|
#4 | |
|
Join Date: Jul 2012
Drives: 2013 BRZ, 2020 KTM Super Duke 1290R
Location: Denver
Posts: 1,788
Thanks: 714
Thanked 1,141 Times in 624 Posts
Mentioned: 49 Post(s)
|
Quote:
|
|
|
|
|
|
11-18-2012, 09:17 PM
|
#5 |
|
That Guy
Join Date: Dec 2011
Drives: 2013 asphalt FRS MT
Location: Halifax, Nova Scotia
Posts: 4,865
Thanks: 5,058
Thanked 2,868 Times in 1,499 Posts
Mentioned: 82 Post(s)
|
Very nice install. I'm loving most of your product choices to. I've been considering going to the 80 from the 9887 but I keep thinking the 9887 is works fine. You may have swayed my decision a little farther.
|
|
|
|
| The Following User Says Thank You to Calum For This Useful Post: | wheelhaus (04-03-2013) |
|
11-18-2012, 09:51 PM
|
#6 |
|
Senior Member

Join Date: Aug 2012
Drives: Toyota GT86, 66 beetle, 11 GSXR 750
Location: Las Vegas, NV.
Posts: 1,382
Thanks: 575
Thanked 836 Times in 436 Posts
Mentioned: 32 Post(s)
|
I like everything but the head unit.. Of course I don't know much about this stuff anymore.. I'd just prefer the double din.. Nav system and all.. Anyways.. Love the subs and enclosure.. Something I'd like to do..
|
|
|
|
| The Following User Says Thank You to Gixxersixxerman For This Useful Post: | wheelhaus (04-03-2013) |
|
11-18-2012, 10:23 PM
|
#7 |
|
Senior Member

Join Date: Jun 2012
Drives: '13 White FR-S, 09 Triumph St.3 R
Location: Eugene, OR
Posts: 812
Thanks: 30
Thanked 135 Times in 106 Posts
Mentioned: 8 Post(s)
|
The sub enclosures are awesome! I want a pair!
|
|
|
|
| The Following User Says Thank You to Cade01 For This Useful Post: | nix (12-27-2012) |
|
11-18-2012, 10:31 PM
|
#8 | |
|
Join Date: Jul 2012
Drives: 2013 BRZ, 2020 KTM Super Duke 1290R
Location: Denver
Posts: 1,788
Thanks: 714
Thanked 1,141 Times in 624 Posts
Mentioned: 49 Post(s)
|
Quote:
|
|
|
|
|
| The Following User Says Thank You to wheelhaus For This Useful Post: | Calum (11-19-2012) |
|
11-19-2012, 05:41 AM
|
#9 | |
|
That Guy
Join Date: Dec 2011
Drives: 2013 asphalt FRS MT
Location: Halifax, Nova Scotia
Posts: 4,865
Thanks: 5,058
Thanked 2,868 Times in 1,499 Posts
Mentioned: 82 Post(s)
|
Quote:
|
|
|
|
|
|
11-19-2012, 11:33 AM
|
#10 |
|
Member
Join Date: Sep 2012
Drives: no car :(
Location: Fountain CO
Posts: 85
Thanks: 3
Thanked 14 Times in 13 Posts
Mentioned: 1 Post(s)
|
how is the amp rack actually attached to the car? i see the hinges and all which is cool, but how are they attached to the car and also the disconnect part also? im looking for a place to install my amp and love this solution but dont want any visible screws on the rear deck or anywhere else
|
|
|
|
|
11-19-2012, 01:43 PM
|
#11 |
|
Member
Join Date: Nov 2012
Drives: 2013 FR-S
Location: Baltimore-DC Metro Sprawl
Posts: 59
Thanks: 5
Thanked 6 Times in 5 Posts
Mentioned: 0 Post(s)
|
Do the sub boxes make it impossible to get to your spare while they're in? How easy is it to pop them out and get at the spare?
|
|
|
|
|
11-19-2012, 02:13 PM
|
#12 |
|
Undisputed El Presidente

Join Date: Jun 2012
Drives: Zenki 37J ZN6
Location: Stockton, CA
Posts: 11,594
Thanks: 9,405
Thanked 9,411 Times in 5,270 Posts
Mentioned: 374 Post(s)
|
Mind giving a rough cost of the materials to make the box?
__________________
 "Just like how a strut bar somehow enables you to corner 20MPH faster around a cloverleaf on-ramp, when the reality is, you can do it already but you just don't have to balls to do it." - CSG David |
|
|
|
|
11-19-2012, 10:41 PM
|
#13 | ||
|
Join Date: Jul 2012
Drives: 2013 BRZ, 2020 KTM Super Duke 1290R
Location: Denver
Posts: 1,788
Thanks: 714
Thanked 1,141 Times in 624 Posts
Mentioned: 49 Post(s)
|
Quote:
Quote:
Fiberglass- Around $20-100 (estimated) I used some leftovers from work, but it's not terribly expensive. Check out Fiberglass Supply or US Composites for prices. It's cheap so you can order a bunch to ensure you don't run out. I think I used about 4 yards total for each enclosure, including scraps and trimmings, but this was with MDF panels for the bottom... Each yard would net about 3 layers if cut into 4x7" strips. Strips allowed me to maximize material economy. Chopped mat is super cheap and good general fill, but it's difficult to work with around tight curves. HD sells this for about $6 per yard, online it's $1-2/yd. This stuff is your best bet for cheapness, but it really only works in the inner shell. You'll want fabric for the outer part of the shell, its easier to work with and typically form around curves much better (unless the weave is too tight and unyielding) and are usually around $3-10/yard. Fabrics are better for adding structural rigidity. We use use 7500 plain weave (about 10oz per sq yd) at work for all kinds of stuff, and it's easy to work with, nice and flexible but still decent thickness. I believe it would take about 7-10 layers, ideally you want something thick and heavy, so it builds up quickly. The 40oz fabric on the USC site would do it in probably 3 layers... for an 8" sub, 3/16" thickness is plenty unless you're going for massive SPL, then 1/4" thick or more would be necessary, even more if you're going bigger. One great benefit from the design of these enclosures, is there's a lot of curves areas and minimal large flat areas, so the curves and complex shapes add a LOT of rigidity so they didn't need to be super thick, about 3/16 is all that was necessary because they're so small. Resin- $70 ($35/gal) I bought two gallons from Home Depot of their 3M general purpose polyester resin. It's a rectangular metal jug. I Mixed about 8 oz at a time, after about 15 minutes it would kick off and become unusable. Cloth- $15 local fabric stores sell by the yard, about $6-7/yd, but the reams are 2 yards wide. I used t-shirt fabric and felt. Misc expendables- $25-50 Buckets, gloves, mix sticks, brushes- If you mix 8oz at a time like I did, you'll burn through a lot of these. I was lucky to be able to snag some from work. I used cheapo 2" brushes. Cut the bristles in half so they're stiffer and make for easier stippling. If you mix larger quantities, you'd better move FAST to use it all before it kicks! Find somewhere to buy this stuff in bulk! Other stuff- $10-50 Mold release agent (I use SC Johnson Paste Wax) painter's tape, trash bags, iso alcohol, good shears (I use Wiss), hardware, hot glue gun, etc all vary cost, some have this stuff laying around. Rings- $25 I found mine on ebay, seller "avpriority". He machines them from a single block of 1" MDF, and his specs are spot on. |
||
|
|
|
| The Following User Says Thank You to wheelhaus For This Useful Post: | finch1750 (11-19-2012) |
|
11-19-2012, 10:52 PM
|
#14 | |
|
Join Date: Jul 2012
Drives: 2013 BRZ, 2020 KTM Super Duke 1290R
Location: Denver
Posts: 1,788
Thanks: 714
Thanked 1,141 Times in 624 Posts
Mentioned: 49 Post(s)
|
Quote:
|
|
|
|
|
|
|
|
|
|
|
 Similar Threads
|
||||
| Thread | Thread Starter | Forum | Replies | Last Post |
| FR-S Audio Build - SQ (Illusion Audio/Mosconi) | DekaMori | Electronics | Audio | NAV | Infotainment | 28 | 04-17-2013 04:34 AM |
| Custom audio in the FRS | Kwise1 | Scion FR-S / Toyota 86 GT86 General Forum | 1 | 11-12-2012 06:27 AM |
| Custom Start-Up Sound/Audio? | joergasm | Electronics | Audio | NAV | Infotainment | 1 | 10-25-2012 03:54 PM |
| Custom Audio Shop | LPC_FRS | Mid-Atlantic | 0 | 09-17-2012 07:42 PM |
| Custom Audio Shop | LPC_FRS | Mid-Atlantic | 0 | 09-17-2012 06:11 PM |


