


|
||||||
| Member's Car Journals Car journals by our members. |
 |
|
|
Thread Tools | Search this Thread |
 09-27-2025, 12:01 AM
|
#141 |
|
Senior Member
Join Date: Jan 2017
Drives: 2020 BRZ Sport Tech RS
Location: Canada
Posts: 446
Thanks: 527
Thanked 354 Times in 193 Posts
Mentioned: 3 Post(s)
Tagged: 0 Thread(s)
|
Fixing Bumper Sag / Gap / Alignment with the MAC Lifter Kit
My next project today was to try the MAC Lifter Kit for fixing the bumper sag / gap / alignment issues. For context, I broke one of the loops (the one nearest the headlight) on the bumper side of the driver's side after hitting a driveway ramp a little too quick and smacking the bottom of the bumper on it.
Replacing the clips didn't help, and the regular metal repair plates from Etsy improved things a bit, but it still didn't fit quite right. Then I stumbled upon the MAC Lifter Kit. The parts arrived from Australia just in time for this weekend, so I thought I'd give them a go. Since I already had the other repair plate installed on the bumper, I decided to just stick with that and only use the body side bracket from the MAC Lifter Kit. While looking up the instructions for installing the kit, I came across this video, where the guy pretty much fixed the bumper gap by using a bolt and nut in place of the push pin at the top of the side marker bracket. I wish I'd seen this video before spending hundreds of dollars having two different repair kits shipped from Australia! Anyway - here's a link to the video: So before installing the MAC Lifter Kit, I decided to just give this a try to see how it did. I removed the stock bumper bracket before doing this, and with just the bolt holding things in place, it actually looked OK:   That said, while the vertical gap was nice and tight, the bumper cover still didn't quite align flush with the fender. So, on to the MAC Lifter Kit! The product page said that trimming of the headlight bracket would be needed for install, which I wasn't really keen on doing. Besides which, with the repair plate in place, that front loop was seating properly below the headlight / above the headlight bracket. Instead, I decided to cut the MAC Lifter Kit bracket short so that it would fit without cutting the headlight bracket:  That allowed it to fit just behind the headlight bracket when installed. I lined it up so that the smooth top edge of the lifter bracket was in line with the top of the headlight bracket, and maintained a consistent gap along the length of the bracket:   That got the bumper cover nice and flush with the fender line. I then installed the serrated flange bolt and nut (one of the stainless-steel M6x1.0 x 16mm sets that came with the MAC Lifter Kit - since I'm only installing the driver's side right now, I used one of the leftover sets) in place of the push pin at the top of the marker light bracket to secure things even more for a little extra insurance, and the fitment is PERFECT!!!   Since I had the side marker light out, I decided to finally get around to upgrading the side marker bulbs to LED's as well (they were the only bulbs not already switched over). I'm going to keep the other MAC Lifter Kit pieces and previous repair plate for the passenger side for when I eventually need to fix that as well (right now it looks fine). While my install wasn't typical / as recommended by the instructions, I'm happy to not have had to cut the headlight bracket for fitment. If you're looking to fix your bumper sag, gap or misalignment, I'd highly recommend the MAC Lifter Kit AND the trick of replacing the push pin at the top of the side marker light bracket with a bolt and nut. Overall, I'd say this was a big win!
__________________
|

|

|
| The Following 3 Users Say Thank You to Tatsu333 For This Useful Post: |
|
09-27-2025, 06:03 PM
|
#142 |
|
Senior Member
Join Date: Jan 2017
Drives: 2020 BRZ Sport Tech RS
Location: Canada
Posts: 446
Thanks: 527
Thanked 354 Times in 193 Posts
Mentioned: 3 Post(s)
Tagged: 0 Thread(s)
|
Sound Tube Delete
I've had the cabin side of the sound tube blocked off with a 3/4" PEX plug since a week or two into owning the car, but just never bothered to remove the tubing, etc. in the engine bay. I figured while I'm waiting for paint to dry (literally) on my other project, might as well get 'er done!
I used the low cost DIY route, buying a 1-1/2" flexible pipe cap from Home Depot (for about $6 CAD including tax). It fit like a glove over the port on the intake tube.   
__________________
|
|
|
|
| The Following User Says Thank You to Tatsu333 For This Useful Post: | Stonehorsw (10-14-2025) |
|
10-01-2025, 12:55 PM
|
#143 |
|
Senior Member
Join Date: Jan 2017
Drives: 2020 BRZ Sport Tech RS
Location: Canada
Posts: 446
Thanks: 527
Thanked 354 Times in 193 Posts
Mentioned: 3 Post(s)
Tagged: 0 Thread(s)
|
Using ChatGPT to analyze ECUTek logs
OK - with most of the little annoyances with my car sorted out and ZERO budget until I sell the ACE headers and other bits and pieces, I've started delving into self-tuning on ECUTek again. Available technologies have come a LONG way in the couple of years since I last dabbled on this side of things, most notably the availability of AI tools like ChatGPT, so I'm going to leverage them to hopefully make this easier.
I'm working on building out some project instruction files and prompts to make use of ChatGPT in analyzing my ECUTek logs and making tuning suggestions based on what is found in them. This was one of the most time-consuming parts of my previous self-tuning efforts, and while it's not instantaneous feedback by any stretch of the imagination, it's a LOT better than manually going through a 40 minute long, 53,000 line log file! One big caveat here - ChatGPT WILL make mistakes and / or make stuff up if you don't constrain it with some very specific instructions or prompting. For example, on one initial pass on MAF Scaling before building out the instructions, it was telling me to increase the g/s values for a section of the MAF Scaling table where LTFT's showed the ECU was consistently pulling fuel (which would indicate that the feedback from the O2 sensors was saying LESS air was coming in for a given MAF voltage than expected). So what was really needed was a LOWER g/s value (so that airflow was being correctly reported), not higher. A VERY basic logic error that you'd think a "smart" AI wouldn't make, but it did. So - short version: AI tools like ChatGPT have the potential to save a lot of grunt work when it comes to data analysis without purpose-built software, but don't trust them to necessarily provide you with the right answer. You need to build in some checks and balances with your instructions / prompting, AND spot check things to make sure it's on the right track! Once I have things built out and tested, I'll be happy to share the project files for other people to try. EDIT #1: And of course, now that I've decided to go this route, my laptop decides to die...  Looks like one of the hard drives failed. Trying to repair it now, otherwise I have to spend money I don't have to get a new laptop. To be fair, I guess, it IS eight years old. Just annoying, and not in the budget at the moment. Looks like one of the hard drives failed. Trying to repair it now, otherwise I have to spend money I don't have to get a new laptop. To be fair, I guess, it IS eight years old. Just annoying, and not in the budget at the moment.EDIT #2: After many hours of fighting with it to try and get my laptop back up and working, I decided to just bite the bullet and picked up a new (to me) laptop instead. Now getting that set up, and then I'll be back on my way with self-tuning... 
__________________
Last edited by Tatsu333; 10-02-2025 at 05:28 PM. |
|
|
|
|
10-09-2025, 01:41 PM
|
#144 |
|
Senior Member
Join Date: Jan 2017
Drives: 2020 BRZ Sport Tech RS
Location: Canada
Posts: 446
Thanks: 527
Thanked 354 Times in 193 Posts
Mentioned: 3 Post(s)
Tagged: 0 Thread(s)
|
EcuTek / ChatGPT self-tuning project progress
I'm making really good progress with building out the instructions, etc. for ChatGPT to assist with self-tuning using EcuTek. So far I've dialed in the process for tackling MAF Scaling and instructions for evaluating performance improvements based on before / after logs.
I've also got some preliminary work done on the process for adjusting cam timing for NA mods like headers, BPB's, etc. based on before / after logged data. I'll be testing out the cam timing changes the next time I have free time on a good weather day to do back-to-back WOT pulls. Once that's done, I'll move on to dialing in ignition timing next.
__________________
|
|
|
|
|
11-18-2025, 12:03 PM
|
#145 |
|
Senior Member
Join Date: Jan 2017
Drives: 2020 BRZ Sport Tech RS
Location: Canada
Posts: 446
Thanks: 527
Thanked 354 Times in 193 Posts
Mentioned: 3 Post(s)
Tagged: 0 Thread(s)
|
Between this reported failure and my experience with corrosion of the brackets despite very low mileage, I've gotten really nervous about the durability of my MCA Traction Mod V1. So, I've decided to replace it with something else.
In searching around this morning, I came across this option that I had never seen before: https://www.justengineering.ca/shop/...traction-arms/ With it using a similar configuration to the MCA's but with what looks to be MUCH more robust materials and finish (and it being a Canadian shop in Quebec producing it ), I decided to pull the trigger. It's a bit pricey, but both relocates the pickup point and replaces the trailing links, so it saves the cost of the STI trailing links as well.Of note is that it moves the pickup point both down by 50mm AND forward slightly, and the new trailing link is longer as a result. They say the forward position and longer arm are "to reduce the toe gain curve as much as possible to so it became more linear." Anyway - there's a little over $600 CAD I didn't really have available now gone, but it will give me a bit more peace of mind...LOL.
__________________
|
|
|
|
|
12-16-2025, 04:42 PM
|
#146 |
|
Senior Member
Join Date: Jan 2017
Drives: 2020 BRZ Sport Tech RS
Location: Canada
Posts: 446
Thanks: 527
Thanked 354 Times in 193 Posts
Mentioned: 3 Post(s)
Tagged: 0 Thread(s)
|
Just Engineering Adjustable Traction Arms
My new replacement for the MCA Traction Mod brackets just arrived - the Adjustable Traction Arms from Just Engineering. They have a design that combines elements from the MCA and GP Sports designs, and replaces the trailing links as well.
The construction is pretty beefy, especially compared to the thin stock used for the MCA brackets, and they have a heavy silver powder coated finish as well, so I'm hoping for much better weather durability than my MCA brackets. Here are some initial pics now that I have them in my hands. Very well packaged to protect them during shipping:  The brackets and trailing links unwrapped:  The BEEFY adjustable trailing links:  The key change - moves the trailing link pickup point both down AND forwards, and the new trailing link is therefore longer than the stock arm:   The forward end of the trailing arm has a spherical bearing that connects to the bracket here. Hardware all looks high quality (unlike my blurry photo...LOL:  I likely won't have an opportunity to get these installed until sometime in mid-January...or *maybe* I'll get them on tomorrow...
__________________
|
|
|
|
| The Following 2 Users Say Thank You to Tatsu333 For This Useful Post: | Code Monkey (12-16-2025), Stonehorsw (02-19-2026) |
|
12-17-2025, 06:29 PM
|
#147 |
|
Senior Member
Join Date: Jan 2017
Drives: 2020 BRZ Sport Tech RS
Location: Canada
Posts: 446
Thanks: 527
Thanked 354 Times in 193 Posts
Mentioned: 3 Post(s)
Tagged: 0 Thread(s)
|
Just Engineering Adjustable Traction Arms Installed
OK - got these installed this morning, because I wasn't willing to wait until late January (which would have been my next opportunity)...LOL.
Install was very easy.
Here are a few pics of the parts during / post install: The new bracket installed in place of the stock brace and MCA Traction Mod:  The new bracket and adjustable trailing arm installed:  And of course, new parts mean new stickers...LOL:  Initial Driving Impressions Doesn't feel any different in terms of ride or NVH vs. the MCA Traction Mod and stock arms. The subframe being tied in a bit more with the new bracket seems to have reduced a little bit of drivetrain bounce when accelerating away from a stop, but other than that, no really noticeable difference. Maybe felt like it put the power down a little better than even with the MCA Traction Mod installed, but that could totally be in my head, and I didn't push things too hard, because I'm on my snow tires right now. Everything feels straight (LOL), but I'll definitely get an alignment done sometime between now and spring when I'll be putting new all-seasons on the car, because this will almost certainly have had some effect on toe at the rear. No rush since I only drive about 300-350 km per month, and won't be pushing hard on my snow tires anyway.
__________________
|
|
|
|
| The Following 2 Users Say Thank You to Tatsu333 For This Useful Post: | Code Monkey (12-18-2025), Stonehorsw (02-19-2026) |
|
01-27-2026, 12:01 PM
|
#148 |
|
Senior Member
Join Date: Jan 2017
Drives: 2020 BRZ Sport Tech RS
Location: Canada
Posts: 446
Thanks: 527
Thanked 354 Times in 193 Posts
Mentioned: 3 Post(s)
Tagged: 0 Thread(s)
|
New Rubber!
Costco had a promotion on for Pirelli tires, so I bought my new all-season rubber a bit early. 245/40R17 Pirelli P-Zero AS Plus 3 mounted on my 17x8" ET35 Fast Wheels FC04's.
Nice, chunky, square-shouldered look on the wheels, which I prefer to the slightly stretched look of the previous 225/45R17 Pirelli P-Zero All Season Plus tires (which had aged out after five years on the car, hence the replacement). Here's a pic of the tire / wheel combo, not yet mounted on the car (I'm going to wait until spring and after I get my alignment done to switch over from my 225/45R17 winters on stock Performance Pack 17x7.5" ET48 wheels):  For now, down into storage in my crawlspace they go!
__________________
|
|
|
|
| The Following 2 Users Say Thank You to Tatsu333 For This Useful Post: | new2subaru (01-28-2026), villainous_frx (01-28-2026) |
|
02-02-2026, 08:08 PM
|
#149 |
|
Senior Member
Join Date: Jan 2017
Drives: 2020 BRZ Sport Tech RS
Location: Canada
Posts: 446
Thanks: 527
Thanked 354 Times in 193 Posts
Mentioned: 3 Post(s)
Tagged: 0 Thread(s)
|
So...I'm not a patient man...LOL
Despite my best intentions, I couldn't wait to put the new Pirelli P-Zero AS Plus 3 245/40R17 rubber (mounted on my 17x8" ET35 Fast Wheels FC04's) onto the car.
Of course, now that I've taken my snows off, we will inevitably have a freak snowstorm in the next couple of months...LOL. In the meantime, here are some pics: So CHUNKY   VERY flush at the rear fender. I haven't pushed it hard yet, but I'm hoping with the rear suspension's camber gain under compression, it shouldn't rub:  Definitely protrudes beyond the lower bumper line, both front and rear, but no visible poke from above:   Not 100% sure yet (because I've only gotten out and driven it three times since putting them on), but the only time I think I have rubbed at all is when pulling into my driveway at an angle. I'll need to investigate this further... With the monsoon rains we've had around here the past couple of days, all I can say about the new tires is the wet traction off the line is very good, and the hydroplaning resistance is great! LOL Next up will be finding an alignment shop around here that won't give me grief about not being within factory recommended specs to get the alignment done. The shop I used to go to has closed down. 
__________________
Last edited by Tatsu333; 02-03-2026 at 06:11 PM. |
|
|
|
| The Following User Says Thank You to Tatsu333 For This Useful Post: | villainous_frx (02-07-2026) |
|
02-03-2026, 04:44 PM
|
#150 |
|
Senior Member
Join Date: Jan 2017
Drives: 2020 BRZ Sport Tech RS
Location: Canada
Posts: 446
Thanks: 527
Thanked 354 Times in 193 Posts
Mentioned: 3 Post(s)
Tagged: 0 Thread(s)
|
Dang...rear is rubbing...
OK - well, I've figured out where the rub is happening when I'm entering the driveway, and it's at the rear outer shoulder on the (heavily loaded) outside rear wheel
... Not sure what to do here, because the camber gain under compression isn't enough (clearly). I guess adjustable rear lower control arms are the only real option here that isn't crazy expensive...? EDIT #1: I guess another rear camber option (according to some posts I've found) is either the H&R TC112 'Triple C' Camber Adjustment Bolt or MOOG K90473 Alignment Camber Kit at the inner control arm pickup point. There are some pics from a post on another forum (albeit on a 2nd gen, but I'm hoping they're the same fitment) that show them installed (I downloaded the pics and re-shared them so I could link them here):  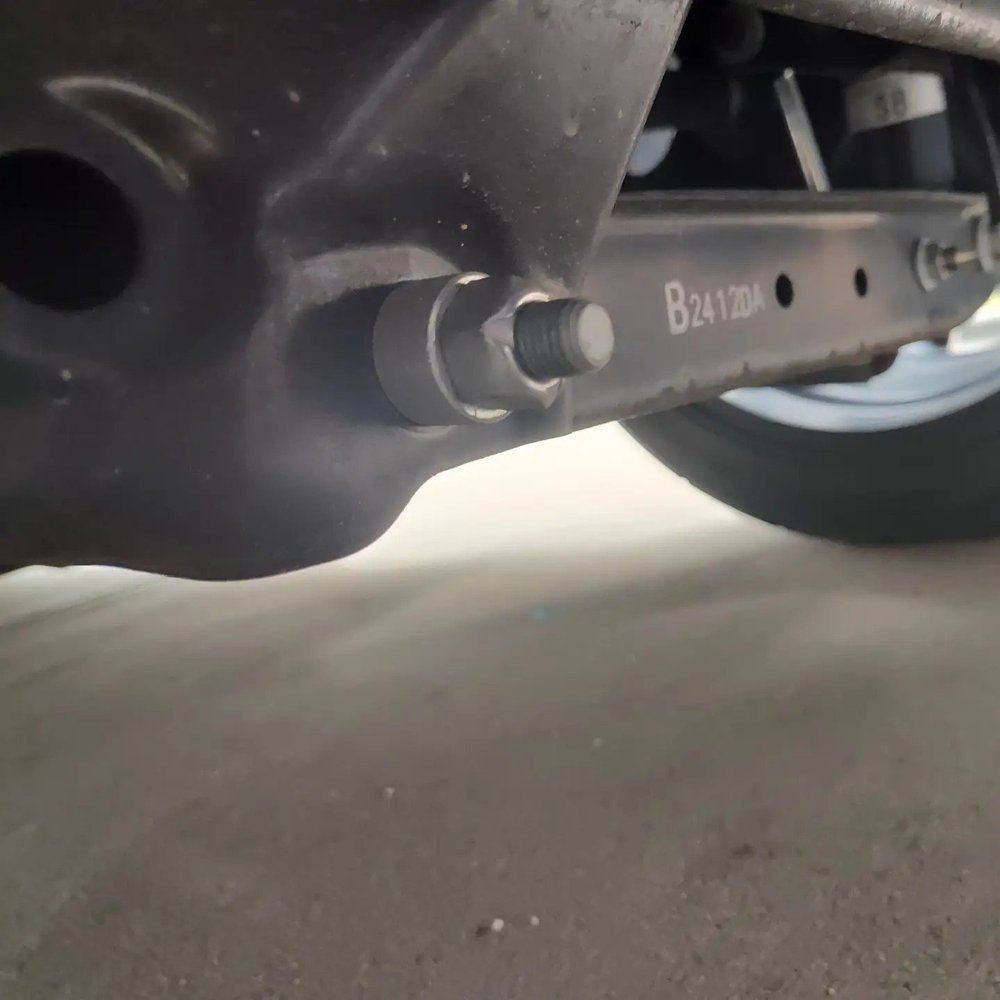 It's an "off-label" use for the Moog bolts (they're front camber bolts for a Chevy Equinox; the H&R's are listed as a universal application - I mean...they're just 12mm camber bolts...) and you don't gain a whole lot of negative camber with the bolts, but it *might* be just enough to gain the few mm of clearance I need at the top. The Moog bolts are about $35 USD for a pair, the H&R bolts are about $80 USD for a pair but look just a *bit* more substantial, and I can get Dorman adjustable RLCA's from Rock Auto for about $103 USD (or Moog for $192 USD)...  I guess I could also try some adjustment to the static rear ride height to see if that changes the camber enough to make a difference. Lower = more negative camber, but I don't really want to go a whole lot lower, and I don't think it will track any differently than simply compressing the suspension (at least with how I'm visualizing it)... EDIT #2: OK - it only happens at the extreme angle I have to use when approaching my driveway from the one side (the right of my driveway). From the other side (the left of my driveway), it's OK. It's a bit of a pain coming in from that side, because I then have to jockey my car back and forth to line it up along the right side where I need to park my car, but it's a temporary, no cost solution anyway. EDIT #3: After seeing DocWalt's endorsement of using the Moog camber bolts in the rear with his hard usage, I'm going to go that way first and see if that does the trick. I've ordered them from RockAuto for $50 CAD / $37 USD shipped.
__________________
Last edited by Tatsu333; 02-03-2026 at 06:43 PM. |
|
|
|
|
02-07-2026, 09:15 PM
|
#151 |
|
Senior Member
Join Date: Jan 2017
Drives: 2020 BRZ Sport Tech RS
Location: Canada
Posts: 446
Thanks: 527
Thanked 354 Times in 193 Posts
Mentioned: 3 Post(s)
Tagged: 0 Thread(s)
|
Update on the rear rubbing issue
I did experience a rub a couple of times on some harder compressions on the road, so this is not just a driveway issue. The rub is VERY slight, but that's kinda like being almost pregnant...LOL. A rub is a rub, and I want ZERO rubbing if I'm going to be taking my car back to the track someday.
The camber bolts arrived yesterday, so I put them in today. They made a VERY small difference, but not enough to resolve the issue. By my before and after measurements, I was able to move the upper shoulder of the tire in by about 1 mm with the bolts maxed out, so virtually no difference (though it was a consistent difference on both sides, so I'm confident it wasn't just a measurement error). I also raised the rear ride height on my RCE SS1's to the maximum spec (I was only 5 mm away from that already), and that improved my driveway approach issue *slightly* but it still rubs. Hopefully that will be enough to prevent any on-the-road compressions from rubbing, but we'll see. EDIT: I don't think I want to use adjustable lower control arms to kick the bottom out even more for pretty minimal clearance gains up top, so I guess the options I have left are a) adjustable upper control arms, or b) higher offset wheels. Neither are inexpensive options, though. For wheels, I'm looking at around $1,800 CAD minimum for the options I'd consider, up to nearly $4,000 CAD. For rear upper control arms, my top pick would be the GK Tech arms, which are $829 USD (around $1,150 CAD). They just look the most solid, and I like their adjustment mechanism best. So...I just have to live with things for now, and save up some money before making a decision.
__________________
Last edited by Tatsu333; 02-07-2026 at 10:15 PM. Reason: Changed my mind on the lower control arm option... |
|
|
|
|
02-14-2026, 11:59 AM
|
#152 |
|
Senior Member
Join Date: Jan 2017
Drives: 2020 BRZ Sport Tech RS
Location: Canada
Posts: 446
Thanks: 527
Thanked 354 Times in 193 Posts
Mentioned: 3 Post(s)
Tagged: 0 Thread(s)
|
GREAT wet traction and grip from Pirelli P Zero AS Plus 3!
After pushing the car a little harder on the cold, wet roads around here the last couple of days, I have to say the wet traction and grip of my new Pirelli P Zero AS Plus 3 245/40R17 rubber is really, REALLY good!
Very confidence-inspiring compared to my previous (admittedly aged out at 6 years since production) 225/45R17 P Zero All Season Plus tires. A bit surprising, actually, because I never found the previous tire particularly great on traction even when it was nearly brand new. Part of that could have been me getting used to driving a RWD car after years of driving only FWD or AWD, but still - what an improvement!
__________________
|
|
|
|
|
02-28-2026, 06:20 PM
|
#153 |
|
Senior Member
Join Date: Jan 2017
Drives: 2020 BRZ Sport Tech RS
Location: Canada
Posts: 446
Thanks: 527
Thanked 354 Times in 193 Posts
Mentioned: 3 Post(s)
Tagged: 0 Thread(s)
|
Last Car Payment!
Last payment today! Just under 22,000 kms on the odometer after five years of ownership.
Feels good to be at the end of that 60-month journey, and to have that monthly expense over and done with. Just a month or two after buying it back in 2021, my business went through another COVID shutdown, and I worried I had made a horrible decision. I've also had regrets over the years about parting with my previous car, which I had tweaked over 14 years of ownership to where it suited me like a tailored glove (and I still miss the glorious V6 noise!) It took a number of years of small tweaks and getting used to how to explore this car's limits after decades of only driving FWD cars. With the latest recent addition (a change to wider, stickier rubber), it's *nearly* there in terms of feeling like I really connect with it on the road the same way I did with my Tiburon. I'm also just a few modifications away from where I think the car will be truly "finished" for me and will feel uniquely mine (they are, unfortunately, not cheap mods...LOL). There's only one car that I would genuinely consider as a replacement, and I'm not going to be in a place to get that anytime soon (if ever). Anyway - it's just a five-year-old, $35K (CAD when new), 200-ish horsepower Subaru, but it's paid for! 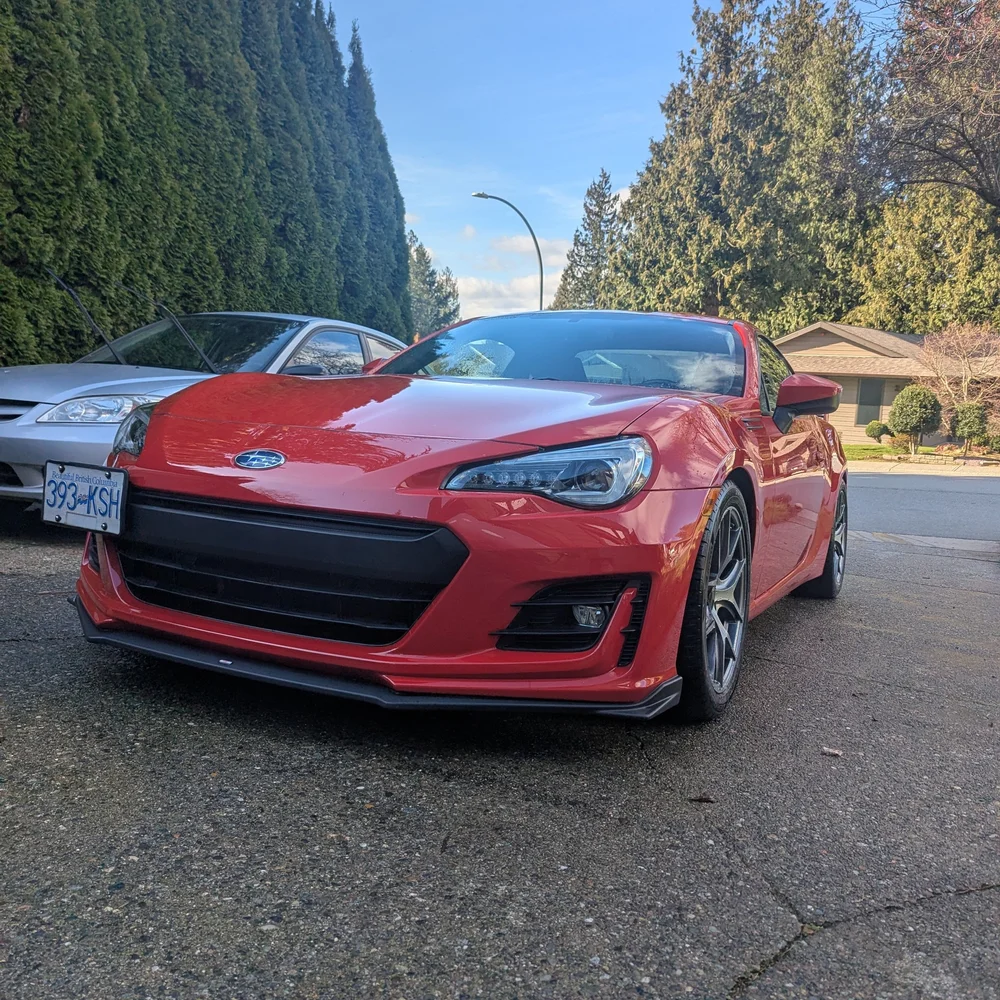 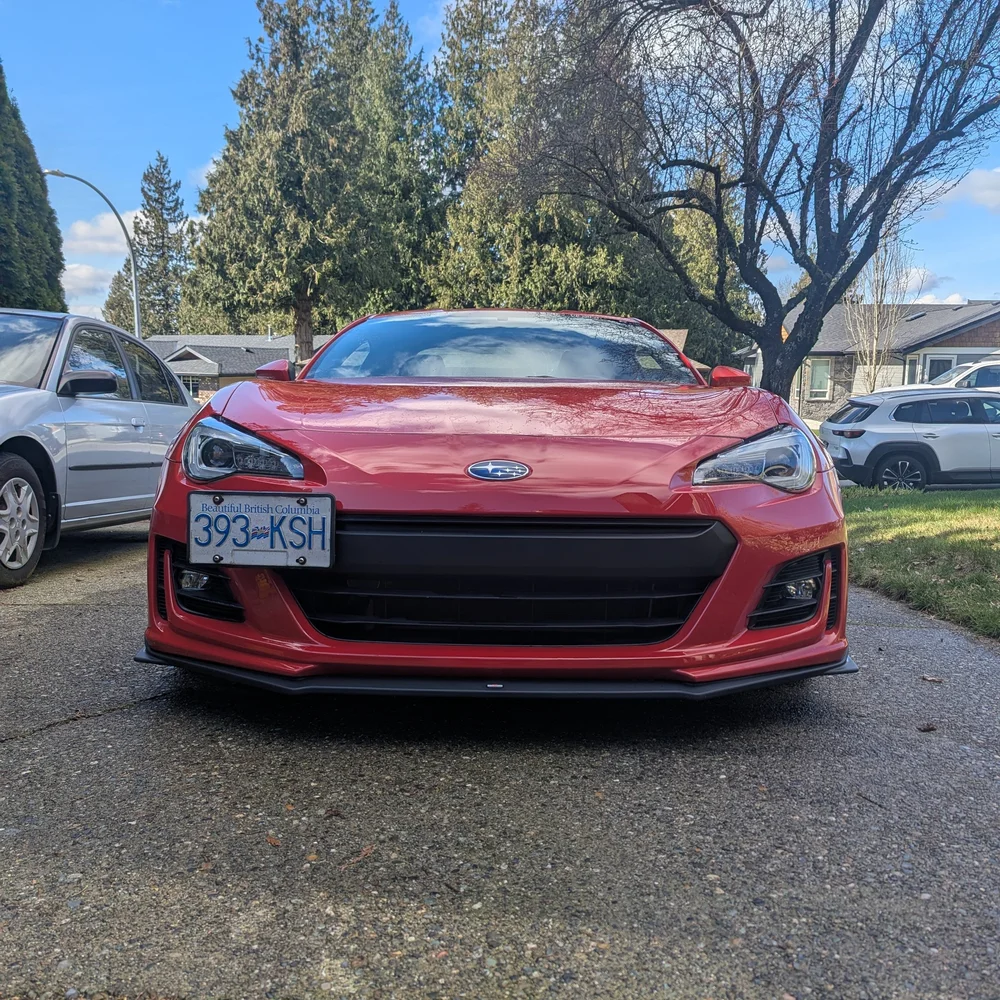  
__________________
|
|
|
|
| The Following 6 Users Say Thank You to Tatsu333 For This Useful Post: | DarkPira7e (02-28-2026), racing_reject_001 (03-01-2026), smackrel (03-02-2026), T-Steve (03-01-2026), The Red One (03-01-2026), villainous_frx (03-02-2026) |
|
|
|
|
|
|
 Similar Threads
|
||||
| Thread | Thread Starter | Forum | Replies | Last Post |
| FS: 2017 BRZ Sport-Tech | BRZ.Omar | Canada Classifieds | 0 | 07-29-2020 05:29 PM |
| 2020 Subaru BRZ STI Sport GT CONCEPT | kev0 | BRZ Photos, Videos, Wallpapers, Gallery Forum | 13 | 07-16-2020 08:02 PM |
| Stop Tech Sport Kit | akuhei | Suspension | Chassis | Brakes -- Sponsored by 949 Racing | 26 | 07-10-2018 10:06 PM |
| WTB: BRZ sport-tech (Canada) | AustinSedz | Cars for Sale/Trade | 2 | 11-17-2015 11:50 PM |
| FS: Black Sport-Tech BRZ (AT) | Eddie | Canada Classifieds | 0 | 06-03-2013 08:55 AM |


