


 09-07-2025, 06:28 PM
|
#127 |
|
Senior Member
Join Date: Jan 2017
Drives: 2020 BRZ Sport Tech RS
Location: Canada
Posts: 446
Thanks: 530
Thanked 355 Times in 193 Posts
Mentioned: 4 Post(s)
|
I nearly sold my car...
So - a few small updates:
I nearly sold my car this past weekend. Long story, but for a number of reasons, money has been pretty tight for a while, and I was considering selling the BRZ and buying a 2008-2013 BMW 128i instead, which would have allowed me to come out about $10K ahead. The NA straight-6 siren song was STRONG, but....manual 128i coupes are very few and far between (all the ones for sale in my province were automatic), and I was having a LOT of trouble getting my head around going from my car (which I've owned since new, has just over 20,000 kms on it, and only has six payments left to be paid off) to something with 6-9x the mileage, silky smooth six cylinder or not. Still, I found one locally that was very tempting even though it was an automatic, and I came *this* close to pulling the trigger. In the end, we worked some stuff out with our financial planners to free up some cash to address our current cashflow issues to carry us through until after my last car payment, which then frees up several hundred dollars per month. So, I decided that keeping my BRZ was the way to go. It is MY car, and I've put so much of my time and energy into it, I'm not ready to move on from it yet. Current issues: ACE Header Issues I don't love the sound with the ACE headers and stock exhaust. Particularly off the line in normal driving and in some off/on throttle transitions, it just sounds...flabby. It's also just a bit thrashy accelerating hard through the 5,000 rpm range. Getting it tuned properly might help that a bit, but I'm not sure, and that's a $1,000 CAD maybe that I don't have money for right now. I'm thinking about picking up a stock FA24 header and putting that on instead. Gains will be much less than with the ACE header, but getting back a bit more refinement might be worth it. That might be a moot point right now because the OTHER thing that just happened is my car threw a P2096 code (too lean), which indicates there is a problem upstream of the primary O2 sensor. Usually means either the O2 sensor itself is loose or damaged, it's loose and leaking at one or both of the flanges, or there's a crack somewhere. I won't have a chance to take things apart to look at it until the end of this month, so for now I'm just going to see if I can snug up the O2 sensor from above, clear the code, and see whether it comes back. By the time I get a chance to torque check all the header bolts and inspect for cracks, I'm hoping to have the FA24 header on hand so I can swap it on then if I decide to go that way instead. Bumper Sag It finally happened - I was rushing into a medical appointment and smacked the bottom of the front lip on a particularly aggressive driveway ramp, popping the clips on the front bumper and causing some sag on the driver's side. I tried just popping it back in but it wouldn't take, so I ordered new clips hoping that would fix it. When swapping the clips on the driver's side, I discovered that one of the loops on the bumper side was broken.   So, I ordered the repair plates from Australia and gave them a go:  But sadly, it didn't work out well. I cannot for the life of me get the bumper to snap back into the clip. Not sure if I didn't sand off quite enough material to allow for the thickness of the repair plate or what, but no matter what I've tried, I can't get it to go in properly. So now, it looks just as bad as before the attempted repair, if not worse. I'm thinking about doing the push-button quick release latches, but seeing the release buttons on the outside of the bumper kind of makes me cringe. If it was just one, *maybe* I could convince myself that it looks kind of like a parking distance sensor, but with two placed so close together...it just looks like the band-aid that it is. I think the first thing I'm going to try is to do the install like this guy did: ...using a quick latch only at the front and relying on the stock bumper/clip system and/or the push-pin at the side marker light to hold the bumper in place further rearward. If that doesn't do the job well enough, then I might try to find a way to hide the rear-most connection by attaching it differently. What I'm thinking is attaching some kind of bracket inside the bumper just ahead of the side marker to mount the release button to (either riveted to the lip where the loops are or the plastic surround for the side marker, or attached to the side marker A-clip bracket somehow) so that I can reach the button with the side marker out, but it's hidden in normal use. Or, alternatively, using a bracket in the same place to mount the the pin part of the latch system to the bumper side and having the release button accessible behind the fender liner. Either way, only the front-most quick latch would be visible from the outside when installed, which I think would be much better than having the two buttons per side visible. If both approaches fail, then I'll have to go with the two visible release buttons per side.  I'm going to buy the latches with the buttons in black. If I don't like the way that looks, then I'll try to paint match the buttons to my bumper instead. ANYway, that's not going to be a quick project, but I'm hoping to tackle the first method (trying just one quick latch per side with the factory clip for the rear) sometime in the next couple of weekends. USB Ports Disconnecting Over Bumps and/or When Cornering Hard This has actually been a problem almost since new. I run Android Auto in my car pretty much all the time, but if I hit any significant bumps (E.G. rough roads due to construction, train tracks, etc.) it nearly always disconnects. This has also happened when cornering hard on some of the canyon roads even without bumps. This has happened with three different phones, maybe a dozen different USB cables using wired Android Auto, regardless of which USB port my device is connected to. Switching to the AA Wireless Android Auto Adapter has made it a bit less frequent, but it still happens. The only thing I can conclude is that the back side connection to the ports themselves is flaky, either at the ports or at the head unit or both. I've read somewhere about using some kind of putty to fill and reinforce the connections, and I'm also thinking there may be some way to secure the cable for the USB ports better to prevent this. Since this will require taking my console apart and head unit out, it's not something I'm going to tackle anytime soon, but it is really annoying. Well, with all that said - at least I still have the car, and I'm not dealing with 12-17 year old car problems...only my OCD and 5 year old car problems...LOL.
__________________
|

|

|
| The Following 3 Users Say Thank You to Tatsu333 For This Useful Post: |
|
09-12-2025, 11:25 AM
|
#128 |
|
Senior Member
Join Date: Jan 2017
Drives: 2020 BRZ Sport Tech RS
Location: Canada
Posts: 446
Thanks: 530
Thanked 355 Times in 193 Posts
Mentioned: 4 Post(s)
|
...and of course the algorithm is listening, and presents a new option...LOL!
My Facebook feed served up the MAC Lifter bumper alignment kits, which are a similar stainless steel repair plate like I tried previously to fix the bumper fitment / sag issue BUT with another key component - a formed stainless steel replacement for the OEM plastic bumper clips as well! Here are a couple of pics (linked from their website):   Note how the mounts for the brackets are slotted, allowing for some vertical adjustment. While the instructions say that some trimming of the headlight bracket may be required for fitment, this is potentially a much better option (for me) than the quick release buttons. Or, possibly could be used like the OEM bracket in addition to a single quick release button towards the front as I mentioned in my previous post, only with more adjustability. I will likely try just the body side bracket on my driver's side in conjunction with the already-installed repair plate, since removing that may be difficult now that it's JB Welded in place. EDIT: Only *slightly* worrying thing is this from the product page: "Middle front tab may not fit later model first generation brz due to bumper style." Might need to be some trimming involved. Anyway - I've placed the order. Like the other repair plates, these are coming from Australia, so "Good on ya!" to the Aussie GT86/BRZ community for continuing to come up with ideas!  Here's a link to the vendor's main Subaru page again, where you can see the options for ordering the full kit, just the body side brackets, or just the bumper side plates: https://www.maclifterkit.co/collections/subaru
__________________
Last edited by Tatsu333; 09-12-2025 at 12:05 PM. Reason: Added note about fitment from the product page |
|
|
|
|
09-12-2025, 06:49 PM
|
#129 |
|
Senior Member
Join Date: Jan 2017
Drives: 2020 BRZ Sport Tech RS
Location: Canada
Posts: 446
Thanks: 530
Thanked 355 Times in 193 Posts
Mentioned: 4 Post(s)
|
Also - I ended up finding an FA24 stock exhaust manifold locally (off of a crashed 2022 BRZ with only 10,000 kms on it!) for a decent deal, so I jumped on it. Now I just need to find time to swap it in place of the ACE header, and then I can be back to OEM levels of quiet but with a little more power potential...
 Here are a couple of pics (excuse the mess in the hatch of my wife's vehicle - LOL):  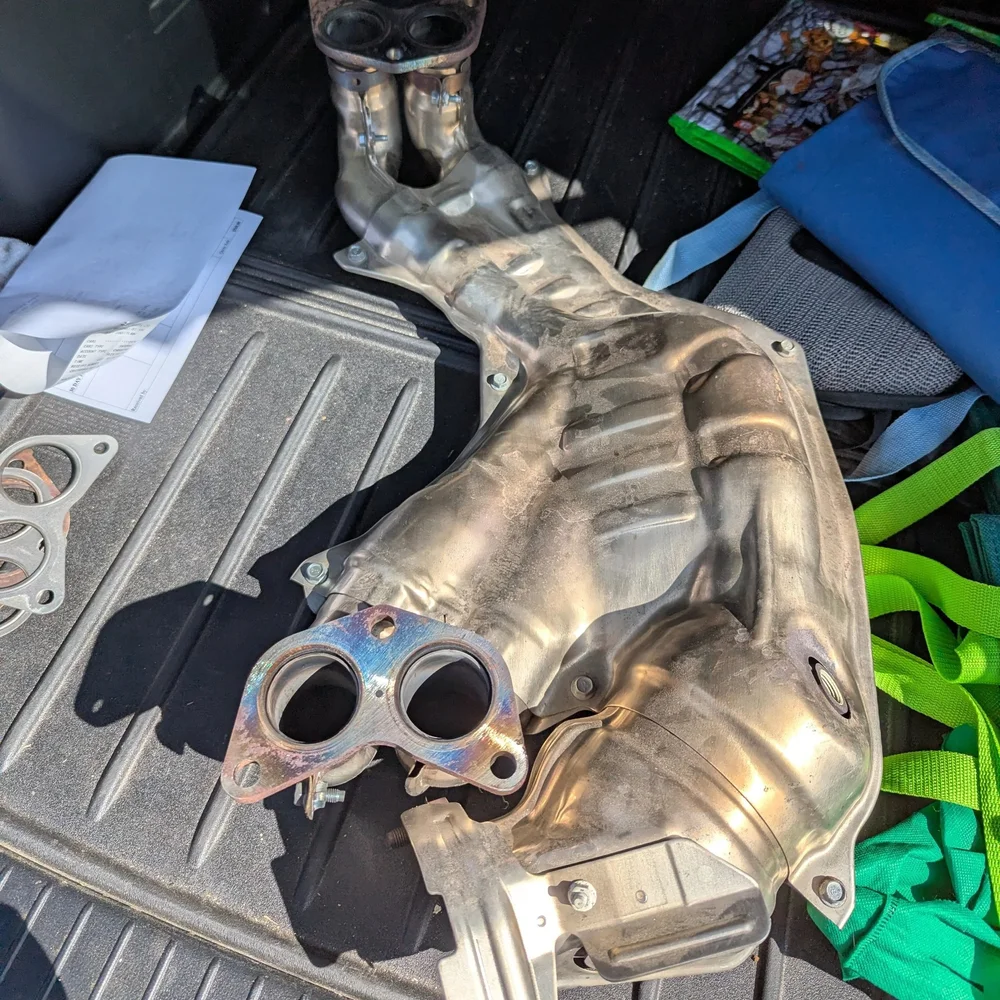 They also included all the gaskets, but I should have gotten them to also include the over pipe. Anyway, I'll be interested to see what it does with the combination of the Billet Power Blocks and the FA24 header, both pre-tuning and after.
__________________
Last edited by Tatsu333; 09-12-2025 at 07:02 PM. Reason: Added photos |
|
|
|
|
09-15-2025, 12:10 PM
|
#130 |
|
Senior Member
Join Date: Jan 2017
Drives: 2020 BRZ Sport Tech RS
Location: Canada
Posts: 446
Thanks: 530
Thanked 355 Times in 193 Posts
Mentioned: 4 Post(s)
|
Just came across these in browsing around for BRZ stuff yesterday. Turns out someone's already done what I was thinking of having made - custom aluminum wing risers using the factory 2017+ wing holes and 3D-scanned from OEM mounts to fit a SARD LSR-style wing. The SARD-style wing option has adjustability to change the angle of attack on the wing, and they also went about making it a modular design that can mount the OEM 2017+ wing!
Here are a couple of pics: With the SARD LSR style wing:  With the 2017+ OEM wing:  Check them out at Battle Garage Racing Services! Here are the links: For the SARD-style wing kit and For the OEM wing kit They say: "Only interior-side drilling required, maintaining the sleek exterior of your trunk. Light modification to factory holes is required." and that interior-side drilling is for "Steel support plate designed to be bolted to inner structure of trunk to further increase support for added downforce of a carbon wing." They're certainly not cheap, but these are DEFINITELY on my list now once I have funds. I'll probably buy the riser kit for the OEM wing first, and then decide if I'll also opt for the SARD-style wing down the road. If I do, I'll buy the full "carbon wing upgrade kit" they list to get both the wing and the adapters, and then I can swap back and forth between the two for road vs. track use.
__________________
|
|
|
|
| The Following User Says Thank You to Tatsu333 For This Useful Post: | SuperTom (09-16-2025) |
|
09-15-2025, 01:25 PM
|
#131 |
|
Senior Member

Join Date: Jul 2022
Drives: Toyota GT86
Location: Ireland
Posts: 699
Thanks: 647
Thanked 517 Times in 321 Posts
Mentioned: 5 Post(s)
|
I saw those wings awhile back and they look awesome !!
__________________
SpareRoomRacing Youtube: https://www.youtube.com/@spareroomracing3168/featured Build Thread: https://www.ft86club.com/forums/showthread.php?t=153004
|
|
|
|
|
09-15-2025, 06:11 PM
|
#132 | |
|
Member
Join Date: Feb 2023
Drives: 2017 GT86
Location: California
Posts: 80
Thanks: 15
Thanked 51 Times in 38 Posts
Mentioned: 2 Post(s)
|
Quote:
I'm very interested to see how the FA24 does without a tune, whether it makes much of a difference to the torque dip without exceeding what the ECM can trim without throwing a code. |
|
|
|
|
|
09-16-2025, 09:23 AM
|
#133 | ||
|
Senior Member
Join Date: Jan 2017
Drives: 2020 BRZ Sport Tech RS
Location: Canada
Posts: 446
Thanks: 530
Thanked 355 Times in 193 Posts
Mentioned: 4 Post(s)
|
Quote:
Quote:
That said, there's DEFINITELY a leak, because the sound has noticeably changed when I've been driving it in the last week as whatever it is has further loosened up (though it hasn't thrown the code again yet). Now that I have the FA24 header to swap to, chasing it down is irrelevant. The swap should be happening sometime between September 26 - 30, as I'll have my garage free for five days straight. Won't be super fun doing it on jackstands though! There's a *slim* possibility I might be able to get it on my friend's hoist that weekend instead.
__________________
|
||
|
|
|
| The Following User Says Thank You to Tatsu333 For This Useful Post: | SuperTom (09-16-2025) |
|
09-16-2025, 03:51 PM
|
#134 | |
|
Member
Join Date: Feb 2023
Drives: 2017 GT86
Location: California
Posts: 80
Thanks: 15
Thanked 51 Times in 38 Posts
Mentioned: 2 Post(s)
|
Quote:
Did you find an FA24 overpipe, or are you hoping to match the FA24 header to your FA20 overpipe? ISTR there's a difference in the angle the flange is clocked at, but I don't know if it's slight enough to get away with. |
|
|
|
|
|
09-17-2025, 02:22 PM
|
#135 | |
|
Senior Member
Join Date: Jan 2017
Drives: 2020 BRZ Sport Tech RS
Location: Canada
Posts: 446
Thanks: 530
Thanked 355 Times in 193 Posts
Mentioned: 4 Post(s)
|
Quote:
I didn't pick up the over pipe, but am considering it. Kind of kicked myself for not thinking of it ahead of time when I got home with the header. I'm pretty certain the wrecker still has it. I had initially thought the difference in alignment in the exhaust systems between 1st and 2nd gen was at the header to over pipe connection as well, but then I've also heard it's nearly every other joint...LOL. Most common ones I've heard are header to over pipe and midpipe to axleback. I'll compare my stock header vs. the FA24 to confirm. Main reasons for me to pick up the over pipe are that it should have a larger diameter to match the FA24's significantly larger outlet diameter after the cat (57.5 mm ID vs 50.5 mm on the FA20 according to one tuner's measurements), and if there is any slight difference in routing to clear the FA24 oil pan, that would be handy to already have in place if I ever do an FA24 swap. It will still step down in diameter at the front pipe, but I guess I could also look at grabbing the FA24 front pipe too if it's also bigger diameter and the wrecker doesn't want too much for it. I've sent them a message to see how much they want for just the over pipe or for both the over pipe and front pipe, and we'll see if it's worth making the drive back out to pick them up! EDIT: they do still have the over pipe and front pipe, and want another $400 CAD for both. $150 for just the over pipe. I'm thinking about it...
__________________
Last edited by Tatsu333; 09-17-2025 at 04:06 PM. |
|
|
|
|
|
09-17-2025, 09:01 PM
|
#136 | |
|
Senior Member

Join Date: Apr 2019
Drives: 86 GT
Location: Malaysia
Posts: 398
Thanks: 270
Thanked 229 Times in 119 Posts
Mentioned: 2 Post(s)
|
Quote:
https://www.hks-power.co.jp/en/produ...ch/product/346 edit: messed up - it's referring to the HKS front pipe, not the stock front pipe.
__________________
DIY stuff at Compelica Works
|
|
|
|
|
|
09-17-2025, 10:27 PM
|
#137 | |
|
Senior Member
Join Date: Jan 2017
Drives: 2020 BRZ Sport Tech RS
Location: Canada
Posts: 446
Thanks: 530
Thanked 355 Times in 193 Posts
Mentioned: 4 Post(s)
|
Quote:
There won't be huge differences in power regardless - it's more a matter of continuity for my OCD than anything else...LOL. EDIT #1: Thinking a lot more on it and running some calculations, presuming the core of the secondary catalytic converter is the same between the 1st gen and 2nd gen (which I'd hazard a guess it is) and the only difference is mating it to larger diameter piping before and after (if that's even the case), the 2nd gen front pipe would at best give something like...2-4% higher peak flow. With an NA FA20, I won't even be close to approaching the peak flow limits of either the 1st gen or 2nd gen front pipe, so I think I'm going to pass on the front pipe. With the over pipe, I'd be a bit more concerned about there being a pronounced step down in diameter at that joint so close to the exit of the primary cat, so I still think that's worth it. EDIT #2: OK - I picked up the FA24 over pipe only (to add to the FA24 manifold), which has a 57 mm ID inlet and outlet. Decided against the the FA24 front pipe. It has a 57 mm ID at the inlet, and the pipe diameter looks consistent up until just before the resonator (which appears to be identical to the FA20's), where it necks down to what I think is the same diameter as the FA20 front pipe, and that smaller diameter is still present at the outlet. Can't remember what the diameter was inside the donut gasket, but it was definitely smaller than 57mm. All will be swapped out this Friday, along with some other little bits and pieces (refinishing my MCA Traction Mod brackets, raising my ride height all around by 5-10mm, maybe a front camber adjustment as well). I might see about getting the car on the same dyno as previous to see what the car does with the FA24 header on the stock FA20 tune just as a reference point.
__________________
Last edited by Tatsu333; 09-22-2025 at 06:25 PM. Reason: Update RE: over pipe and front pipe |
|
|
|
|
|
09-26-2025, 01:45 AM
|
#138 |
|
Senior Member
Join Date: Apr 2019
Drives: 86 GT
Location: Malaysia
Posts: 398
Thanks: 270
Thanked 229 Times in 119 Posts
Mentioned: 2 Post(s)
|
__________________
DIY stuff at Compelica Works
|
|
|
|
| The Following User Says Thank You to Compelica For This Useful Post: | Tatsu333 (09-26-2025) |
|
09-26-2025, 03:05 AM
|
#139 |
|
Senior Member
Join Date: Jan 2017
Drives: 2020 BRZ Sport Tech RS
Location: Canada
Posts: 446
Thanks: 530
Thanked 355 Times in 193 Posts
Mentioned: 4 Post(s)
|
OK - FA24 OEM headers and over pipe are on! I've reflashed my ECU back to 100% stock (I had been running some changes for cold start only with the ACE headers to try and quiet it down a bit), and went for a bit of a drive.
First impressions are as expected. It feels a bit more linear through the power band on full throttle pulls (I did 4 pulls from 2,000 rpm to redline - three in 3rd gear, and one in 2nd) with a *slight* soft spot just before 4,000 rpm, and it also pulls more strongly up top right to redline than I remember with the stock header. Driving some of my normal around-town roads, I don't notice any significant loss of low-end torque either. It pulls strongly away from stops / traffic lights / tight corners, even uphill from low revs. The sound is a little bit deeper toned in the mid-range than I remember with the stock FA20 header, but otherwise just as quiet (again, as expected). Bear in mind that this is all still with the Billet Power Blocks installed, which shift the power curve down the rev range a bit, so someone else's experience with the FA24 headers on an FA20 might be a bit different. Also worth remembering that it's been four months since I had the stock headers on, so my recollection of how they felt and sounded may be hazy...LOL. Vs. the ACE headers, I'd say it doesn't feel quite as strong in the midrange and maybe a *little* more restricted up top, but feels like it pulls away from stops and low revs more smoothly. Anyway - overall, I'm happy with it so far. I'm going to do a BUNCH of driving around under various conditions over the next week or so to give the ECU some time to make adjustments, and then I'll try to see about getting it on the same dyno as my previous pulls to see how it does on the stock tune. EDIT: Darn - I just found out that the shop where I had done my previous dyno runs has closed down. So, no apples-to-apples comparison is possible, unfortunately.
__________________
Last edited by Tatsu333; 09-26-2025 at 12:26 PM. Reason: Dyno update :( |
|
|
|
| The Following 4 Users Say Thank You to Tatsu333 For This Useful Post: |
|
09-26-2025, 03:26 PM
|
#140 |
|
Senior Member
Join Date: Jan 2017
Drives: 2020 BRZ Sport Tech RS
Location: Canada
Posts: 446
Thanks: 530
Thanked 355 Times in 193 Posts
Mentioned: 4 Post(s)
|
Traction Mod Refinishing
OK - on to the next project! Since I have five days where I don't have clients in my garage, I'm going to try and get everything outstanding done on my car.
Next up after the header swap is refinishing my MCA Traction Mod brackets. With at best 16,000 kms on the car since they were installed in November 2021 and very little winter driving, I was a little shocked to see how badly rusted they were when the car was up on the lift back in May, so this has been on my mind for the last four months. Here are some pics of them after removal:     ...and here are a couple of pics after cleaning them up the best I could with solvent and a wire brush and then brake clean:   After letting them dry, I hit them with a coat of Tremclad Rust Reformer, and now they have to dry / cure for 24 hours before finishing:  I'll be finishing them with 2 or 3 coats of Tremclad Professional rust paint tomorrow, reinstalling, and then I'll probably spray some Kleen Flo Honey Goo around the assembly for a bit of extra protection. While I'm waiting for the Rust Reformer to dry, on to my next project... (I'll update this post with further progress on this project tomorrow) UPDATE 2025-09-28: Refinishing is done, and MCA Traction Mod brackets are reinstalled. The driver's side went in no problem, but for some reason the passenger side one was VERY difficult to get back in place. Took a lot of swearing and levering to get it to seat up in the stock bracket and align the holes, so of course my nice new finish got all scratched up. Here's a couple pics of them before reinstalling:   Anyway, it's all back together, and I sprayed the whole assembly with Kleen Flo Honey Goo afterwards as a further layer of protection against corrosion. While I had the car up, I also increased the ride height all around to the maximum ride height supported by the RCE SS1's to give me a little more leeway with driveway ramps, etc. It's only 5-10 mm higher than before, but it's something!
__________________
Last edited by Tatsu333; 09-28-2025 at 06:25 PM. |
|
|
|
| The Following User Says Thank You to Tatsu333 For This Useful Post: | autoracer86 (09-27-2025) |
|
|
|
|
|
|
 Similar Threads
|
||||
| Thread | Thread Starter | Forum | Replies | Last Post |
| FS: 2017 BRZ Sport-Tech | BRZ.Omar | Canada Classifieds | 0 | 07-29-2020 04:29 PM |
| 2020 Subaru BRZ STI Sport GT CONCEPT | kev0 | BRZ Photos, Videos, Wallpapers, Gallery Forum | 13 | 07-16-2020 07:02 PM |
| Stop Tech Sport Kit | akuhei | Suspension | Chassis | Brakes -- Sponsored by 949 Racing | 26 | 07-10-2018 09:06 PM |
| WTB: BRZ sport-tech (Canada) | AustinSedz | Cars for Sale/Trade | 2 | 11-17-2015 10:50 PM |
| FS: Black Sport-Tech BRZ (AT) | Eddie | Canada Classifieds | 0 | 06-03-2013 07:55 AM |


