


|
||||||
| BRZ First-Gen (2012+) General Topics All discussions about the first-gen Subaru BRZ coupe |
 |
|
|
Thread Tools | Search this Thread |
 08-09-2021, 12:10 PM
|
#19265 | |
|
Senior Member

Join Date: Jan 2018
Drives: Crapcan
Location: Oregon
Posts: 11,603
Thanks: 18,883
Thanked 16,883 Times in 7,684 Posts
Mentioned: 112 Post(s)
|
Quote:
__________________
"Experience is the hardest kind of teacher. It gives you the test first and the lesson afterward." -Oscar Wilde.
|
|

|

|
| The Following User Says Thank You to NoHaveMSG For This Useful Post: | norcalpb (08-09-2021) |
|
08-10-2021, 08:49 AM
|
#19266 |
|
Senior Member

Join Date: Jun 2019
Drives: 2013 BRZ Sport-Tech
Location: Toronto
Posts: 355
Thanks: 184
Thanked 179 Times in 121 Posts
Mentioned: 0 Post(s)
|
Finally completed part 1 of my brake change. Started Last Thursday!
Nothing fancy, just normal brakes for a 2013. Bought the parts Wednesday, started on Thursday after work by pulling the rears... Well attempting to; they were stuck. Turns out I was sold the wrong rear rotors anyway (non-vented). Put everything back on, looked up the threads for the 2 bolt holes to push the rotors off. Went to the store to exchange the rear rotors and bought the required bolts. Well, the right rears weren't in stock so they had to order them for me to pick up yesterday. Went home and proceeded to pull apart the fronts (this is still Thursday). Fronts were also stuck on but now I had the bolts. Got the left front off, pulled out the new rotor, "hey, these don't quite look the same size." Sure enough, the new ones were ~3/8" smaller in diameter (see attached photo with inside pad and rotor. No you shouldn't be able to see the pad at all). Re-assemble old brakes. Pack up tools. No time to get back to the store before they close. Messed up plans for the weekend. Fast forward to yesterday. Get home from work, go return front rotors and pick up new for all 4 corners (store wouldn't do anything to compensate me on what an ordeal they had added to this job, "rotors were already on sale"). Start with fronts again. Rotors are stuck again/still but deal with it using the bolts. Everything is going ok but then I can't get the caliper over the lower pin on the drivers side. Push as hard as I can on the pin and nothing. Pull it out, wipe off the grease and re-insert to see if there's just an air pocket trapped by excess grease. Still no luck. Feels like it's bottoming out. try putting a C clamp on it, tapping with a hammer, no luck. Remove it to find lots of grease on the tip this time. Wipe off and reinsert. Seems to be going a bit farther but not enough. Press with fingers and remove, barely any grease on tip. Tap with hammer and remove; big glob. Repeat tapping of hammer and wiping of grease until pin sits well within the area it needs to. Remove 1 last time to re-grease the sides. I'm now working by flashlight but I finally manage to get everything re-assembled. Now I have to find time to do the rears...  Then I get to do my girlfriends car. 
|
|
|
|
| The Following User Says Thank You to CrowsFeast For This Useful Post: | Wally86 (08-10-2021) |
|
08-10-2021, 09:36 AM
|
#19267 | |
|
Senior Member

Join Date: Jul 2020
Drives: 18 Brz (Sold) / 22 BRZ / 13 BRZ
Location: Michigan
Posts: 676
Thanks: 1,160
Thanked 450 Times in 264 Posts
Mentioned: 1 Post(s)
|
Brake work
Quote:
Also, an anti-seize between hub and rotor may help next time you havr to change. |
|
|
|
|
| The Following User Says Thank You to Stonehorsw For This Useful Post: | Wally86 (08-10-2021) |
|
08-10-2021, 10:56 AM
|
#19268 | |
|
Senior Member
Join Date: Jun 2019
Drives: 2013 BRZ Sport-Tech
Location: Toronto
Posts: 355
Thanks: 184
Thanked 179 Times in 121 Posts
Mentioned: 0 Post(s)
|
Quote:
Unfortunately I do not currently have a wire brush (didn't see a hand held one when I was at the store) but I did liberally coat the inside mounting surfaces of the new rotors with anti seize (the outside has a coating but not the inside  ) )
|
|
|
|
|
|
08-10-2021, 11:05 AM
|
#19269 | |
|
Senior Member
Join Date: Jul 2020
Drives: 18 Brz (Sold) / 22 BRZ / 13 BRZ
Location: Michigan
Posts: 676
Thanks: 1,160
Thanked 450 Times in 264 Posts
Mentioned: 1 Post(s)
|
Quote:
Also, replace hardware (clips, specially for anti-drag feature, if available) Last edited by Stonehorsw; 08-10-2021 at 11:06 AM. Reason: Anti drag? |
|
|
|
|
|
08-10-2021, 12:23 PM
|
#19270 |
|
Senior Member
Join Date: Jan 2018
Drives: Crapcan
Location: Oregon
Posts: 11,603
Thanks: 18,883
Thanked 16,883 Times in 7,684 Posts
Mentioned: 112 Post(s)
|
Ordered a wrap for the car. Just doing the hood, roof, and trunk lid in a geometric pattern. There are so many DGM cars out there I want mine to look a little different. I am also filling in my OE spoiler holes, so now I don't need to paint it, just primer.
__________________
"Experience is the hardest kind of teacher. It gives you the test first and the lesson afterward." -Oscar Wilde.
|
|
|
|
| The Following User Says Thank You to NoHaveMSG For This Useful Post: | soundman98 (08-10-2021) |
|
08-10-2021, 03:11 PM
|
#19271 | |
|
Senior Member
Join Date: Jun 2019
Drives: 2013 BRZ Sport-Tech
Location: Toronto
Posts: 355
Thanks: 184
Thanked 179 Times in 121 Posts
Mentioned: 0 Post(s)
|
Quote:
The pin itself is metal at the end but has a ribbed plastic sleeve for about 1" near the tip. Found a picture of a similar one (no hex portion on ours, just 2 flats)  Piston boots and guide pin boots were good; metal clips for guiding the pads were replaced and greased. I've done a number of brake jobs on a number of vehicles. That's part of what makes it so frustrating when a simple job like replacing brake rotors and pads becomes a long drawn out pain.  I think I now prefer the setup I had on my german cars; pins are screwed into the caliper bracket and the caliper glided on the pins as opposed to this setup where the pins are bolted to the calipers and the pins glide on the mounting bracket. No way for air/grease/etc to get stuck inside the glide hole. |
|
|
|
|
|
08-10-2021, 03:47 PM
|
#19272 | |
|
Senior Member
Join Date: Jul 2020
Drives: 18 Brz (Sold) / 22 BRZ / 13 BRZ
Location: Michigan
Posts: 676
Thanks: 1,160
Thanked 450 Times in 264 Posts
Mentioned: 1 Post(s)
|
Quote:
Now I got what you meant, and I never saw a similar failure, with the grease loosing their properties to a point that becomes a impediment for the guide pin to bottom (i would expect the grease to move and create space). Whenever I have to rotate the tires, I will take a look on those brakes (I think those are Tokicos, but need to verify). See if they have anything unusual. Two flats on guide pin is not ideal |
|
|
|
|
|
08-14-2021, 05:34 PM
|
#19273 |
|
Senior Member

Join Date: Jun 2017
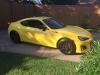
Drives: BRZ Yellow, 2019 Ranger, 2011 Evora
Location: Dallas
Posts: 1,705
Thanks: 354
Thanked 1,489 Times in 781 Posts
Mentioned: 14 Post(s)
|
Installed a Garmin Catalyst. Sometimes I think the Garmin discount I get is a curse. Makes me buy to many Garmin things.
|
|
|
|
| The Following 7 Users Say Thank You to Grady For This Useful Post: | BrahmaBull1990 (08-14-2021), Dzmitry (08-16-2021), Jdmjunkie (08-18-2021), MrSkubi (08-19-2021), NoHaveMSG (08-15-2021), villainous_frx (08-27-2021), wolffbite (08-16-2021) |
|
08-18-2021, 05:14 PM
|
#19274 |
|
Senior Member
Join Date: May 2020
Drives: BRZ ts
Location: SACRAMENTO
Posts: 767
Thanks: 424
Thanked 800 Times in 305 Posts
Mentioned: 8 Post(s)
|
From traveling for funerals, vacation, field work, buying a house and living in general Ive neglected installing the Edelbrock unit I bought in May(?). Taking a couple days off to do it leisurely. Installed a new led unit in my garage to work w.
|
|
|
|
| The Following 5 Users Say Thank You to dpfarr For This Useful Post: | MJones_RB (08-20-2021), norcalpb (08-27-2021), soundman98 (08-18-2021), Stonehorsw (08-18-2021), Wally86 (08-19-2021) |
|
08-26-2021, 03:46 PM
|
#19275 |
|
Member

Join Date: Aug 2021
Drives: 2018 BRZ Limited
Location: CO
Posts: 12
Thanks: 1
Thanked 14 Times in 9 Posts
Mentioned: 0 Post(s)
|
Tinted the front windshield today:
 Louvers last weekend: 
|
|
|
|
| The Following User Says Thank You to Danathin For This Useful Post: | 2020BRZtS (08-27-2021) |
|
08-27-2021, 09:53 AM
|
#19276 | |
|
Senior Member
Join Date: Jun 2019
Drives: 2013 BRZ Sport-Tech
Location: Toronto
Posts: 355
Thanks: 184
Thanked 179 Times in 121 Posts
Mentioned: 0 Post(s)
|
Quote:
|
|
|
|
|
|
08-27-2021, 10:23 AM
|
#19277 | |
|
Senior Member

Join Date: Jul 2019
Drives: 2018 Subaru BRZ Limited with PP
Location: Phildalphia, Pennsylvania
Posts: 975
Thanks: 2,123
Thanked 609 Times in 391 Posts
Mentioned: 4 Post(s)
|
Quote:
|
|
|
|
|
| The Following User Says Thank You to Dzmitry For This Useful Post: | villainous_frx (08-27-2021) |
|
08-27-2021, 11:36 AM
|
#19278 | ||
|
Member
Join Date: Aug 2021
Drives: 2018 BRZ Limited
Location: CO
Posts: 12
Thanks: 1
Thanked 14 Times in 9 Posts
Mentioned: 0 Post(s)
|
Quote:
Quote:
Comparative pic: 
|
||
|
|
|
| The Following User Says Thank You to Danathin For This Useful Post: | Dzmitry (08-27-2021) |
|
|
|
|
|
|
 Similar Threads
|
||||
| Thread | Thread Starter | Forum | Replies | Last Post |
| Saw My First FR-S Today | Marrk | Scion FR-S / Toyota 86 GT86 General Forum | 26 | 05-15-2013 12:40 PM |
| Got my new FR-S today. | Boosted2.0 | Scion FR-S / Toyota 86 GT86 General Forum | 51 | 06-03-2012 10:35 PM |
| Sat in a FRS today!! | Ladnerd | Scion FR-S / Toyota 86 GT86 General Forum | 12 | 04-30-2012 01:48 PM |
| Got my VIN today... | Enemies | BRZ First-Gen (2012+) General Topics | 63 | 04-12-2012 10:19 PM |
| sat in a BRZ today | NESW20 | BRZ First-Gen (2012+) General Topics | 8 | 03-31-2012 08:53 AM |


 Minion
 2018 Subaru BRZ