


|
||||||
| DIY (Do-It-Yourself) Guides For all DIYs. |
 |
|
|
Thread Tools | Search this Thread |
 02-22-2015, 10:45 PM
|
#1 |
|
Senior Member

Join Date: Jul 2014
Drives:
Posts: 2,002
Thanks: 1,157
Thanked 1,903 Times in 911 Posts
Mentioned: 23 Post(s)
Tagged: 0 Thread(s)
|
DIY: Smaller Windshield Washer Reservoir
First off... shout out to @Whatabouteggs for finding and posting this link ACI 99300 Windshield Washer Pump
The factory reservoir is effing huge and takes up too much real estate. As a provision for when I go forced induction I wanted to complete this modification... especially while I have my front bumper off. I purchased the aforementioned windshield washer reservoir with the idea that I could make it work in my 86. After brainstorming some ideas I came up with the following: This coupler I acquired from a mini attachment for vacuums bundle from Harbor Freight - $5.99-$8.99. I believe it is 1 1/4" on one side 1 1/8" on the other.  When pressed into the factory fill neck... a lip is present. I used a 45 degree test probe to score the pattern I would Dremel later. **Fitment here is tight... does not require a clamp.**  Scored pattern to Dremel.  Knotched out.  Flush with factory fill neck.  I purchased the flexible hose (1 1/4" bilge and pump) from Ace Hardware for $3 and some change...You'll find it in plumbing. I used a little over a foot. **Clamp is required here for secure fit.**  I found this in the lumber section of Home Depot. The part is called a twisted strap. The part number is LTS12 and the barcode is 44315 93300. **I had to cut a portion out with tin snips so I could bend the bracket a bit. I also cut a section off the top because the twist strap was too tall. **  Bend bracket over the resevoir as pictured.  Prepped for paint. **I lined up and drilled hole that secures bracket to chassis prior to paint. I used factory reservoir bolt to secure to chassis. This installs in the upper factory reservoir nut plate.**  Painted and clear coated to protect against corrosion.  I secured the twisted strap bracket to reservoir under the bracing and with a strip of all weather 3M double sided tape. **Previously prepped and painted reservoir bracing.**   I purchased this part at Ace Hardware for like $4 and some change. **Comes with clamp...not pictured**  I used flexible hose end to stencil area to cut.  Installed with provided clamp.  Spacers, bolt, and a nut required here. I used a 1 inch spacer and a 1/2 inch spacer I had. I used a 10mm bolt and nut I had to secure bracket to chassis. **Spacers create the necessary area required to clear wheel well liner.**  Close up pic.  Mounting completed.  I modded the factory plug/connector instead of tapping into factory wires. Yellow wire is positive on factory end... so connect with red wire from reservoir motor. I unclipped connector from factory reservoir using small flat tip screw driver. I chose to remove the seal and replace with 3M strip caulk.  I used a hole saw (1 1/2 - 38mm) to cut through an ABS plastic scrap I had. **Dremel away the rough edges.**  I lined up the pins and drilled a hole big enough to accommodate pins and soldered/heat shrunk wires from new reservoir motor.  I used JB Weld for Plastics to seal center hole created by hole saw.  I placed some 3M strip caulk to act as a seal and adhesive.     Although the strip caulk holds tight I wrapped a zip tie around the plug/connector just in case.   Plugged in and secured with zip ties.   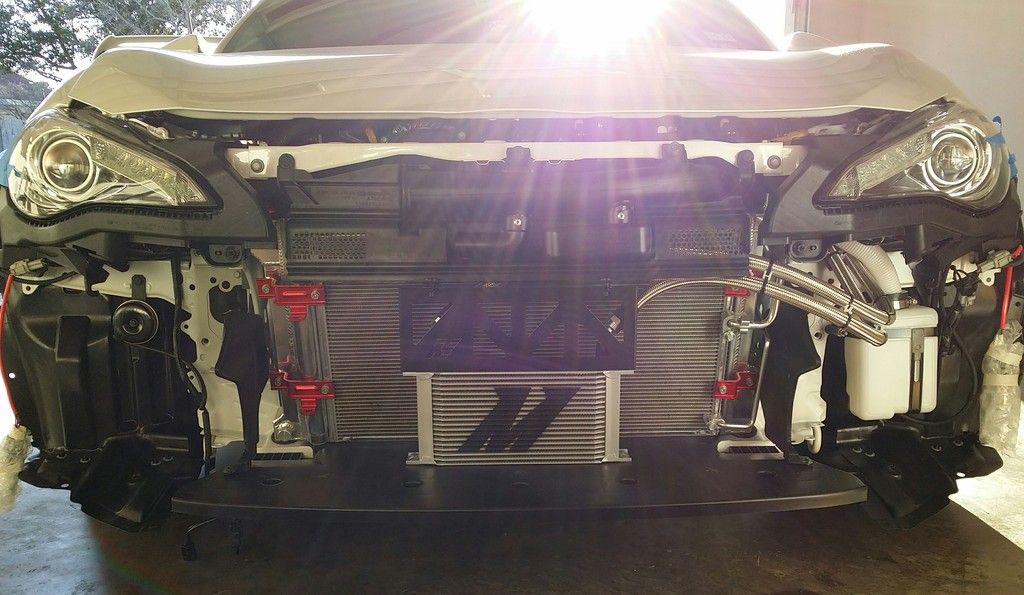
Last edited by zeal86; 08-04-2015 at 07:07 PM. |

|

|
| The Following 10 Users Say Thank You to zeal86 For This Useful Post: | aegisdrgn (03-21-2015), civicdrivr (06-27-2016), DustinS (08-04-2015), funwheeldrive (05-15-2017), Guff (02-22-2015), Gums (05-30-2015), Joesurf79 (05-08-2017), MJones_RB (05-10-2017), swarb (05-15-2017), SWPinATL (02-23-2015) |
|
03-21-2015, 08:46 PM
|
#2 |
|
Senior Member
Join Date: Jul 2014
Drives:
Posts: 2,002
Thanks: 1,157
Thanked 1,903 Times in 911 Posts
Mentioned: 23 Post(s)
Tagged: 0 Thread(s)
|
Because of the installation of my Beatrush front beam brace, I had to make an adjustment to my windshield washer reservoir mod... adjustment would have probably been necessary even with the OEM beam brace though.
   projekt zeal86 build |
|
|
|
| The Following User Says Thank You to zeal86 For This Useful Post: | MJones_RB (05-10-2017) |
|
03-21-2015, 11:58 PM
|
#3 |
|
Member
Join Date: Aug 2014
Drives: 13 FR-S whiteout / blue w2w
Location: St. Charles IL
Posts: 91
Thanks: 6
Thanked 14 Times in 10 Posts
Mentioned: 0 Post(s)
Tagged: 0 Thread(s)
|
Removal of the OEM version
How did you remove the OEM version. The instructions here seem to miss some undocumented clips or screws.
http://intranet.toyotaperu.com.pe/td...034yk03fx.html |
|
|
|
|
03-22-2015, 12:40 AM
|
#4 | |
|
Senior Member
Join Date: Jul 2014
Drives:
Posts: 2,002
Thanks: 1,157
Thanked 1,903 Times in 911 Posts
Mentioned: 23 Post(s)
Tagged: 0 Thread(s)
|
Quote:
There were two bolts from what I remember... I'm not sure if the top bolt would be easily accessible from the wheel well. To pull off this mod (if that is your intention) I would advise that you remove the front bumper. projekt zeal86 build |
|
|
|
|
|
05-08-2017, 11:52 AM
|
#5 |
|
Senior Member

Join Date: Mar 2016
Drives: 2016 White Pearl BRZ Premium
Location: Houston, Texas
Posts: 548
Thanks: 204
Thanked 252 Times in 147 Posts
Mentioned: 6 Post(s)
Tagged: 0 Thread(s)
|
This is exactly what I need to make room for brake ducting on my track build. Great DIY!!!
|
|
|
|
|
05-15-2017, 04:53 PM
|
#6 |
|
Senior Member
Join Date: Mar 2016
Drives: 2016 White Pearl BRZ Premium
Location: Houston, Texas
Posts: 548
Thanks: 204
Thanked 252 Times in 147 Posts
Mentioned: 6 Post(s)
Tagged: 0 Thread(s)
|
Installed my brake ducting this weekend, and this washer bottle to make room for it. Couple of observations - the factory pump provides a much stronger stream, and the included bracket for the tank is super flimsy.
Just be aware if you go this route 
|
|
|
|
| The Following User Says Thank You to Joesurf79 For This Useful Post: | funwheeldrive (05-15-2017) |
|
05-15-2017, 05:13 PM
|
#7 | |
|
Senior Member
Join Date: Jul 2014
Drives:
Posts: 2,002
Thanks: 1,157
Thanked 1,903 Times in 911 Posts
Mentioned: 23 Post(s)
Tagged: 0 Thread(s)
|
Quote:
Thanks for providing the input for others..I made my own bracket that passed through the provided bracket. My install did not feel flimsy though. __________________________________________ projekt zeal86 build zeal.eightsix Facebook Instagram @zeal.eightsix |
|
|
|
|
|
05-15-2017, 08:04 PM
|
#8 |
|
Senior Member
Join Date: Apr 2012
Drives: FR-S
Location: California
Posts: 1,956
Thanks: 294
Thanked 673 Times in 390 Posts
Mentioned: 11 Post(s)
Tagged: 2 Thread(s)
|
This seems to be much cheaper vs the OEM Toyota Motorsport version but you gotta hack it up with this DIY.
|
|
|
|
|
05-15-2017, 08:20 PM
|
#9 | |
|
Senior Member
Join Date: Jul 2014
Drives:
Posts: 2,002
Thanks: 1,157
Thanked 1,903 Times in 911 Posts
Mentioned: 23 Post(s)
Tagged: 0 Thread(s)
|
Quote:
If I were to redo this mod I would use sheet metal, a press shear, and a metal break to make my bracket. __________________________________________ projekt zeal86 build zeal.eightsix Facebook Instagram @zeal.eightsix |
|
|
|
|
|
05-15-2017, 08:23 PM
|
#10 | |
|
Senior Member

Join Date: Jul 2014
Drives: 2020 Hakone
Location: London, Ont
Posts: 69,841
Thanks: 61,656
Thanked 108,295 Times in 46,456 Posts
Mentioned: 2499 Post(s)
Tagged: 50 Thread(s)
|
Quote:
__________________
Racecar spelled backwards is Racecar, because Racecar.
|
|
|
|
|
|
05-15-2017, 08:40 PM
|
#11 | |
|
Senior Member
Join Date: Jul 2014
Drives:
Posts: 2,002
Thanks: 1,157
Thanked 1,903 Times in 911 Posts
Mentioned: 23 Post(s)
Tagged: 0 Thread(s)
|
Quote:
__________________________________________ projekt zeal86 build zeal.eightsix Facebook Instagram @zeal.eightsix |
|
|
|
|
| The Following User Says Thank You to zeal86 For This Useful Post: | Tcoat (05-15-2017) |
|
05-15-2017, 08:46 PM
|
#12 | |
|
Senior Member
Join Date: Jul 2014
Drives: 2020 Hakone
Location: London, Ont
Posts: 69,841
Thanks: 61,656
Thanked 108,295 Times in 46,456 Posts
Mentioned: 2499 Post(s)
Tagged: 50 Thread(s)
|
Quote:
I knew yours was more a show car but to never have used it boggles my mind. I use a gallon a week for about 4 months of the year.
__________________
Racecar spelled backwards is Racecar, because Racecar.
|
|
|
|
|
|
05-15-2017, 10:47 PM
|
#13 | |
|
Senior Member

Join Date: Mar 2013
Drives: 2013 DGM BRZ, 2020 C8 Corvette
Location: USofA!
Posts: 1,763
Thanks: 963
Thanked 1,896 Times in 789 Posts
Mentioned: 41 Post(s)
Tagged: 1 Thread(s)
|
Quote:
__________________
My DGM BRZ vid: https://www.youtube.com/watch?v=0OL9OhxexAA
My car journal thread: http://www.ft86club.com/forums/showthread.php?t=43402 |
|
|
|
|
|
05-15-2017, 11:39 PM
|
#14 |
|
Senior Member

Join Date: Aug 2016
Drives: 2013 BRZ Limited / 2024 G70 3.3T
Location: Vegas
Posts: 270
Thanks: 243
Thanked 174 Times in 110 Posts
Mentioned: 4 Post(s)
Tagged: 0 Thread(s)
|
I've never used it either...for all I know it doesn't even work, lol. Same for the seat warmers and probably a half dozen other things.
|
|
|
|
| The Following User Says Thank You to BRZyJ For This Useful Post: | Tcoat (05-16-2017) |
|
|
|
|
|
|
 Similar Threads
|
||||
| Thread | Thread Starter | Forum | Replies | Last Post |
| Total windshield washer amt? | SteveGrillo | BRZ First-Gen (2012+) General Topics | 21 | 03-04-2022 10:21 AM |
| SUBARU BRZ/ SCION FR-S PTUNING Windshield Washer Reservoir Kit | Freddy@PTUNING | Forced Induction | 9 | 03-28-2017 05:19 PM |
| Where can I get the Smaller Windshield Washer Tank? | Cross | Forced Induction | 37 | 01-19-2017 04:23 PM |
| where to buy a windshield washer tank | shif7i7down | Mechanical Maintenance (Oil, Fluids, Break-In, Servicing) | 3 | 02-23-2015 08:09 AM |
| smaller washer reservoir for use w/ brake ducts | blazinicon | Scion FR-S / Toyota 86 GT86 General Forum | 1 | 12-11-2014 07:57 PM |


