


|
||||||
| Cosmetic Modification (Interior/Exterior/Lighting) Discussions about cosmetic mods. |
 |
|
|
Thread Tools | Search this Thread |
 11-03-2016, 01:45 PM
|
#1 |
|
Senior Member

Join Date: Apr 2016
Drives: 2013 Supercharged BRZ, E85, Ohlins
Location: Oregon
Posts: 143
Thanks: 23
Thanked 133 Times in 61 Posts
Mentioned: 3 Post(s)
Tagged: 0 Thread(s)
|
best tool for cutting fenders?
greetings,
So I'm ready to cut the gaps behind fender vents in order to make them functional. Got my replacement grills ready. I've searched around and seen reports of some tools burning or crazing the paint near the cuts. Those of you who have cut the fenders, what tool works best, with least chance of damage? Dremel? Die Grinder? Recip. saw? Any advice on cutting disc type or blade type? I will be cutting the fenders on the car, and I'd rather not screw it up. thx... canyons. =========== "Oversteer is where the back of the car hits the wall first; understeer is where the front of the car hits the wall first." |

|

|
|
11-03-2016, 02:29 PM
|
#2 | |
|
Not Bаnned Anymore

Join Date: Jan 2015
Drives: Heavily Modified FRS
Location: Calgary, AB
Posts: 9,827
Thanks: 14,918
Thanked 8,275 Times in 4,797 Posts
Mentioned: 355 Post(s)
Tagged: 374 Thread(s)
|
scissors

__________________
Quote:
 |
|
|
|
|
| The Following User Says Thank You to go_a_way1 For This Useful Post: | olsonpg (11-13-2016) |
|
11-03-2016, 02:42 PM
|
#3 | |
|
Senior Member

Join Date: Jul 2014
Drives: 2020 Hakone
Location: London, Ont
Posts: 69,841
Thanks: 61,656
Thanked 108,295 Times in 46,456 Posts
Mentioned: 2499 Post(s)
Tagged: 50 Thread(s)
|
Quote:
I would stay away from the saw since one catch of a tooth and the fender is toast. Any of the spinning discs should do the job. Just take it slow and easy, do small sections at a time and stop to let the heat dissipate frequently and you should not have any issue. I personally would go the Dremel route with a heavy cutting disk.
__________________
Racecar spelled backwards is Racecar, because Racecar.
|
|
|
|
|
| The Following User Says Thank You to Tcoat For This Useful Post: | canyons (11-04-2016) |
|
11-05-2016, 12:48 AM
|
#5 |
|
Senior Member

Join Date: Mar 2016
Drives: 2013 Scion FR-S
Location: Phoenix
Posts: 143
Thanks: 22
Thanked 44 Times in 34 Posts
Mentioned: 3 Post(s)
Tagged: 0 Thread(s)
|
I used a pneumatic cutting wheel on one side and decided to use tin snips on the other just to see how they worked. The tin snips worked remarkably well when used in the proper direction(at some angles it is impossible to snip in the correct direction). The cutting wheel was superior tho. Just make sure you are prepared for the sparks to fly!
|
|
|
|
|
11-05-2016, 09:27 AM
|
#6 |
|
Senior Member
Join Date: Feb 2014
Drives: GT 86
Location: australia
Posts: 369
Thanks: 84
Thanked 121 Times in 77 Posts
Mentioned: 3 Post(s)
Tagged: 0 Thread(s)
|
I would NOT use any sort of cutting disc / jigsaw / dremel just to easy to make a mistake .
I used a compact Nibbler which attaches to a drill ( I used a cordless 18v ) and it worked a treat with no chance of cutting into anything behind the fender plus no heat/sparks or chance of slipping . |
|
|
|
|
11-06-2016, 12:22 AM
|
#7 |
|
Member
Join Date: Mar 2015
Drives: 2015 WRB BRZ Limited 6AT
Location: Houston, Tx
Posts: 30
Thanks: 5
Thanked 7 Times in 5 Posts
Mentioned: 0 Post(s)
Tagged: 0 Thread(s)
|
I'm using a Dremel, and it works fine. Just be sure to take your time and work slowly. And don't try to cut the tight corners, just make a rough cut and grind them down.
|
|
|
|
|
11-13-2016, 07:52 PM
|
#8 |
|
Senior Member
Join Date: Apr 2016
Drives: 2013 Supercharged BRZ, E85, Ohlins
Location: Oregon
Posts: 143
Thanks: 23
Thanked 133 Times in 61 Posts
Mentioned: 3 Post(s)
Tagged: 0 Thread(s)
|
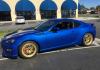
Fender vents completed
This the process and end result.
The functional vents started out as new oem vents which I cut out, painted and backed with black wire mesh. The fender cuts were done with a CBN wheel on a dremel (link here). This wheel works fine as long as you go slowly and guard against the dremel's chuck touching the bodywork. I used two layers of tape holding a plastic ruler along the bottom of the vents. If you do this, try to keep intact the receptacle for the rear-most press clip; it helps align the new piece. After cutting the fenders, I put two coats of flat black on the edges of the cuts to minimize potential rust. I also blacked out the inner body panel just behind the vent, which was still showing a lot of primer ( see 2nd photo.) Attachment 145935 FYI The 'supercharged' sticker is from ebay. I wanted some subtle bling. Last edited by canyons; 11-13-2016 at 09:11 PM. |
|
|
|
| The Following 5 Users Say Thank You to canyons For This Useful Post: | 8R6 (11-15-2016), bcj (11-14-2016), geezerbrzeezer (11-16-2016), Reign (11-16-2016), SuperTom (08-17-2025) |
|
11-13-2016, 08:07 PM
|
#9 |
|
Senior Member
Join Date: Mar 2016
Drives: 2013 Scion FR-S
Location: Phoenix
Posts: 143
Thanks: 22
Thanked 44 Times in 34 Posts
Mentioned: 3 Post(s)
Tagged: 0 Thread(s)
|
Very nice. Great job!
|
|
|
|
| The Following User Says Thank You to Mr Nerd For This Useful Post: | canyons (11-13-2016) |
|
11-13-2016, 08:30 PM
|
#10 |
|
insert witty quip here
Join Date: Mar 2016
Drives: 2016 Limited BRZ
Location: Stockton CA
Posts: 255
Thanks: 52
Thanked 193 Times in 103 Posts
Mentioned: 1 Post(s)
Tagged: 0 Thread(s)
|
That has to be the cleanest set of functional vents that I have seen so far.
Awesome job Canyon! |
|
|
|
| The Following 2 Users Say Thank You to iamjacob For This Useful Post: | canyons (11-13-2016), theneptune86 (03-16-2021) |
|
11-13-2016, 09:00 PM
|
#11 |

Join Date: Oct 2016
Drives: Black 17 BRZ LT MT PP
Location: NYC
Posts: 477
Thanks: 507
Thanked 520 Times in 203 Posts
Mentioned: 30 Post(s)
Tagged: 0 Thread(s)
|
Looks amazing. How did you remove the center fakegrill plastic piece?
Last edited by Drambeenie; 11-13-2016 at 09:17 PM. |
|
|
|
| The Following User Says Thank You to Drambeenie For This Useful Post: | canyons (11-13-2016) |
|
11-13-2016, 11:44 PM
|
#12 |
|
Senior Member
Join Date: Apr 2016
Drives: 2013 Supercharged BRZ, E85, Ohlins
Location: Oregon
Posts: 143
Thanks: 23
Thanked 133 Times in 61 Posts
Mentioned: 3 Post(s)
Tagged: 0 Thread(s)
|
I bought two extra OEM trim pieces to work on. The black trim bit pops off. The center opening was a time consuming task of drilling and dremellng to leave the center spar in place. I filled the back of the center spar ( it's normally hollow) with a cut down chunk of plastic and lots of body filler. It's now solid. The mesh screws to it as well as being stuck at the edges with 3M trim adhesive.
Rear surface painted black. Then several coats of priming, sanding and more primer on the outward facing surfaces. Then final paint and clear coat. Lots of work but it turned out great. I spread out the prep over a few weekends. |
|
|
|
| The Following User Says Thank You to canyons For This Useful Post: | Drambeenie (11-14-2016) |
|
11-14-2016, 06:08 PM
|
#13 | |
|
Senior Member

Join Date: Feb 2014
Drives: BRZ & XV
Location: Boulder, CO
Posts: 316
Thanks: 352
Thanked 204 Times in 106 Posts
Mentioned: 3 Post(s)
Tagged: 1 Thread(s)
|
Quote:
Also, is there a noticeable increase in wind noise or any whistling from the added air flow around the side mirrors?
__________________
2016 BRZ, Series.HyperBlue - Build Thread
2014 XV Crosstrek, CBS 2011 STi, SWP Sedan - Sold Instagram: mr.nick.hanson |
|
|
|
|
|
11-15-2016, 11:28 AM
|
#14 |
|
Senior Member
Join Date: Apr 2016
Drives: 2013 Supercharged BRZ, E85, Ohlins
Location: Oregon
Posts: 143
Thanks: 23
Thanked 133 Times in 61 Posts
Mentioned: 3 Post(s)
Tagged: 0 Thread(s)
|
I have not seen hood lift at freeway speeds. Definitely no more wind noise. A bit more engine noise now.
This area of the fender is a fairly neutral pressure area ( see other posts on this topic) meaning it does vent heat once positive air pressure builds in the engine bay. I am thinking there is enough room to fit a small 12V blower fan above the battery as well to provide ~30CFM of active airflow even when stopped. Haven't determined yet whether same is actually necessary.... Last edited by canyons; 11-19-2016 at 12:38 PM. |
|
|
|
| The Following User Says Thank You to canyons For This Useful Post: | nisti (11-15-2016) |
|
|
|
|
| Tags |
| bodywork, cutting fenders |
|
|
 Similar Threads
|
||||
| Thread | Thread Starter | Forum | Replies | Last Post |
| Cutting apart the rear bumper | SavingManuals | Cosmetic Modification (Interior/Exterior/Lighting) | 32 | 06-19-2016 05:47 PM |
| WTB: Rocket Bunny V1 front and rear fenders or V2 rear fenders | Puropinchetoyobaru | Want-To-Buy Requests | 0 | 04-12-2016 10:24 PM |
| CF fenders for your stock asphalt fenders | SpeedR | Southwest | 4 | 02-25-2014 07:06 PM |
| feeler CA: trade seibon CF fenders for stock red fenders | Alliedforces86 | Exterior Parts (Aero, Lighting, Etc.) | 11 | 08-08-2013 01:03 PM |
| HU/Amplifier cutting off low/mid frequencies? | 6-Shift | Electronics | Audio | NAV | Infotainment | 13 | 03-17-2013 10:01 PM |


 BRZ
BRZ

 Betty Rock