


|
||||||
| DIY (Do-It-Yourself) Guides For all DIYs. |
 |
|
|
Thread Tools | Search this Thread |
 11-08-2014, 04:36 PM
|
#15 |
|
Turning is for Nerds

Join Date: Aug 2013
Drives: 35 characters is not enough
Location: PDX
Posts: 1,974
Thanks: 836
Thanked 1,259 Times in 717 Posts
Mentioned: 186 Post(s)
|
Ok so a few takeaways from this morning as well as a few recommendations for any next revisions from the folks at Grimmspeed.
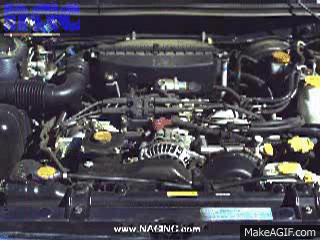
First off the intake fits with the mocal takeoff plate   But there is contact with the oil cooler lines on startup  I have a piece of tape in place to monitor wear over the next couple of weeks. If it's an issue I'll probably window the intake box. I have a piece of tape in place to monitor wear over the next couple of weeks. If it's an issue I'll probably window the intake box.  Channel my inner Clarkson  Or most likely take a dremel to the stock oil cap to buy me a few degrees of rotation (I'm maxed out right now)  I would recommend for future iterations the Grimmspeed move the top wall of the box in by 1/2 inches. This should not change the form/function of the box, but will buy a much larger clearence for oil coolers and the the stock temp sender (mine is close as well) Pro tip for everybody installing this, it's way easier to measure 0.75" from the end of the filter tube and make a mark than it is to measure from the MAF block. I would recommend there be a mark/stop on future revisions  Cheers, -Doug
__________________
Last edited by Decay107; 11-09-2014 at 10:43 PM. |

|

|
| The Following 3 Users Say Thank You to Decay107 For This Useful Post: |
|
11-08-2014, 05:58 PM
|
#16 |

Join Date: Nov 2011
Drives: '13 BRZ, '12 WRX
Location: Minneapolis, MN
Posts: 1,676
Thanks: 271
Thanked 3,553 Times in 886 Posts
Mentioned: 218 Post(s)
  |
Doug, thanks a ton for the pictures and the feedback! We'll look into addressing your points on future revisions!
It fits though, which is fantastic news! Matt Beenen Engineering |
|
|
|
|
11-10-2014, 11:47 AM
|
#17 | |
|
Join Date: Nov 2011
Drives: '13 BRZ, '12 WRX
Location: Minneapolis, MN
Posts: 1,676
Thanks: 271
Thanked 3,553 Times in 886 Posts
Mentioned: 218 Post(s)
|
Quote:
The .75in from the front of the air straightener recommendation might have worked for you, but may not be a good "one size fits all" recommendation. Since these are manufactured by hand right here, and multipiece, there is a certain amount of variation. I measured many intakes here, and the variance I saw was about .05in, and in the range of .92in to .87in from the air straightener (but none were as short as .75in, but being further away from the MAF is better than being too close, so you're good!), and this is why we just recommend measuring from the edge of the MAF flange. We'll definitely look into how to make a positive stop for the filter to simplify this in the future. Thanks for the fitment verification and for the feedback, it really helps us make our stuff better! Chase Engineering |
|
|
|
|
|
11-10-2014, 12:16 PM
|
#18 | |
|
Turning is for Nerds
Join Date: Aug 2013
Drives: 35 characters is not enough
Location: PDX
Posts: 1,974
Thanks: 836
Thanked 1,259 Times in 717 Posts
Mentioned: 186 Post(s)
|
Quote:
|
|
|
|
|
|
11-11-2014, 03:02 PM
|
#19 |
|
Senior Member
Join Date: Jun 2013
Drives: 2013 Whiteout FRS
Location: North Carolina
Posts: 106
Thanks: 26
Thanked 33 Times in 26 Posts
Mentioned: 1 Post(s)
|
What's the point of resetting the ECU? Seems odd to have an optional step like that in there.
|
|
|
|
|
11-11-2014, 04:07 PM
|
#20 | ||
|
Join Date: Nov 2011
Drives: '13 BRZ, '12 WRX
Location: Minneapolis, MN
Posts: 1,676
Thanks: 271
Thanked 3,553 Times in 886 Posts
Mentioned: 218 Post(s)
|
Quote:
Quote:
Resetting the ECU is fast, and the only negative to it is that if you don't go through the "pedal stomping procedure" we have laid out, your throttle response won't be the best at first until you've gone to wide open throttle a few times by driving. Chase Engineering |
||
|
|
|
| The Following User Says Thank You to GrimmSpeed For This Useful Post: | chanomatik (11-11-2014) |
|
11-11-2014, 05:05 PM
|
#21 | |
|
Turning is for Nerds
Join Date: Aug 2013
Drives: 35 characters is not enough
Location: PDX
Posts: 1,974
Thanks: 836
Thanked 1,259 Times in 717 Posts
Mentioned: 186 Post(s)
|
Quote:
1.77 from flange  1.57 from weld  Also sadly, it looks like the intake isn't quite as compatible with oil coolers as I thought. Wore through the tape after after about 10 minutes of moderately hard street driving  
|
|
|
|
|
| The Following 3 Users Say Thank You to Decay107 For This Useful Post: |
|
11-11-2014, 05:54 PM
|
#22 |
|
Join Date: Nov 2011
Drives: '13 BRZ, '12 WRX
Location: Minneapolis, MN
Posts: 1,676
Thanks: 271
Thanked 3,553 Times in 886 Posts
Mentioned: 218 Post(s)
|
Mr. Mitutoyo wins every time
 Sad to see the oil cooler is making contact. Like I said before we'll look into potentially updating the airbox if it doesn't affect performance negatively. But for now what happened to your Clarkson spirit! That's nothing the "pound-o-meter" precision adjustment tool can't fix :P Art told me he talked to you on the phone, and I don't know if he was able to talk to Matt yet to see what we can do for you, but we're working on it! Chase Engineering |
|
|
|
| The Following User Says Thank You to GrimmSpeed For This Useful Post: | chanomatik (11-11-2014) |
|
11-11-2014, 07:08 PM
|
#23 |
|
Turning is for Nerds
Join Date: Aug 2013
Drives: 35 characters is not enough
Location: PDX
Posts: 1,974
Thanks: 836
Thanked 1,259 Times in 717 Posts
Mentioned: 186 Post(s)
|
Pound-o-meter is still on the table, just need to figure out worst case scenario engine rotation (basically when I'm at the 200 ft marker in turn 1 at PIR, downshift to third and miss my rev match). God, I wish I wish my 1000 FPS camera fit under the hood of my car so I could get something like this at a track and see what kind of clearance the FA20 REALLY has.
 Also wanted to make sure you cats didn't want to get your hands on it before I made any permanent changes.
__________________
Last edited by Decay107; 11-11-2014 at 07:28 PM. |
|
|
|
|
11-11-2014, 10:03 PM
|
#24 |
|
Senior Member

Join Date: Aug 2013
Drives: 10 Series FR-S
Location: S. Jerz / Philly
Posts: 254
Thanks: 41
Thanked 121 Times in 67 Posts
Mentioned: 1 Post(s)
|
I tried installing and re-installing the main opening gasket and it looks horrible. Both with the favoring side out OR in, it doesn't look as good as everyone's pictures... (if anything, it didn't really seem to favor any side and would get pulled/pinched in different places.)
I don't know what I'm doing wrong! I'm sure it'll be fine but it's bugging the hell out of me. I guess i'll take it all apart again tomorrow... hopefully without ripping it. If there is any way, I would even pay for another gasket! |
|
|
|
|
11-11-2014, 10:57 PM
|
#25 | |
|
Turning is for Nerds
Join Date: Aug 2013
Drives: 35 characters is not enough
Location: PDX
Posts: 1,974
Thanks: 836
Thanked 1,259 Times in 717 Posts
Mentioned: 186 Post(s)
|
Quote:
|
|
|
|
|
| The Following User Says Thank You to Decay107 For This Useful Post: | Struckbylitenin (11-12-2014) |
|
11-11-2014, 11:21 PM
|
#26 |
|
Señor Member

Join Date: Aug 2012
Drives: 86 GT/'74 TA22 Celica/Kangaroo
Location: Melbourne, Australia
Posts: 1,706
Thanks: 1,107
Thanked 769 Times in 480 Posts
Mentioned: 13 Post(s)
|
One thing I found during installation is when I torqued up the bolts the go in the rubber bushes it deformed the shape of the box slightly so that it was difficult to align the lid properly. I had to loosen off the two bolts, attached the lid and re-tightened the bolts. Not a big deal just something to note.
__________________
1974 TA22 Celica
2013 86 GT |
|
|
|
|
11-12-2014, 12:34 AM
|
#27 | |||
|
Join Date: Nov 2011
Drives: '13 BRZ, '12 WRX
Location: Minneapolis, MN
Posts: 1,676
Thanks: 271
Thanked 3,553 Times in 886 Posts
Mentioned: 218 Post(s)
|
Quote:
Quote:
Quote:
Matt Beenen Engineering |
|||
|
|
|
| The Following User Says Thank You to GrimmSpeed For This Useful Post: | Struckbylitenin (11-12-2014) |
|
11-12-2014, 10:16 AM
|
#28 | |
|
Join Date: Nov 2011
Drives: '13 BRZ, '12 WRX
Location: Minneapolis, MN
Posts: 1,676
Thanks: 271
Thanked 3,553 Times in 886 Posts
Mentioned: 218 Post(s)
|
Quote:
And like Matt said, if you need new gasket contact us! Chase Engineering |
|
|
|
|
| The Following User Says Thank You to GrimmSpeed For This Useful Post: | unsurety (11-22-2014) |
|
|
|
|
|
|
 Similar Threads
|
||||
| Thread | Thread Starter | Forum | Replies | Last Post |
| BRZ/FR-S Coilover Installation Guide | GrimmSpeed | DIY (Do-It-Yourself) Guides | 64 | 02-21-2020 05:30 PM |
| Requesting DIY bayson r body kit installation guide | jay_ | DIY (Do-It-Yourself) Guides | 14 | 09-26-2016 01:42 PM |
| eibach sportlines springs installation guide? | juanam0909 | Suspension | Chassis | Brakes -- Sponsored by 949 Racing | 2 | 10-15-2013 05:53 PM |
| DIY 6000K HID Kit Installation(Scion FR-S ONLY) - Video Guide | Alex | DIY (Do-It-Yourself) Guides | 10 | 07-09-2013 07:38 AM |


 Lexi B