


|
||||||
| DIY (Do-It-Yourself) Guides For all DIYs. |
 |
|
|
Thread Tools | Search this Thread |
 03-24-2014, 06:53 PM
|
#1 |
|
Fears Hiccups

Join Date: Nov 2013
Drives: Toyota badged 2013 Whiteout FR-S
Location: Dallas/Kennesaw, GA
Posts: 127
Thanks: 48
Thanked 126 Times in 31 Posts
Mentioned: 3 Post(s)
Tagged: 0 Thread(s)
|
DIY - Third brake light relocate to headliner
UPDATE 4/1/14: Tint tests added on third page.
TL;DR I made this: 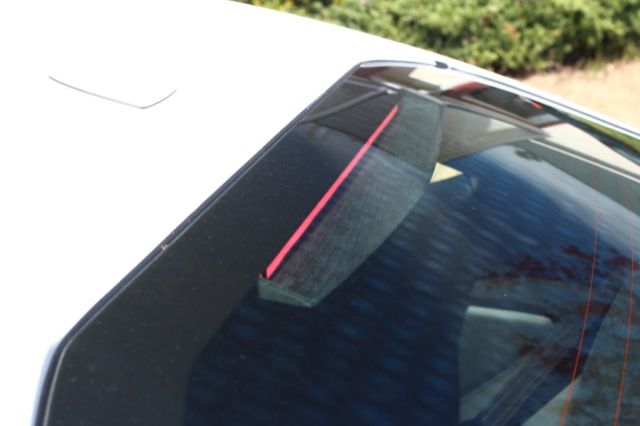 And it looks awesome: 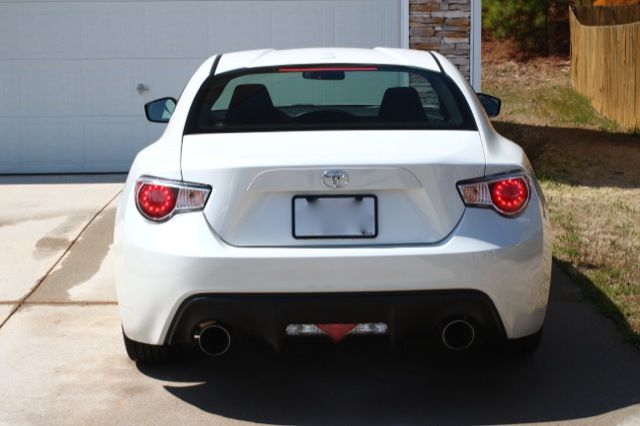 The third brake light in this car has always bugged me. It’s in the way and it’s ugly. So I moved it. I used basswood and aluminum because they’re very easy to work with and I bought an LED strip from SuperBrightLEDs.com. The strip I got is 18’ long and very thin (it had to be to fit in the thickness of the headliner), and it has it’s own housing with a diffuser on the front so no individual LEDs are visible. It’s a cool looking light. Speaking of thinness, one of the goals of this project was that I wanted an unobstructed rear view, so it was important that the entire enclosure be very thin so as little as possible is visible from the rear view mirror. It ended up that it is completely invisible, so it turned out really well in that regard. Another requirement was that it not be attached in any way to the window, and that the new brake light be easily removable for tinting or washing the window. In this regard, the enclosure is attached with a small aluminum panel with just the center clip holding the headliner to the roof. To the process of making and installing… Materials: (2) 1/8”x4”x24” basswood from Michael’s or craft store Various #6 screws, nuts, and bolts from Home Depot Rattle can flat black spray paint 12”x24”x.019” mill finish aluminum sheet (I had a lot left over) 18” red 12vdc LED strip from superbrightleds.com 3m extension cable for LED strip The design was the hardest part because it had to fit the window well enough that almost no light passed between the enclosure and the window, illuminating the rear deck. This is where the basswood came in handy. Using just a utility knife, I could cut, hold it up to the window, adjust my measurements and cut again. Here is how the basic frame came out after cutting it a few times: 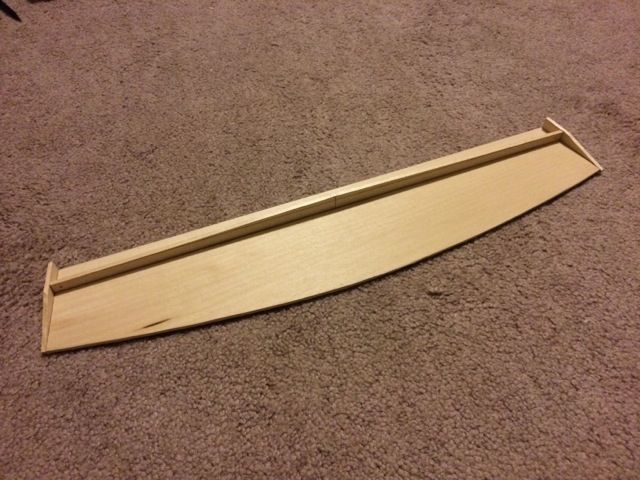 And with the LED strip in it: 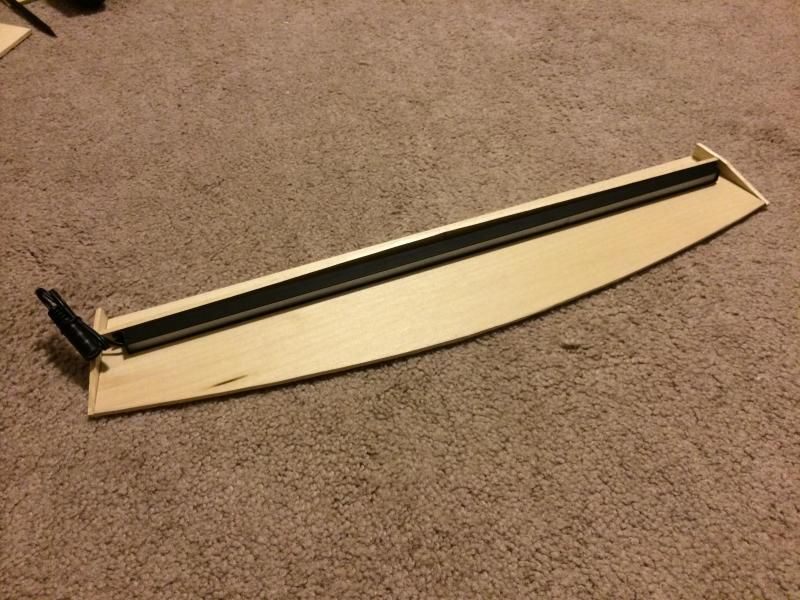 I don’t have much to talk about in the way of actually building the thing. I just used a little trial and error and put it all together with super glue. If you use super glue, let it sit out of the car overnight to dry before painting. If you leave it up against the window before it cures, it will off-gas and leave a film on your windows that will not come off. I then painted it flat black, attached the light, and put so self sticking felt on the edges and anywhere I though it might rattle up against the window. The important part is the aluminum bracket I made to hold it up. 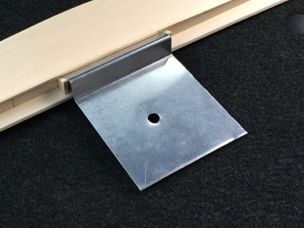 I made this so there would be one point of attachment for ease of installation and removal. I cut about a 4x5 piece of 1mm thick aluminum and bent it up and over the back lip of the headliner. It attaches with the center clip of the headliner through the hole into the roof (look back there, you’ll see what I mean). The important part is bending the part that the light enclosure attaches to so that there is constant pressure against the window. You want pretty solid pressure because if not it may separate and tap the window when you drive over large bumps in the road. Here is the whole thing finished: 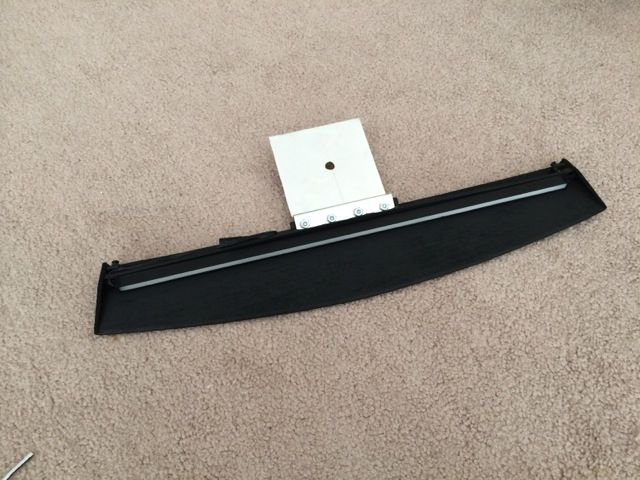 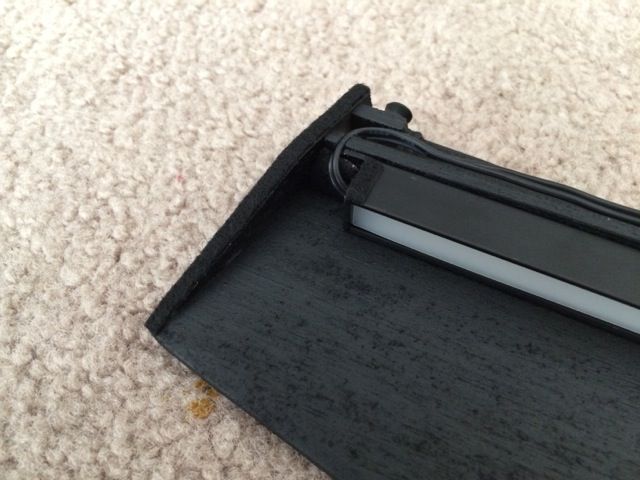  I also added some screws to the ends to press against the headliner to keep the whole thing from wobbling and help with the pressure against the window: 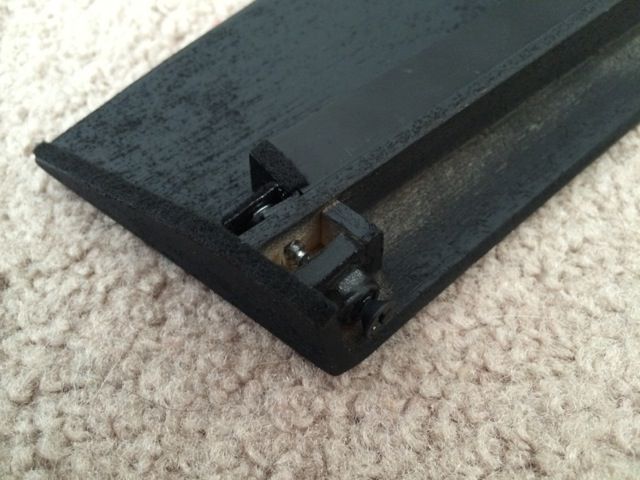 Ok, now the installation. I followed this wonderful thread to remove the rear deck. It wasn’t necessary just to run the cables as they can just be tucked behind the panels around the window and the headliner, but since I really want that stock third brake light gone, I had to take the deck out. Yes, I had to remove almost all of the panels in the rear just like in the DIY linked above to easily get the deck out and back in. Once I had the deck out I drilled the plastic rivets holding the brake light on and removed it: 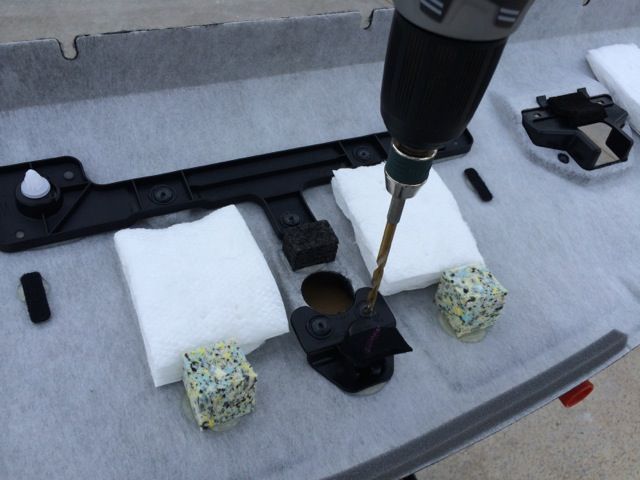 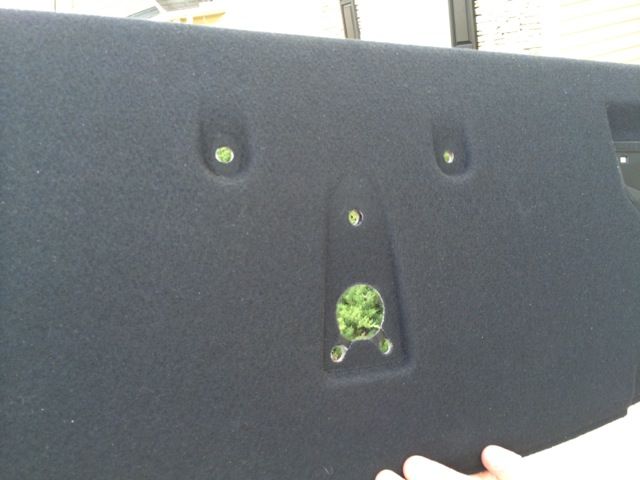 “Nooooooooooo!” Unhook the OEM cable from the LEDs on the stock brake light. 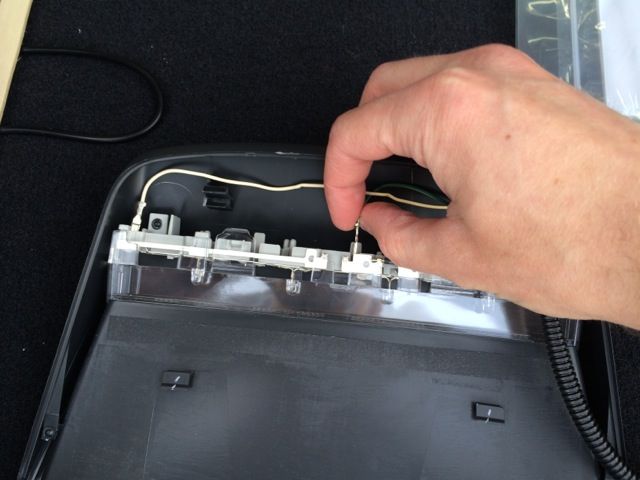 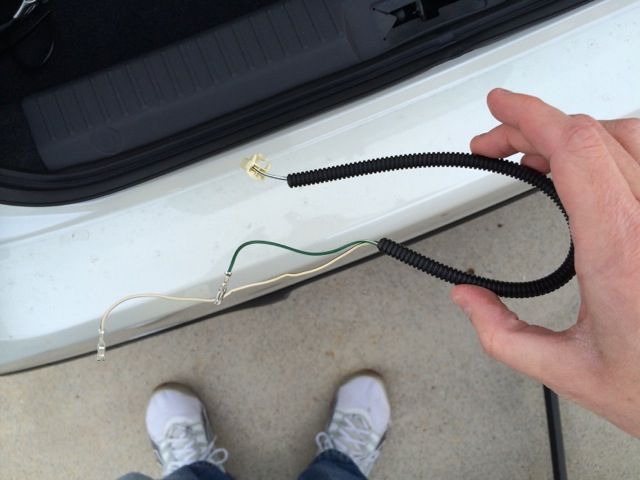 I also bought the 3 meter extension cable for this LED strip from SuperBrightLEDs here: 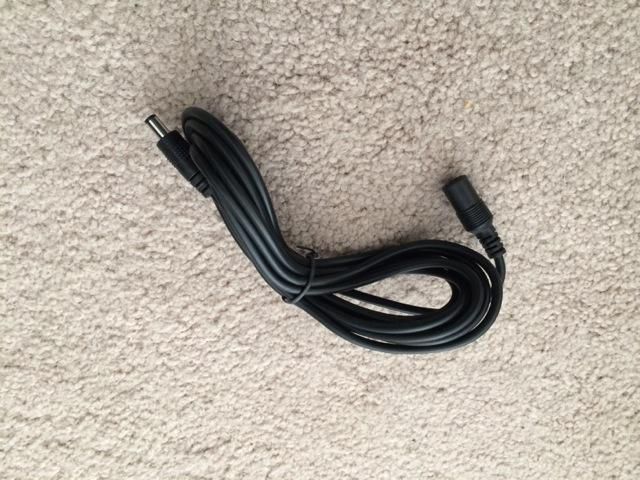 Cut it to the right length (sorry I didn’t measure before putting it in the car, you’ll have to route it then cut to the right length) and attach the two wires (however you see fit) to the OEM cable. I just put two small blades on the extension and plugged them into the OEM cable leads. Super easy and reversible. Then I wrapped it with padding so it wouldn’t rattle around: 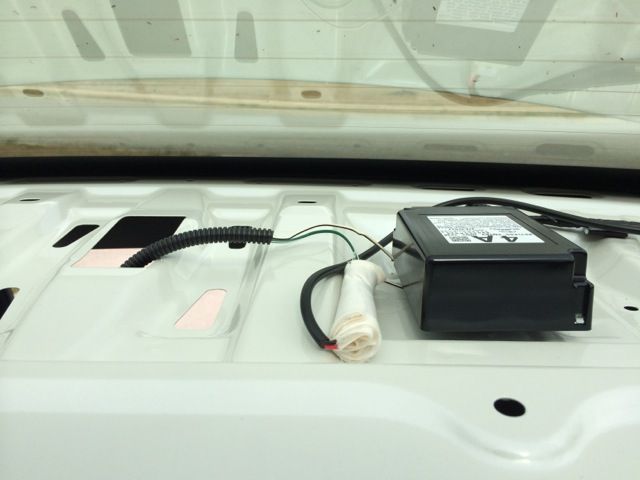 This is how I routed the cable: 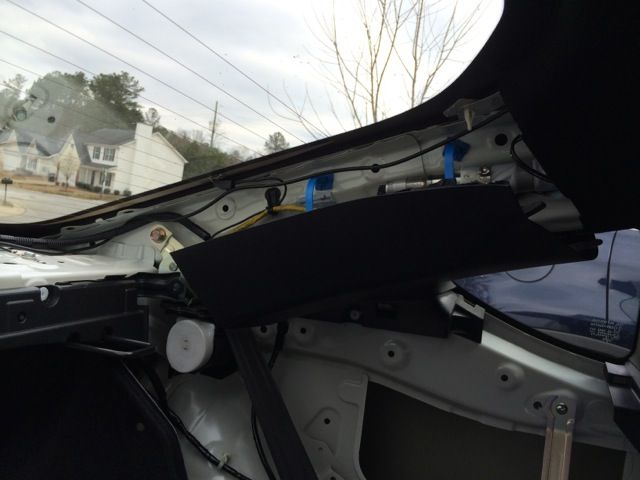 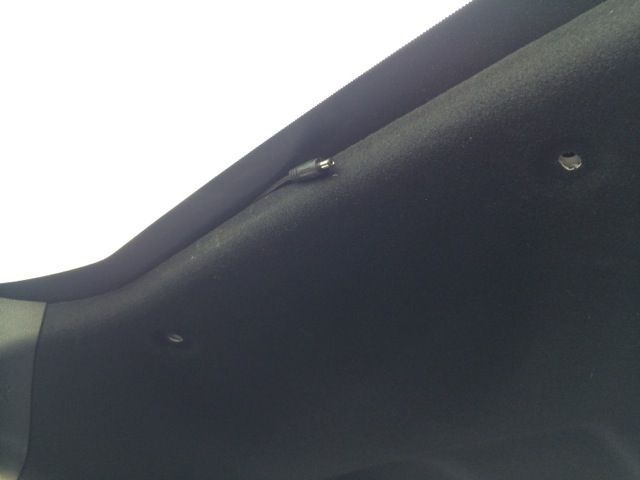 From here mounting the light is simple. Pop the three clips holding up the headliner up in the back. Side note: legitimate panel removal tools make working on projects like this 10x easier. Attach the extension cable, pull the headliner down, and slide the bracket in, lining up the holes.  The connectors sit nicely outside the headliner in the the open area on the enclosure toward the front of the car. Push it up to the roof (remember because it’s bent to have tension) and pop the center clip into the headliner. Pop the two side clips in. 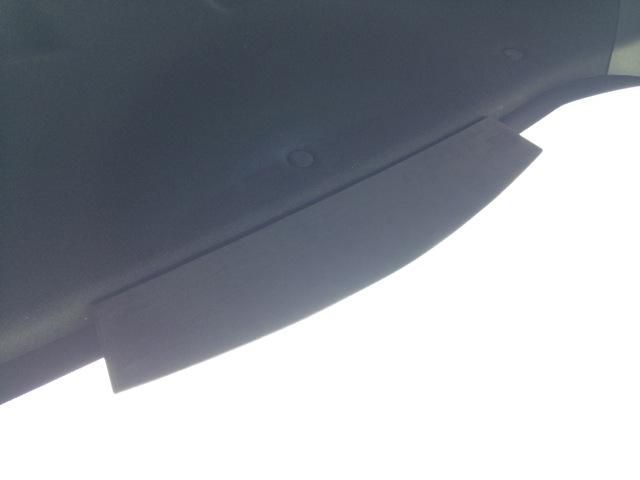 As for the rear deck, I don’t have any pictures showing me covering it, but all I did was get some Krylon All-purpose 7010 spray adhesive and glue a large piece of felt to it. I also cut out the areas for the carseat ring covers: 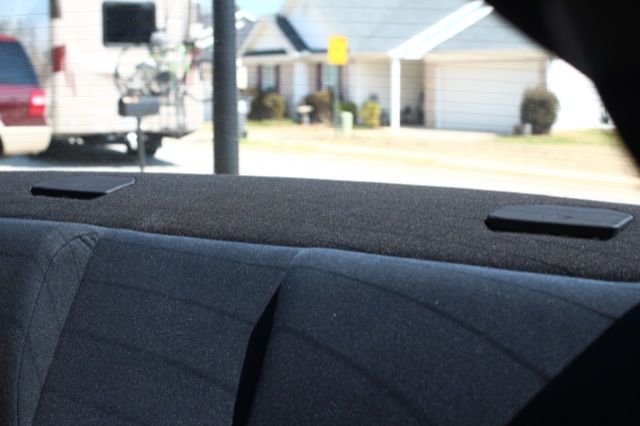 Yay! No more stock third brake light! Reassemble everything and that’s it. After this I drove around and tweaked the new third brake light to get rid of some rattles by covering the aluminum with thin black fabric. Here’s my new rear view: 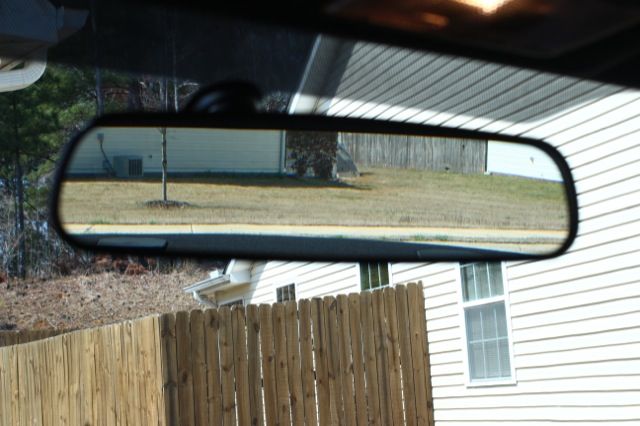 So good! And here’s the final product: 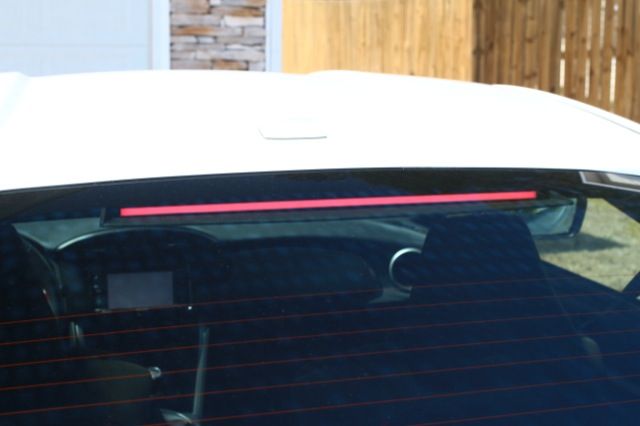 And not illuminated: 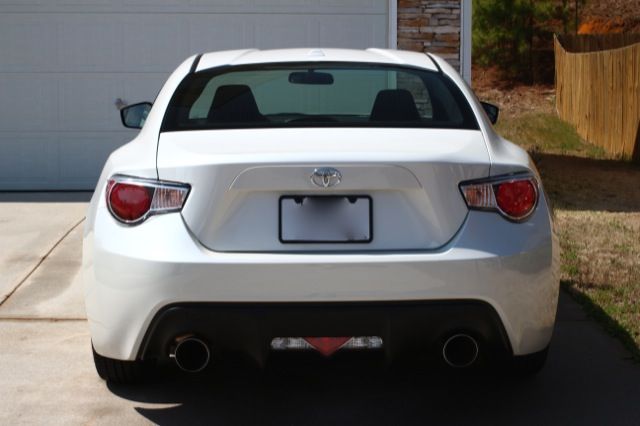 I think that’s about it. I love how it turned out. It looks almost OEM and that’s how I like my mods. I'll post some night shots later. Last edited by fatherfork; 04-01-2014 at 11:21 AM. Reason: Added link to LED strip |

|

|
| The Following 50 Users Say Thank You to fatherfork For This Useful Post: | 00NissanNinja (03-26-2014), 8R6 (08-15-2014), 93cc (04-10-2014), akyp (04-06-2014), Ammunition (05-20-2015), amram (03-25-2014), BabaYaga (10-07-2014), badrad (04-17-2014), BirdTRD (08-06-2014), Black Tire (04-24-2014), blugbox (03-27-2014), booyaka (08-11-2014), Bu-Tang (03-27-2014), campy (03-25-2014), Carban (04-22-2014), DarkestBuddha (03-25-2014), deliroast (03-30-2014), disgruntld (04-11-2014), DustinS (08-28-2014), Enders FRS (04-21-2014), Fett4Real (03-25-2014), FLYFISHR (03-24-2014), Ganthrithor (04-24-2014), Goya (04-17-2014), Gums (06-17-2014), hur1ey02 (04-16-2014), Hyper4mance2k (04-28-2015), Jac (04-28-2014), jbsali (04-19-2014), JEFFSTYLE (03-25-2014), Jman1759 (03-24-2014), kakarot1657 (04-08-2014), Kayzer Soze (04-24-2014), korhun (08-23-2019), MaXimus (04-02-2014), notout86 (05-18-2015), Overdrive (02-22-2017), PNW FRS (04-12-2014), post_break (03-24-2014), roddy (03-24-2014), Sigh-on-Rice (03-25-2014), sshole (03-25-2014), Steege (11-17-2014), SWPinATL (08-07-2014), t.chk (08-06-2014), TennisHsu (03-26-2014), userjack6880 (03-27-2014), wheelhaus (04-15-2014), willypongtb (03-25-2014), YMAA (03-25-2014) |
|
03-24-2014, 06:53 PM
|
#2 |
|
Fears Hiccups
Join Date: Nov 2013
Drives: Toyota badged 2013 Whiteout FR-S
Location: Dallas/Kennesaw, GA
Posts: 127
Thanks: 48
Thanked 126 Times in 31 Posts
Mentioned: 3 Post(s)
Tagged: 0 Thread(s)
|
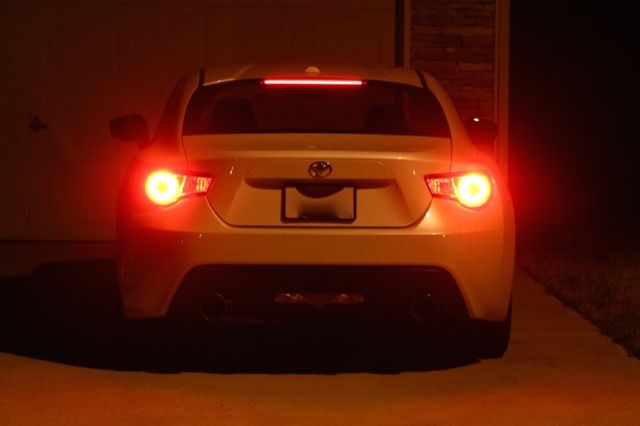
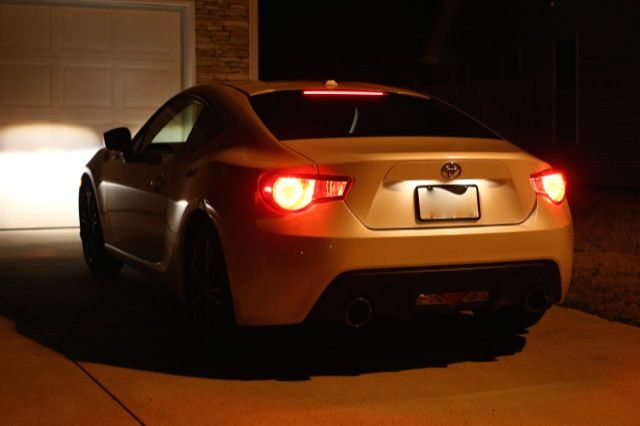
Night shots!
Last edited by fatherfork; 03-25-2014 at 12:00 AM. |
|
|
|
| The Following 14 Users Say Thank You to fatherfork For This Useful Post: | 636 (04-15-2014), 8R6 (08-15-2014), AtlasMick (04-24-2014), CamryDS (08-10-2014), Carban (05-10-2014), Cjymiller (03-25-2014), DashRipRock (04-27-2015), Ganthrithor (04-24-2014), korhun (08-23-2019), LRNAD90 (06-09-2022), NOI (07-01-2017), Overdrive (02-22-2017), SkAsphalt (03-31-2014), zohare (04-21-2014) |
|
03-24-2014, 06:57 PM
|
#3 |
|
Professional Smartass

Join Date: Jul 2012
Drives: White Out FRS
Location: Houston TX
Posts: 1,126
Thanks: 114
Thanked 610 Times in 308 Posts
Mentioned: 51 Post(s)
Tagged: 0 Thread(s)
|
Awesome.
Last edited by post_break; 03-24-2014 at 11:06 PM. |
|
|
|
| The Following User Says Thank You to post_break For This Useful Post: | fatherfork (03-25-2014) |
|
03-24-2014, 07:09 PM
|
#4 |
|
Much title. Wow.

Join Date: Mar 2013
Drives: 2013 BRZ Sport-Tech
Location: Edmonton, AB
Posts: 716
Thanks: 118
Thanked 292 Times in 163 Posts
Mentioned: 8 Post(s)
Tagged: 0 Thread(s)
|
Classy.
__________________
༼ つ ◕_◕ ༽つI PUT A SPELL ON YOU ༼ つ ◕_◕ ༽つ
|
|
|
|
| The Following User Says Thank You to Deadspool For This Useful Post: | fatherfork (03-24-2014) |
|
03-24-2014, 07:12 PM
|
#5 |
|
The Original Super Saiyan

Join Date: Oct 2011
Drives: 2014 SWP BRZ
Location: OC CA
Posts: 239
Thanks: 162
Thanked 63 Times in 41 Posts
Mentioned: 0 Post(s)
Tagged: 0 Thread(s)
|
sub'd
__________________
To each his own, Agree to Disagree
 |
|
|
|
|
03-24-2014, 10:56 PM
|
#6 |
|
Builder
Join Date: Jan 2014
Drives: 2014 BRZ - World Rally Blue
Location: Kitsap, Washington
Posts: 425
Thanks: 105
Thanked 68 Times in 54 Posts
Mentioned: 9 Post(s)
Tagged: 0 Thread(s)
|
I will be doing this as I have already swapped my rear shelf with a light delete... Great DIY
|
|
|
|
|
03-24-2014, 11:28 PM
|
#7 |
|
Senior Member
Join Date: Apr 2012
Drives: White
Location: Southeast US
Posts: 161
Thanks: 22
Thanked 78 Times in 50 Posts
Mentioned: 2 Post(s)
Tagged: 0 Thread(s)
|
Lightweight as well! Love the idea.
|
|
|
|
|
03-24-2014, 11:35 PM
|
#8 |
|
AKA Mugen Dom

Join Date: May 2013
Drives: 2013 FR-S, 2007 FJ Voodoo Blue
Location: Hill AFB UT
Posts: 957
Thanks: 125
Thanked 337 Times in 239 Posts
Mentioned: 8 Post(s)
Tagged: 0 Thread(s)
|
Think if you covered the wood in vinyl it would look more OEM...right now you can tell its wood...that would bother me...but otherwise great idea.
|
|
|
|
|
03-24-2014, 11:41 PM
|
#9 |
|
AKA Mugen Dom
Join Date: May 2013
Drives: 2013 FR-S, 2007 FJ Voodoo Blue
Location: Hill AFB UT
Posts: 957
Thanks: 125
Thanked 337 Times in 239 Posts
Mentioned: 8 Post(s)
Tagged: 0 Thread(s)
|
Really theres palstic you could use...called sintra, its a foam based plastic cuts like balsa even.
|
|
|
|
| The Following 2 Users Say Thank You to Fett4Real For This Useful Post: | BabaYaga (10-07-2014), fatherfork (03-24-2014) |
|
03-24-2014, 11:59 PM
|
#10 | |
|
Fears Hiccups
Join Date: Nov 2013
Drives: Toyota badged 2013 Whiteout FR-S
Location: Dallas/Kennesaw, GA
Posts: 127
Thanks: 48
Thanked 126 Times in 31 Posts
Mentioned: 3 Post(s)
Tagged: 0 Thread(s)
|
Quote:
|
|
|
|
|
|
03-25-2014, 12:06 AM
|
#11 |
|
AKA Mugen Dom
Join Date: May 2013
Drives: 2013 FR-S, 2007 FJ Voodoo Blue
Location: Hill AFB UT
Posts: 957
Thanks: 125
Thanked 337 Times in 239 Posts
Mentioned: 8 Post(s)
Tagged: 0 Thread(s)
|
It would bother the hell out of me, Im sure no one else would notice but its like that small ding or chip that isnt noticable you know its there but no one else does
|
|
|
|
|
03-25-2014, 12:18 AM
|
#12 | |
|
Fears Hiccups
Join Date: Nov 2013
Drives: Toyota badged 2013 Whiteout FR-S
Location: Dallas/Kennesaw, GA
Posts: 127
Thanks: 48
Thanked 126 Times in 31 Posts
Mentioned: 3 Post(s)
Tagged: 0 Thread(s)
|
Quote:
|
|
|
|
|
|
03-25-2014, 12:29 AM
|
#13 |
|
Sideways and smiling!
Join Date: Jan 2012
Drives: First 86 FRS 5/8/2012 (second US)
Location: Oregon
Posts: 941
Thanks: 17
Thanked 273 Times in 179 Posts
Mentioned: 15 Post(s)
Tagged: 0 Thread(s)
|
I like that a lot. I recommend wrapping it like you did the rear deck. It would look OEM.
__________________
|
|
|
|
|
03-25-2014, 01:24 AM
|
#14 |
|
Banned
Join Date: Feb 2013
Drives: 2013 Whiteout Scion FR-S 6MT
Location: Gainesville, FL
Posts: 3,272
Thanks: 1,278
Thanked 4,183 Times in 1,415 Posts
Mentioned: 28 Post(s)
Tagged: 2 Thread(s)
|
Thinking of making some and selling them?
|
|
|
|
|
|
|
|
|
|
 Similar Threads
|
||||
| Thread | Thread Starter | Forum | Replies | Last Post |
| ZILLA: (How-To) *REAR FOG LIGHT WITH BRAKE LIGHT* MOD! | ZILLA | DIY (Do-It-Yourself) Guides | 117 | 09-19-2017 11:17 AM |
| **PHASTEK** Rear Fog Light/Brake Light Kit for the Scion FR-S and Subaru BRZ | PhastekSport | Exterior Parts - Lighting | 57 | 07-10-2017 09:14 PM |
| 4th Brake Light/Rear Fog Light Kit FRS/BRZ/GT86 - $59.95! | Vicious LED | Groupbuys | 58 | 01-05-2014 06:13 PM |
| For Sale: Smoked/Red/Clear Reverse Light + Brake Light Bars Brand New! | Vicious LED | Exterior Parts (Aero, Lighting, Etc.) | 9 | 08-25-2013 08:26 PM |
| 4th Brake Light Mod | boredom.is.me | Cosmetic Modification (Interior/Exterior/Lighting) | 1 | 12-29-2012 02:46 AM |


 86
86 Betty
Betty
