|
||||||
| DIY (Do-It-Yourself) Guides For all DIYs. |
 |
|
|
Thread Tools | Search this Thread |
 09-01-2012, 11:52 PM
|
#1 |
|
Photo Specialist

Join Date: Feb 2012
Drives: 2013 Toyota 86 DGM 6MT
Location: Texas
Posts: 1,152
Thanks: 587
Thanked 1,805 Times in 420 Posts
Mentioned: 94 Post(s)
Tagged: 0 Thread(s)
|
DIY Blackvue DR400G-HD/Power Magic Pro Dashcam
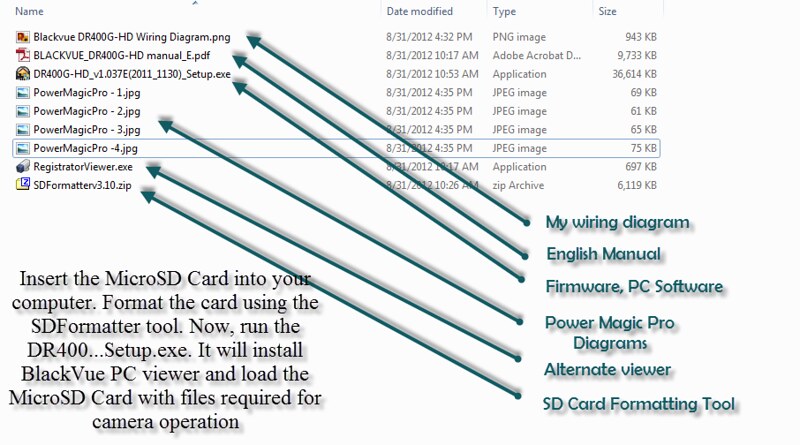
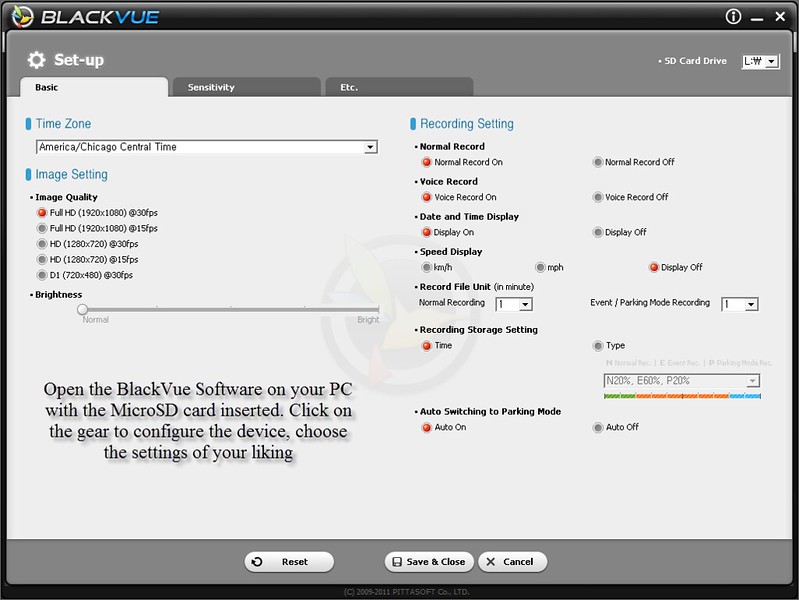
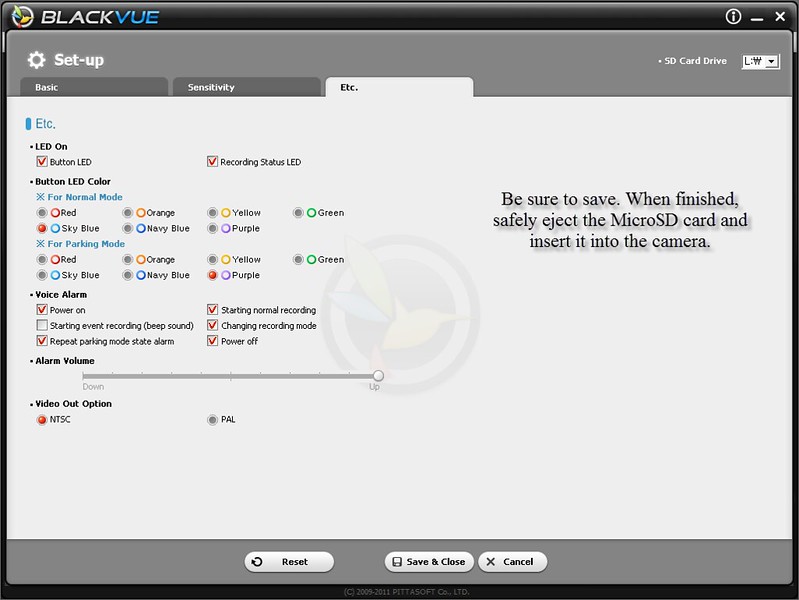
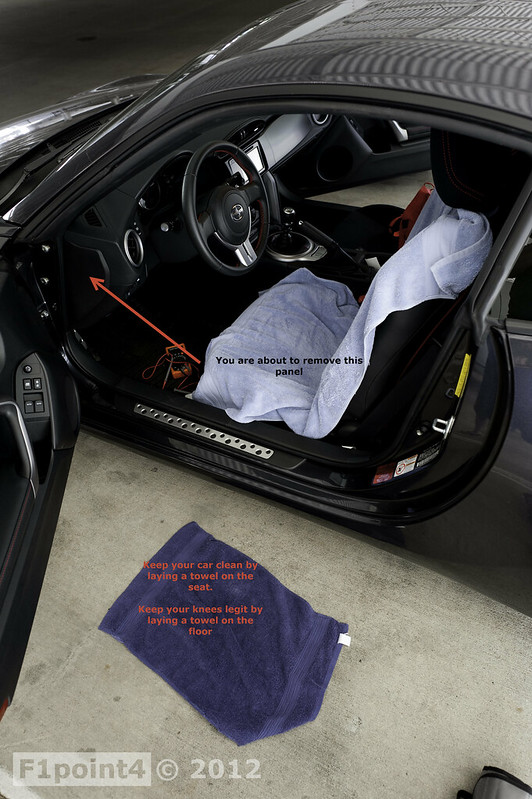
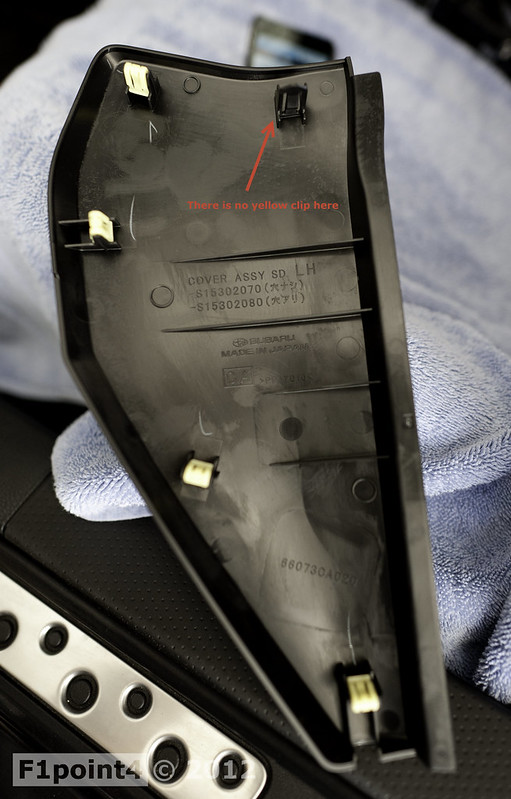
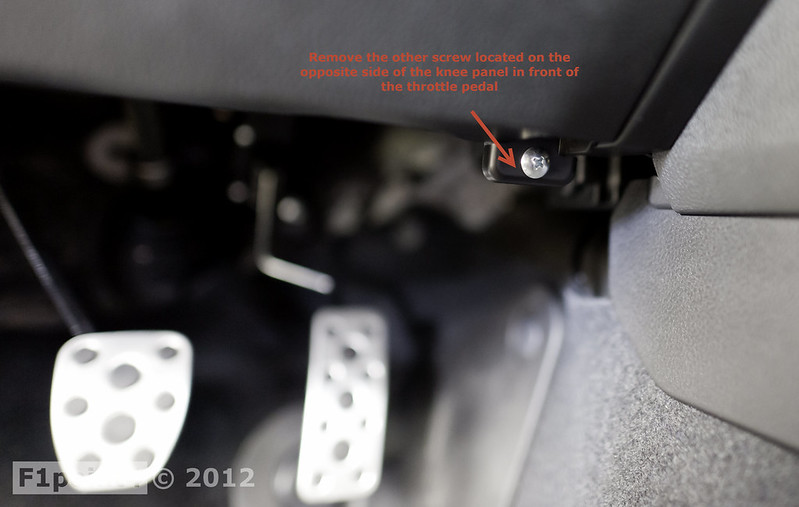
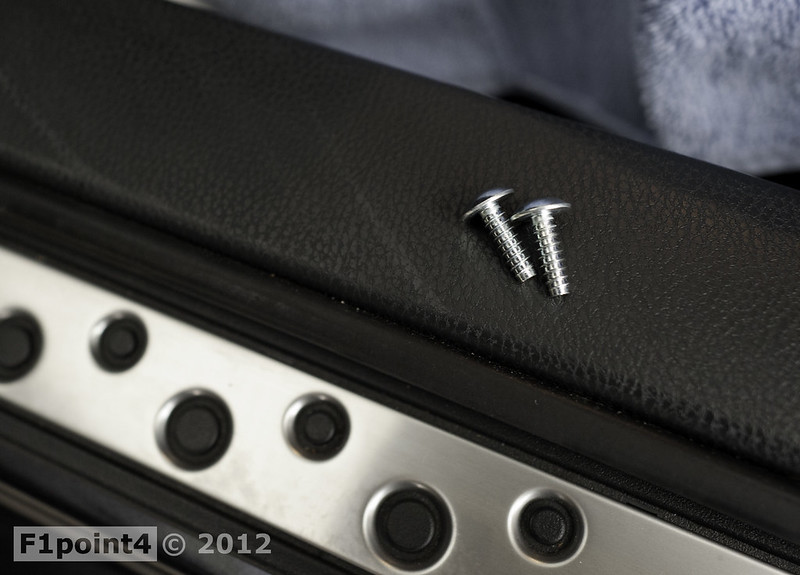
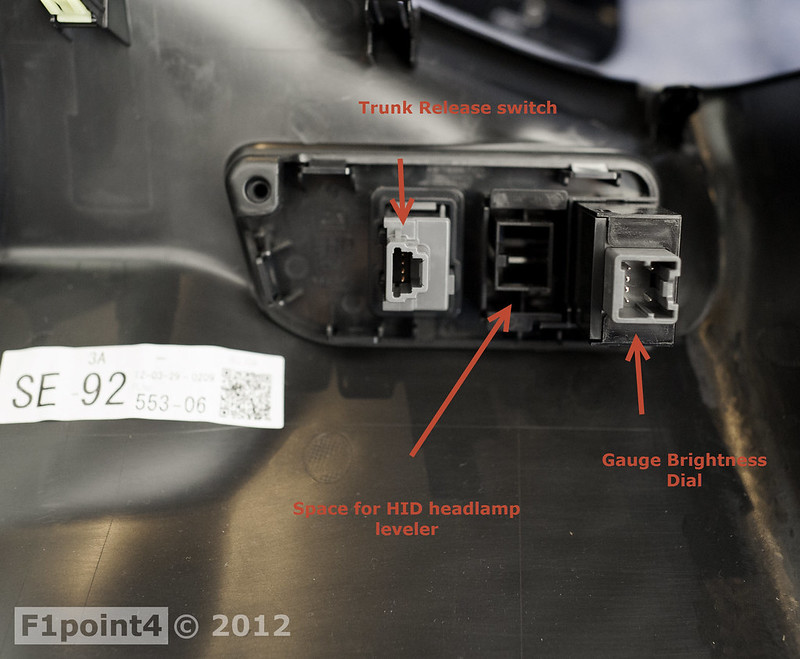
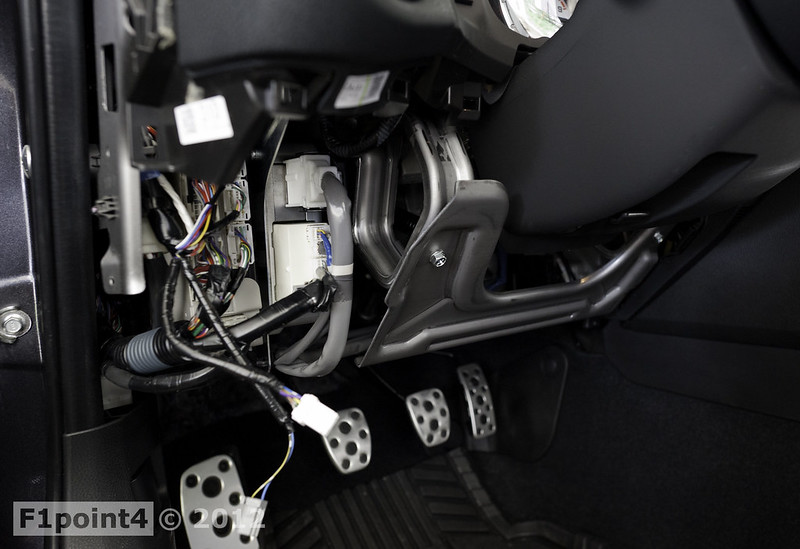
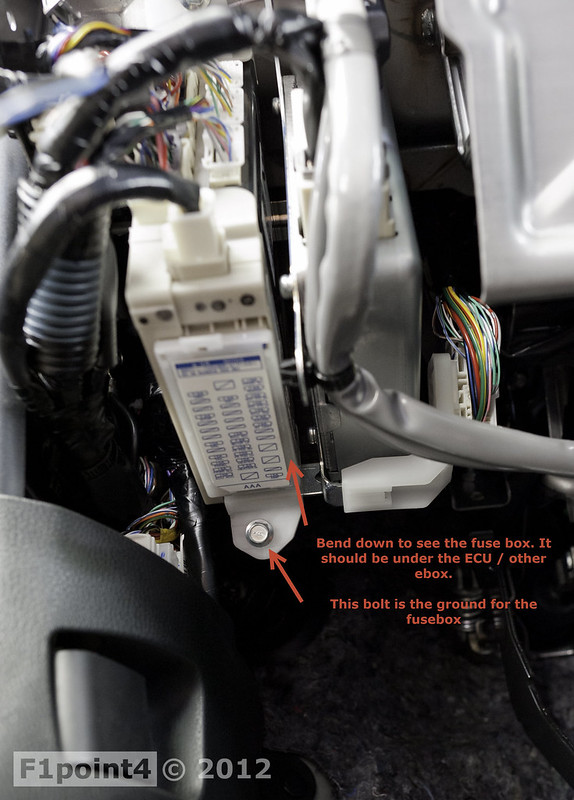
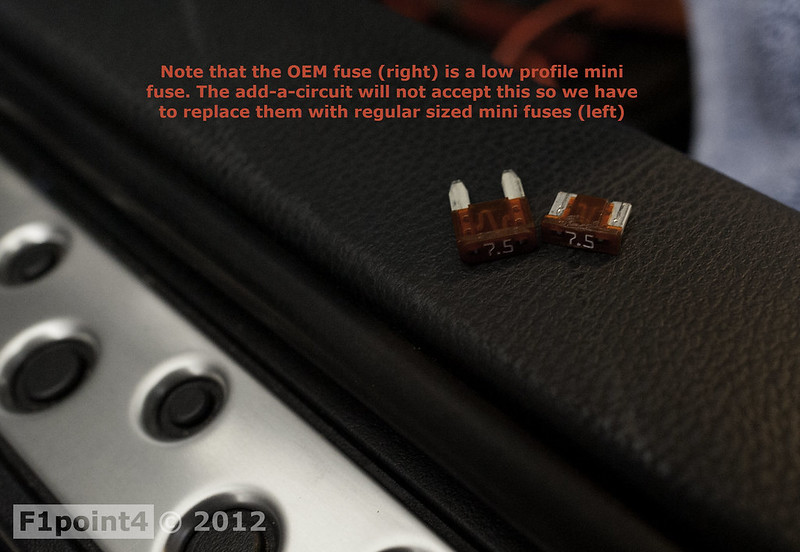
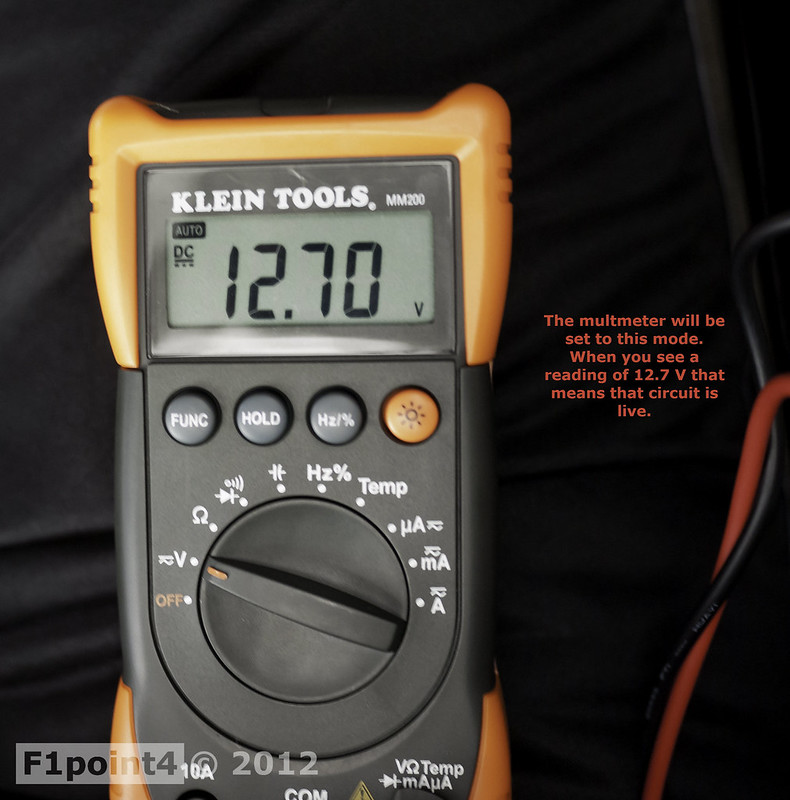
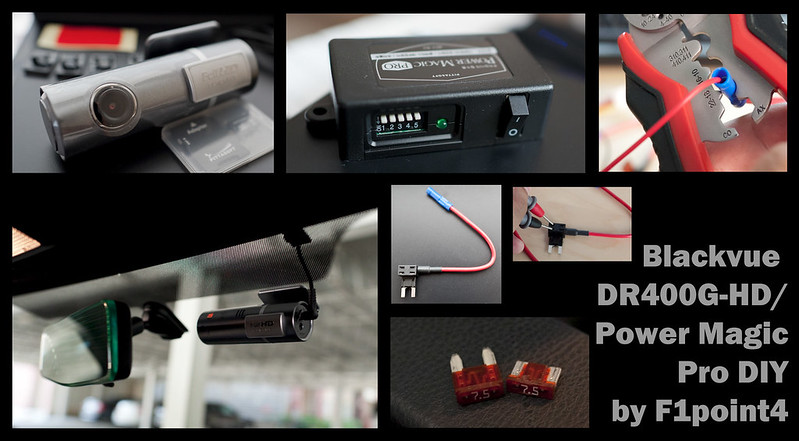 20120831-LolaBlackVue400DIY-01 by VictorN07, on Flickr Back again. This time we will cover how to install the Blackvue DR400G-HD combined with the Power Magic Pro monitoring system. Thanks to @DarrenDriven for his DIY covering just the camera install. http://www.ft86club.com/forums/showthread.php?t=15167 Please note you will learn the skills required to hardwire any sort of device (sat nav, radar detector, lights) safely to the vehicle. This will be very picture heavy. Enjoy. **UPDATE** Added a bit about where to buy everything. http://www.ft86club.com/forums/showp...5&postcount=23 The Kit 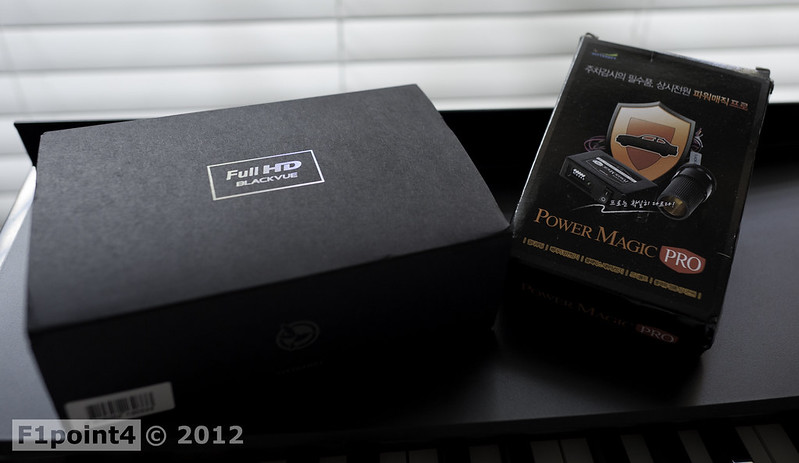 20120831-LolaBlackVue400DIY-02 by VictorN07, on Flickr  20120831-LolaBlackVue400DIY-03 by VictorN07, on Flickr 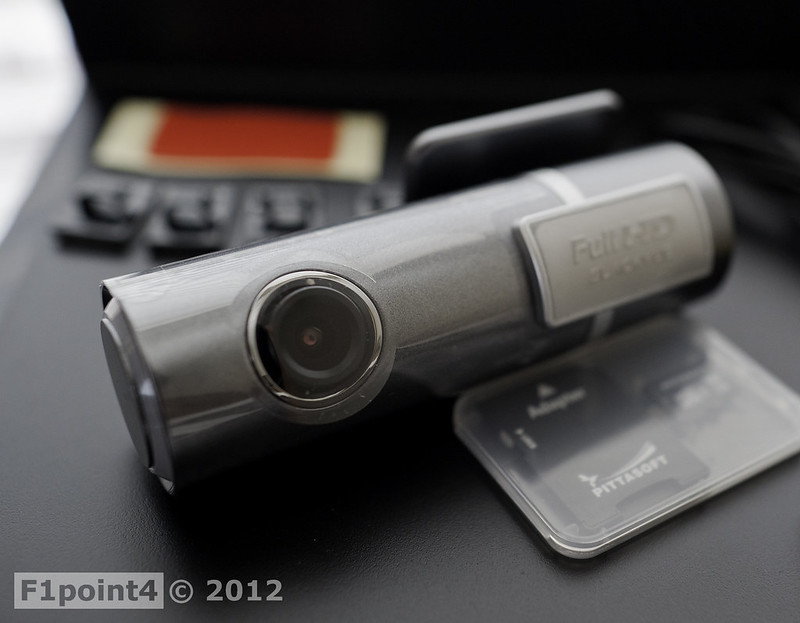 20120831-LolaBlackVue400DIY-04 by VictorN07, on Flickr 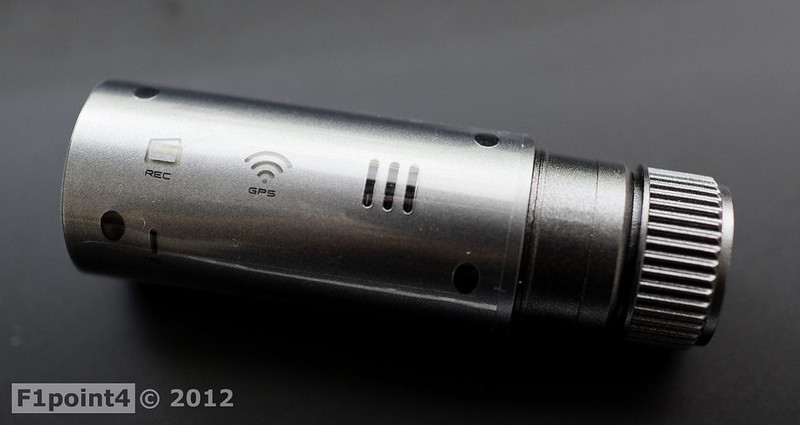 20120831-LolaBlackVue400DIY-05 by VictorN07, on Flickr 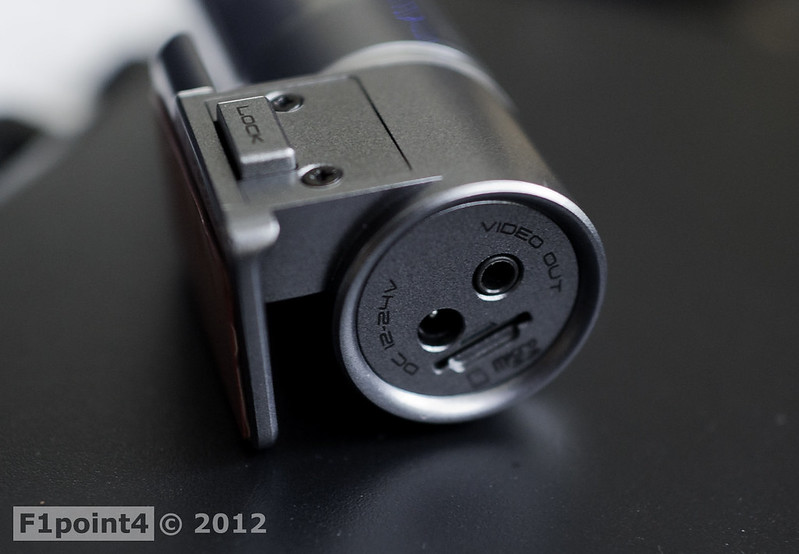 20120831-LolaBlackVue400DIY-06 by VictorN07, on Flickr  20120831-LolaBlackVue400DIY-07 by VictorN07, on Flickr 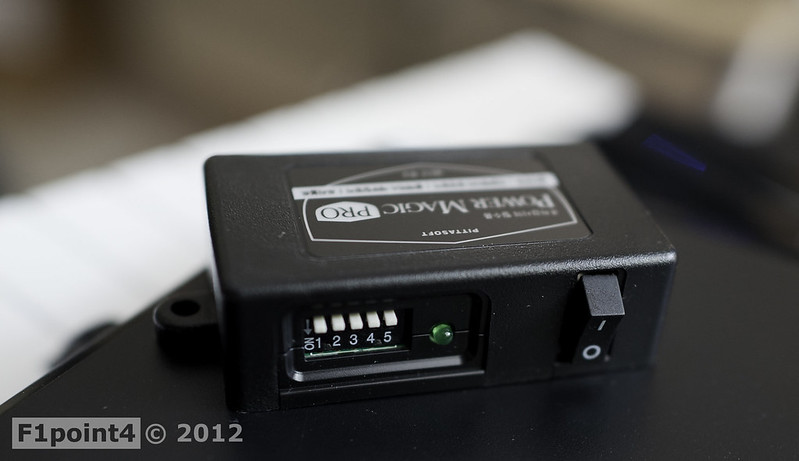 20120831-LolaBlackVue400DIY-08 by VictorN07, on Flickr Tools Required You may need different size fuses depending on the choice of circuits tapped into. 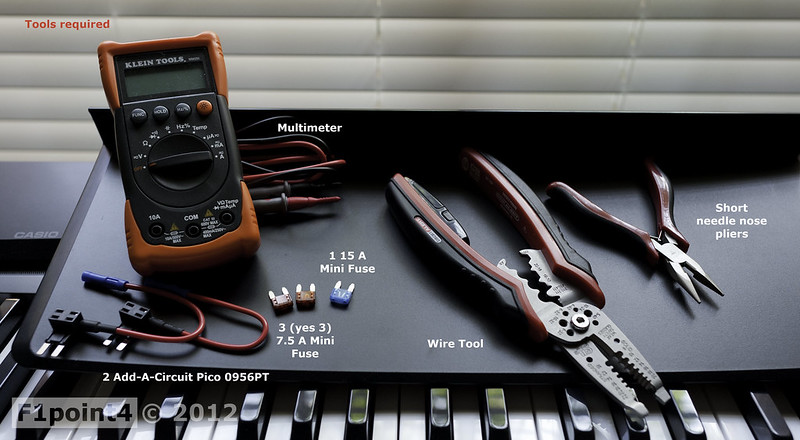 20120831-LolaBlackVue400DIY-09 by VictorN07, on Flickr 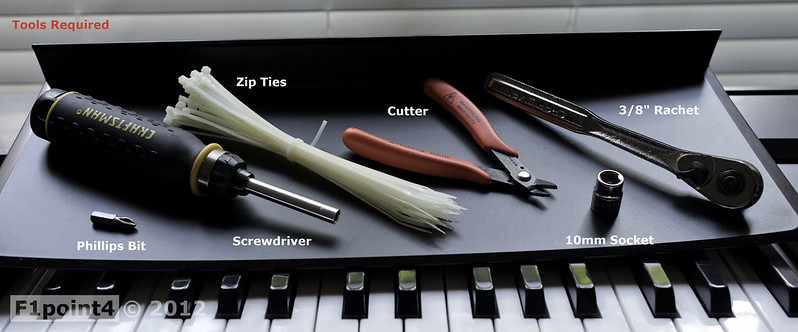 20120831-LolaBlackVue400DIY-10 by VictorN07, on Flickr Preparation Click for huge 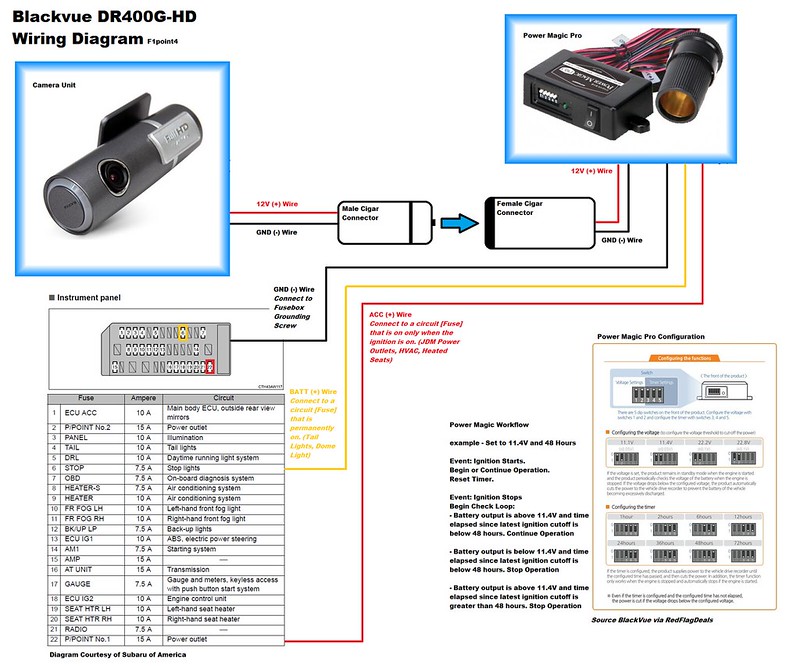 20120831-LolaBlackVue400DIY-13 by VictorN07, on Flickr  20120831-LolaBlackVue400DIY-11 by VictorN07, on Flickr 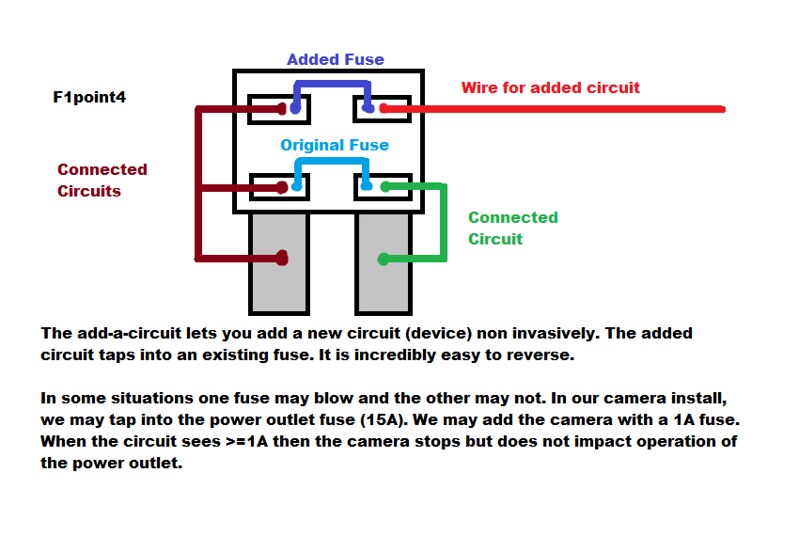 20120831-LolaBlackVue400DIY-12 by VictorN07, on Flickr Harness Setup 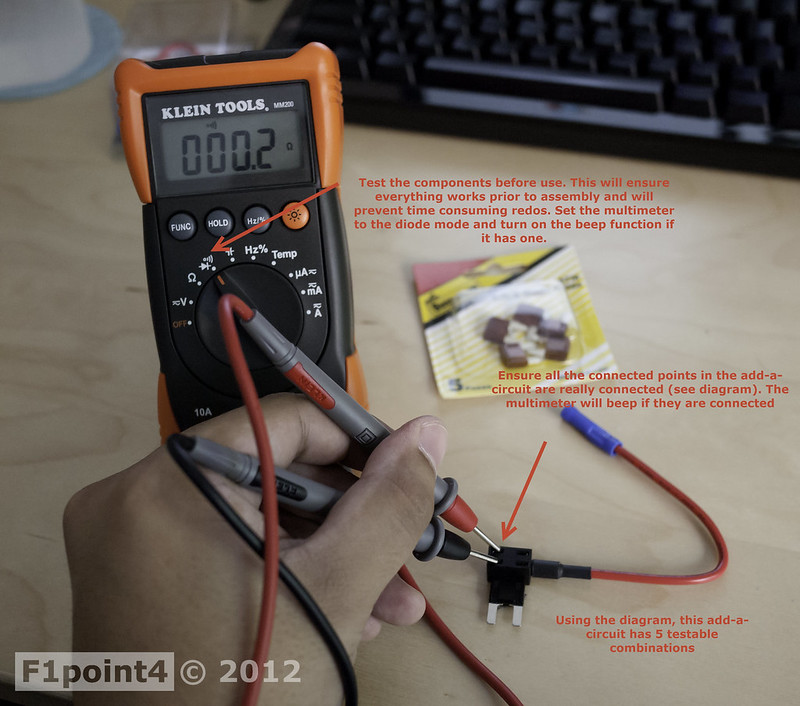 20120831-LolaBlackVue400DIY-14 by VictorN07, on Flickr  20120831-LolaBlackVue400DIY-15 by VictorN07, on Flickr  20120831-LolaBlackVue400DIY-16 by VictorN07, on Flickr  20120831-LolaBlackVue400DIY-17 by VictorN07, on Flickr 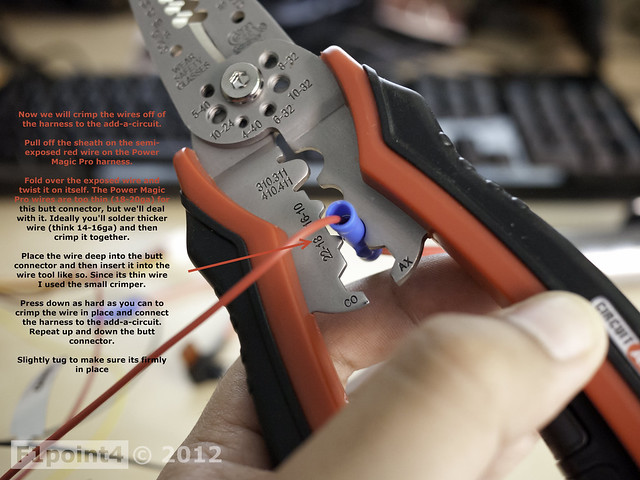 20120831-LolaBlackVue400DIY-18 by VictorN07, on Flickr  20120831-LolaBlackVue400DIY-19 by VictorN07, on Flickr  20120831-LolaBlackVue400DIY-20 by VictorN07, on Flickr 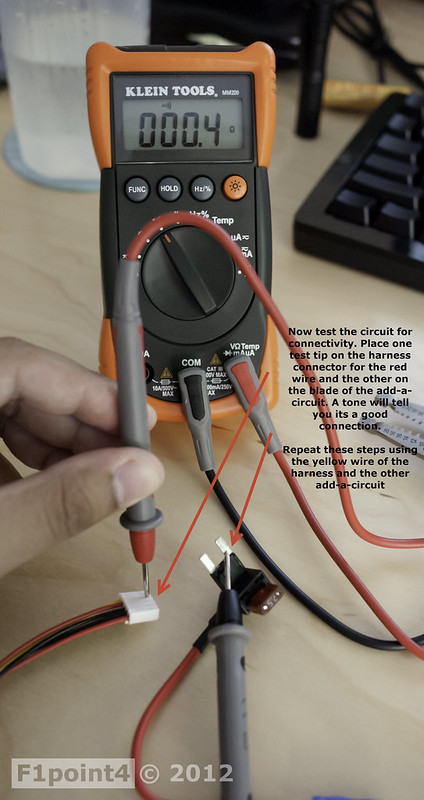 20120831-LolaBlackVue400DIY-21 by VictorN07, on Flickr 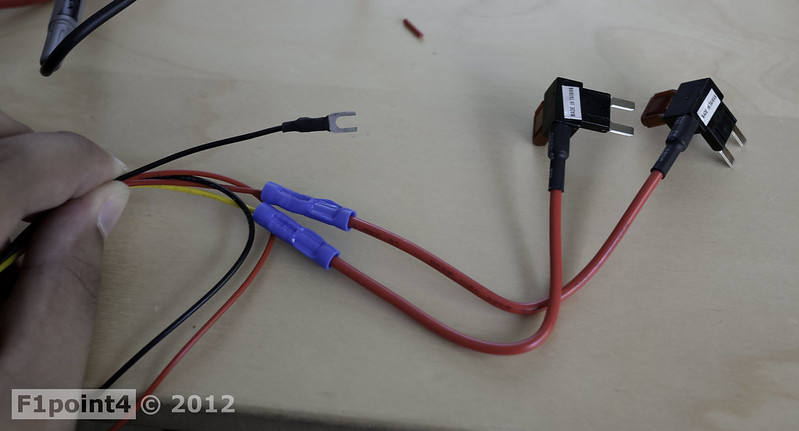 20120831-LolaBlackVue400DIY-22 by VictorN07, on Flickr  20120831-LolaBlackVue400DIY-23 by VictorN07, on Flickr  20120831-LolaBlackVue400DIY-24 by VictorN07, on Flickr Last edited by F1point4; 09-06-2012 at 03:28 PM. Reason: Added clarity around choice of fuses specced |

|

|
| The Following 23 Users Say Thank You to F1point4 For This Useful Post: | 0x56 (09-16-2018), 8R6 (05-03-2016), @Art_Mighty (09-17-2012), Anal0g (01-11-2016), b.e (09-16-2012), blue cat (03-01-2013), Busybee (10-13-2019), CA2 (01-14-2013), canon_spec (09-02-2013), Dang Lad (01-02-2013), ducks (04-29-2013), Guillaume (08-08-2013), kludger (11-07-2012), kwood9000 (09-02-2012), MJones_RB (10-05-2017), Myv (05-19-2013), normancw (12-25-2012), Pointmutation (11-27-2017), post_break (09-06-2012), redKnight (03-17-2013), steeloyangster (09-05-2012), voyager2285 (02-10-2016), _Se7en_ (01-09-2016) |
| The Following 11 Users Say Thank You to F1point4 For This Useful Post: | 8R6 (05-03-2016), b.e (12-20-2012), canon_spec (09-02-2013), ducks (04-29-2013), jer305 (07-03-2013), normancw (09-04-2012), Pointmutation (11-27-2017), steeloyangster (09-05-2012), TennisHsu (09-06-2012), willypongtb (04-26-2014), WRXGuy1 (04-22-2014) |
|
09-01-2012, 11:53 PM
|
#3 |
|
Photo Specialist
Join Date: Feb 2012
Drives: 2013 Toyota 86 DGM 6MT
Location: Texas
Posts: 1,152
Thanks: 587
Thanked 1,805 Times in 420 Posts
Mentioned: 94 Post(s)
Tagged: 0 Thread(s)
|
Wiring and Testing
I spec'd out three 7.5 A and one 15 A fuse. The "stop light" has a 7.5A fuse, and each power outlet uses a 15 A fuse. Combine that with two 7.5 A fuses to hook up the power magic pro, you get the four I spec'd out. If you decide to use different circuits you may need different sized fuses.  20120831-LolaBlackVue400DIY-43 by VictorN07, on Flickr 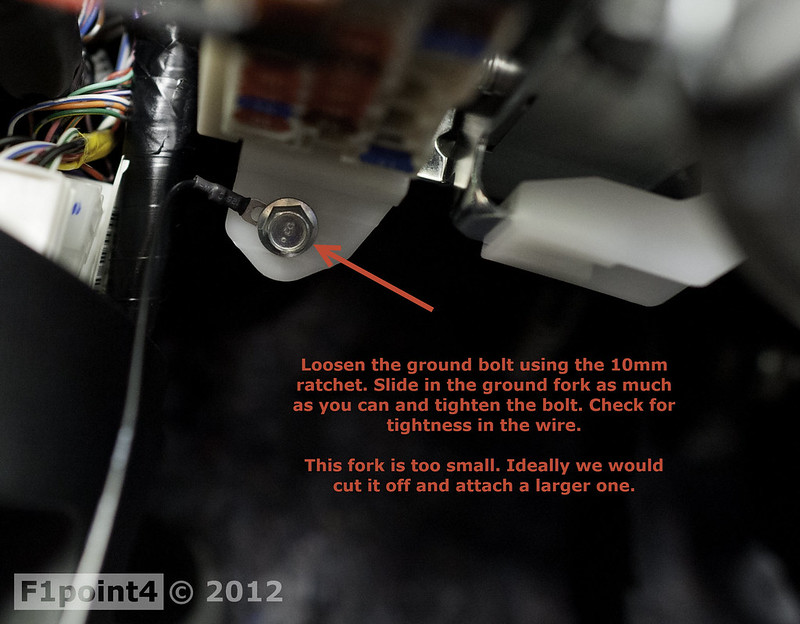 20120831-LolaBlackVue400DIY-44 by VictorN07, on Flickr 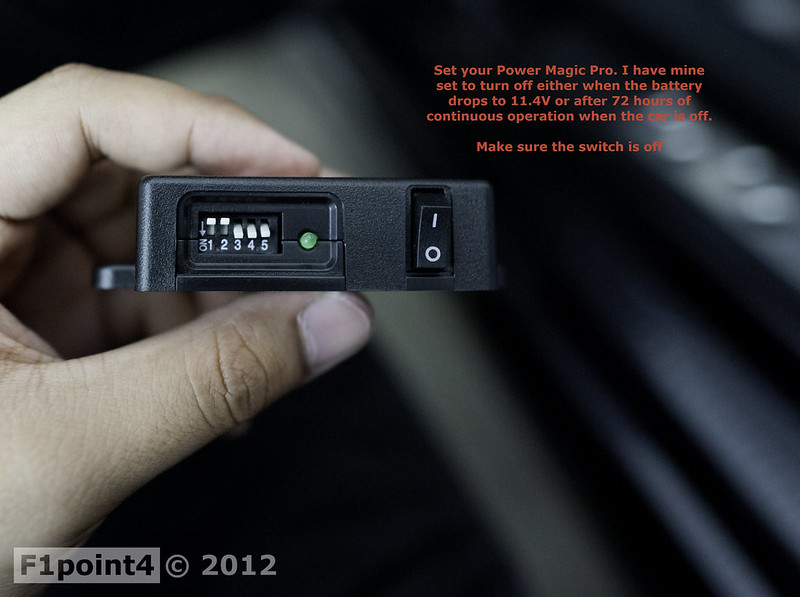 20120831-LolaBlackVue400DIY-45 by VictorN07, on Flickr  20120831-LolaBlackVue400DIY-46 by VictorN07, on Flickr  20120831-LolaBlackVue400DIY-47 by VictorN07, on Flickr 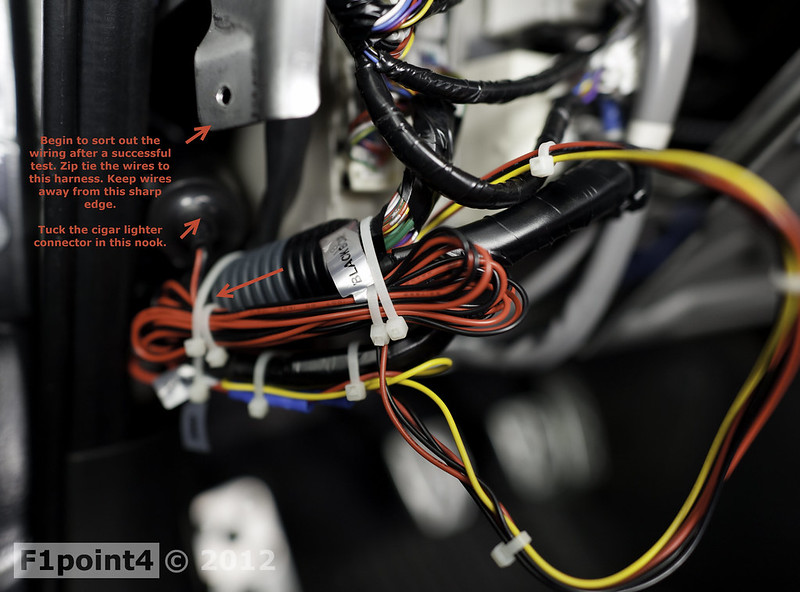 20120831-LolaBlackVue400DIY-48 by VictorN07, on Flickr  20120831-LolaBlackVue400DIY-49 by VictorN07, on Flickr Reassembly 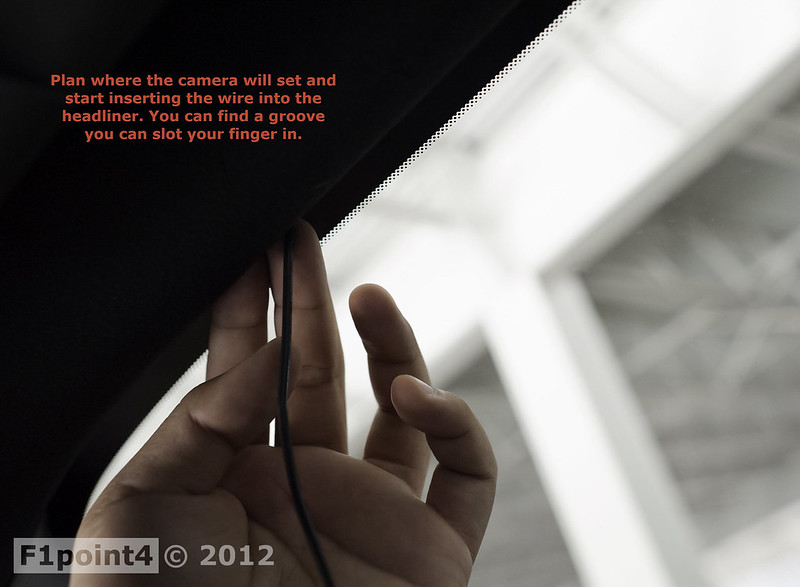 20120831-LolaBlackVue400DIY-50 by VictorN07, on Flickr  20120831-LolaBlackVue400DIY-51 by VictorN07, on Flickr  20120831-LolaBlackVue400DIY-52 by VictorN07, on Flickr 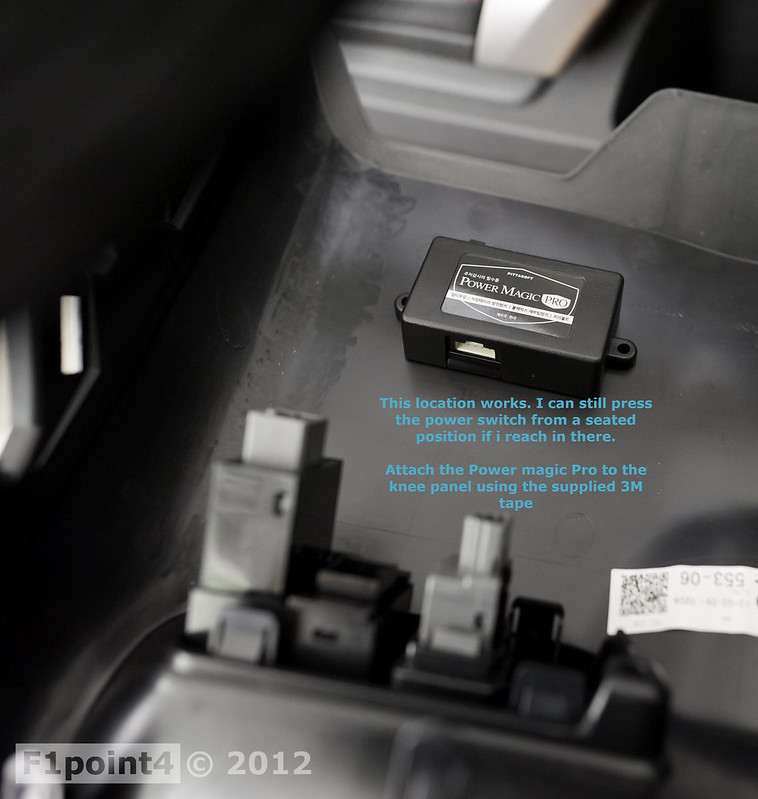 20120831-LolaBlackVue400DIY-53 by VictorN07, on Flickr 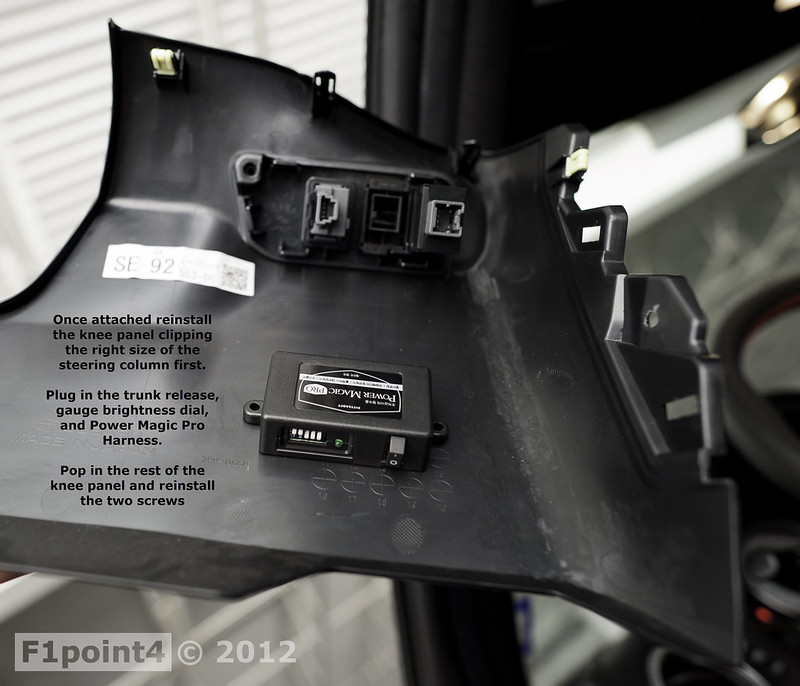 20120831-LolaBlackVue400DIY-54 by VictorN07, on Flickr Tuning and Results 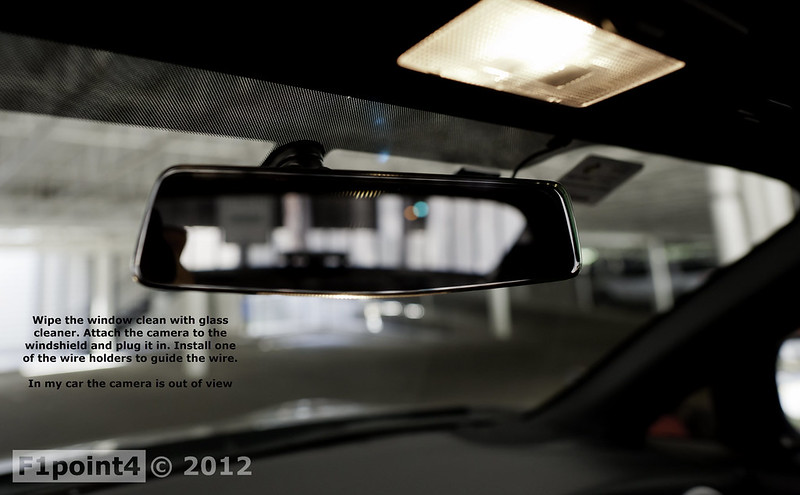 20120831-LolaBlackVue400DIY-55 by VictorN07, on Flickr  20120831-LolaBlackVue400DIY-56 by VictorN07, on Flickr Thoughts after some use Overall the camera works very well. There isn't much to set and most of it happens automatically. Pro Tip: once you are set on the angle of the camera use a permanent marker to mark the position so if you remove the camera you know where to reinsert it. + The unit will always start with normal mode. It will record everything. + After the ignition is cut, if there is no movement/event for 10 minutes it enters parking mode. It will only record when there is movement or an event. + When the ignition turns on, the unit reenters normal mode after about 10-20 seconds of driving. + @1080p you can record about 4-5 hours of video before it loops on itself + Having a power button via the power magic means I can turn off the camera without having to unplug the wires. + The video I get is on par with all the other videos posted on the internet. It is a good dash camera + The alternate viewer software is awesome. Plots on map, speed, times for scrolling. ~ The microphone isn't very sensitive. - You need the original Blackvue viewer to configure the device - The unit does run extremely hot. See the picture below. 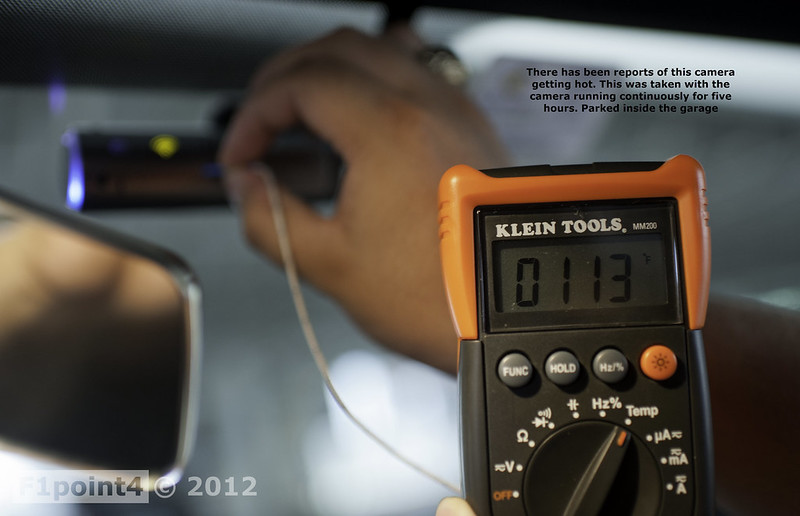 20120901-LolaBlackVue400DIY-57 by VictorN07, on Flickr Update: Wanted a more stealth look. I moved the camera higher on the windshield (picture to come) and I Aperture Science the LED ring. Used racer's tape for science. Left a little opening so I can still see the camera status. 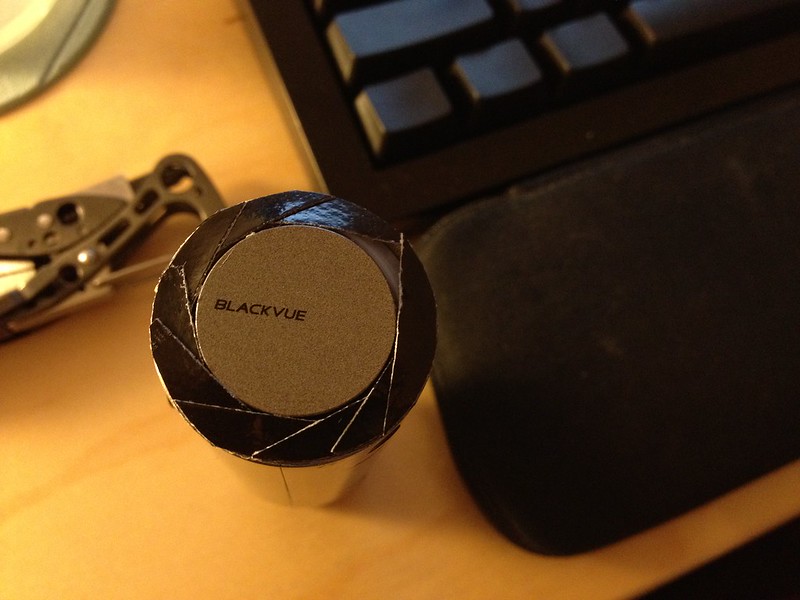 Blackvue Sticker by VictorN07, on Flickr Last edited by F1point4; 09-04-2012 at 10:23 PM. Reason: Added more clarity around the fuses, Aperture Science |
|
|
|
| The Following 34 Users Say Thank You to F1point4 For This Useful Post: | 8R6 (05-03-2016), @Art_Mighty (09-17-2012), AARON691983 (12-05-2017), ATL BRZ (09-04-2012), b.e (12-20-2012), BillyStrato (03-02-2015), BRZranger (09-02-2012), canon_spec (09-02-2013), Dispect (11-03-2012), ducks (04-29-2013), eurominican (01-23-2014), Hawaiian (09-04-2012), Jayde (11-03-2012), JEFFSTYLE (01-11-2015), JiB (09-06-2012), Khyron686 (09-25-2012), kwood9000 (09-04-2012), lantsalot (11-24-2014), MJones_RB (03-07-2017), normancw (09-04-2012), os86 (09-13-2012), redKnight (01-27-2013), Rossman (09-03-2012), Scooby South (04-11-2013), ShoGun (09-06-2012), SkyeHack (06-03-2019), Smudgeous (09-04-2012), SnapOv3st3r (02-11-2013), Snoopyalien24 (11-08-2014), stevo_12v (11-30-2012), TennisHsu (09-05-2012), Thedishdoc (02-04-2019), willypongtb (04-26-2014), WRXGuy1 (04-22-2014) |
|
09-04-2012, 11:47 AM
|
#4 |
|
NW Region Moderator

Join Date: Mar 2010
Drives: FR-S No More
Location: Portland OR
Posts: 5,156
Thanks: 1,134
Thanked 3,187 Times in 1,091 Posts
Mentioned: 300 Post(s)
Tagged: 4 Thread(s)
|
Great topic, I am replacing the link to my installation in the DIY directory with this one.
DIY Directory http://www.ft86club.com/forums/showthread.php?t=7365 My old installation topic: http://www.ft86club.com/forums/showthread.php?t=15167
__________________
|
|
|
|
| The Following User Says Thank You to DarrenDriven For This Useful Post: | willypongtb (04-26-2014) |
|
09-04-2012, 01:47 PM
|
#5 |
|
Senior Member

Join Date: Jun 2012
Drives: '22 BRZ, '17 BRZ (prev '13 FR-S)
Location: Backwoods Ontario
Posts: 366
Thanks: 44
Thanked 123 Times in 68 Posts
Mentioned: 2 Post(s)
Tagged: 0 Thread(s)
|
What a great DIY, thanks!
Just got my Blackvue from Korea today so we'll see how it goes! |
|
|
|
|
09-04-2012, 02:07 PM
|
#6 |
|
Senior Member

Join Date: Apr 2012
Drives: Limited WRB AT6 BRZ
Location: Atlanta, Ga
Posts: 371
Thanks: 993
Thanked 86 Times in 59 Posts
Mentioned: 4 Post(s)
Tagged: 0 Thread(s)
|
Great write up!
|
|
|
|
|
09-04-2012, 02:17 PM
|
#7 | |
|
That guy

Join Date: Feb 2012
Drives: Ultramarine mt FR-S
Location: chicago
Posts: 2,370
Thanks: 692
Thanked 1,389 Times in 730 Posts
Mentioned: 71 Post(s)
Tagged: 0 Thread(s)
|
Quote:
__________________
Ultramarine mt FR-S
P&L stage 1 turbo Prime Motoring Flex fuel Jr Tuned 506whp @17psi (e73) |
|
|
|
|
|
09-04-2012, 04:22 PM
|
#8 |
|
Senior Member

Join Date: Jun 2012
Drives: Nevermorange FRS
Location: Seattle, WA
Posts: 4,175
Thanks: 758
Thanked 4,213 Times in 1,809 Posts
Mentioned: 78 Post(s)
Tagged: 1 Thread(s)
|
I notice with the add-a-circuit you cannot close the cover all the way. Doesn't our fuse box have useable but non-used circuits that don't require the use of an add-a-circuit (like a fuse for heated seats that aren't in the FRS for example)?
Would like to close fuse box cover all the way that is all. Also: Low Profile add-a-fuse: http://www.ebay.com/itm/LATEST-LOW-P...item4abb89b83e |
|
|
|
|
09-04-2012, 04:47 PM
|
#9 | |
|
Photo Specialist
Join Date: Feb 2012
Drives: 2013 Toyota 86 DGM 6MT
Location: Texas
Posts: 1,152
Thanks: 587
Thanked 1,805 Times in 420 Posts
Mentioned: 94 Post(s)
Tagged: 0 Thread(s)
|
Quote:
Every fuse that is marked in the manual and fuse box lid has a fuse installed, regardless of if that feature is present in the car (heated seats in frs) The low profile add-a-circuit is great! Still won't let the box close though. |
|
|
|
|
|
09-04-2012, 10:23 PM
|
#10 |
|
Photo Specialist
Join Date: Feb 2012
Drives: 2013 Toyota 86 DGM 6MT
Location: Texas
Posts: 1,152
Thanks: 587
Thanked 1,805 Times in 420 Posts
Mentioned: 94 Post(s)
Tagged: 0 Thread(s)
|
|
|
|
|
|
09-04-2012, 10:28 PM
|
#11 |
|
Senior Member
Join Date: May 2012
Drives: BRZ
Location: Everett, WA
Posts: 736
Thanks: 996
Thanked 268 Times in 180 Posts
Mentioned: 15 Post(s)
Tagged: 0 Thread(s)
|
Because of your diy post, i stopped procrastinating, and dropped $250 for camera and power pro.
The blackvue camera I bought is a "session 2" version, which supposedly addresses the overheating issue. Thanks for this great post. |
|
|
|
|
09-05-2012, 05:54 PM
|
#12 | |
|
Senior Member
Join Date: Jun 2012
Drives: '22 BRZ, '17 BRZ (prev '13 FR-S)
Location: Backwoods Ontario
Posts: 366
Thanks: 44
Thanked 123 Times in 68 Posts
Mentioned: 2 Post(s)
Tagged: 0 Thread(s)
|
Installed mine today, just ran to the glove compartment 12V power for now. Quality of the recordings is amazing but they are large files!
The only thing I wish they would change is the camera should be black and not silver. As it stands, it's a little more noticable from outside the car than I would like. Otherwise a good buy! Quote:
|
|
|
|
|
|
09-05-2012, 08:39 PM
|
#13 | |
|
Senior Member

Join Date: Mar 2012
Drives: 2013 Sonic, 2013 BRZ ltd
Location: VA
Posts: 127
Thanks: 12
Thanked 18 Times in 16 Posts
Mentioned: 10 Post(s)
Tagged: 4 Thread(s)
|
Mind sharing where you purchased it from?
Quote:
|
|
|
|
|
|
09-06-2012, 10:27 AM
|
#14 |
|
Senior Member
Join Date: Jun 2012
Drives: '22 BRZ, '17 BRZ (prev '13 FR-S)
Location: Backwoods Ontario
Posts: 366
Thanks: 44
Thanked 123 Times in 68 Posts
Mentioned: 2 Post(s)
Tagged: 0 Thread(s)
|
Only place I've seen the "Season II" models is on ebay.
|
|
|
|
| The Following User Says Thank You to Rossman For This Useful Post: | BRZranger (09-06-2012) |
|
|
|
|
| Tags |
| blackvue, dashcam, diy, dr400g-hd, power magic pro |
|
|
 Similar Threads
|
||||
| Thread | Thread Starter | Forum | Replies | Last Post |
| Dash Cam Installation (BlackVue DR400G-HD) | DarrenDriven | DIY (Do-It-Yourself) Guides | 93 | 05-01-2018 09:54 PM |
| R-Magic & Rasty build 86 | toxicdrift | FR-S & 86 Photos, Videos, Wallpapers, Gallery Forum | 23 | 08-10-2012 12:24 AM |
| R Magic Parts List | quik1987 | Engine, Exhaust, Transmission | 9 | 07-30-2012 01:55 PM |
| R-Magic Demo Car (Exhaust video too!) | ttknf | Engine, Exhaust, Transmission | 5 | 06-06-2012 02:20 AM |