


|
||||||
| DIY (Do-It-Yourself) Guides For all DIYs. |
 |
|
|
Thread Tools | Search this Thread |
 06-12-2013, 06:48 PM
|
#1 |
|
Member

Join Date: Sep 2012
Drives: FR-S
Location: Santa Fe Springs California
Posts: 51
Thanks: 59
Thanked 84 Times in 28 Posts
Mentioned: 15 Post(s)
|
DIY - Sway Bar (Stabilizer Bar) Installation
Hey everyone! I haven't seen a DIY for installing sway bars yet, so I figured we can help out in case you guys needed any info on this subject. This install depicts the installation of our Hotchkis sway bars, but the the same concept applies to any sway bar you install. Hopefully this can be a good reference for anyone interested in replacing their sway bars.
Good Luck! -Aaron On to the install... Front Stabilizer Bar Install 1F. Raise the front end of the vehicle either by using a lift or using a floor jack. Use jack stands to secure the vehicle if you are using a floor jack. Drive-on floor ramps may also be used. This installation will depict using an alignment rack. It is not required to droop the suspension for the front bar installation. 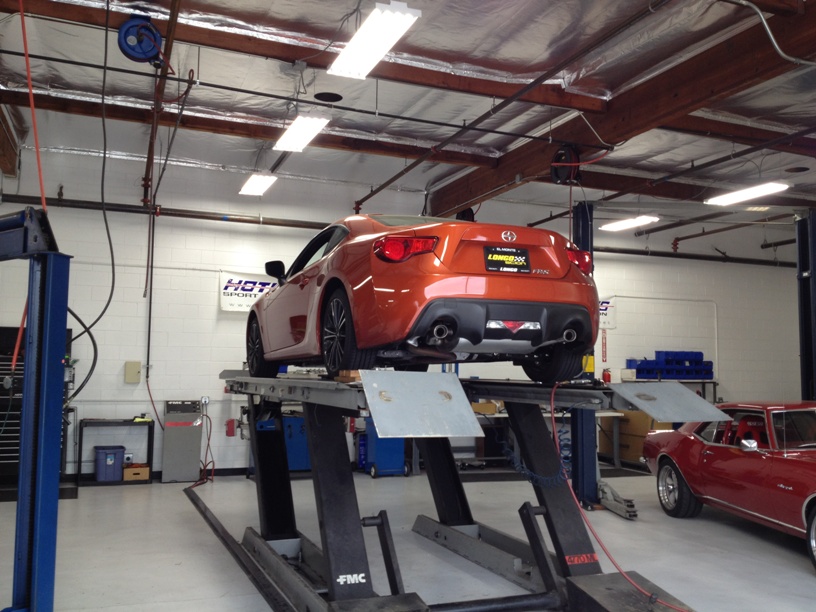 2F. Remove the two engine under covers. The silver aluminum cover is held in by 8 bolts and 7 push clips. The black cover is held in by 11 bolts. (10mm, 12mm Socket, slotted screwdriver) 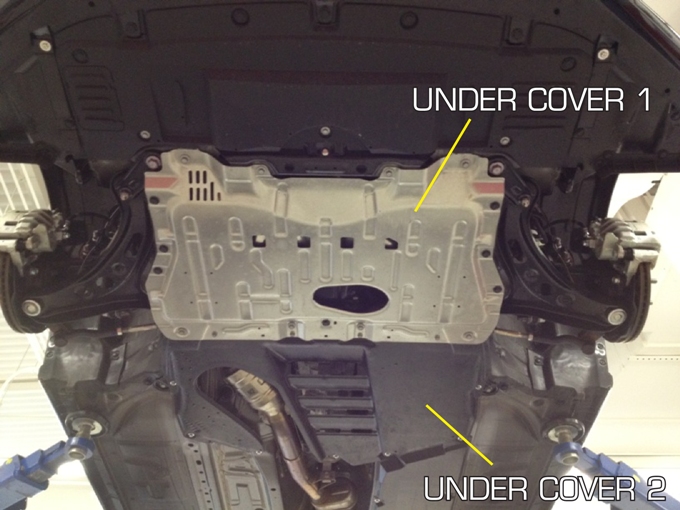 3F. Unbolt the end links from the OE stabilizer bar. (17mm wrench, 6mm allen) 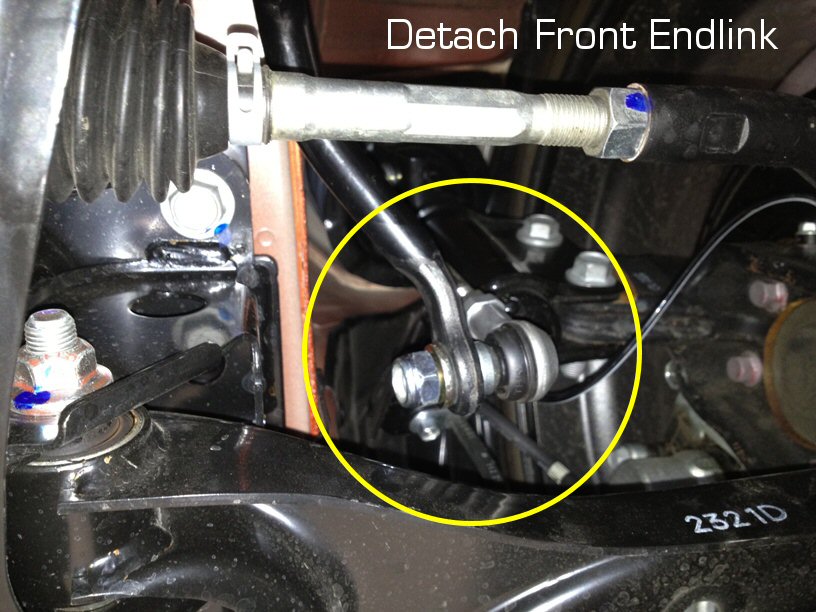 4F. Undo the single push clip on each side. It is located just below the stabilizer bar bushings. (Pick or slotted screwdriver) 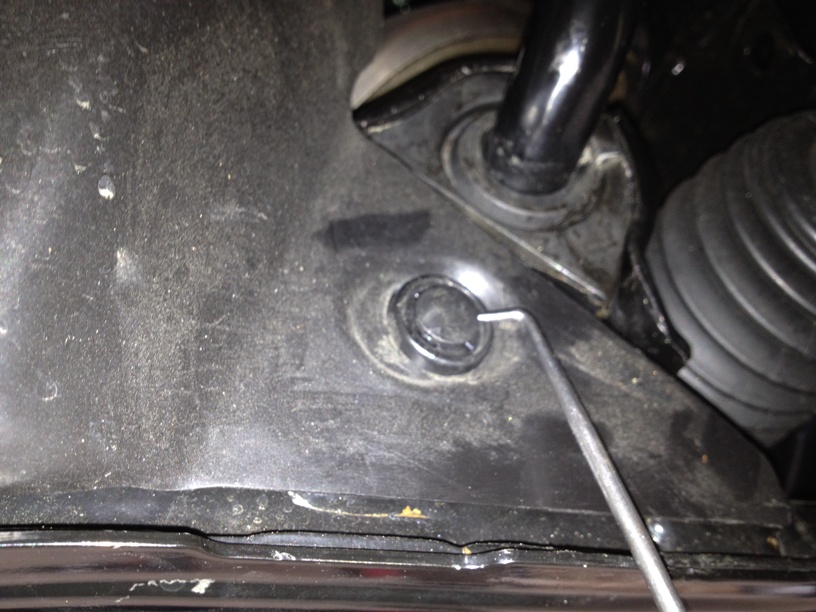  5F. Unbolt the 2 frame mount brackets. There are 4 bolts per bracket. (14mm socket) 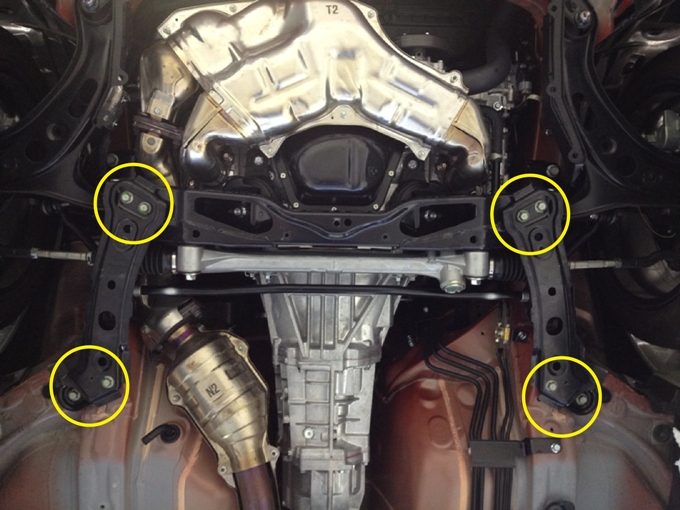 6F. Remove the stabilizer bar assembly from the vehicle.  7F. Unbolt the bushing brackets on each side. Retain the bolts for reinstallation, but you may discard the OE bracket, bushing and nut when installing the Hotchkis bar. (14mm socket, 12mm wrench)  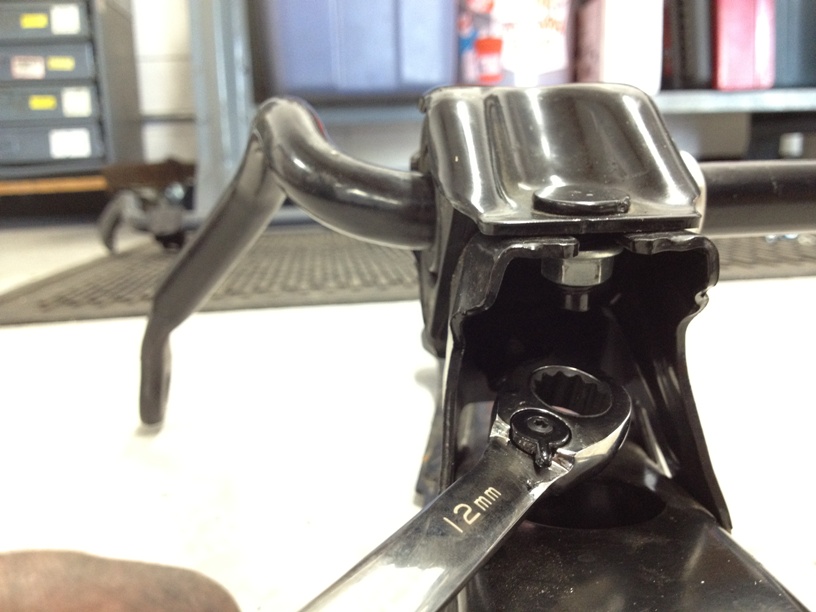 8F. Grab your new front stabilizer bar and install the included polyurethane bushing and bracket as shown. Be sure to apply the included silicon grease to the inner surfaces of the bushings before installing onto the bar. 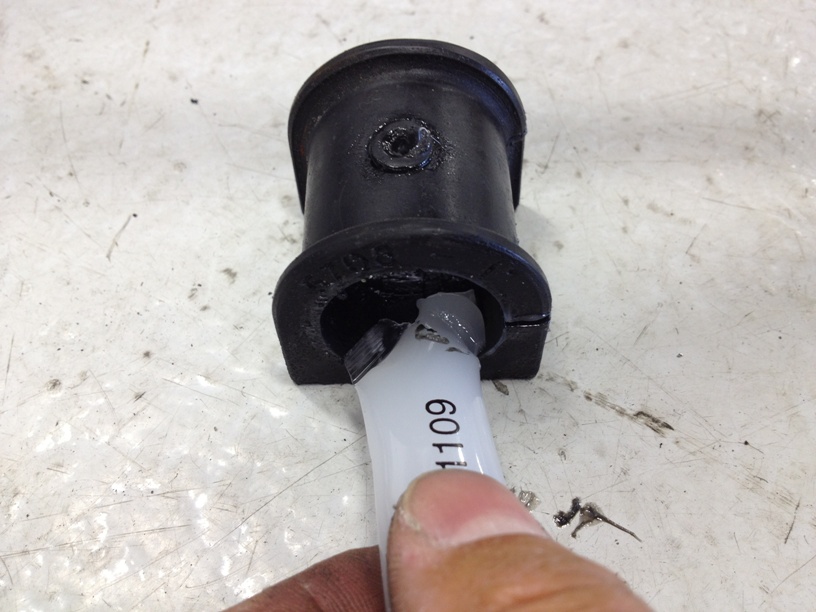  9F. Install the stabilizer bar and brackets onto the frame mount brackets. Reuse the OE bolt for the front and use the Hotchkis flange bolt/washer/nut for the rear. IMPORTANT: TIGHTEN THE REAR BOLT & NUT BEFORE YOU TIGHTEN THE FRONT BOLT. This will allow the bracket to position properly when tightening. (Front bolt: 55 ft-lb. Rear bolt and nut: 25 ft-lb)  [IMG]http://farm4.staticflickr.com/3750/9029694074_977a1***06_o.jpg[/IMG] 10F. Reinstall the stabilizer bar assembly in the same manner as removal. 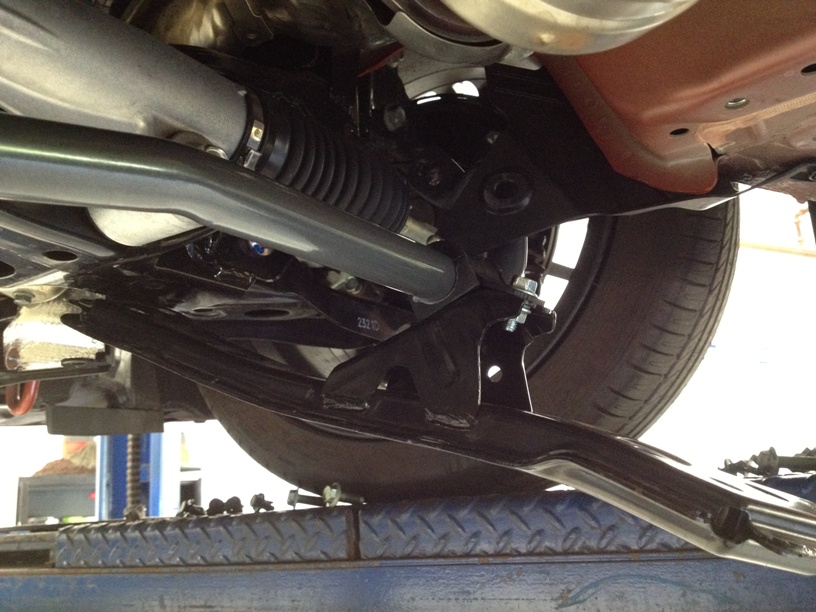 11F. Repeat steps 1F-5F in reverse order. See below for proper torque specs.  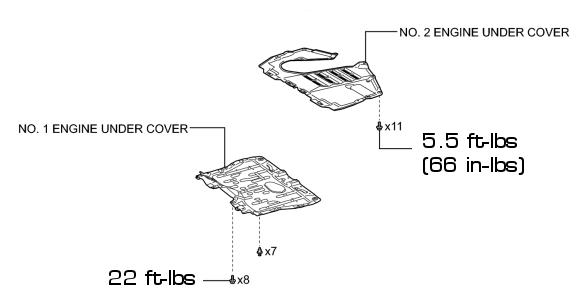
Last edited by Hotchkis; 06-09-2014 at 01:24 PM. |

|

|
| The Following 12 Users Say Thank You to Hotchkis For This Useful Post: |
|
06-12-2013, 06:49 PM
|
#2 |
|
Member
Join Date: Sep 2012
Drives: FR-S
Location: Santa Fe Springs California
Posts: 51
Thanks: 59
Thanked 84 Times in 28 Posts
Mentioned: 15 Post(s)
|
Rear Stabilizer Bar Install
1R. Raise the rear end of the vehicle either by using a lift or using a floor jack. Use jack stands to secure the vehicle if you are using a floor jack. Drive-on floor ramps may also be used. This installation will depict using an alignment rack. It is not required to droop the suspension for the rear bar installation. 2R. Remove the OE end links from the vehicle. (14mm socket/wrench, 5mm allen) Use a 14mm wrench and 5mm allen to detach the end link from the sway bar 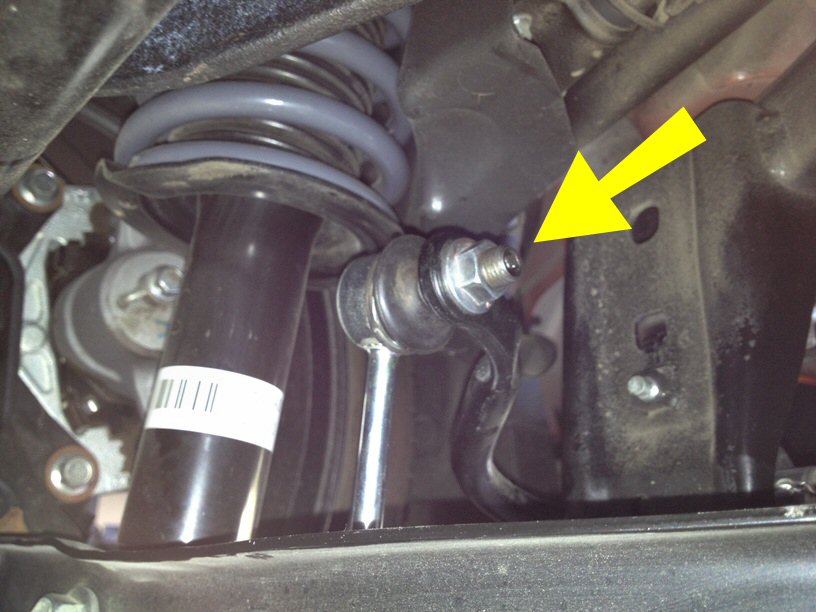 Use a 14mm socket wrench to detach the end link from the control arm 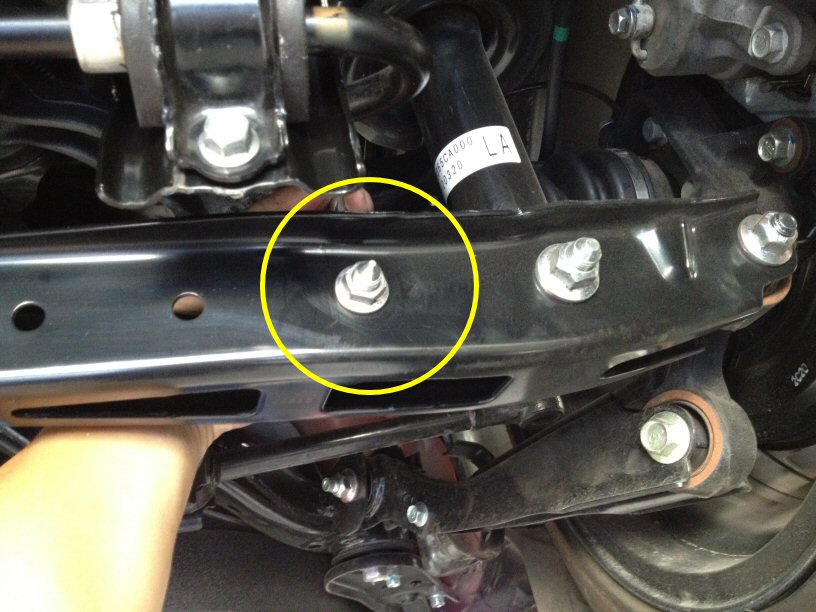 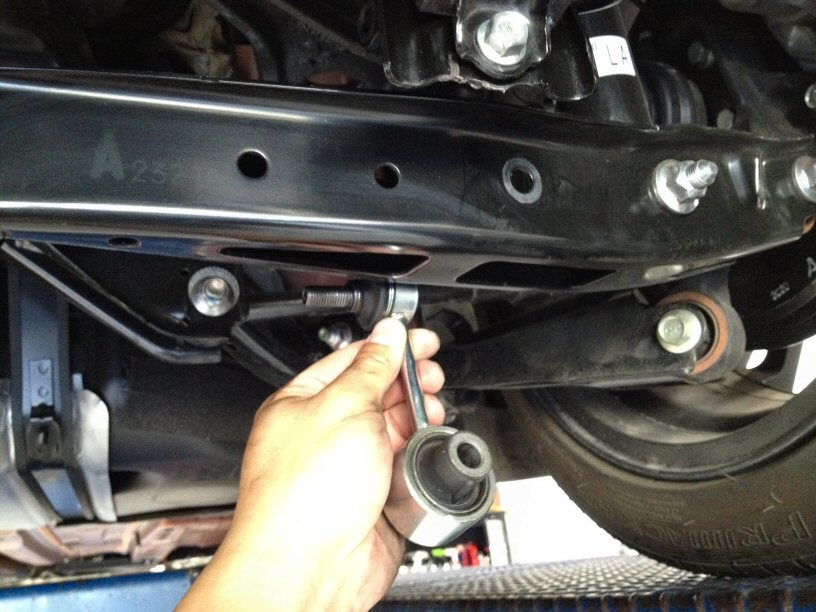 3R. Unbolt the bushing brackets and remove the bar from the vehicle. (12mm socket)  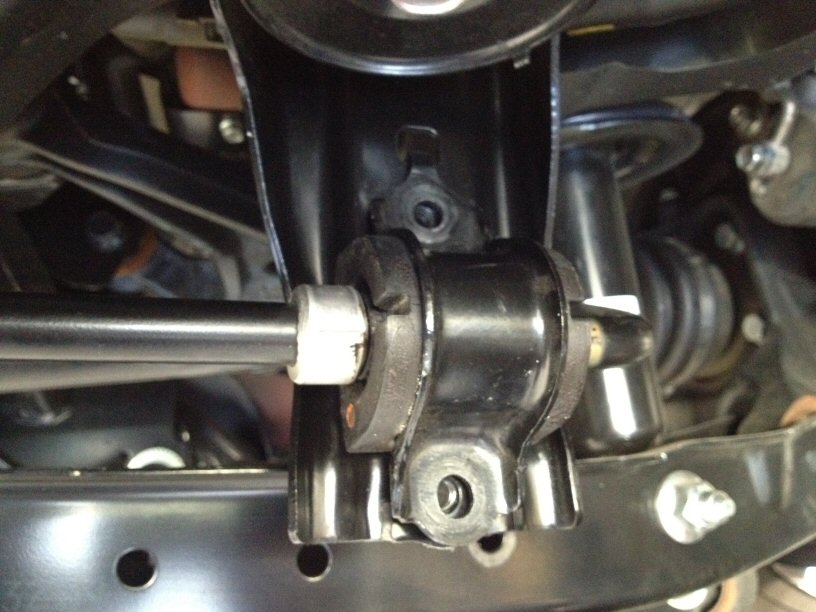 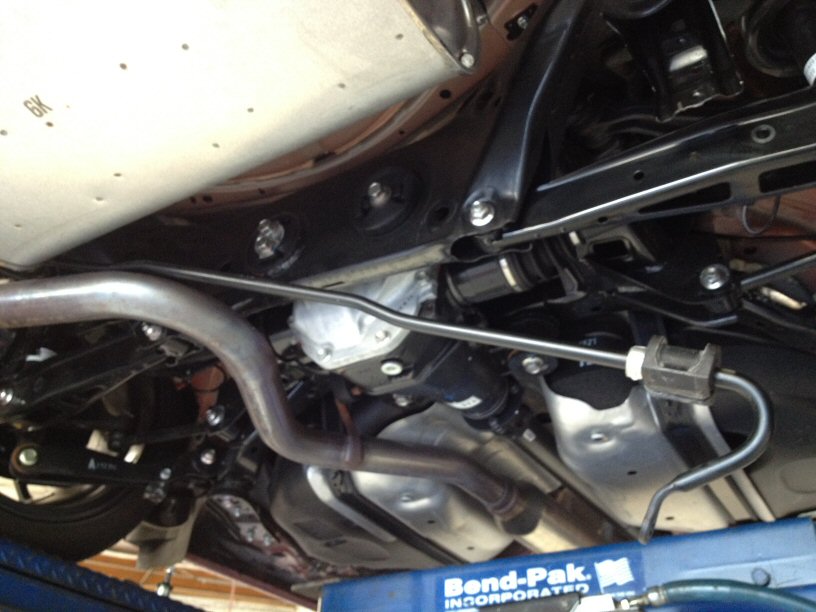 4R. Grab your new rear stabilizer bar and install the included polyurethane bushing. Be sure to apply the included silicon grease to the inner surfaces of the bushings before installing onto the bar. 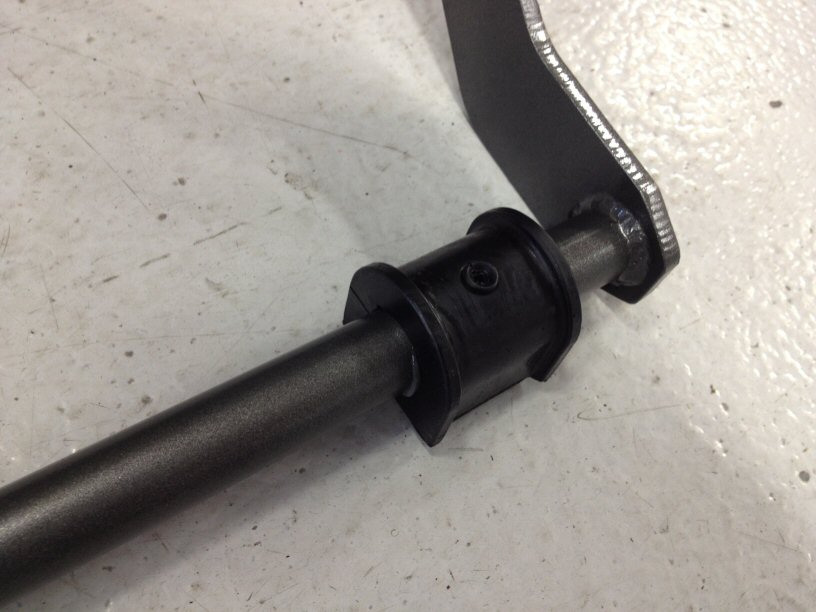 5R. Position the rear bar onto the vehicle. Insert the bridge plates between the frame mount and the polyurethane bushing. Then install the bushing bracket onto the bushing. Reuse the OE bolts to secure the bushing brackets. Bushing Bracket Bolts: 22 ft-lbs 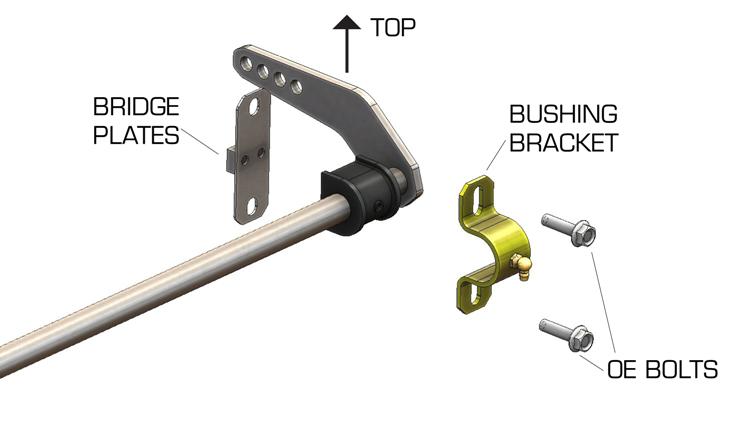 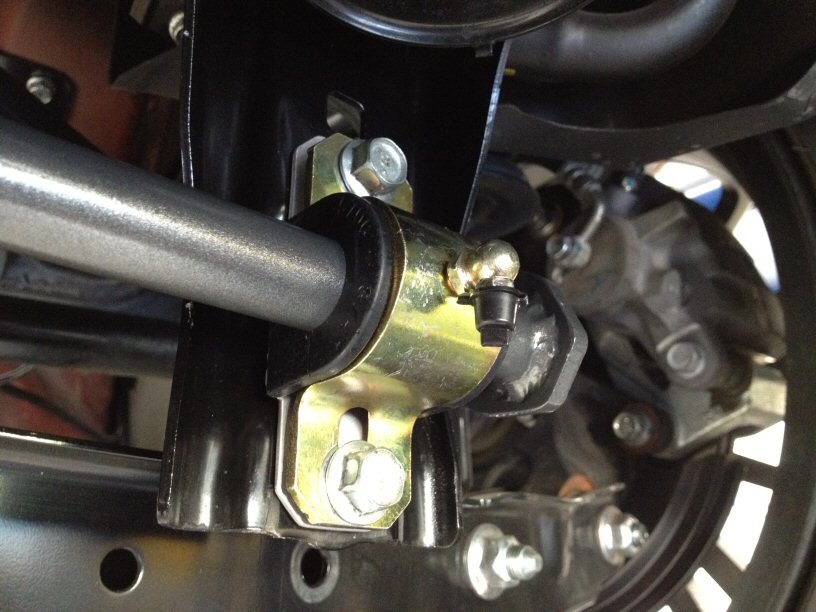 6R. At this point, the rear bar can shift side-to-side. Shift the bar side to side until it is perfectly centered with the car. You should have equal distance between the stabilizer bar lever arms and the frame mounting point. Install the aluminum collars on the inboard side of each bushing. Butt the collar all the way to the bushing, no gap. This will keep the bar centered during operation. 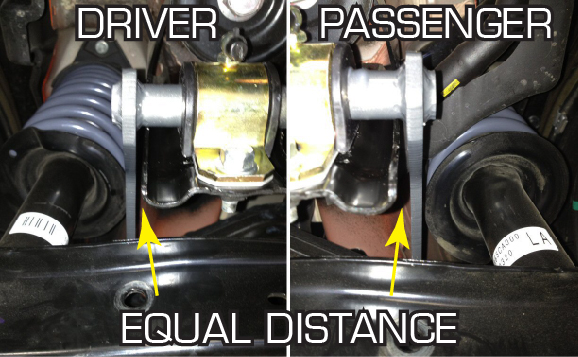 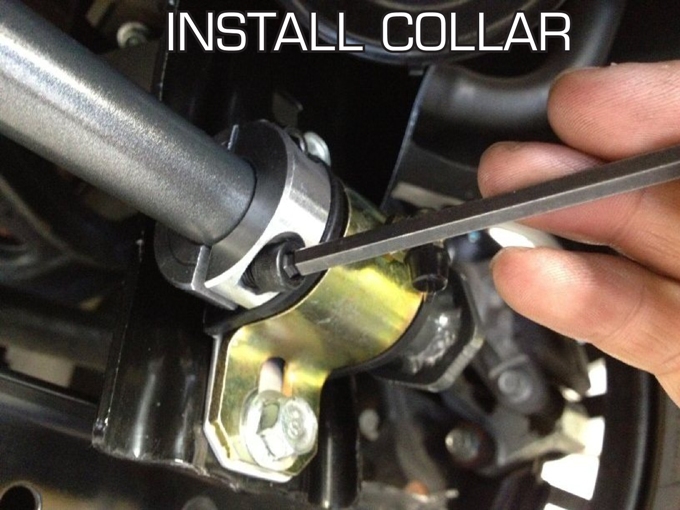 7R. Assemble the end links as shown in the diagram. 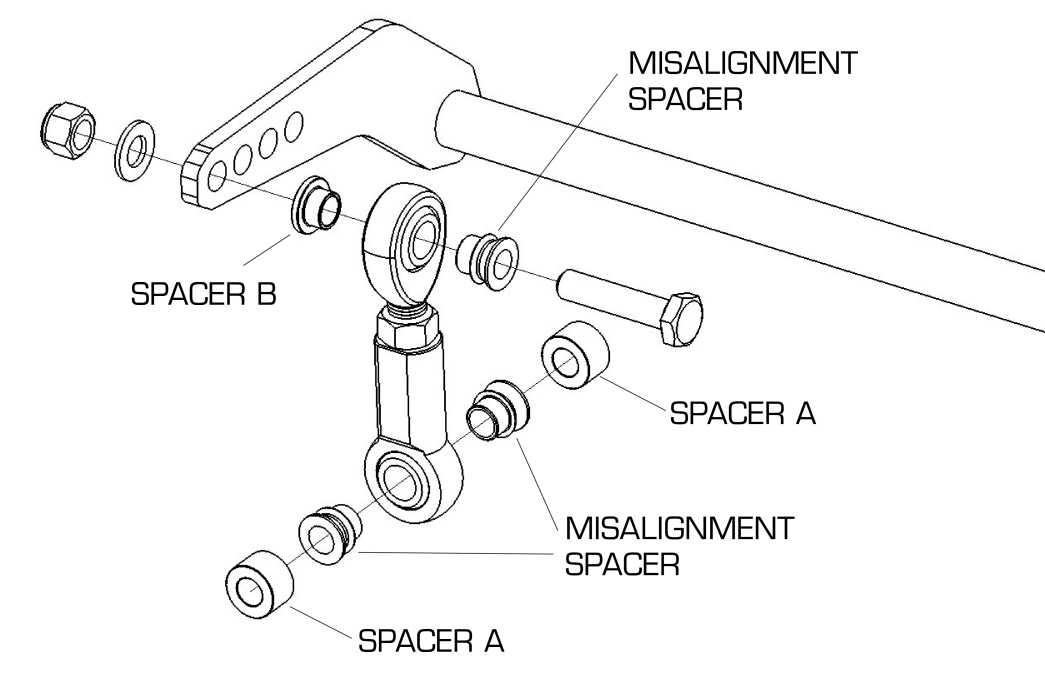 When choosing the lever hole on the stabilizer bar, it is important to mount the end link correctly in the lower control arm. See diagram for all configurations. 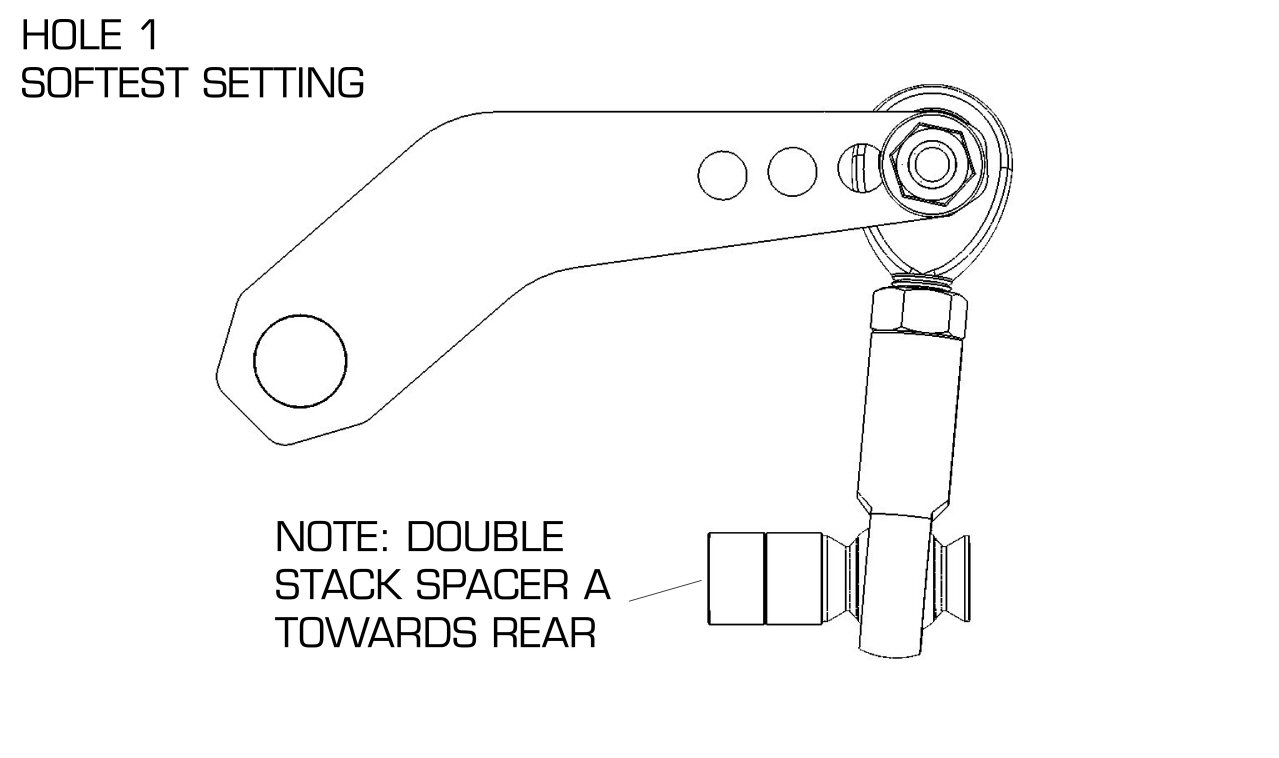  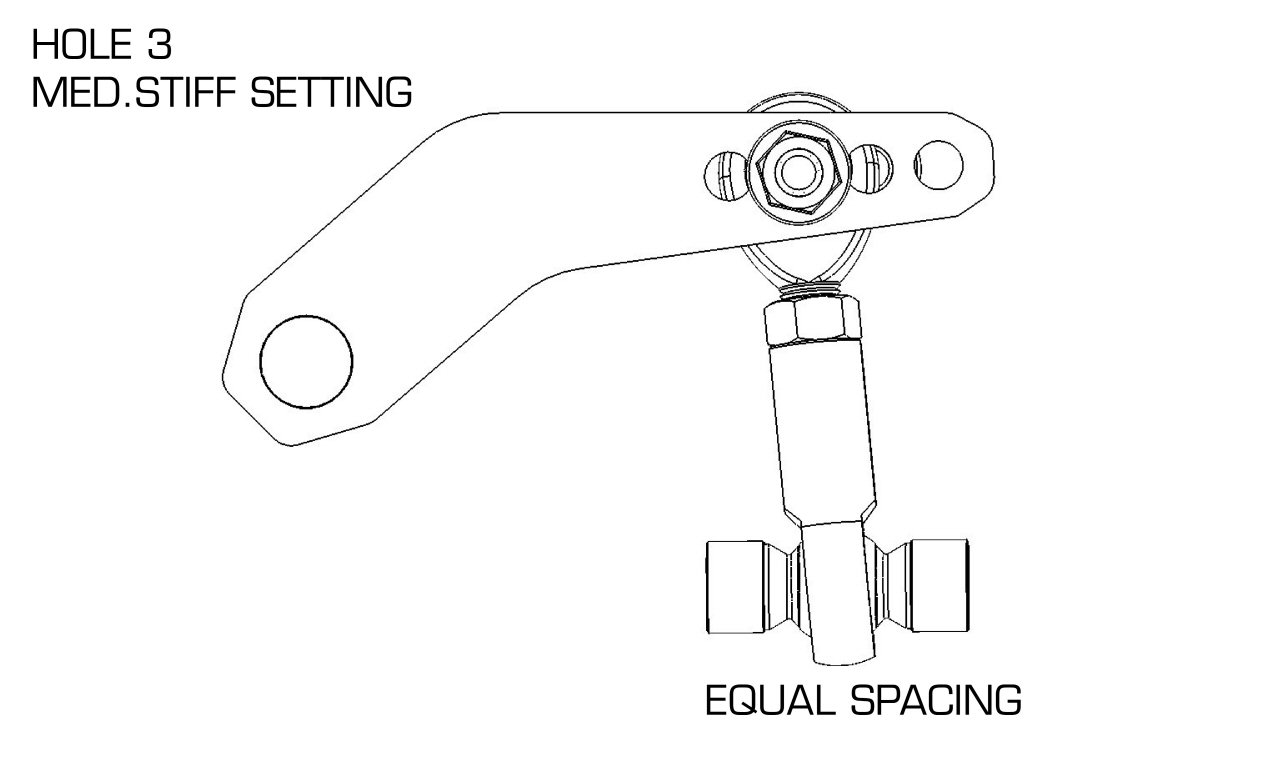  8R. Once you've chosen your configuration, tighten the end link to lower control arm mount point to 28 ft-lbs. Tighten the end link to stabilizer bar point to 50 ft-lbs. 9R. Make sure all hardware is tight and lower the rear end of the vehicle. Last edited by Hotchkis; 06-09-2014 at 01:23 PM. |
|
|
|
| The Following 7 Users Say Thank You to Hotchkis For This Useful Post: | Baldoak (10-04-2017), C4RBON (09-23-2017), Choco (01-21-2015), EN2_Squirrel (07-03-2013), mla163 (06-30-2013), slava (10-08-2014), slim blanco (07-21-2015) |
|
06-12-2013, 06:50 PM
|
#3 |
|
Member
Join Date: Sep 2012
Drives: FR-S
Location: Santa Fe Springs California
Posts: 51
Thanks: 59
Thanked 84 Times in 28 Posts
Mentioned: 15 Post(s)
|
Reserved....
|
|
|
|
|
06-30-2013, 11:39 AM
|
#4 |
|
Overthinking it
Join Date: May 2012
Drives: BRZ in CS
Location: DC
Posts: 271
Thanks: 27
Thanked 81 Times in 48 Posts
Mentioned: 1 Post(s)
|
How many hours for front/ rear?
|
|
|
|
|
07-03-2013, 12:38 PM
|
#5 | |
|
Member
Join Date: Sep 2012
Drives: FR-S
Location: Santa Fe Springs California
Posts: 51
Thanks: 59
Thanked 84 Times in 28 Posts
Mentioned: 15 Post(s)
|
Quote:
Front should be about 1-1/2 hrs and the rear is 3/4 hr when doing it on the floor with jack stands/floor ramps. I've done this install so many times though, I've gotten it down to under an hour for the whole car when using a lift. Compared to other car makes we deal with, this is one of the easiest sway bar installs. Good Luck!  -Aaron |
|
|
|
|
|
07-03-2013, 01:13 PM
|
#6 |
|
Senior Member

Join Date: Sep 2012
Drives: White FR-S, 6M
Location: East Tennessee
Posts: 272
Thanks: 70
Thanked 92 Times in 53 Posts
Mentioned: 3 Post(s)
|
Great Write up! Very glad to see those front brackets drop so you aren't snaking in and out the front bar. What is your recommendation for the rear bar adjustment for a neutral handling setup?
__________________
|
|
|
|
| The Following User Says Thank You to FastLane1000 For This Useful Post: | Hotchkis (07-03-2013) |
|
07-03-2013, 02:16 PM
|
#7 |
|
Senior Member

Join Date: Nov 2011
Drives: Subaru BRZ Limited 6MT
Location: Winston-Salem, NC
Posts: 2,432
Thanks: 712
Thanked 955 Times in 545 Posts
Mentioned: 47 Post(s)
|
Thanks for sharing, wish I had this before my install
 Very happy with the product, game changing upgrade.
__________________
Innovate Supercharged Black Limited BRZ 6-Speed MT(Build Thread)
2010 Cadillac CTS-V Sedan M6 w/550whp (Build Thread)  |
|
|
|
|
07-03-2013, 04:55 PM
|
#8 | |
|
Member
Join Date: Sep 2012
Drives: FR-S
Location: Santa Fe Springs California
Posts: 51
Thanks: 59
Thanked 84 Times in 28 Posts
Mentioned: 15 Post(s)
|
Quote:
Yes, Subaru did us a favor by making those front sway bar bushing mounts modular. Dropping subframes are never fun. With OE springs and tires, you can achieve neutral handling with the front on stiff and the rear on medium soft hole setting (2nd hole from the end). With some better tires you can have plenty of stability even on the medium stiff hole setting (3rd hole from the end). If you have Hotchkis springs, these settings apply as well. When introducing higher/varying spring rates, more aggressive alignment settings and shock damping adjustability, you will have to adjust the sway bars accordingly to suit your needs. Cheers!
|
|
|
|
|
|
07-16-2013, 03:39 PM
|
#9 |
|
Senior Member
Join Date: Sep 2012
Drives: White FR-S, 6M
Location: East Tennessee
Posts: 272
Thanks: 70
Thanked 92 Times in 53 Posts
Mentioned: 3 Post(s)
|
Mine just arrived today. No collars needed on the front bar to prevent the side to side movement?
Edit: never mind collars are built in on front bar
__________________
Last edited by FastLane1000; 07-17-2013 at 03:59 PM. Reason: answered my own question |
|
|
|
|
07-16-2013, 04:04 PM
|
#10 |
|
Senior Member

Join Date: May 2013
Drives: 2013 BRZ
Location: Iowa
Posts: 928
Thanks: 135
Thanked 298 Times in 202 Posts
Mentioned: 1 Post(s)
|
Huh. I did mine without unbolting from the subframe. It was a PITA of course.
__________________
|
|
|
|
|
07-16-2013, 04:59 PM
|
#11 |
|
me
Join Date: Jan 2013
Drives: FR-S
Location: USA
Posts: 43
Thanks: 8
Thanked 13 Times in 8 Posts
Mentioned: 1 Post(s)
|
i have clunking issue using the stiffest settings for the front swaybar with stock endlink. (adjustable endlink possibly will fixed this though)
|
|
|
|
|
07-16-2013, 05:21 PM
|
#12 |
|
Senior Member
Join Date: May 2013
Drives: 2013 BRZ
Location: Iowa
Posts: 928
Thanks: 135
Thanked 298 Times in 202 Posts
Mentioned: 1 Post(s)
|
I can't speak for any other bars but my Whiteline and a buddy's Hotchkis bar both clunk. Something needs to be done with the endlinks, either replacing or cutting and shortening stock.
__________________
|
|
|
|
|
07-16-2013, 07:33 PM
|
#13 | |
|
Senior Member
Join Date: Sep 2012
Drives: White FR-S, 6M
Location: East Tennessee
Posts: 272
Thanks: 70
Thanked 92 Times in 53 Posts
Mentioned: 3 Post(s)
|
Quote:
@Hotchkis have any input?
__________________
|
|
|
|
|
|
|
|
|
|
|
 Similar Threads
|
||||
| Thread | Thread Starter | Forum | Replies | Last Post |
| TRD Door Stabilizer Kit | AL008 | Australia Classifieds | 3 | 03-17-2013 08:53 PM |
| FS; TRD DOOR STABILIZER | photomike | Brakes, Suspension, Chassis | 1 | 03-07-2013 04:05 AM |
| EOI - TRD Door Stabilizer kit | AL008 | AUSTRALIA | 2 | 02-28-2013 02:21 AM |
| TRD Door Stabilizer | scioneric | Canada Classifieds | 15 | 01-22-2013 08:49 PM |
| Rear Sway Bar Stabilizer Bracket Bolt replacement? | Books | Suspension | Chassis | Brakes -- Sponsored by 949 Racing | 4 | 12-19-2012 03:55 PM |


