


|
||||||
| Other Vehicles & General Automotive Discussions Discuss all other cars and automotive news here. |
 |
|
|
Thread Tools | Search this Thread |
 03-04-2013, 08:21 PM
|
#1 |
|
Spaceman

Join Date: Jun 2012
Drives: 2013 Firestorm Scion FR-S
Location: Wallingford, CT
Posts: 1,581
Thanks: 854
Thanked 860 Times in 468 Posts
Mentioned: 26 Post(s)
Tagged: 0 Thread(s)
|
FML!
So I got a call the other evening that my mother had a flat tire. I went to help.
I jacked her car up and worked like a dog to get the lugs off with a tire iron after they'd been hammered away at by the airgun at the service department a Toyota (it's an 09 Matrix). Got the wheel off and put her spare on. Told her to take the flat to the tire shop and ask them to repair it. There was a nice large screw sticking out of it. I torqued the lugs back on to the appropriate spec (78 ft lbs). That was a little over two days ago. Today she got her repaired wheel back and I went to help put it back on. 4 of the 5 lugs came off without an issue. The final one would not budge so I put some force on it for a few turns and then it popped off..... with the stud right down to the surface of the rotor.  Has anyone replaced wheel studs before? I've never done it but I'm sure I could handle it. Just want to get an idea of what sort of tools I'd need.
__________________
|

|

|
|
03-04-2013, 08:57 PM
|
#2 |
|
Senior Member

Join Date: Aug 2012
Drives: 2013 Scion FR-S
Location: Syracuse
Posts: 719
Thanks: 274
Thanked 277 Times in 161 Posts
Mentioned: 6 Post(s)
Tagged: 0 Thread(s)
|
Take off the brakes, knock the stud out with a hammer and punch. To put the new stud on the poor mans way without an installer: you will need a nut larger than the stud and a washer. Put the stud through the hub, put the washer over the stud, put the oversize nut on the stud. Then use your new lug nut and tighten until it is tight, coat all of the surfaces good in oil. Where the washer touches the hub, nut touches the washer, lug nut touches the oversize nut and the threads. Once the back of the stud is flush to the hub you are set. Clean all the oil off of everything with brake clean and re-assemble everything.
__________________
Mods: Perrin CAI, JDL EL header, DC sports Catless front pipe, top speed auto pro-1 cat-back, H&R sport line springs, Headlight blackout, "Demon eyes"
|
|
|
|
| The Following User Says Thank You to Hardrock4445 For This Useful Post: | Bonburner (03-04-2013) |
|
03-04-2013, 09:06 PM
|
#3 |
|
Senior Member
Join Date: Aug 2012
Drives: 2013 Scion FR-S
Location: Syracuse
Posts: 719
Thanks: 274
Thanked 277 Times in 161 Posts
Mentioned: 6 Post(s)
Tagged: 0 Thread(s)
|
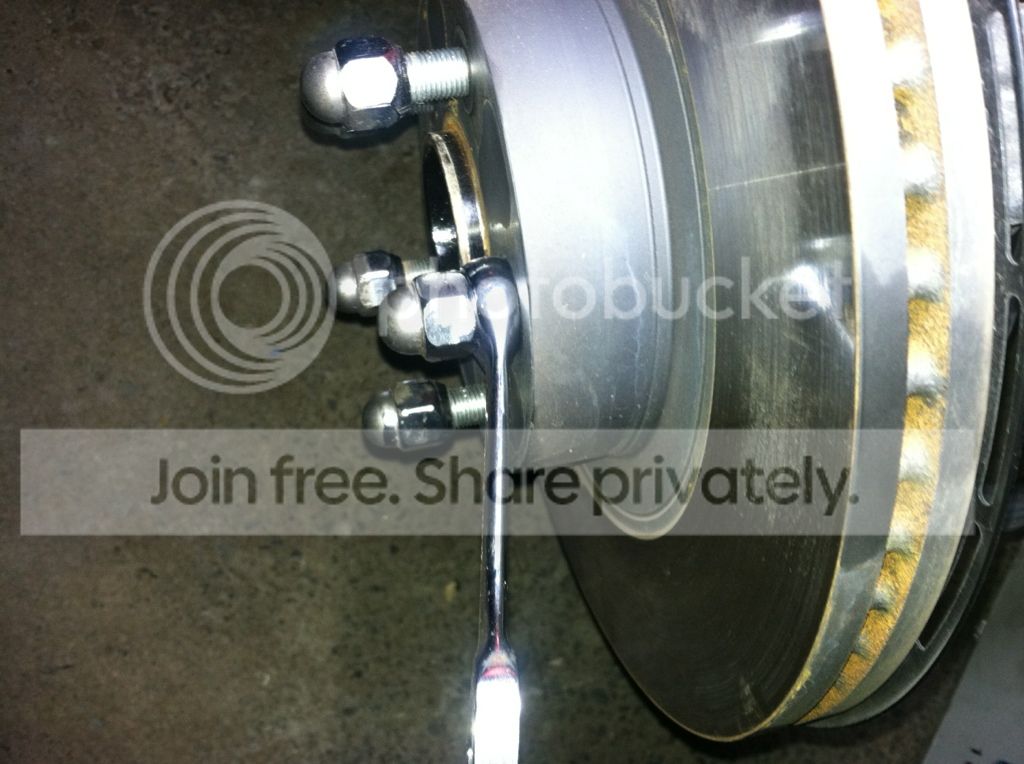
If you don't have a over size nut and washer you can use a wrench, just took a quick pic on the FR-S as an example. Remember to remove brake components. Use a 14 or 15 mm box end wrench. The wrench is going to be the "spacer" again, lube everything really good. Tighten the lug nut until the stud is installed fully. Hope this helps.
__________________
Mods: Perrin CAI, JDL EL header, DC sports Catless front pipe, top speed auto pro-1 cat-back, H&R sport line springs, Headlight blackout, "Demon eyes"
|
|
|
|
| The Following 2 Users Say Thank You to Hardrock4445 For This Useful Post: | Bonburner (03-04-2013), Chewie4299 (03-05-2013) |
|
03-05-2013, 05:22 PM
|
#4 | |
|
Spaceman
Join Date: Jun 2012
Drives: 2013 Firestorm Scion FR-S
Location: Wallingford, CT
Posts: 1,581
Thanks: 854
Thanked 860 Times in 468 Posts
Mentioned: 26 Post(s)
Tagged: 0 Thread(s)
|
Quote:
Think I've lucked out from what I'm reading. Apparently the AWD matrix required removing an entire axle shaft but since this one is FWD I'm golden.
__________________
|
|
|
|
|
|
03-05-2013, 06:19 PM
|
#5 |
|
Spaceman
Join Date: Jun 2012
Drives: 2013 Firestorm Scion FR-S
Location: Wallingford, CT
Posts: 1,581
Thanks: 854
Thanked 860 Times in 468 Posts
Mentioned: 26 Post(s)
Tagged: 0 Thread(s)
|
There's a shroud on the back of the hub that I didn't want to remove so I had to feel the rear of the stud to see if it was flush.
I'm not 100% certain that I got it flush but I feel pretty good about it. I'm going to check and re-torque the lugs on that wheel every night for the next couple weeks.
__________________
|
|
|
|
|
03-05-2013, 06:35 PM
|
#6 |
|
That Guy
Join Date: Dec 2011
Drives: 2013 asphalt FRS MT
Location: Halifax, Nova Scotia
Posts: 4,865
Thanks: 5,058
Thanked 2,868 Times in 1,499 Posts
Mentioned: 82 Post(s)
Tagged: 1 Thread(s)
|
As long as you felt a marked difference in how easy it was to turn the lug, you're pretty well guarantied it's seated.
|
|
|
|
| The Following User Says Thank You to Calum For This Useful Post: | Hardrock4445 (03-05-2013) |
|
03-05-2013, 07:06 PM
|
#7 |
|
Senior Member
Join Date: Aug 2012
Drives: 2013 Scion FR-S
Location: Syracuse
Posts: 719
Thanks: 274
Thanked 277 Times in 161 Posts
Mentioned: 6 Post(s)
Tagged: 0 Thread(s)
|
:happy0180: Good!, you will notice how much harder it is to tighten when it sets. Glad I could help!
__________________
Mods: Perrin CAI, JDL EL header, DC sports Catless front pipe, top speed auto pro-1 cat-back, H&R sport line springs, Headlight blackout, "Demon eyes"
|
|
|
|
|
03-07-2013, 08:53 PM
|
#8 | |
|
Senior Member
Join Date: Aug 2012
Drives: 2013 Scion FR-S
Location: Syracuse
Posts: 719
Thanks: 274
Thanked 277 Times in 161 Posts
Mentioned: 6 Post(s)
Tagged: 0 Thread(s)
|
Quote:
__________________
Mods: Perrin CAI, JDL EL header, DC sports Catless front pipe, top speed auto pro-1 cat-back, H&R sport line springs, Headlight blackout, "Demon eyes"
|
|
|
|
|
|
|
|
|
|
|
|


