


|
||||||
| Cosmetic Modification (Interior/Exterior/Lighting) Discussions about cosmetic mods. |
 |
|
|
Thread Tools | Search this Thread |
 01-20-2013, 10:23 AM
|
#1 |
|
Senior Member

Join Date: Jul 2012
Drives: Pearl White
Location: Cape Town
Posts: 151
Thanks: 5
Thanked 66 Times in 40 Posts
Mentioned: 0 Post(s)
|
F 'n A Fog Light Mod INSTALLED
Howdee Peeps.
I'm guessing I'm the first person outside the US to install this kit as I'm the first with OE fog lights already installed to add this.. First off the kit.. arrived quickly from Frank Jannucci and looks to be very nicely put together.. all neat and tidy.. As I have the 3-wire version.. it taps into the existing fog light connection at about 50% brightness and then ramps up to full brightness (which is very bright) when the brakes are pressed. On to the install (which took me about 25 minutes with basic tools) First off open the boot (rocket science this) 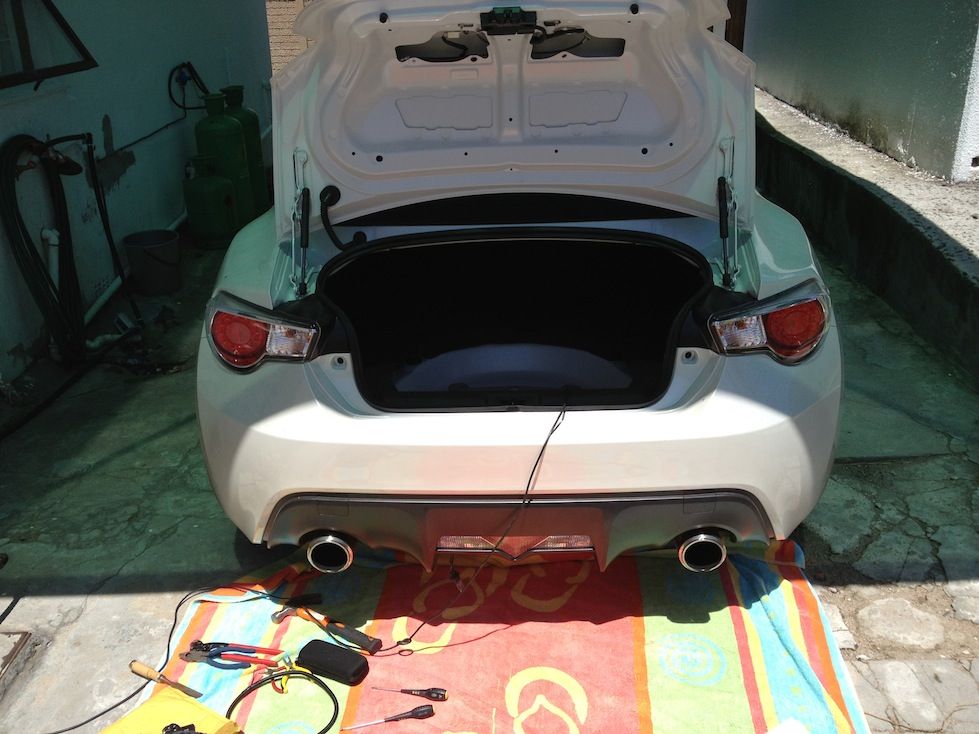 Remove the negative terminal to avoid any unwanted hairstyle mods 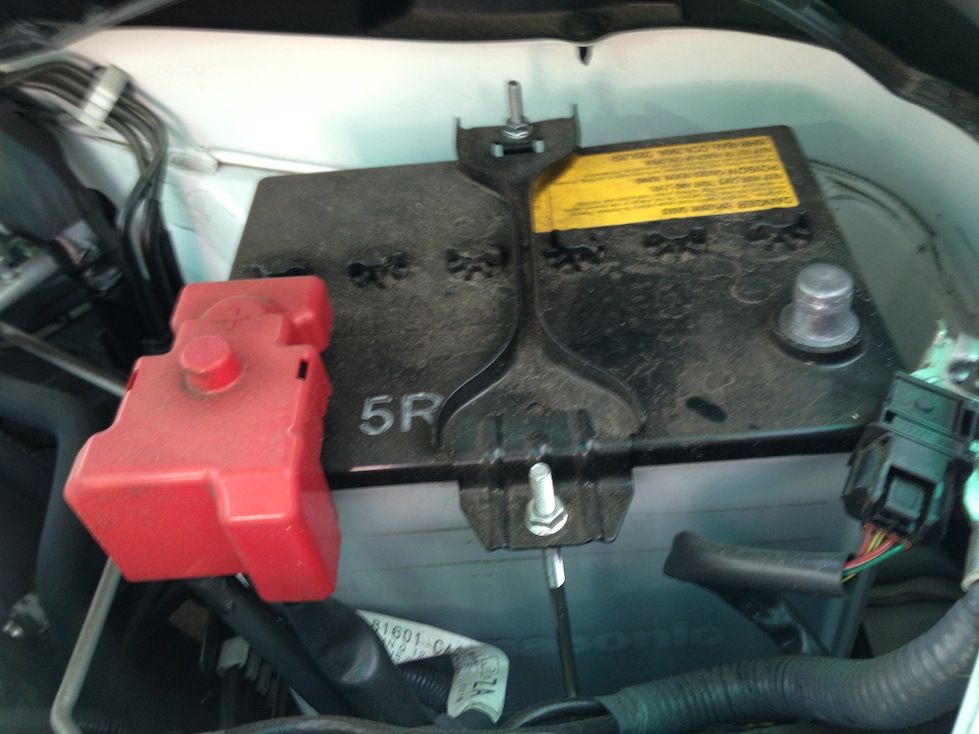 Remove the 3 clips that hold the rear plastic cover in place and remove it with a upwards pull.. this is so easy that if you don't get it right first time, I suggest you take the car back to the dealer and tell them you need to return the car as you are too stupid to be driving 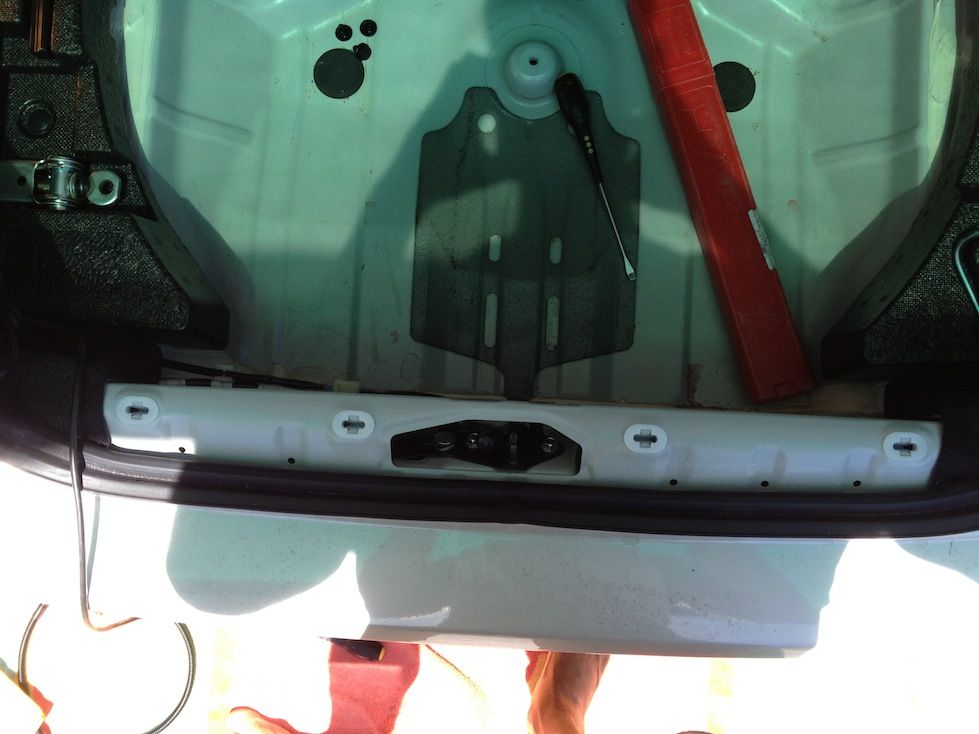 Pull back the carpet on the left and find the white plug to the light... you will need to connect the single yellow wire to the green wire here.. this is the "trigger wire" for the brake lights 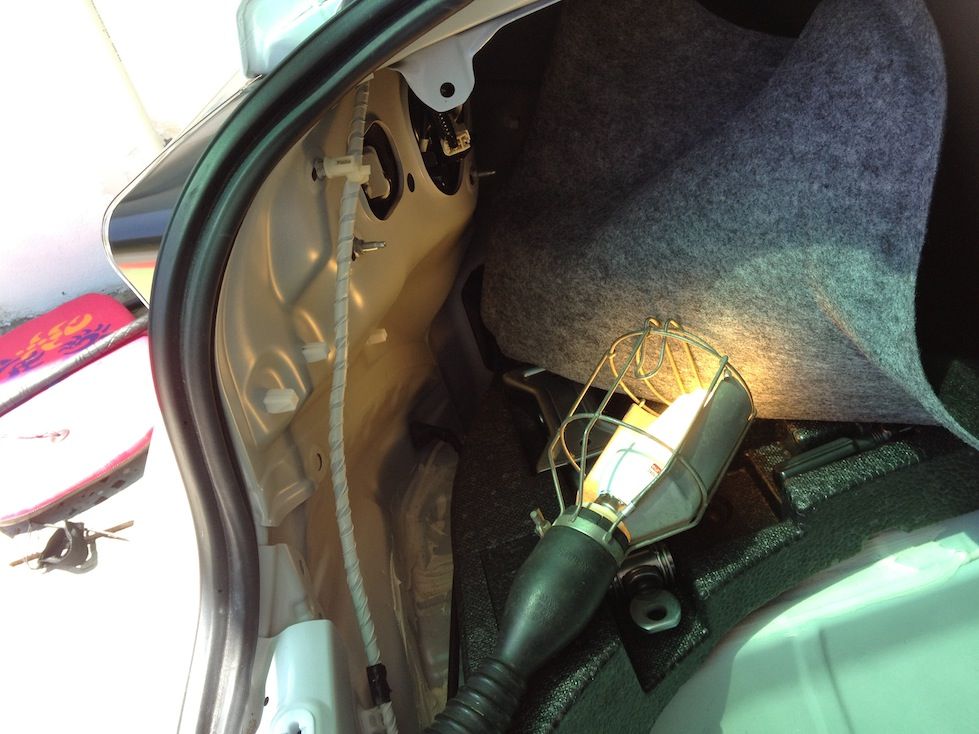 Here's the plug removed 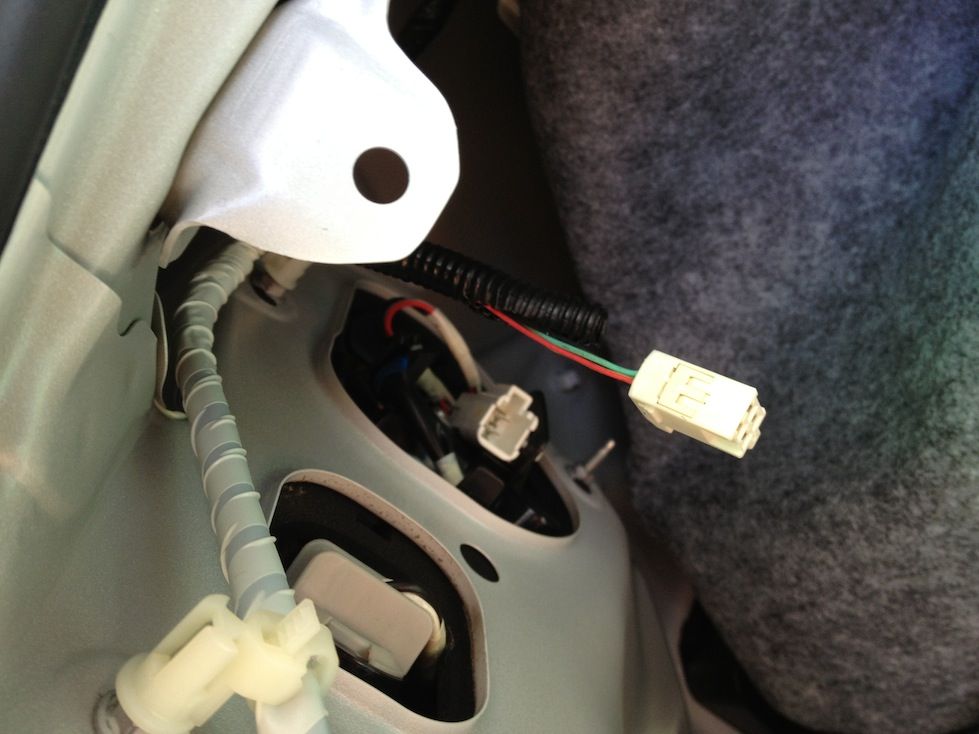 and then the wire tapped in to the green brake wire 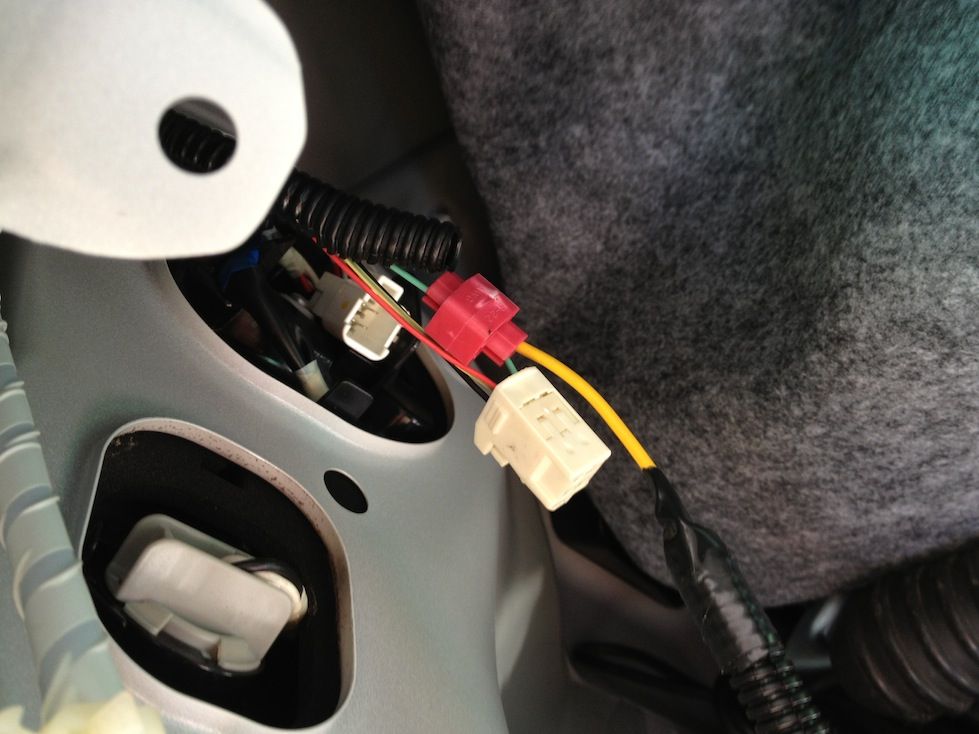 Now before this wire will work.. the kit needs a negative connection.. the kit is essentially 2 positives (a "low power" for fogs and a "high power" for brakes) and 1 negative for ...er... negative. Okay so under the car (if you have OE fogs) you will find the fog wire which is blue and green... 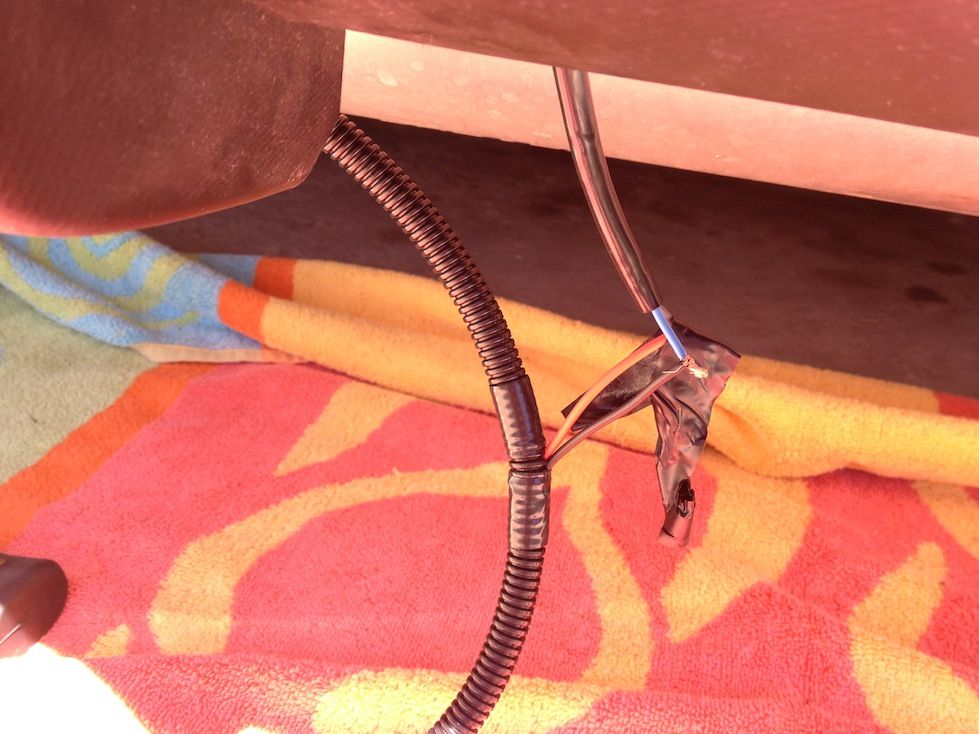 Pictured here I did a rough n ready connection to test the kit prior to wiring it all permanently....  Wire the Black to Dark Green and Red to Blue for the existing fog.. then the LED fog will come on using the stalk on the steering wheel. If it works you can then tap it in permanently 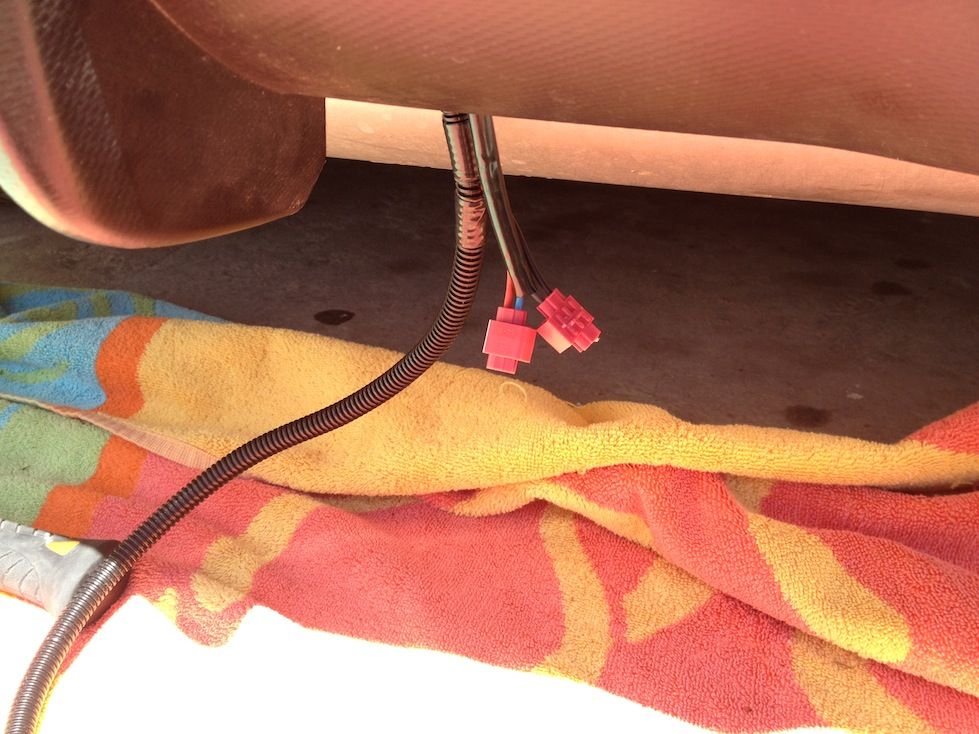 Make sure that before you finally attached the wire which goes INSIDE the car to the brake light.. that you feed it through the existing rubber grommet from behind the bumper to inside the rear boot to ensure a water tight connection.. Okay... now the light fitting from F 'n A is square however the OE fitting is a kind of elliptical triangle.. but this is not a big problem.. 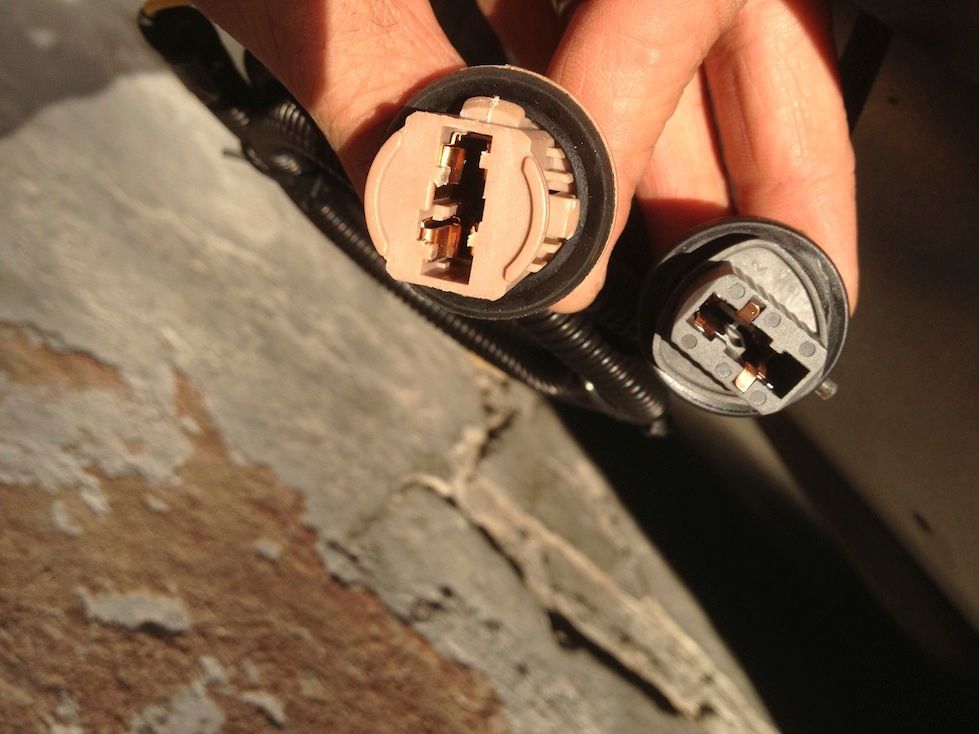 On the F 'n A fitting (shown on the Left above) just take a blade and shave off ONE NOT BOTH of the smaller clips.. there are 2 larger clips which hold it in place and 2 smaller ones which act as guides.. just shave off one of these smaller clips and the fitting will fit.. it wont click into place... but you can twist it about 30 degrees anti-clockwise and it jams well and truly in place. Once it's all done.. make sure you tape up all your connections... re attached the battery and replace the cover and you are done.. should be about 30 minutes all in all  Here's how it looks when it's done.. my 7-yr old is in the driver's seat so bare with me here. 
__________________
|

|

|
| The Following 4 Users Say Thank You to MattQ-WP For This Useful Post: | F n' A Automotive (01-20-2013), Lverasky (03-08-2013), ShoNUFF (01-20-2013), Sportsguy83 (01-20-2013) |
|
01-20-2013, 10:35 AM
|
#2 |
|
Join Date: Nov 2012
Drives: 11 STi Sedan
Location: CNJ
Posts: 15
Thanks: 270
Thanked 121 Times in 78 Posts
Mentioned: 22 Post(s)
|
Awesome Matt! Your help was essential! lol
Kit looks great and you know we are more than happy to work with you to find you the correct socket that needs to be put in there that give that "snap" when turned into the hole. Otherwise, great write-up and we do really appreciate it! For anyone else who is interested in the kit, feel free to check out our Vendor page in the classified exterior mods section of this forum. Anyone who orders a kit who's car has a rear fog stock, you will not have to modify the socket we send to you. Matt was very good about working with us, and was able to make our socket fit on his own. Now that we learned the secret, future kits will not need to be modified to fit! Here's the link! Click this! Thanks -FNA |
|
|
|
|
01-20-2013, 09:30 PM
|
#3 |
|
Senior Member
Join Date: Jan 2013
Drives: MY04 S2000 (LEXY)
Location: san fernando valley 818
Posts: 105
Thanks: 53
Thanked 10 Times in 10 Posts
Mentioned: 0 Post(s)
|
Looks awesome
|
|
|
|
|
01-21-2013, 01:41 AM
|
#4 |
|
Custom User Title

Join Date: Jun 2012
Drives: Asphalt FR-S MT
Location: Buford, GA/Daytona Beach, FL
Posts: 2,793
Thanks: 395
Thanked 1,182 Times in 697 Posts
Mentioned: 49 Post(s)
|
For the amount of work you have to do, it's overpriced. I did this same thing for less than $30.
__________________
 |
|
|
|
|
01-21-2013, 03:26 AM
|
#5 | |
|
Senior Member
Join Date: Jul 2012
Drives: Pearl White
Location: Cape Town
Posts: 151
Thanks: 5
Thanked 66 Times in 40 Posts
Mentioned: 0 Post(s)
|
Quote:
Please refer to the line in my signature, it applies to you specifically
__________________
|
|
|
|
|
| The Following 3 Users Say Thank You to MattQ-WP For This Useful Post: |
|
01-21-2013, 09:07 AM
|
#6 | |
|
Senior Member

Join Date: Oct 2012
Drives: 2013 Scion FR-S
Location: Mid-Michigan
Posts: 799
Thanks: 392
Thanked 388 Times in 180 Posts
Mentioned: 2 Post(s)
|
Quote:
__________________
Ultramarine 2013 Scion FR-S 6MT
 |
|
|
|
|
|
01-21-2013, 09:51 AM
|
#7 |
|
Senior Member
Join Date: Sep 2012
Drives: 2013 BRZ SWP 6AT Ltd
Location: Alexandria, VA.
Posts: 1,607
Thanks: 859
Thanked 776 Times in 485 Posts
Mentioned: 37 Post(s)
|
Well done and Thanks for Sharing!!
|
|
|
|
|
01-21-2013, 09:51 AM
|
#8 | |
|
Custom User Title
Join Date: Jun 2012
Drives: Asphalt FR-S MT
Location: Buford, GA/Daytona Beach, FL
Posts: 2,793
Thanks: 395
Thanked 1,182 Times in 697 Posts
Mentioned: 49 Post(s)
|
Quote:
__________________
|
|
|
|
|
|
01-21-2013, 11:37 AM
|
#9 |
|
Senior Member
Join Date: Oct 2012
Drives: 2013 Scion FR-S
Location: Mid-Michigan
Posts: 799
Thanks: 392
Thanked 388 Times in 180 Posts
Mentioned: 2 Post(s)
|
That's like saying "oh, buying an intake manifold is a waste of money...I welded up mine for like $30 in materials". DIY kits are made for people who don't want to (or don't feel comfortable) sourcing all the materials necessary to complete a job, and take a lot of the guesswork out of the process. They lend a sense of comfort that someone with more skill than you has taken the time to think everything out, source the proper materials, and put it all together for you with instructions and support to help guide you through the process.
__________________
Ultramarine 2013 Scion FR-S 6MT
|
|
|
|
|
01-21-2013, 12:05 PM
|
#10 |
|
Custom User Title
Join Date: Jun 2012
Drives: Asphalt FR-S MT
Location: Buford, GA/Daytona Beach, FL
Posts: 2,793
Thanks: 395
Thanked 1,182 Times in 697 Posts
Mentioned: 49 Post(s)
|
Yes I agree that there is a sense of security, but in a case like this, you only need two items: a bulb and 5 feet of 3 piece/conductor wiring. You still have to do all the work so it really isn't plug and play.
I'm done though. Edit: I'm not at all trying to dump on anyone's product. I'm just trying to show what this really is. And your intake manifold comparison was just wrong. That would require all kinds of R&D which justifies (in most cases) the cost. This doesn't.
__________________
|
|
|
|
|
01-21-2013, 12:12 PM
|
#11 | |
|
Banned
Join Date: Oct 2012
Drives: Asphalt AT
Location: Midwest
Posts: 813
Thanks: 324
Thanked 608 Times in 262 Posts
Mentioned: 10 Post(s)
|
Quote:
What is an exhaust? Pieces of metal just bent in cool shapes. What is a car? A bunch of pieces just put together for less than what they sell it for. Full herp-derp engaged. 
|
|
|
|
|
| The Following User Says Thank You to Asphalt~86 For This Useful Post: | F n' A Automotive (01-21-2013) |
|
01-21-2013, 04:34 PM
|
#12 |
|
Senior Member
Join Date: Jul 2012
Drives: Pearl White
Location: Cape Town
Posts: 151
Thanks: 5
Thanked 66 Times in 40 Posts
Mentioned: 0 Post(s)
|
I'm really enjoying this little mod.. Especially at night, that additional reverse light is very noticeable.
Dude. Agreed on being able to do this yourself, but to be perfectly honest the parts they have put together are all top notch, there's a spare bulb, all the connectors I needed were there, and the wires were pre-cut and nicely wrapped so it all looks OE. If I did it myself even locally the time to source and buy the bits and assemble would cost more in time than getting it all pre-done. Even knowing how to do it I'd still rather get a kit and let someone make their markup for doing a good job 
__________________
|
|
|
|
| The Following User Says Thank You to MattQ-WP For This Useful Post: | F n' A Automotive (01-21-2013) |
|
01-21-2013, 04:54 PM
|
#13 | |
|
Senior Member
Join Date: Jun 2012
Drives: 2013 FR-S Hot Lava, 2007 Tundra
Location: Utah
Posts: 174
Thanks: 283
Thanked 117 Times in 50 Posts
Mentioned: 3 Post(s)
|
Quote:

__________________
 |
|
|
|
|
| The Following 3 Users Say Thank You to b.e For This Useful Post: |
|
01-23-2013, 06:03 AM
|
#14 | |
|
Senior Member
Join Date: Jul 2012
Drives: Pearl White
Location: Cape Town
Posts: 151
Thanks: 5
Thanked 66 Times in 40 Posts
Mentioned: 0 Post(s)
|
Quote:
__________________
|
|
|
|
|
| The Following User Says Thank You to MattQ-WP For This Useful Post: | Sportsguy83 (01-23-2013) |
|
|
|
|
|
|
 Similar Threads
|
||||
| Thread | Thread Starter | Forum | Replies | Last Post |
| ZILLA: (How-To) *REAR FOG LIGHT WITH BRAKE LIGHT* MOD! | ZILLA | DIY (Do-It-Yourself) Guides | 117 | 09-19-2017 10:17 AM |
| **PHASTEK** Rear Fog Light/Brake Light Kit for the Scion FR-S and Subaru BRZ | PhastekSport | Exterior Parts - Lighting | 57 | 07-10-2017 08:14 PM |
| JDM Fog Light ON and installed! | 86design | BRZ Photos, Videos, Wallpapers, Gallery Forum | 111 | 09-20-2013 12:23 AM |
| experiencing tail light + fog light condensation? | whyreeto | AUSTRALIA | 20 | 01-14-2013 11:15 PM |
| Risk Racing Light Mine Professional Magneti - Magnetic mini light fixture! | DjDATZ | Off-Topic Lounge [WARNING: NO POLITICS] | 0 | 06-28-2012 11:21 AM |


 Ashley
 My 86
My 86