


|
||||||
| DIY (Do-It-Yourself) Guides For all DIYs. |
 |
|
|
Thread Tools | Search this Thread |
 01-17-2013, 11:17 PM
|
#1 |
|
Professional Smartass

Join Date: Jul 2012
Drives: White Out FRS
Location: Houston TX
Posts: 1,126
Thanks: 114
Thanked 610 Times in 308 Posts
Mentioned: 51 Post(s)
|
DIY upgraded H9 bulbs for FRS owners
This DIY is very easy, cheap, and nets you higher output headlights without blinding people like the chumps with plug and play HID kits. There are, however, risks involved so I take no responsibility if you screw up.
Tools needed: Hands, latex gloves (don't touch the bulbs!), 8mm to aim headlights after, snips, x-acto knife for trimming, needle nose pliers. Bulbs: [ame="http://www.amazon.com/gp/product/B00480KOP4/ref=oh_details_o00_s00_i00"]Philips H9 Standard Headlight Bulb, Pack of 1 : Amazon.com : Automotive[/ame] First of all this DIY has been around for a long time. I am not the first to do this. Our cars use H11 bulbs for low beams. They are around 1300 lumens. They use 55 watts and 12 volts. They also suck the big one. H9 bulbs are 65 watts, 12 volts, and closer to 2100 lumens. Here is what our H11 bulb on the left looks like compared to the H9 on the right. You'll notice they are pretty much identical. That's because they are. They are the same size, connector, etc. There are a few modifications you need to make to the bulb to get them to fit. First you need to file down the inside of the connector with an exacto knife. Easy because the plastic is soft. In the picture below you can see the ridge in the center you need to remove. Next you need to tweeze off some metal on the front of the bulb. I used needle nose pliers and simply bent and twisted the metal until it broke off. This picture is after I broke off the metal. Below is a picture from behind the wheel showing the more powerful H9 bulb on the left, and the stock on the right. Now lets talk about the risks. You're running a 65w bulb on a harness that is designed for 60w. Before doing this modification I took a look at the gauge of wire used and it can more than handle this minor bump. After driving around for 30 minutes I checked the wires, cold to the touch. The bulbs were warm but that's to be expected. The harness that the bulbs connect to was also cold. Again, this isn't a crazy bump in power or heat generated. A word of warning: I needed to lower my headlights after this because the output was much higher. You must do this for the sake of other drivers. If you can suddenly see much more it's because you're blinding people, get an 8mm wrench and adjust them down. It took a few tries before I got them aligned correctly. Only time will tell how long they last, but at $7 a piece and the minor work involved to get them to fit properly I doubt I'll complain if it's a yearly situation. All I ask is that if you do this mod please align your headlights, I don't want to be an enabler for people to blind other drivers. |

|

|
|
01-18-2013, 12:48 AM
|
#2 |
|
Senior Member

Join Date: Sep 2012
Drives: 2013 Scion FR-S
Location: Olympia, WA
Posts: 581
Thanks: 230
Thanked 343 Times in 189 Posts
Mentioned: 7 Post(s)
|
Could you provide a bit more info on the alignment process?
|
|
|
|
|
01-18-2013, 09:10 AM
|
#3 | |
|
Professional Smartass
Join Date: Jul 2012
Drives: White Out FRS
Location: Houston TX
Posts: 1,126
Thanks: 114
Thanked 610 Times in 308 Posts
Mentioned: 51 Post(s)
|
Quote:
Bulb on the left with the blue is the low beam, right is the high beam. 
|
|
|
|
|
|
01-18-2013, 09:23 AM
|
#4 |
|
Senior Member
Join Date: Oct 2012
Drives: Ultramarine FR-S 6MT
Location: Columbus, OH
Posts: 525
Thanks: 349
Thanked 204 Times in 121 Posts
Mentioned: 2 Post(s)
|
Hey somebody beat me to it! Hooray I don't have to make the thread.
I'm putting mine in tonight. How long did all the work / mods take you? I'm taking a short road trip after I put them in tonight, will definitely have a review of the results!
__________________
 Car Received: 10/18. Break in ended: 10/28 Goal: Openflash UEL headers, Stage II 93 oct, TRD intake, arm rest :P |
|
|
|
|
01-18-2013, 09:32 AM
|
#5 | |
|
Professional Smartass
Join Date: Jul 2012
Drives: White Out FRS
Location: Houston TX
Posts: 1,126
Thanks: 114
Thanked 610 Times in 308 Posts
Mentioned: 51 Post(s)
|
Quote:
|
|
|
|
|
|
01-18-2013, 12:14 PM
|
#6 | |
|
Senior Member
Join Date: Oct 2012
Drives: Ultramarine FR-S 6MT
Location: Columbus, OH
Posts: 525
Thanks: 349
Thanked 204 Times in 121 Posts
Mentioned: 2 Post(s)
|
Quote:
1) You replaced both the low beams form h11 to h9, right? The ones in the projectors. 2) Which pic are you referring to? The last pic with it shining on your other car, and the blue fringing on the left light meaning it's the bright one? 3) The alignment arrow - do you mean the piece we have to cut on in the third pic? Basically cut it to the right size so it'll align right in the projector, or are you talking about changing the angle of hte projector itself? Thanks 
__________________
Car Received: 10/18. Break in ended: 10/28 Goal: Openflash UEL headers, Stage II 93 oct, TRD intake, arm rest :P |
|
|
|
|
|
01-18-2013, 12:23 PM
|
#7 | |
|
Professional Smartass
Join Date: Jul 2012
Drives: White Out FRS
Location: Houston TX
Posts: 1,126
Thanks: 114
Thanked 610 Times in 308 Posts
Mentioned: 51 Post(s)
|
Quote:
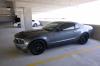
2. The picture of the BRZ is showing the H9 in the drivers side, stock in passenger. 3. The red arrow shows the 8mm head you need to turn to raise or lower the lamp. You don't cut anything to align, you turn the nut to raise or lower. That's the pic with the other purple arrows that you can ignore. You cut the metal on the bulb so it fits in the socket. |
|
|
|
|
|
01-18-2013, 02:21 PM
|
#8 | |
|
Senior Member
Join Date: Oct 2012
Drives: Ultramarine FR-S 6MT
Location: Columbus, OH
Posts: 525
Thanks: 349
Thanked 204 Times in 121 Posts
Mentioned: 2 Post(s)
|
Quote:
Thanks for finding /solving all the annoying little bits for our specific car!
__________________
Car Received: 10/18. Break in ended: 10/28 Goal: Openflash UEL headers, Stage II 93 oct, TRD intake, arm rest :P |
|
|
|
|
|
01-18-2013, 02:29 PM
|
#9 |
|
Senior Member

Join Date: Nov 2012
Drives: sc00ter
Location: 805 818
Posts: 568
Thanks: 76
Thanked 139 Times in 115 Posts
Mentioned: 1 Post(s)
|
good job. although how is this differ from getting HIDs kit? you adjusted the headlights pointing down to prevent blinding, this same concept could be applied to HIDs kit..
|
|
|
|
|
01-18-2013, 02:42 PM
|
#10 | |
|
Professional Smartass
Join Date: Jul 2012
Drives: White Out FRS
Location: Houston TX
Posts: 1,126
Thanks: 114
Thanked 610 Times in 308 Posts
Mentioned: 51 Post(s)
|
Quote:
|
|
|
|
|
|
01-18-2013, 02:43 PM
|
#11 | |
|
Professional Smartass
Join Date: Jul 2012
Drives: White Out FRS
Location: Houston TX
Posts: 1,126
Thanks: 114
Thanked 610 Times in 308 Posts
Mentioned: 51 Post(s)
|
Quote:
|
|
|
|
|
|
01-18-2013, 03:06 PM
|
#12 | |
|
Senior Member
Join Date: Nov 2012
Drives: sc00ter
Location: 805 818
Posts: 568
Thanks: 76
Thanked 139 Times in 115 Posts
Mentioned: 1 Post(s)
|
Quote:
|
|
|
|
|
|
01-18-2013, 03:12 PM
|
#13 |
|
Senior Member

Join Date: Jun 2012
Drives: 2013 BRZ, 2002 WRX
Location: Houston, TX
Posts: 710
Thanks: 978
Thanked 246 Times in 158 Posts
Mentioned: 33 Post(s)
|
FYI: turn the leveling adjustment clockwise to lower the throw and counter-clockwise to raise your throw.
8mm wrench will get 'er done.
__________________
|
|
|
|
|
01-18-2013, 03:22 PM
|
#14 | |
|
Professional Smartass
Join Date: Jul 2012
Drives: White Out FRS
Location: Houston TX
Posts: 1,126
Thanks: 114
Thanked 610 Times in 308 Posts
Mentioned: 51 Post(s)
|
Quote:
http://www.ft86club.com/forums/showt...fit+comparison |
|
|
|
|
|
|
|
|
|
|
 Similar Threads
|
||||
| Thread | Thread Starter | Forum | Replies | Last Post |
| upgraded mounts? | 7thgear | Engine, Exhaust, Transmission | 19 | 01-11-2013 11:31 PM |
| Does anyone have the factory upgraded stereo? | redwing634 | Electronics | Audio | NAV | Infotainment | 8 | 08-22-2012 01:38 PM |
| Cost of upgraded FRS | ngabdala | Scion FR-S / Toyota 86 GT86 General Forum | 8 | 08-04-2012 04:38 PM |
| FR-S\BRZ owners give thumbs up to AE86 owners | Oriental Life | Scion FR-S / Toyota 86 GT86 General Forum | 19 | 06-13-2012 03:12 AM |


 Betty
Betty
