|
||||||
| DIY (Do-It-Yourself) Guides For all DIYs. |
 |
|
|
Thread Tools | Search this Thread |
 12-19-2012, 02:14 AM
|
#1 |
|
Codename: Stitch

Join Date: Apr 2012
Drives: 91 MR2; 06 IS350; 16 BRZ; 18 CX-5
Location: Hayward/NorCal
Posts: 5,248
Thanks: 4,021
Thanked 5,436 Times in 2,307 Posts
Mentioned: 462 Post(s)
Tagged: 6 Thread(s)
|
In this writeup we are going to cover changing out your brake pads on a BRZ/FR-S. This guide will cover changing the front pads; I don't have photos covering the the rear set but the process is very similar and once you’ve done the front axle the rear axle will be pretty self-explanatory. While I had the wheels off I also flushed out the brake fluid and changed to Motul 660 Racing Brake Fluid, and installed speed bleeders, but I won’t get into that because @F1point4 already did an excellent writeup on how to do that – in fact I read and followed that when doing it. http://www.ft86club.com/forums/showthread.php?t=20311
What he didn’t cover, however is the brake pad change, which is actually pretty simple, but I saw that no one had done an article on it yet so I figured I would snap a few pics and do the writeup myself. Tools needed: Jack and jackstands or a lift 19mm socket and a breaker bar, or the lug wrench from the tool set in the trunk Wheel lock key (if you have wheel locks) 14mm socket and ratcheting wrench Rubber/latex or mechanic’s gloves (optional but recommended) Torque wrench (optional but recommended) C-clamp (optional) Turkey baster (optional for removing excess brake fluid) 10mm or 11mm wrench (optional for bleeding brakes) spray bottle of water (in case you spill any fluid) paper towels or rags (for cleaning any spills) work light or flashlight (optional) short stool or chair (optional) Supplies needed: 1 set of replacement brake pads (for the front, set of 4 pads total; another set of 4 for rear) Anti-squeal brake grease (optional) Tasty beverage (optional) Total time required: approximately 30 min to 1 hour. I probably spent 30 min lifting the car and removing/replacing the wheels carefully. About 15 min actually working on the brakes, including stopping and taking pictures. With practice I am sure you can do the whole brake pad swap in even less time. Instructions: 1. First before you lift the car, loosen the lug nuts on the wheels that you will be removing, using the lug wrench or a 19mm socket and breaker bar. If you are just changing the front pads then you could do one wheel at a time. I was going to be doing a full brake fluid flush and speed bleeders install at the same time so I loosened all 4 wheels. 2. Lift the car using jack and stands, or a lift. If the former, take care to do this safely, follow the very thorough and well written instructions written up by @GrimmSpeed: http://www.ft86club.com/forums/showthread.php?t=10111 Safety first! If you are not sure what you are doing seek help from an experienced friend or take it to a shop instead. 3. Remove the wheel. Put the lug nuts in a safe place where you won’t lose them or trip over them.  4. Now you have access to the brake rotor and caliper. There are two 14mm bolts on the back side of the caliper that hold the caliper to the rotor and thus clamp the brake pads in place. Use your ratchet and socket to loosen the top bolt, and remove the bottom bolt. 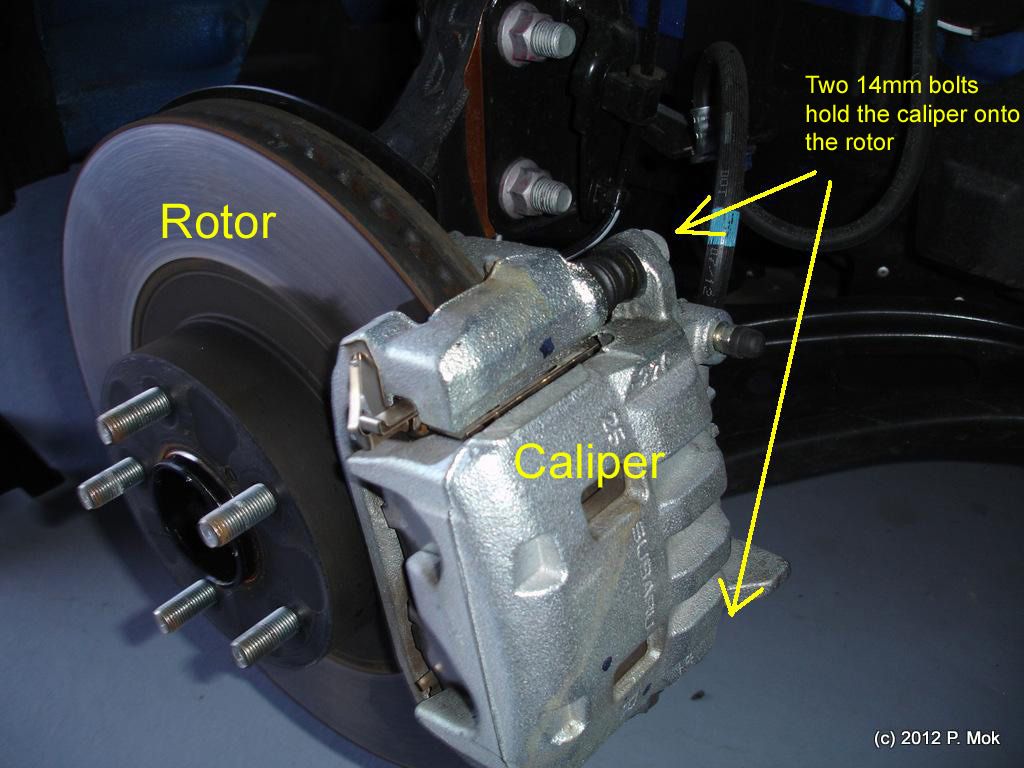 5. You do not have to remove the top bolt, as now you can simply swing the caliper up and away from the pads, pivoting on the loosened top bolt. Note that the caliper is still connected to the brake lines and you should take care not to damage the lines. Now the 2 pads (one on each side of the rotor) are exposed and you can simply pull them out and away from the rotor. I held the caliper up with one hand and removed the pads with the other, they came out easily. Take note of their positioning as you will need to put the new pads in the same way. Some clips remained in the rotor/caliper as I removed the pad, they help to align and hold the pads in place. I left those in the caliper; if you have replacement clips with the pads you bought you can remove and replace these. At this time you can also inspect your rotors and see if they are worn, scored, or otherwise showing signs of severe wear. Replacing your rotors or having them refinished may be necessary, but that is beyond the scope of this particular writeup – I was upgrading my pads at 3000 miles to get ready for a track day, so my rotors are fairly new and not in need of replacement. 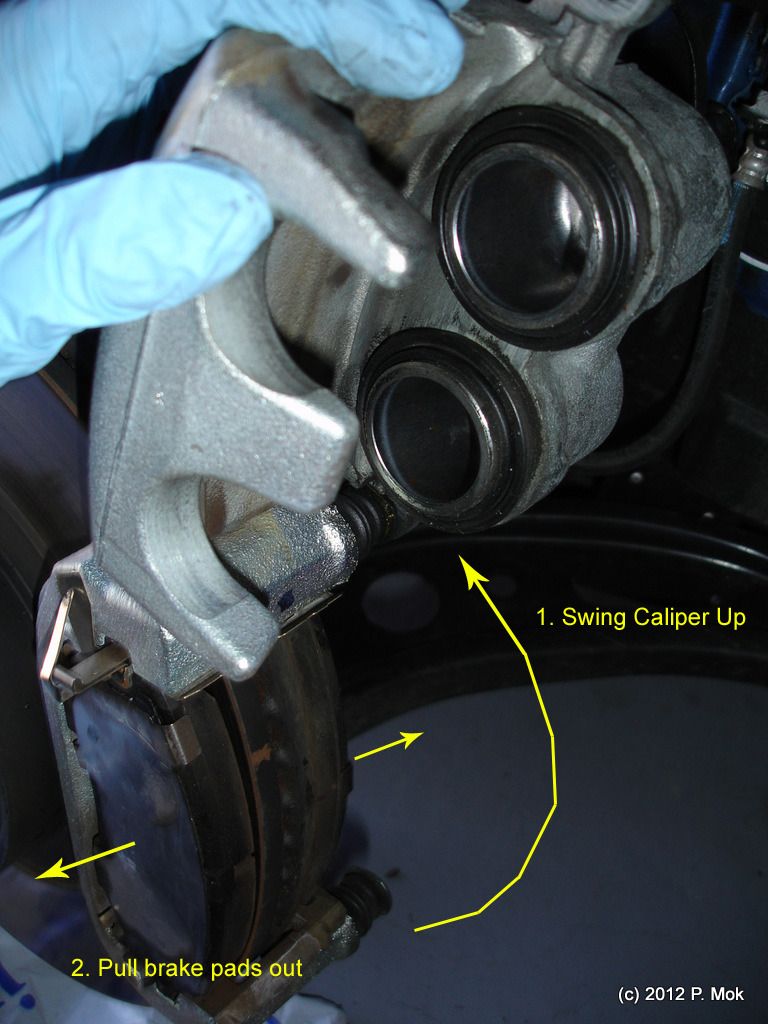 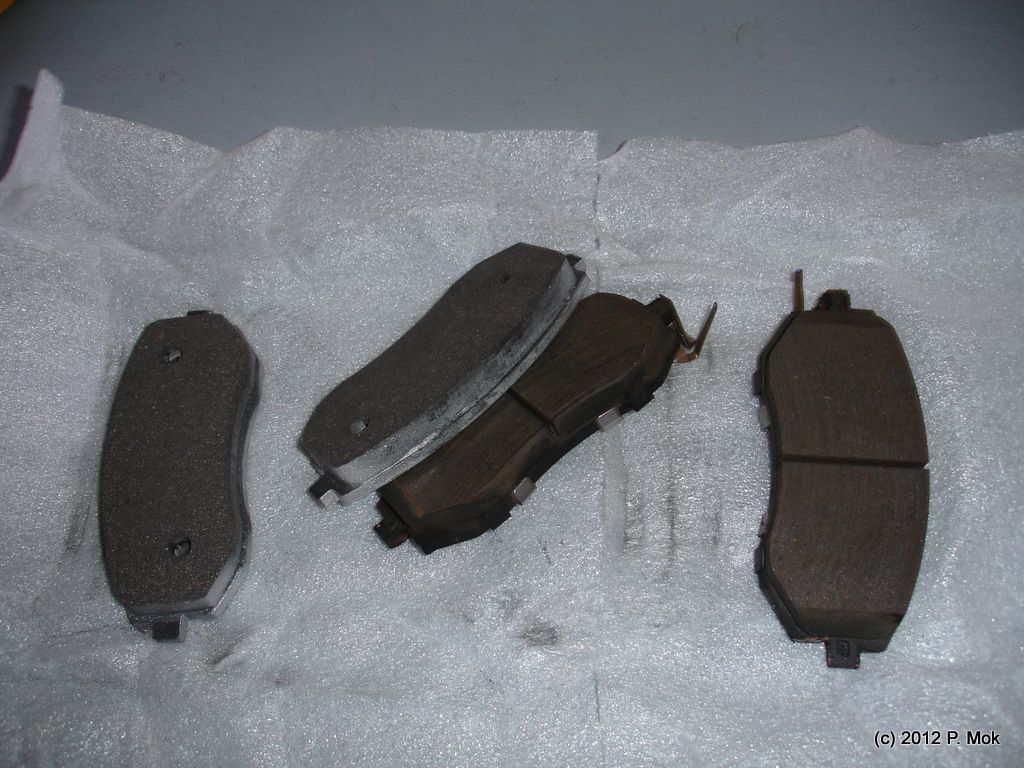 6. New pads are pictured on the left, old pads are on the right. My OEM pads are practically new so they have plenty of thickness left. I am upgrading my front pads to Carbotech XP8s which are a racing/track pad and will hang on to the OEM pads as a backup. Note that the OEM pads have additional clips and shims attached to them that the XP8s do not have. The clips help you recognize when your pads are worn out and need replacing by scraping against the rotor when the pad material is worn down to the point that the clips make contact with the rotor. The shims are supposed to help reduce brake noise or squeal. If you are replacing your pads with OEM or street-use pads, you will probably want to install the clips and shims on the new pads to retain these functions. You would also apply some anti-squeal brake grease between the shims and the pads. Make sure you do not put any grease on the pad material or the rotor – only on the back side of the pad. At CSG Mike’s advice I am skipping the clips and shims and grease because they are not really needed for race pads and the grease will just smoke and burn off at high track temperatures. 7. Place the new pads back into place and gently lower the caliper. If your old pads were badly worn, you will now notice that the caliper pistons are too far extended to allow you to lower the caliper over the pads. If so follow the next step to depress the pistons. If you are able to lower the caliper all the way then skip the next 2 steps. 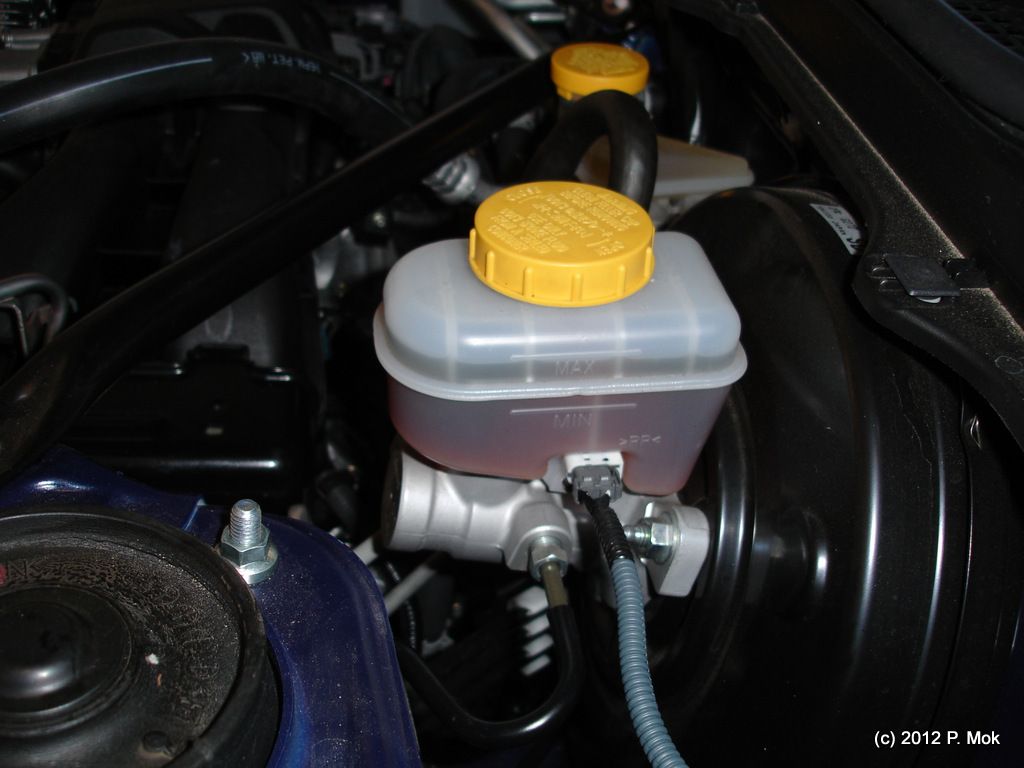 8. At this point, remove the cap from the brake master cylinder/reservoir (under the hood). Now you are going to compress both pistons. You can do this one of two ways. If you have a C-clamp you can place the used brake pad against the pistons and then tighten the C-clamp on the caliper and pad to compress the piston. Or, you can use the lug wrench handle across the two pistons, and push on it with both hands. Use a rocking motion from one piston to the other until eventually they are both fully depressed. You can brace the caliper against the strut so that you can get a decent amount of force onto the caliper. While you are doing this, it is important to periodically check the level of the brake fluid in the reservoir. As you push the pistons in it will push brake fluid back into the reservoir. Brake fluid is extremely corrosive and will eat paint -- you don't want it to overflow and splash around in your engine bay. If you do spill any fluid, spray down the area with water immediately and wipe it up with paper towels or rags. 9. If you cannot get the pistons depressed, you will need to release pressure (and fluid) from the system by opening the caliper bleed screw (with a hose attached and appropriate catch bottle ready – you will need a small 10mm wrench). This will allow you to easily depress both pistons, BUT will absolutely necessitate a bleed of the brake system afterward. See f1point4’s article on bleeding the brakes. You may also have to follow this procedure if depressing the pistons causes the reservoir fluid level to get too high, but what I would do is use a turkey baster to suction off the excess fluid and drain it into a spare bottle or can (take care not to drip brake fluid on the paintwork). 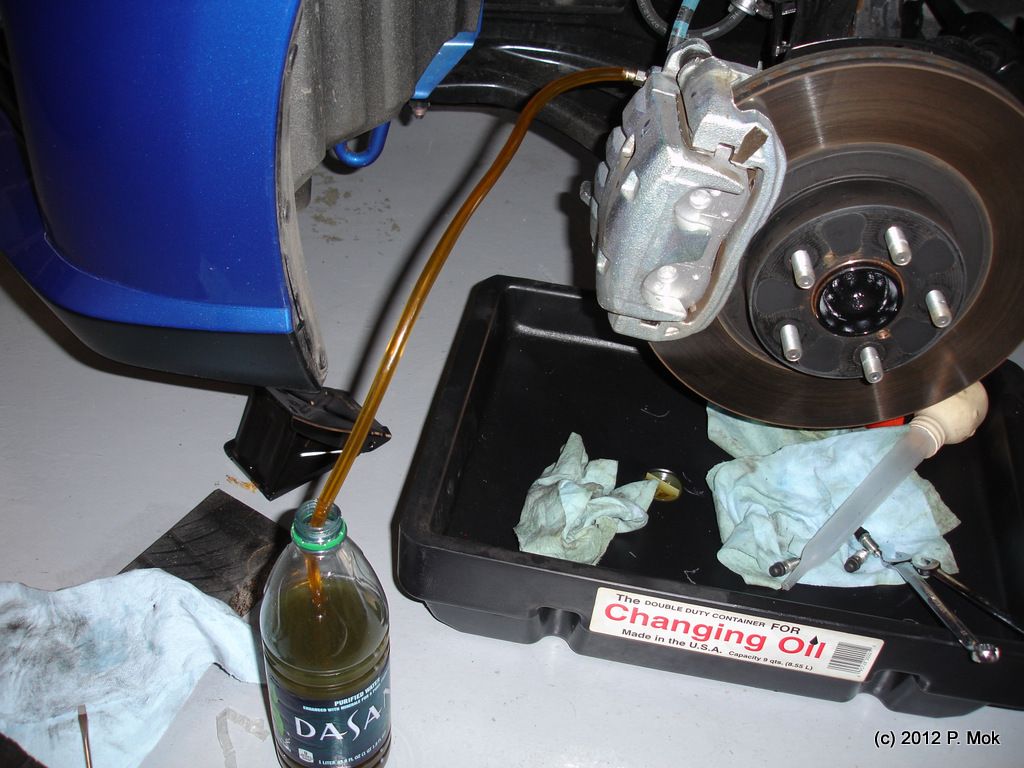 10. Now the caliper can be lowered gently over the pads, and you can replace the lower 14mm bolt, and retighten the upper 14mm bolt. Don’t over tighten these bolts. According to the FR-S service manual the torque should be 19 ft-lbs. The space is a little too tight to fit a torque wrench, so I just approximated it by feel. 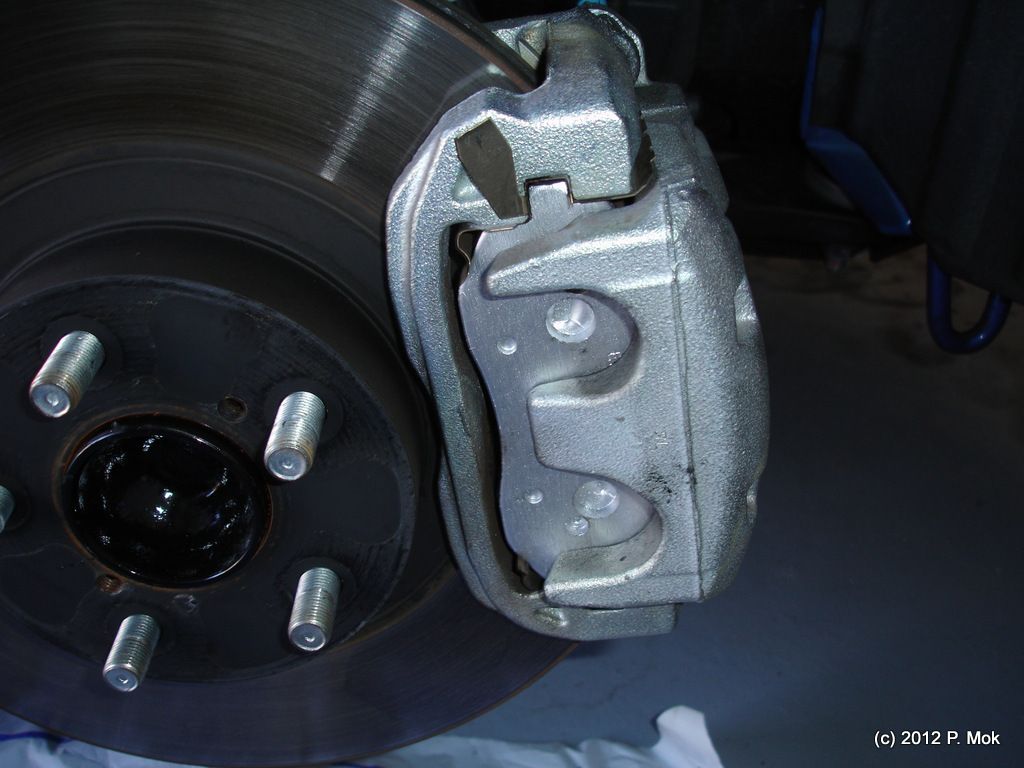 11. Other possible steps: since you’ve already got the wheel off and you’re there, you can install speed bleeders, stainless steel brake lines, and/or bleed or flush the brake fluid. Again, refer to the previous article by f1point4 for directions on any of these. 12. Now you can put the wheel back on and secure it with the lug nuts. Hand tighten them (in star pattern) and then lower the car/remove the jack stand. Once the wheel is fully loaded on the ground, tighten the lugs to 89 ft-lbs using a torque wrench. 13. Repeat the process described in steps 3-12 for the other side. 14. If you are replacing pads on the rear as well, the steps are basically the same. The only difference is that you only remove the lower 14mm bolt, and I found that the caliper will swing up without needing to loosen the upper bolt, to get to the pads. 15. Very Important!!! Once you’re done installing all the pads, start the car and pump the brake pedal a few times to make sure the pistons/pads are fully primed and ready to go before you drive off. 16. In a safe area, road test the car to make sure the brakes work properly. Follow the bedding procedure as recommended by your brake pad’s instructions. Typically this involves incrementally increasing speeds and applying hard braking pressure until the brakes get nice and hot, then letting them cool off. Make sure you do this in a safe area, i.e. not on city streets filled with traffic. Thanks and credits to f1point4 for his previous write up which guided me, and to GrimmSpeed for their lifting and jackstands tutorial. Shout out to @CounterSpace Garage who supplied me with the Carbotech brake pads, and Motul brake fluid, and answered many of my questions about brakes and pad selection. Also parts of this write up were inspired and guided by a DIY posted on ClubWRX by user pace, who documented the pad change process on a WRX. http://www.clubwrx.net/forums/mainte...-pads-wrx.html If you spot any inaccuracies or have anything to add, please let me know!
__________________
Last edited by PMok; 03-20-2014 at 01:35 AM. Reason: added a few small details |

|

|
| The Following 67 Users Say Thank You to PMok For This Useful Post: | 1Cor10:23 (05-19-2015), amram (03-21-2014), Anthonytpt (04-18-2013), Asurendra (11-16-2013), bcj (11-23-2015), BigFatFlip (12-26-2012), bigred18 (04-18-2020), BRAWL (03-22-2014), chenshuo (05-09-2013), chrisp1992 (03-23-2014), CounterSpace Garage (05-28-2013), CxG (05-17-2016), DandoX (08-06-2019), danthedirt (12-27-2012), DarkSunrise (09-17-2013), developer (12-19-2012), DocWalt (10-07-2015), Donbrz (04-13-2015), driftagoon (08-26-2015), eurominican (11-28-2016), F1point4 (12-27-2012), finch1750 (03-01-2014), FRSBRZGT86FAN (09-27-2015), ft86Fan (12-20-2012), GhostOp86 (08-20-2015), Greenhorn (03-21-2014), Guff (12-19-2012), Hanakuso (12-27-2012), hushypushy (04-23-2014), IBill4You (09-15-2016), illicitstylz (07-08-2014), Jesse (12-27-2012), Jetscape (07-22-2013), jimmillion (06-29-2014), kodyo (12-17-2014), MaXimus (12-29-2012), mfbmike (01-23-2014), mgarcia707 (03-10-2020), mike_ekim1024 (12-07-2013), misooscar (03-13-2016), MJones_RB (05-10-2017), mla163 (06-06-2013), MTCRX (04-20-2013), mx5 2nr (05-23-2014), ndsleep612 (02-27-2016), nzer (11-21-2013), Pointmutation (07-17-2016), racecaresuaceb (03-21-2013), Rosticles (04-09-2015), S3pt1c (08-05-2020), smg1138 (07-12-2016), Strife26 (05-02-2017), tato.valverde (06-05-2015), the new guy (04-19-2014), TofuJoe (09-20-2016), torqdork (08-12-2013), voyager2285 (11-18-2017), WatchmaN (03-11-2013), wbradley (04-23-2015), weederr33 (12-06-2019), whataboutbob (12-28-2012), Yamaha_R6 (03-28-2014), YMAA (07-06-2015), ymboc (12-19-2012), ysu (06-19-2016), ZionsWrath (05-24-2014), zoomzoomers (03-22-2013) |
|
12-19-2012, 02:15 AM
|
#2 |
|
Codename: Stitch
Join Date: Apr 2012
Drives: 91 MR2; 06 IS350; 16 BRZ; 18 CX-5
Location: Hayward/NorCal
Posts: 5,248
Thanks: 4,021
Thanked 5,436 Times in 2,307 Posts
Mentioned: 462 Post(s)
Tagged: 6 Thread(s)
|
Sorry for the loss of the images in this thread, Photobucket has changed their policy about external hosting.
Until I get around to rehosting the images somewhere else, you can access the photos from this DIY by going directly to the Photobucket album: http://s78.photobucket.com/user/pmok...ru/brake%20job
__________________
Last edited by PMok; 08-21-2017 at 03:39 PM. |
|
|
|
| The Following 2 Users Say Thank You to PMok For This Useful Post: | mgarcia707 (03-10-2020), ZionsWrath (05-24-2014) |
|
12-19-2012, 06:30 AM
|
#3 |
|
Now w/ over 400 womprats!

Join Date: Nov 2011
Drives: BRZ LZR
Location: Texas/Illinois
Posts: 4,785
Thanks: 10,452
Thanked 3,420 Times in 1,424 Posts
Mentioned: 301 Post(s)
Tagged: 4 Thread(s)
|
Excellent DIY! Definitely useful for anybody that's doing pads for the first time!

__________________
"Sweet Subaru, sweet Subaru, send your BRZ unto me, for the roads of the unworthy must be baptized in speed and glory."
- The Ancient BRZ Sacrament by Zaku |
|
|
|
| The Following 4 Users Say Thank You to Guff For This Useful Post: |
|
12-19-2012, 07:46 AM
|
#4 |
|
Senior Member
Join Date: Aug 2012
Drives: Frs
Location: Dc
Posts: 106
Thanks: 9
Thanked 53 Times in 20 Posts
Mentioned: 0 Post(s)
Tagged: 0 Thread(s)
|
Nice write up
I want to emphasize step 15 ... The brake pedal will go to the floor several times, if you have compressed the pistons to install the new pads. You will have no stopping if you just drive off without doing this step. |
|
|
|
| The Following User Says Thank You to Jeffsu350 For This Useful Post: | ZionsWrath (05-24-2014) |
|
12-19-2012, 08:13 AM
|
#5 |
|
Senior Member

Join Date: Dec 2011
Drives: BRZ and NA
Location: Annapolis, MD
Posts: 878
Thanks: 46
Thanked 270 Times in 167 Posts
Mentioned: 11 Post(s)
Tagged: 2 Thread(s)
|
Are you still able to use the C clamp on the rears? Wouldn't the rear pistons need to be 'screwed' in using a tool because of the emergency brakes? Or do Subarus not work that way?
|
|
|
|
| The Following User Says Thank You to Grimlock For This Useful Post: | ZionsWrath (05-24-2014) |
|
12-19-2012, 01:28 PM
|
#6 |
|
Senior Member
Join Date: Aug 2012
Drives: Frs
Location: Dc
Posts: 106
Thanks: 9
Thanked 53 Times in 20 Posts
Mentioned: 0 Post(s)
Tagged: 0 Thread(s)
|
The parking brake is a drum brake inside the hat of the rear rotors.
So no, the piston does not have to be screwed in |
|
|
|
| The Following 4 Users Say Thank You to Jeffsu350 For This Useful Post: |
|
12-27-2012, 10:08 PM
|
#7 | |
|
Senior Member

Join Date: Jun 2012
Drives: 86 GTS
Location: Brisbane Australia
Posts: 706
Thanks: 141
Thanked 275 Times in 176 Posts
Mentioned: 13 Post(s)
Tagged: 0 Thread(s)
|
Quote:
All the same cautions apply - pump those brakes up before moving the car!!!! |
|
|
|
|
| The Following 3 Users Say Thank You to Panman For This Useful Post: |
|
12-27-2012, 10:14 PM
|
#8 | |
|
Site Moderator

Join Date: Dec 2010
Drives: Stuff
Location: Florida
Posts: 10,317
Thanks: 955
Thanked 5,965 Times in 2,689 Posts
Mentioned: 262 Post(s)
Tagged: 8 Thread(s)
|
Quote:
__________________
-Dave
Track cars: 2013 Scion FRS, 1998 Acura Integra Type-R, 1993 Honda Civic Hatchback DD: 2005 Acura TSX Tow: 2022 F-450 Toys: 2001 Chevrolet Corvette Z06, 1993 Toyota MR2 Turbo, 1994 Toyota MR2 Turbo, 1991 Mitsubishi Galant VR-4 Parts: 2015 Subaru BRZ Limited, 2005 Acura TSX Projects: 2013 Subaru BRZ Limited track car build FS: 2004 GMC Sierra 2500 LT CCSB 8.1/Allison with 99k miles |
|
|
|
|
| The Following User Says Thank You to Dave-ROR For This Useful Post: | ZionsWrath (05-24-2014) |
|
12-28-2012, 10:57 PM
|
#9 |
|
Pepe Le Pew Wannabe

Join Date: Dec 2012
Drives: FR-S
Location: WA
Posts: 147
Thanks: 10
Thanked 26 Times in 18 Posts
Mentioned: 0 Post(s)
Tagged: 0 Thread(s)
|
Great detailed write up. Thanks for the effort. The only thing I d add is if you have a way of pumping the brakes before step 10, I.e. put the bolt back in, finger tight, then pump the brakes and hold the brake pedal down while someone else torqued/tightens the caliper mounting bolts, you will have your caliper perfectly aligned on the center line of your rotor.
|
|
|
|
| The Following User Says Thank You to Kamran For This Useful Post: | ZionsWrath (05-24-2014) |
|
03-22-2013, 07:24 PM
|
#10 |
|
Member
Join Date: Jun 2012
Drives: DGM BRZ
Location: Northern Suburb
Posts: 22
Thanks: 6
Thanked 3 Times in 3 Posts
Mentioned: 0 Post(s)
Tagged: 0 Thread(s)
|
Thanks for writing up this DYI. Worked perfectly to change the front pads on my BRZ. I have a question regarding the metal shim on the original pads. I did not transfer those to my new Ferodo pads. Any problems not transferring those? Thanks in advance for the reply.
|
|
|
|
| The Following User Says Thank You to Red Barchetta For This Useful Post: | ZionsWrath (05-24-2014) |
|
03-22-2013, 08:27 PM
|
#11 | ||
|
Codename: Stitch
Join Date: Apr 2012
Drives: 91 MR2; 06 IS350; 16 BRZ; 18 CX-5
Location: Hayward/NorCal
Posts: 5,248
Thanks: 4,021
Thanked 5,436 Times in 2,307 Posts
Mentioned: 462 Post(s)
Tagged: 6 Thread(s)
|
Quote:
Quote:
__________________
|
||
|
|
|
| The Following 3 Users Say Thank You to PMok For This Useful Post: |
|
03-22-2013, 08:59 PM
|
#12 |
|
Member
Join Date: Jun 2012
Drives: DGM BRZ
Location: Northern Suburb
Posts: 22
Thanks: 6
Thanked 3 Times in 3 Posts
Mentioned: 0 Post(s)
Tagged: 0 Thread(s)
|
Thanks for the response. Great write up.
|
|
|
|
| The Following User Says Thank You to Red Barchetta For This Useful Post: | ZionsWrath (05-24-2014) |
|
03-22-2013, 09:01 PM
|
#13 |
|
Senior Member
Join Date: Feb 2013
Drives: 2013 FR-S whiteout
Location: Columbia, SC
Posts: 157
Thanks: 65
Thanked 165 Times in 59 Posts
Mentioned: 0 Post(s)
Tagged: 0 Thread(s)
|
don't forget to grease the slide pins (with proper grease)
|
|
|
|
| The Following 4 Users Say Thank You to SloS13 For This Useful Post: |
|
03-01-2014, 12:01 AM
|
#14 |
|
Member

Join Date: Mar 2013
Drives: 86 HS AFE filter, BRZ Xors, Kaymak
Location: Durban
Posts: 29
Thanks: 39
Thanked 10 Times in 4 Posts
Mentioned: 0 Post(s)
Tagged: 0 Thread(s)
|
Excellent. Thanks a lot for this article.
|
|
|
|
| The Following 2 Users Say Thank You to Ayrton For This Useful Post: | PMok (03-20-2014), ZionsWrath (05-24-2014) |
|
|
|
|
| Tags |
| brake pads, pad change |
|
|
 Similar Threads
|
||||
| Thread | Thread Starter | Forum | Replies | Last Post |
| Brake Pads, Rotors and All Your Brake/Suspension Needs! Great Prices!! Check it out!! | Mike@CZP | Brakes, Suspension, Chassis | 348 | 06-01-2018 12:29 PM |
| which brake pads? | NESW20 | Suspension | Chassis | Brakes -- Sponsored by 949 Racing | 165 | 02-25-2018 02:07 AM |
| Redline360: Brake Lines, Brake Rotors, Brake Pads for BRZ/FRS | Redline360 | Brakes, Suspension, Chassis | 12 | 01-05-2013 10:20 PM |
| brake pads | Dpark27 | Suspension | Chassis | Brakes -- Sponsored by 949 Racing | 3 | 09-07-2012 07:58 PM |