


|
||||||
| DIY (Do-It-Yourself) Guides For all DIYs. |
 |
|
|
Thread Tools | Search this Thread |
 12-06-2012, 03:18 PM
|
#1 |
|
Senior Member
Join Date: Jul 2012
Drives: 2013 SWP BRZ
Location: New York
Posts: 2,240
Thanks: 458
Thanked 878 Times in 556 Posts
Mentioned: 34 Post(s)
|
DIY - FnA Automotive Rear Fog Light (Kit 1) Installation
Tools:
10mm wrench (optional) flat head screwdriver Electrical Tape Wire Puller (optional) Dremel with grinding accessory Drill 7/64 Drill bit or small Drill Bit Step Up Drill Bit Sharpie Channel locks (to clamp down wire taps) Included in the FnA Kit 1: Two (2) Wire taps Bulb with harness with positive and negative wires IMPORTANT:This kit is for a working rear fog light ONLY. They offer two other kits with other options that require a slightly bigger drill hole and different wiring. Step 1 This depends on what you want to do. I have an aftermarket exhaust, so the rear light is easily accessible to me. So I removed the light assembly so I could easily drill a hole inside my hose instead of doing it outside in the cold. If you decide to remove this, It is held on with two 10mm bolts, and two push clips. Unbolt, pop out the clips, and then you have to push the tab down on the bottom and pull the light assembly out towards you. If you decide to skip this and do it on the car, Get the car up on jacks. Im not too sure if you have enough room to do this with the stock muffler in place, you might have to drop it. Step 2 Shaving Down the Plastic You must remove the plastic nub first that is located in the center of the drill spot. Take a dremel and shave this down like so: 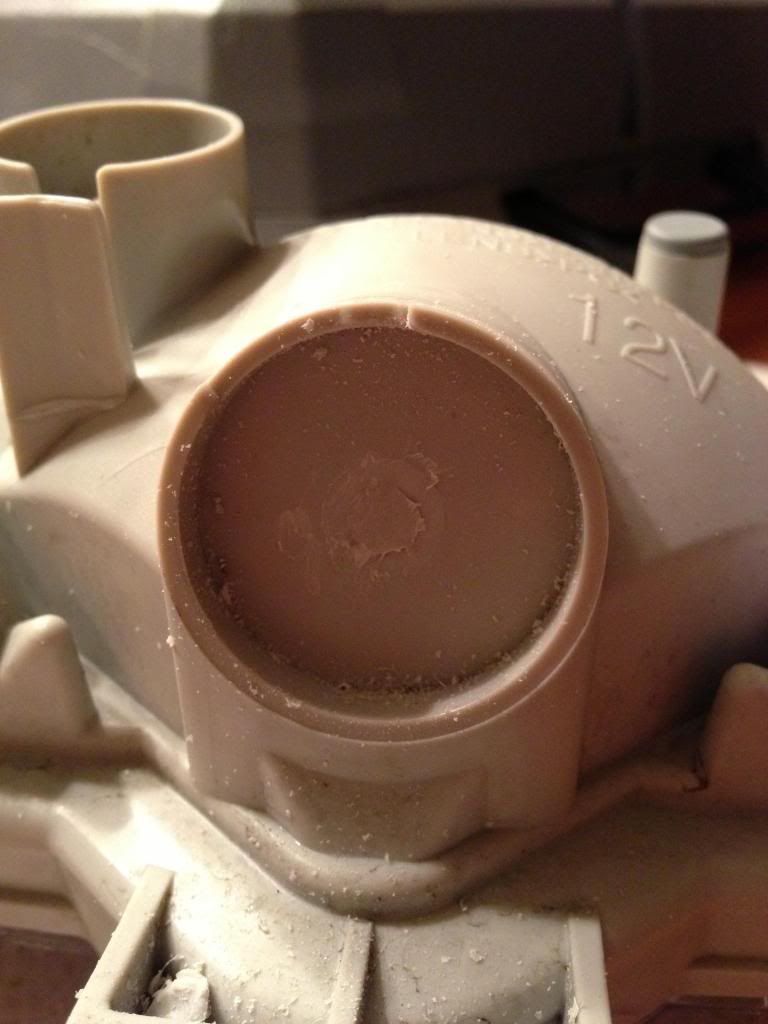 Dremel Bit used: 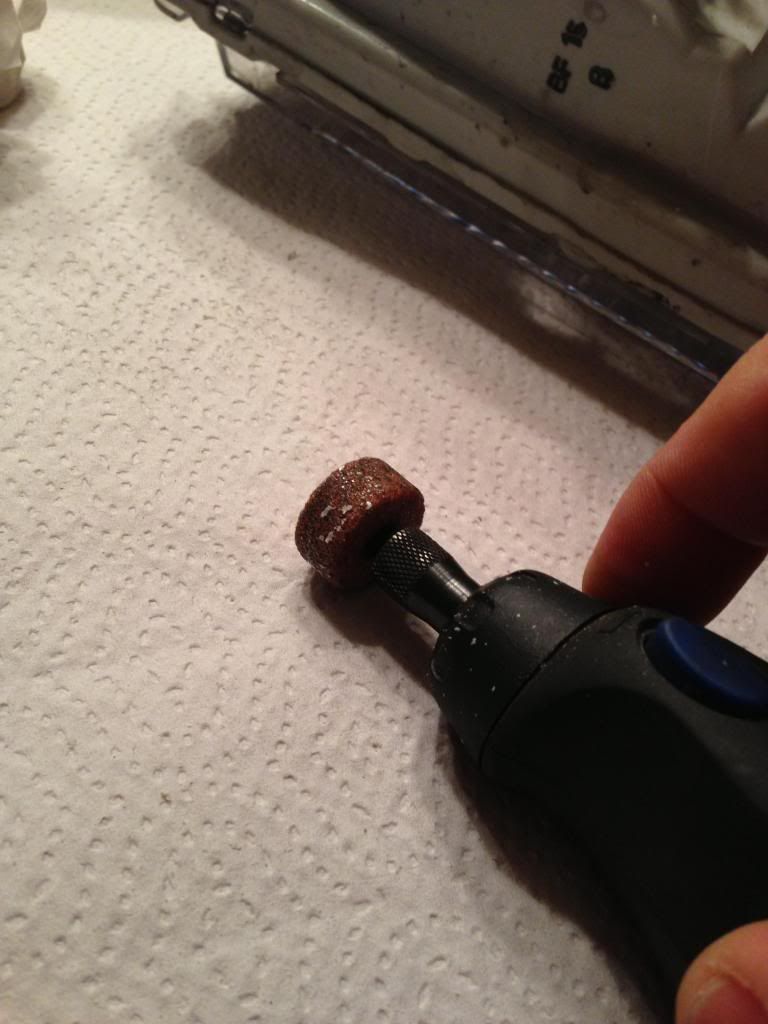 Step 3 Mark & Drill Now that you have the nub out of the way, take a sharpie and try to mark dead center. 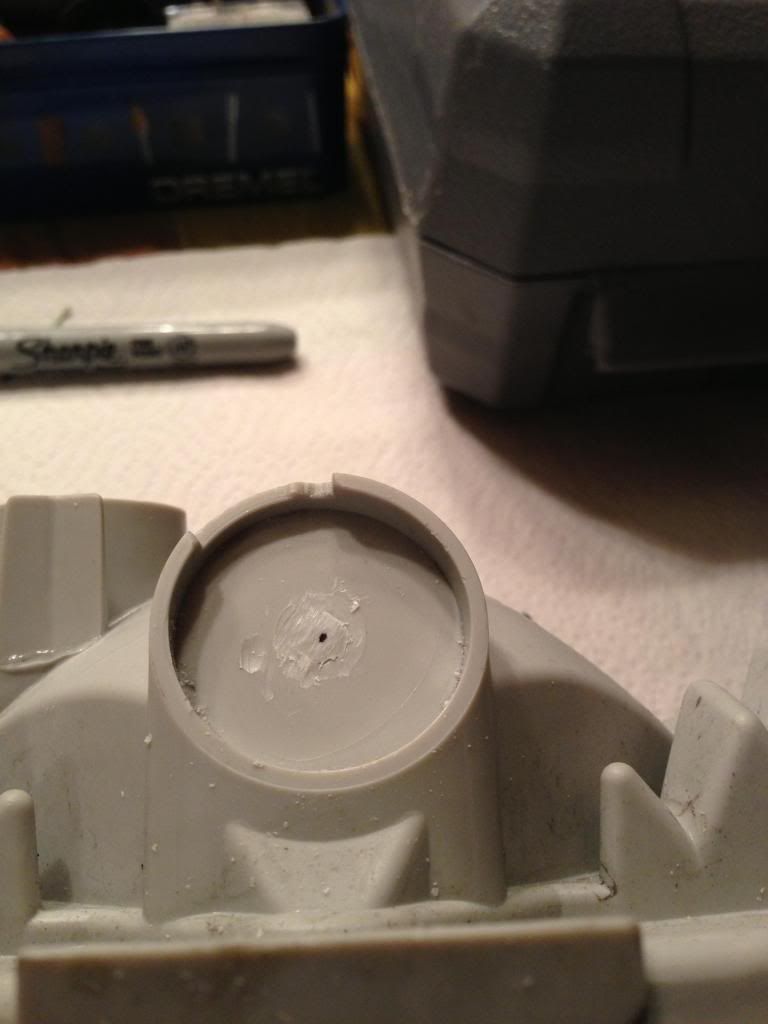 I used a 7/64 drill bit but you can really use any size you want, just keep it small. 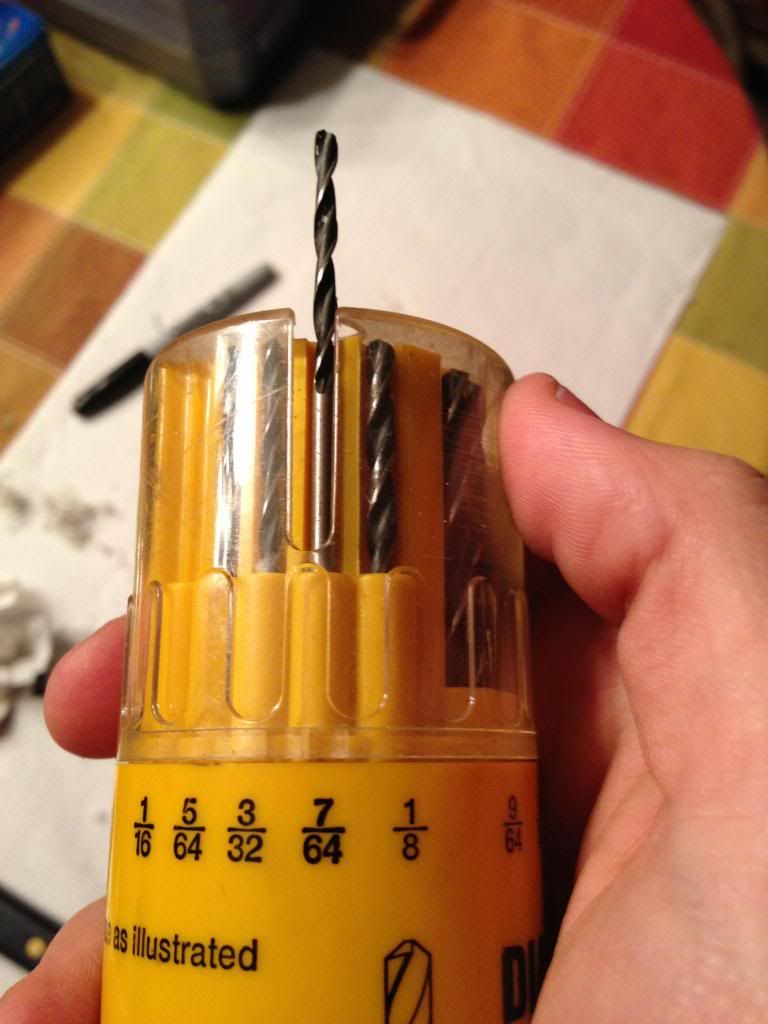 Pilot hole made 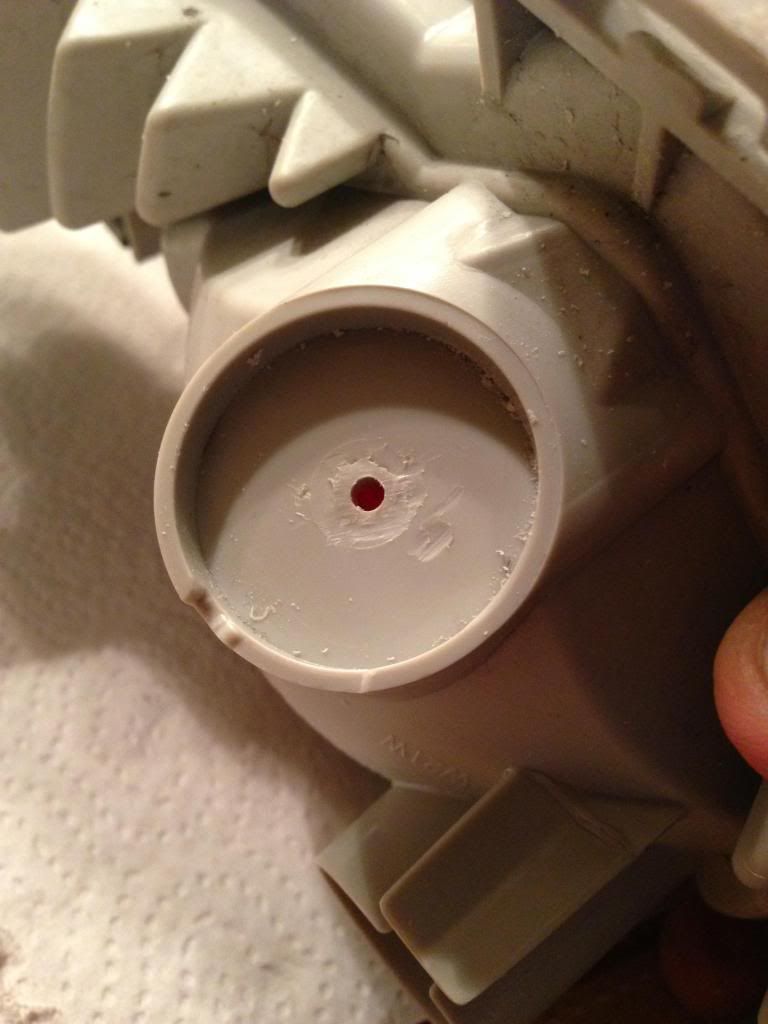 Now grab your step up drill bit. For Kit 1, you need to make a 11/16 size hole. 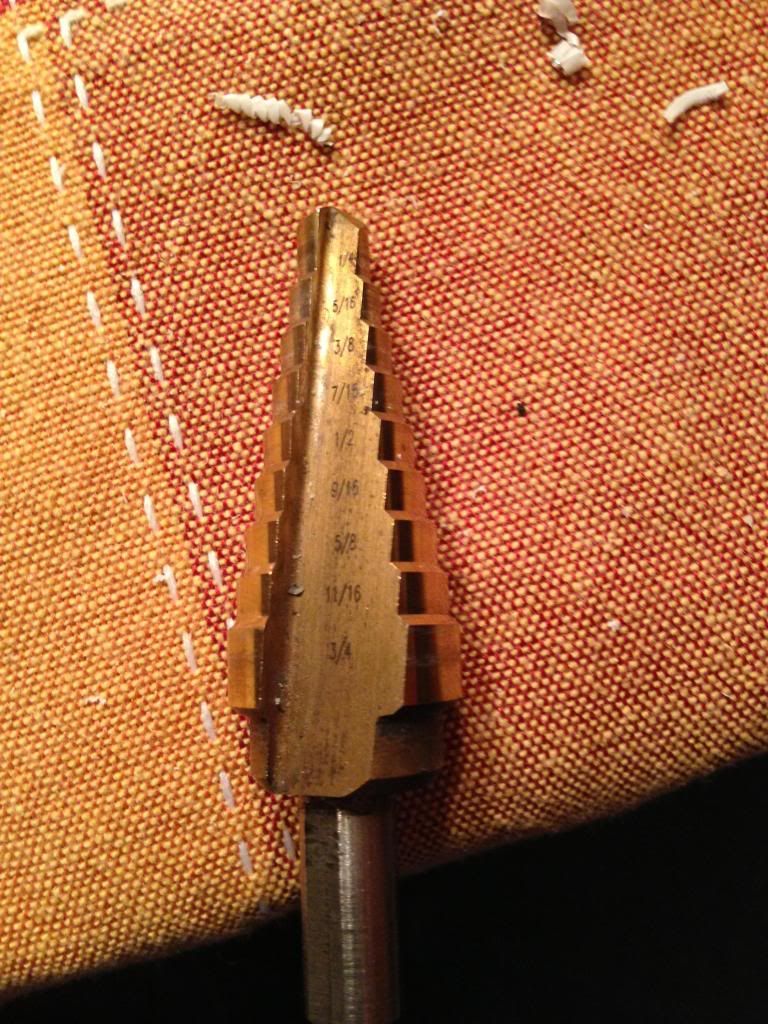 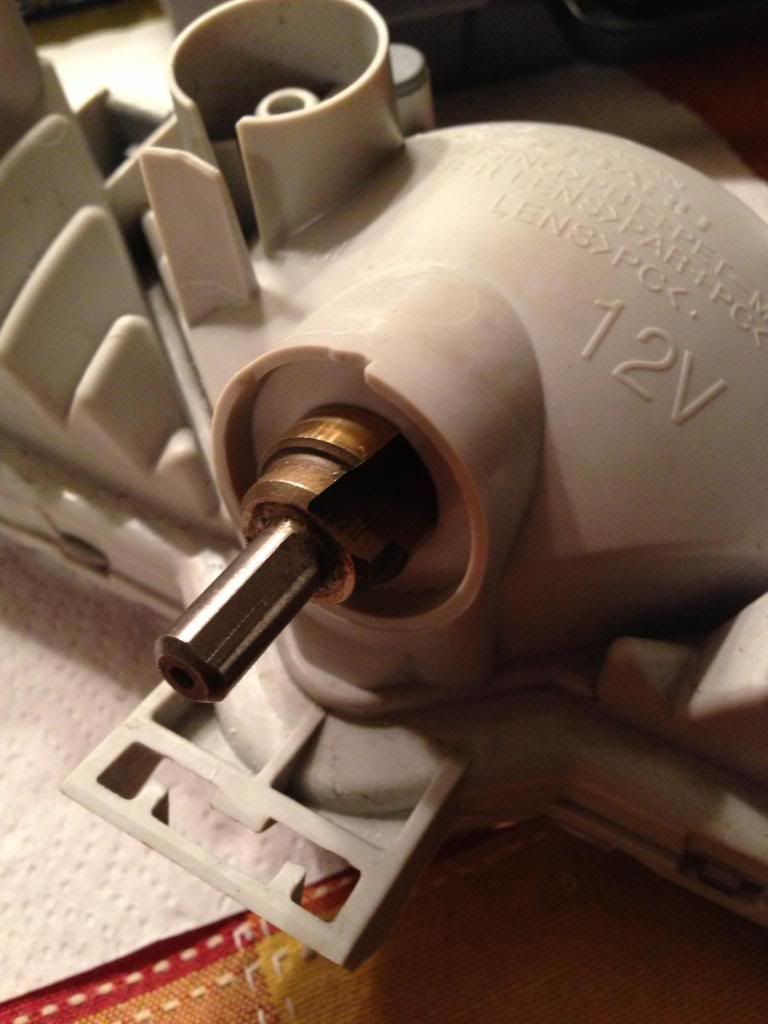 Drilled out hole: 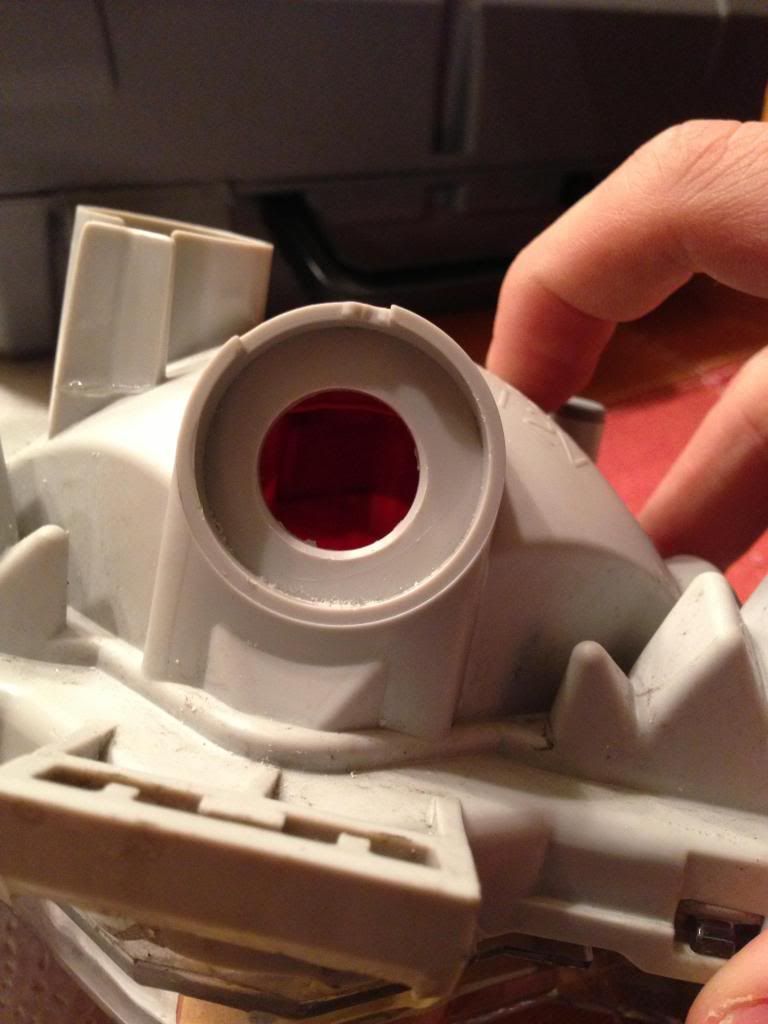 Make sure to clean out any shavings you create inside the hole. Just turn it over and shake/smack it a bit. Step 4 Installing the Bulb To install the bulb, simply stick the bulb in the hole you just made. Push and twist, and it should seat in there nicely. 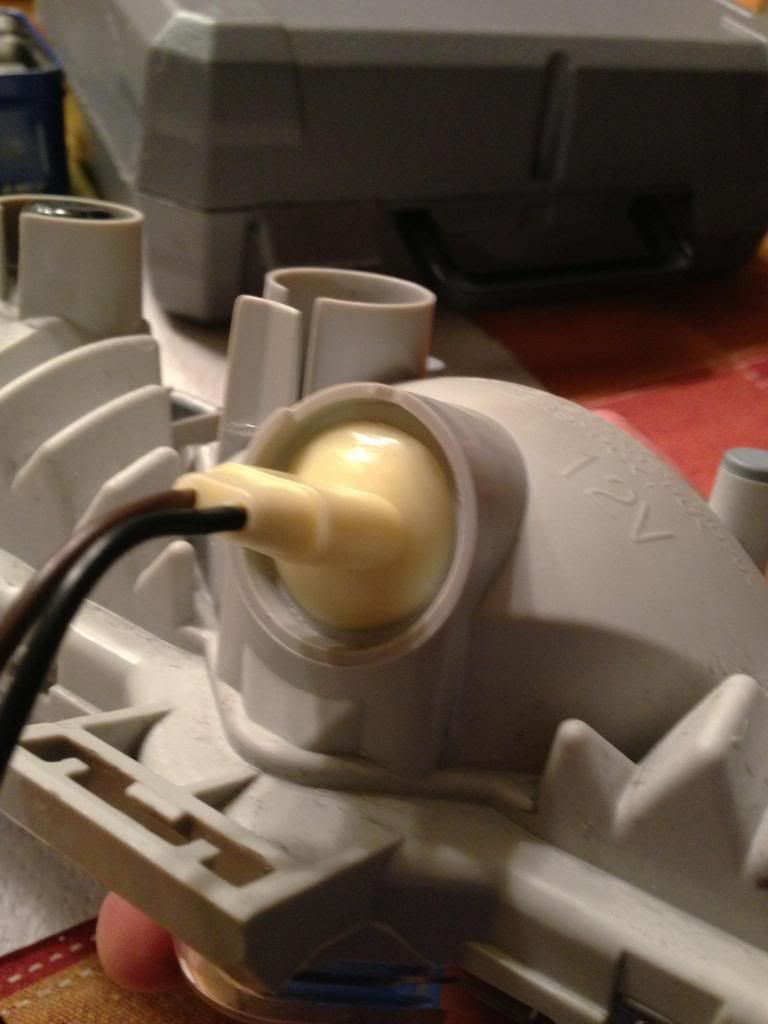 Time to go back outside. Re-install the light if you chose to remove it. If not, You now need to wire the kit up. |

|

|
| The Following 2 Users Say Thank You to xxscaxx For This Useful Post: | DAEMANO (02-01-2016), Sportsguy83 (12-13-2012) |
|
12-06-2012, 03:19 PM
|
#2 |
|
Senior Member
Join Date: Jul 2012
Drives: 2013 SWP BRZ
Location: New York
Posts: 2,240
Thanks: 458
Thanked 878 Times in 556 Posts
Mentioned: 34 Post(s)
|
Step 5 – Run the wires
For this kit, all you have to do is run the wires from the bulb harness up into the trunk and tap them into the driver side taillight harness. I chose to route the wires in the same hole as the reverse light harness goes through (I don’t have a pic of this, but all you have to do is trace the harness from the bulbs that are installed on either side of where you had to drill). To get to this, you need to remove the trunk plastic where the latch is. Three plastic clips hold it in place, then you firmly pull straight up on it. (don’t have a pic of this but will get one). Pop the three clips out on the driver side trunk liner (one near the edge of the trunk, and the two by the emergency trunk opener button – you don’t have to remove these two, but it gives you more room to work with. Unclip the harness for the emergency trunk button. Here is the rubber seal I ran the wires through, the same spot the reverse light harness comes through. I used a wire puller to get the wires through. I ran the wires right along the reverse light harness, and zip tied them to it, right up through the hole and through the seal. 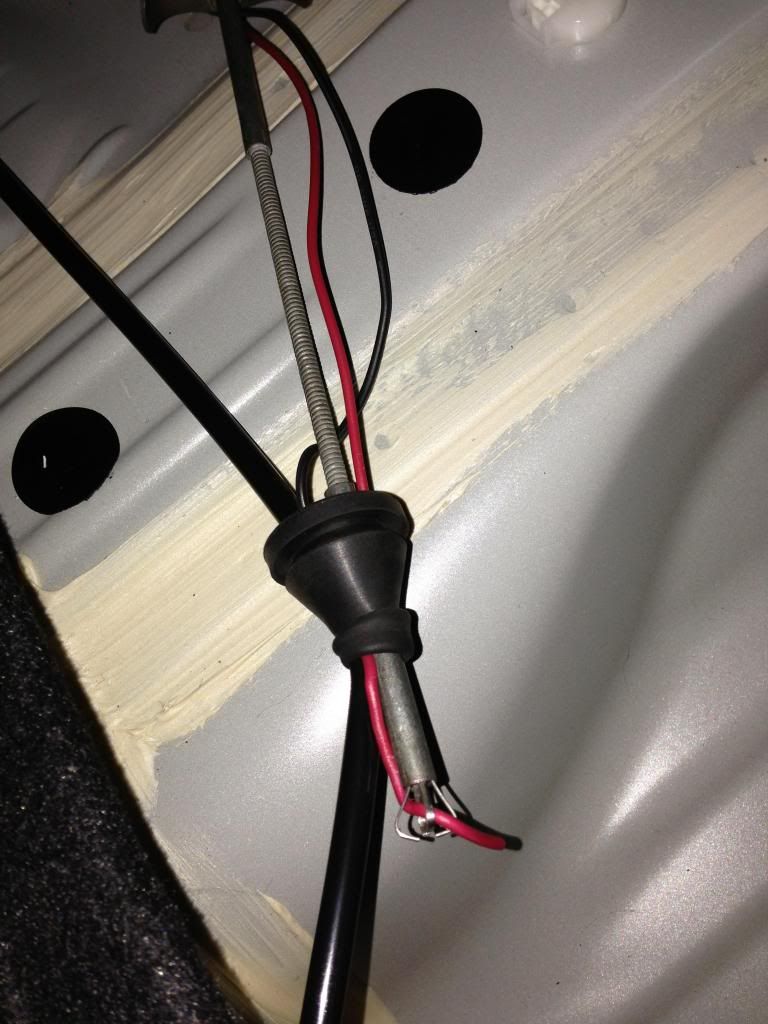 Here is a pic of it back in place and taped up so you know where it is in the trunk. 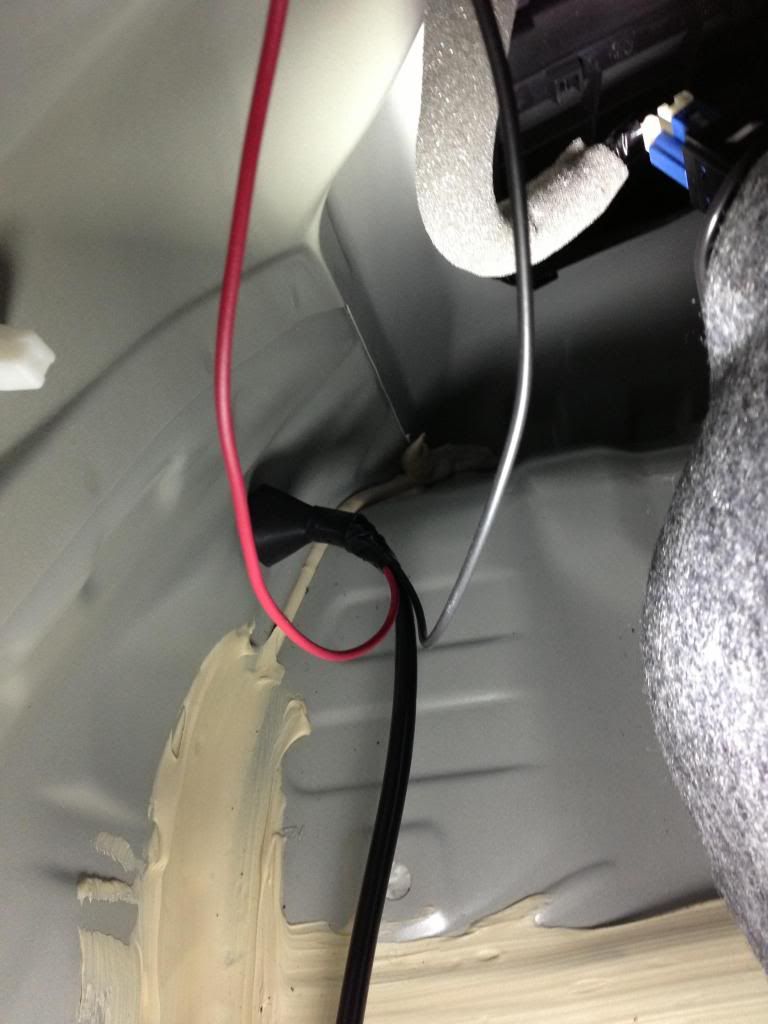 Pull the wires through nice and snug, making sure you have some wiggle room below in case you ever need to pull the bulb out and replace it. Zip tie the wires to the reverse light harness. Step 6 – Tap the wires Unplug the taillight clip. This kit is simple – Red to red, black to black. Use the provided wire taps. 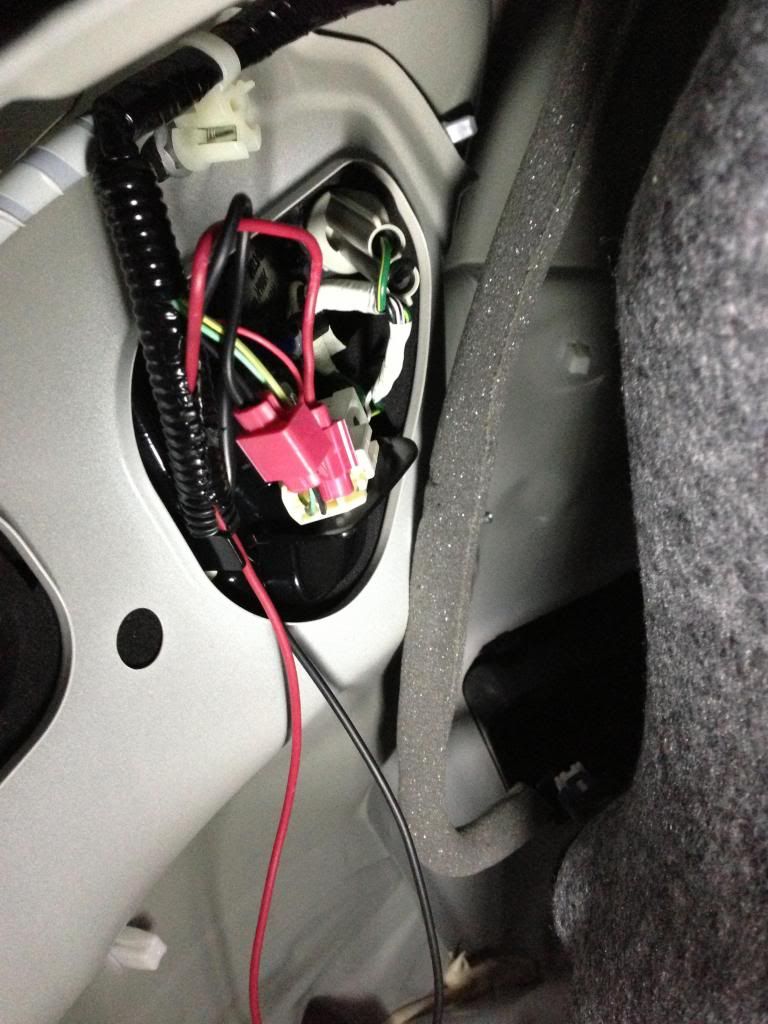 Step 7 – Re-Install the trunk liner clips and plastic trim Self explanatory.. make sure when you put the plastic trim back you line up the clips underneath before pushing down. If you don’t, your going to break them. You also have to pull the rubber seal over the plastic trim once you pop it in place. Step 8 – Your Done! Installed PICS 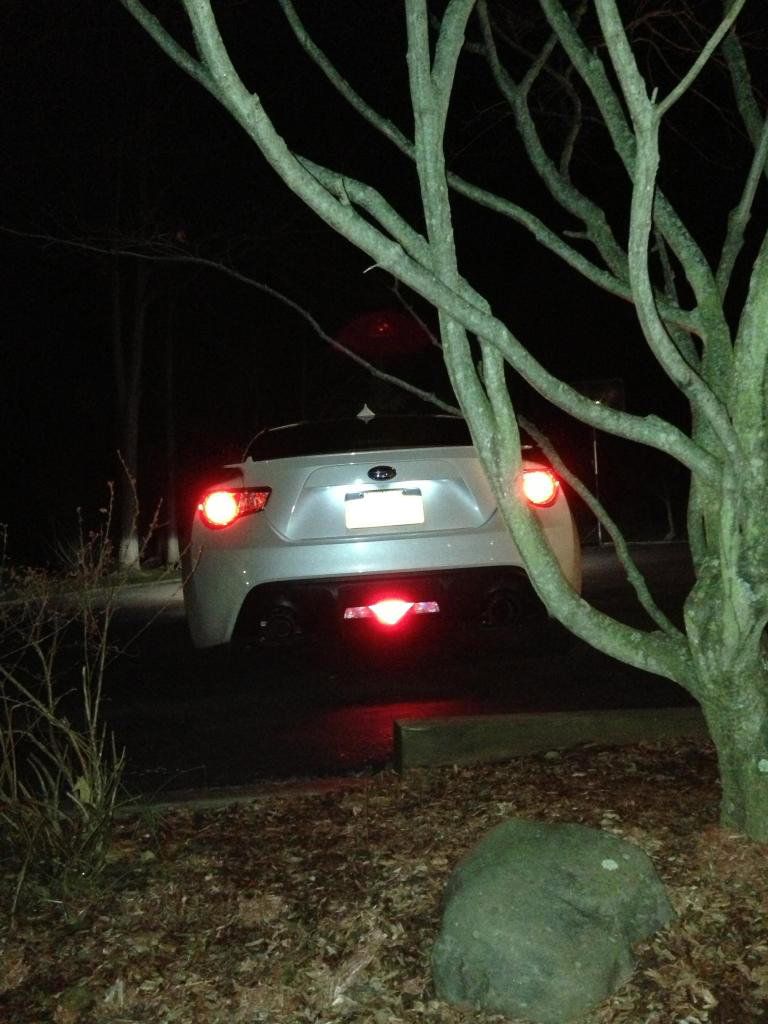 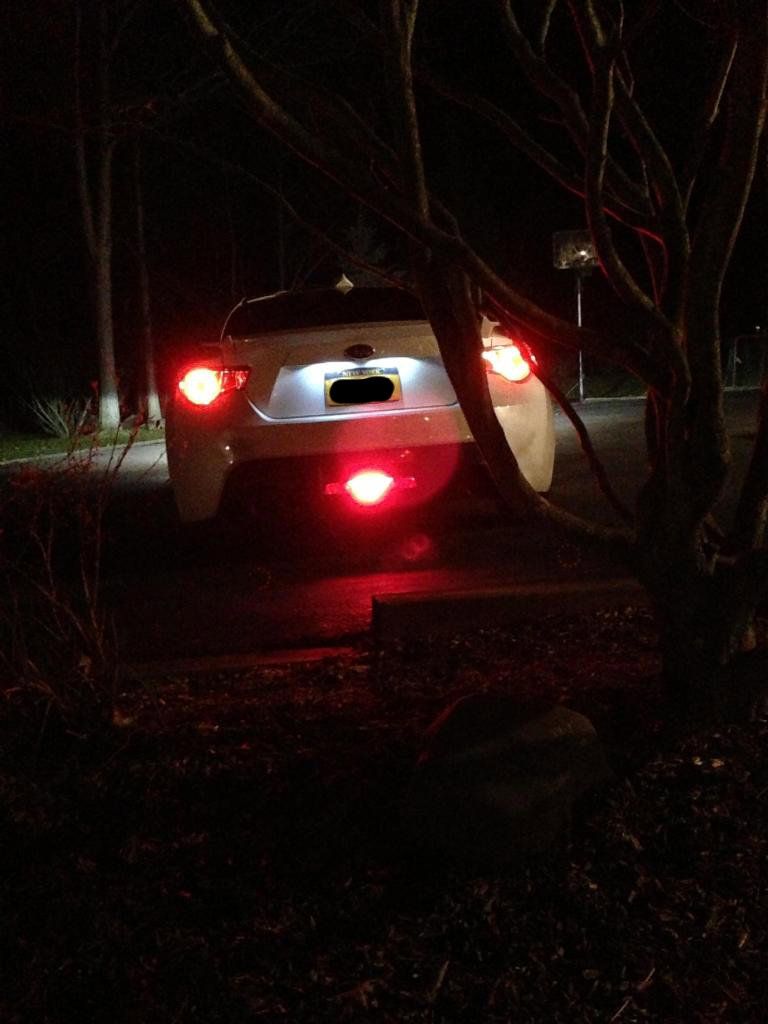
|
|
|
|
|
12-06-2012, 03:19 PM
|
#3 |
|
Senior Member
Join Date: Jul 2012
Drives: 2013 SWP BRZ
Location: New York
Posts: 2,240
Thanks: 458
Thanked 878 Times in 556 Posts
Mentioned: 34 Post(s)
|
reserved in case of more pics added
|
|
|
|
|
12-12-2012, 09:40 PM
|
#4 |
|
Join Date: Nov 2012
Drives: 11 STi Sedan
Location: CNJ
Posts: 15
Thanks: 270
Thanked 121 Times in 78 Posts
Mentioned: 22 Post(s)
|
Kits will be posted in the private classified for sale section under exterior modifications.
|
|
|
|
|
12-13-2012, 02:07 AM
|
#5 |
|
Senior Member

Join Date: Mar 2012
Drives: 2013 Subaru BRZ
Location: PA
Posts: 683
Thanks: 106
Thanked 248 Times in 133 Posts
Mentioned: 10 Post(s)
|
Maybe a dumb question, but if it's a rear fog light kit how to do switch the fog off and on?
|
|
|
|
|
12-13-2012, 07:04 AM
|
#6 |
|
Join Date: Nov 2012
Drives: 11 STi Sedan
Location: CNJ
Posts: 15
Thanks: 270
Thanked 121 Times in 78 Posts
Mentioned: 22 Post(s)
|
Our kits are wired up to turn on and off with the tail lights. We are aware that some people prefer to use the kits as they're meant to be used with a switch for foggy weather, but we just haven't pulled the trigger on putting together a switched kit. We consider that more of an advanced install, which would take away from how we sell our kit on being very easy to install. However, if we get requests for custom orders, we are always more than willing to work with the customers to fill them. We're currently working with a member here to create an actual FT86 rear fog/brake kit that will utilize the existing housing socket!
|
|
|
|
|
12-13-2012, 08:37 AM
|
#7 |
|
Join Date: Nov 2012
Drives: 11 STi Sedan
Location: CNJ
Posts: 15
Thanks: 270
Thanked 121 Times in 78 Posts
Mentioned: 22 Post(s)
|
http://www.ft86club.com/forums/showthread.php?t=24188 Here is the link to our Vendor Page!
|
|
|
|
|
12-13-2012, 08:41 AM
|
#8 |
|
Sarcastic SOB

Join Date: May 2012
Drives: '13 FR-S M6, '23 Volvo V60 CC
Location: Toronto Ontario
Posts: 4,647
Thanks: 1,364
Thanked 2,863 Times in 1,645 Posts
Mentioned: 32 Post(s)
|
Maybe reword the title of the DIY to rear foglight converted to working brake light.
__________________
5:AD kit, HKS V1+ S/C, ECUtek dyno'd, Ohlins MP20, Magnaflow cb, Revworks UEL, Topspeed overpipe, Pinnacle Ceramic tint, VG shark fin, HID's, yellow DRL's, full LEDs, red floor lights, Homelink mirror, trunk lid liner, Perrin LWCP, Valenti smoked, Flossy Grip Tape Shorty, GT86 plaque, lighted vanity mirror, Michelin PSS, Project mU +800, DOT4 fluid, 720 Form GTF1 17x8&9, stitched leather bits, EZ valve.
|
|
|
|
| The Following 2 Users Say Thank You to wbradley For This Useful Post: | 2point0 (12-19-2012), microbionic (12-13-2012) |
|
12-13-2012, 03:41 PM
|
#9 |
|
Senior Member
Join Date: Jul 2012
Drives: 2013 SWP BRZ
Location: New York
Posts: 2,240
Thanks: 458
Thanked 878 Times in 556 Posts
Mentioned: 34 Post(s)
|
Its not a working brake light. It turns on with the lights, and acts as a fog light, but without a separate on/off switch.
|
|
|
|
| The Following User Says Thank You to xxscaxx For This Useful Post: | F n' A Automotive (12-13-2012) |
|
12-19-2012, 12:34 PM
|
#10 |
|
Join Date: Nov 2012
Drives: 11 STi Sedan
Location: CNJ
Posts: 15
Thanks: 270
Thanked 121 Times in 78 Posts
Mentioned: 22 Post(s)
|
bump

|
|
|
|
|
12-19-2012, 04:22 PM
|
#11 |
|
Member

Join Date: Jun 2012
Drives: WRB Limited AT, 1965 COBRA,
Location: Central Pa
Posts: 41
Thanks: 0
Thanked 5 Times in 5 Posts
Mentioned: 0 Post(s)
|
I have Kit 2 and it was a simple project to do. Looks great!
Something I noticed, and maybe someone else has too or maybe F n' A knows about it: When lights are in AUTO mode, after turning off ignition the tail lights stay lit for a bit like they are supposed to but the Kit 2 light does not. Any reason why? |
|
|
|
|
05-15-2014, 11:40 AM
|
#12 |
|
Senior Member

Join Date: Feb 2013
Drives: Ultramarine '13 FR-S
Location: Hampton, VA
Posts: 224
Thanks: 148
Thanked 69 Times in 37 Posts
Mentioned: 4 Post(s)
|
@xxscaxx we're the pictures with their high output bulb or just the regular bulb the kit came with?
Sent from my SCH-I605 using Tapatalk |
|
|
|
|
05-15-2014, 12:30 PM
|
#13 | |
|
Senior Member
Join Date: Jul 2012
Drives: 2013 SWP BRZ
Location: New York
Posts: 2,240
Thanks: 458
Thanked 878 Times in 556 Posts
Mentioned: 34 Post(s)
|
Quote:
|
|
|
|
|
|
|
|
|
|
|
|
 Similar Threads
|
||||
| Thread | Thread Starter | Forum | Replies | Last Post |
| ZILLA: (How-To) *REAR FOG LIGHT WITH BRAKE LIGHT* MOD! | ZILLA | DIY (Do-It-Yourself) Guides | 117 | 09-19-2017 10:17 AM |
| GT86 rear emblem installation pdf | Silverback | Cosmetic Modification (Interior/Exterior/Lighting) | 3 | 04-08-2014 08:40 PM |
| Five Axis Rear Deck Spoilers @Pure Automotive Performance | Pure Automotive | Exterior Parts - The Rest | 208 | 11-26-2013 08:23 AM |
| rear brake light in the rear fog light section | FR-Shadow | Cosmetic Modification (Interior/Exterior/Lighting) | 34 | 12-13-2012 10:52 AM |
| REAR FOG LIGHT MOD | FR-ser | Scion FR-S / Toyota 86 GT86 General Forum | 14 | 09-04-2012 05:57 PM |


