


|
||||||
| Electronics | Audio | NAV | Infotainment Anything related to in-car electronics, navigation, and infotainment. |
 |
|
|
Thread Tools | Search this Thread |
 10-28-2012, 03:10 PM
|
#1 |
|
Senior Member
Join Date: Aug 2012
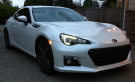
Drives: 2013 BRZ Limited SWP
Location: Seattle
Posts: 204
Thanks: 53
Thanked 53 Times in 31 Posts
Mentioned: 3 Post(s)
Tagged: 0 Thread(s)
|
Kenwood CMOS-210 Backup Camera Install
Thanks to everyone to posted on how to install a backup camera- made my install MUCH EASIER!!!
Most of how to do this has already been posted. I got the pass through harness from SVXdc- Thanks David! He was quite helpful with my questions about the install. I thought I'd post some pics for those who are interested. Kenwood CMOS-210: Nicely made. Aluminum body. made in Japan. No parking lines and the image is reversed, so it's just plug and play. The RCA connector and power wires come off the combined harness at the same location at the HU end of the harness, so my plans to power the camera from the back of the car would not work. 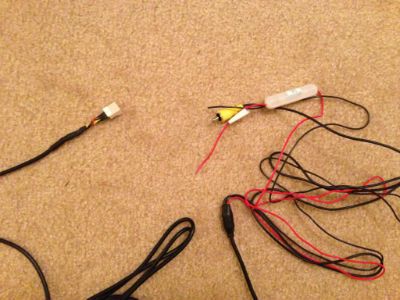 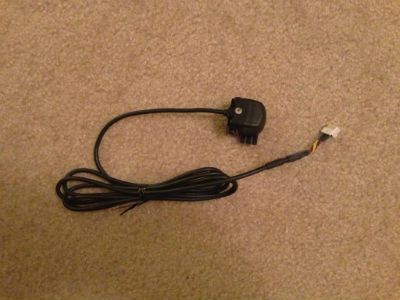 So I used a posi-tap to tap into the HU 12v ACC wire. The camera comes with an in-line 2amp fuse. 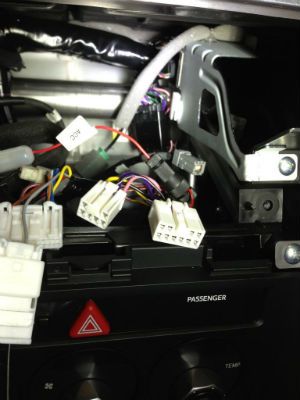 Then just ran the harness wire to the back of the car and installed it like everyone else. I made a very small round notch in the trunk fascia for the wire to pass through. Kind of hard to see. 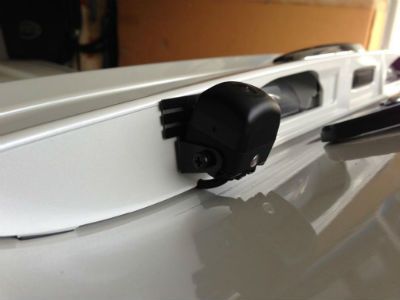 Pics of the camera from the back of the car. 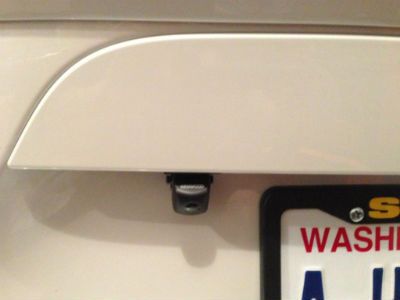 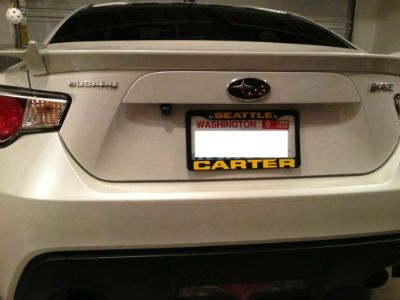 Screen shot during the day and night. The picture is quite bright at night and it's easy to see. Camera quality is of course very good. I set the parking lines to "G 5dr" which other than the up/down settings appear to be right on. What's nice about this camera is I was able to adjust the angle so that it's perfect.  [IMG]http://i1264.photobucket.com/albums/jj498/tomsyang/2013%20BRZ%20Limited%20SWP/Backup%20Camera/s_zps7***b86c.jpg[/IMG] Pretty simple install. I'd say the hardest part was pulling the camera wire/connector through the rubber sleeve/hose from the trunk lid to the trunk. If I had to do it again I'd lubricate that sleeve with something first! And I would cover the console and shifter with a towel to protect everything as you're trying to pull the radio out. The radio as it's coming out can rest on the shifter knob and I got a little scratch on mine.
__________________
Past Subarus: 08 STI, 05 Legacy GT, 98 Legacy L wagon, 97 SVX LSi
Daily Driver: 2013 Acura MDX Last edited by TSY; 10-28-2012 at 03:28 PM. |

|

|
|
10-28-2012, 05:45 PM
|
#2 |
|
Radio wiring harness guru

Join Date: Jun 2012
Drives: 1996 SVX L AWD
Location: Atlanta
Posts: 155
Thanks: 59
Thanked 98 Times in 47 Posts
Mentioned: 23 Post(s)
Tagged: 0 Thread(s)
|
Thanks for posting those pics!
Here are some larger pics of the Kenwood CMOS-210 camera on Sonic Electronix: SE's product page for the CMOS-210
__________________
|
|
|
|
| The Following User Says Thank You to SVXdc For This Useful Post: | TSY (10-28-2012) |
|
10-29-2012, 08:25 PM
|
#3 | |
|
Member

Join Date: Jun 2012
Drives: SSM 6-MT limited
Location: NJ
Posts: 99
Thanks: 8
Thanked 7 Times in 6 Posts
Mentioned: 0 Post(s)
Tagged: 0 Thread(s)
|
Quote:
Install looks good. Nice work! One of these days, I'm gonna do one of these myself... Sent from my GT-N8013 using Tapatalk 2 |
|
|
|
|
| The Following User Says Thank You to inimitable For This Useful Post: | TSY (10-30-2012) |
|
11-06-2012, 05:03 PM
|
#4 |
|
Senior Member
Join Date: Sep 2012
Drives: BRZ Limited
Location: Portland OR
Posts: 127
Thanks: 72
Thanked 64 Times in 29 Posts
Mentioned: 5 Post(s)
Tagged: 0 Thread(s)
|
I have the parts and I will be doing the install as soon as dealer gets my GPS fix done, but I have some questions about how you did your install.
Where are you running the cable inside the car from the navigation system to the trunk? I have looked at my BRZ Limited's trunk lid, I didn't see anywhere to feed the wire from inside the trunk lid to the outside. Did you just drill a small hole from the inside to the outside? If so how did you prevent moisture from getting into the trunk? |
|
|
|
|
11-06-2012, 08:45 PM
|
#5 |
|
Senior Member
Join Date: Aug 2012
Drives: 2013 BRZ Limited SWP
Location: Seattle
Posts: 204
Thanks: 53
Thanked 53 Times in 31 Posts
Mentioned: 3 Post(s)
Tagged: 0 Thread(s)
|
I didn't repeat all the steps of the install as others have already done this.
From the trunk fascia when you remove it (Carefully! Don't scratch your trunk!) in the limited there's a wire from the electronic trunk release. It runs through a hole in the center of the trunk lid. There's a grommet that I had to carefully trim (to not cut the wires) and make room for the camera wire to run through. Then you just put the grommet back in. It's tucked way up so I doubt much water will get there to leak. I suppose if you shot a stream of water up at the license plate lights it could leak- but again I doubt it. If none of this makes sense I'll after you read the writeups some of the other guys have done then just PM me and I'll try to find them for you. Good luck!
__________________
Past Subarus: 08 STI, 05 Legacy GT, 98 Legacy L wagon, 97 SVX LSi
Daily Driver: 2013 Acura MDX |
|
|
|
| The Following User Says Thank You to TSY For This Useful Post: | developer (11-06-2012) |
|
11-06-2012, 10:09 PM
|
#6 | |
|
Senior Member
Join Date: Sep 2012
Drives: BRZ Limited
Location: Portland OR
Posts: 127
Thanks: 72
Thanked 64 Times in 29 Posts
Mentioned: 5 Post(s)
Tagged: 0 Thread(s)
|
I searched a little harder this time and found some of the other installs for the BRZ. I have my project for the weekend!
 Quote:
|
|
|
|
|
|
11-06-2012, 10:49 PM
|
#7 | |
|
Senior Member
Join Date: Aug 2012
Drives: 2013 BRZ Limited SWP
Location: Seattle
Posts: 204
Thanks: 53
Thanked 53 Times in 31 Posts
Mentioned: 3 Post(s)
Tagged: 0 Thread(s)
|
Quote:
You're welcome! Just set aside 4 hours to do it and take your time. As for running the wire back from the HU, there are some wires under the driver's side dash that I just zip tied the camera wire to. I ran this down the side to the door sill. If you start from the back of the door sill you can remove it pretty easily. Run the camera wire back with the factory wiring in the door sill and run it back into the trunk and you're set. Remember, zip ties are your friend. You'll need quite a few of them. Also, like I said in my post, running the wire through the rubber tube from the trunk lid to the trunk is a real pain! If I had to do it again I'd probably just cut the camera wire and just reconnect everything after passing it through the tube. It's definitely worth doing and I feel much better about not hitting things when I back up!
__________________
Past Subarus: 08 STI, 05 Legacy GT, 98 Legacy L wagon, 97 SVX LSi
Daily Driver: 2013 Acura MDX |
|
|
|
|
| The Following User Says Thank You to TSY For This Useful Post: | developer (11-06-2012) |
|
11-28-2012, 10:24 PM
|
#8 |
|
Senior Member

Join Date: Oct 2012
Drives: 2013 Subaru BR-Z Limited
Location: Fort Lauderdale, Florida
Posts: 883
Thanks: 407
Thanked 562 Times in 294 Posts
Mentioned: 42 Post(s)
Tagged: 4 Thread(s)
|
Wow, 4 hours?!?!? I have never spent more than 45 minutes for a full install with soldered connections and run with factory harness. I couldn't imagine it ever taking that long...
__________________
|
|
|
|
|
11-28-2012, 11:04 PM
|
#9 | |
|
Never on Time Always Late

Join Date: Jun 2012
Drives: #silenced crickets
Location: Norcal
Posts: 578
Thanks: 86
Thanked 152 Times in 101 Posts
Mentioned: 9 Post(s)
Tagged: 0 Thread(s)
|
Quote:
__________________
CO>CA Cartel
|
|
|
|
|
| The Following User Says Thank You to Norkoastal For This Useful Post: | TSY (11-30-2012) |
|
11-29-2012, 03:59 PM
|
#10 |
|
Senior Member
Join Date: Oct 2012
Drives: 2013 Subaru BR-Z Limited
Location: Fort Lauderdale, Florida
Posts: 883
Thanks: 407
Thanked 562 Times in 294 Posts
Mentioned: 42 Post(s)
Tagged: 4 Thread(s)
|
Oh trust me I'm familiar with the procedure I've installed hundreds over the years..that's why I was so surprised to hear 4 hours.
__________________
|
|
|
|
|
01-10-2013, 08:01 PM
|
#11 | |
|
Senior Member

Join Date: Apr 2011
Drives: 2014 Boxster S; 2015 Macan S
Location: MA
Posts: 206
Thanks: 326
Thanked 233 Times in 63 Posts
Mentioned: 2 Post(s)
Tagged: 0 Thread(s)
|
Quote:
|
|
|
|
|
|
01-10-2013, 08:20 PM
|
#12 | |
|
Senior Member
Join Date: Oct 2012
Drives: 2013 Subaru BR-Z Limited
Location: Fort Lauderdale, Florida
Posts: 883
Thanks: 407
Thanked 562 Times in 294 Posts
Mentioned: 42 Post(s)
Tagged: 4 Thread(s)
|
Quote:
Hope this helps.
__________________
|
|
|
|
|
| The Following User Says Thank You to chadstyle For This Useful Post: | davesrave (01-10-2013) |
|
01-12-2013, 04:58 AM
|
#13 |
|
Senior Member
Join Date: Aug 2012
Drives: 2013 BRZ Limited SWP
Location: Seattle
Posts: 204
Thanks: 53
Thanked 53 Times in 31 Posts
Mentioned: 3 Post(s)
Tagged: 0 Thread(s)
|
@chadstyle
Really??? Wow, you're great.  For those of us who don't install stereos for a living and want everything to be perfect without breaking anything in our new cars, setting aside more time than needed is a good idea. I find when I rush projects mistakes get made and it doesn't turn out perfect. I never said I took 4 hours to install it. I just said set aside 4 hours. Or get it professionally installed and let them break parts of your car. (yes, it does happen) Otherwise, for others who might appreciate my install, I will say after several months of using it it's definitely worth it. The picture quality is very very good and the night vision is also really easy to see. Better than a lot of factory backup cameras.
__________________
Past Subarus: 08 STI, 05 Legacy GT, 98 Legacy L wagon, 97 SVX LSi
Daily Driver: 2013 Acura MDX |
|
|
|
|
01-12-2013, 09:31 AM
|
#14 | |
|
Senior Member
Join Date: Oct 2012
Drives: 2013 Subaru BR-Z Limited
Location: Fort Lauderdale, Florida
Posts: 883
Thanks: 407
Thanked 562 Times in 294 Posts
Mentioned: 42 Post(s)
Tagged: 4 Thread(s)
|
Quote:
__________________
|
|
|
|
|
|
|
|
|
|
|
|
 Similar Threads
|
||||
| Thread | Thread Starter | Forum | Replies | Last Post |
| Toyota sized Kenwood Navigation unit | Laurie | Electronics | Audio | NAV | Infotainment | 36 | 09-26-2012 12:07 PM |
| In car black box camera | cgrey | Scion FR-S / Toyota 86 GT86 General Forum | 56 | 08-26-2012 07:35 PM |
| Reverse Camera - install question | Sutty | AUSTRALIA | 1 | 07-28-2012 08:40 AM |
| Planning out my Kenwood install | KRAZYK | Electronics | Audio | NAV | Infotainment | 1 | 07-19-2012 09:24 PM |
| Reverse camera? | dorkymork | BRZ First-Gen (2012+) -- General Topics | 28 | 05-21-2012 10:21 AM |


 Ms. Gunny