


|
||||||
| Electronics | Audio | NAV | Infotainment Anything related to in-car electronics, navigation, and infotainment. |
 |
|
|
Thread Tools | Search this Thread |
 10-02-2014, 01:59 PM
|
#1 |
|
Member
Join Date: Jun 2014
Drives: Whiteout
Location: Austin
Posts: 95
Thanks: 2
Thanked 6 Times in 6 Posts
Mentioned: 0 Post(s)
Tagged: 0 Thread(s)
|
Automatic dual climate control harness
Hi everyone,
I'm planning on doing a retrofit auto climate control from a BRZ Limited to a FRS. I have most of the parts except for the harness. I know there was a vendor (advanced industries) selling a harness. However, it appears he is no longer a vendor. Any idea where I can get this harness? Thanks in advance |

|

|
|
02-16-2015, 10:59 PM
|
#2 |
|
Senior Member
Join Date: Jul 2012
Drives: FRS
Location: Cali
Posts: 1,558
Thanks: 188
Thanked 462 Times in 264 Posts
Mentioned: 9 Post(s)
Tagged: 0 Thread(s)
|
Bump. Can anyone tell me where to get the harness for the conversion?
|
|
|
|
|
02-17-2015, 11:38 AM
|
#3 |
|
Senior Member

Join Date: Apr 2014
Drives: 2013 Ultramarine FR-S
Location: Springfield, MO
Posts: 1,950
Thanks: 2,539
Thanked 1,421 Times in 805 Posts
Mentioned: 31 Post(s)
Tagged: 3 Thread(s)
|
I would go off the assumption it is no longer being sold. I tried to get in contact with him multiple times a couple months back and heard nothing.
__________________
 |
|
|
|
|
02-25-2015, 12:54 AM
|
#4 |
|
Senior Member
Join Date: Jul 2012
Drives: FRS
Location: Cali
Posts: 1,558
Thanks: 188
Thanked 462 Times in 264 Posts
Mentioned: 9 Post(s)
Tagged: 0 Thread(s)
|
Darn... Anyone else feel like figuring this out?
|
|
|
|
|
07-23-2015, 02:07 PM
|
#5 |
|
Senior Member
Join Date: Nov 2012
Drives: Whiteout FRS
Location: Florida
Posts: 325
Thanks: 150
Thanked 272 Times in 120 Posts
Mentioned: 8 Post(s)
Tagged: 1 Thread(s)
|
Automatic dual climate control harness
There are a few threads scattered around on the forum on this topic, so I wasn't sure where to post this. However, this seemed as good a place as any. There have been multiple people over the last year or so inquiring about the plug and play harness which was made by a former board member (who has since been banned I think, or he left, either way he seems to be gone and all his threads deleted) that allows you to retrofit your manual A/C for the automatic, dual climate A/C. I bought one of those harnesses, but haven't yet done the install (I plan on it soon). However, since nobody has had any luck contacting the guy who originally made these, and seeing as the harness is just sitting here, I figured I would map it out with a volt meter, in case anything ever goes wrong with it. Therefore, I am posting this info as is. I am not responsible for anything you do for your car, I can't guarantee this info is correct, nor that this harness even works (although I'm pretty sure it will, the guy did a really nice job on it). Below are some scans of figures I drew by hand, and they are kind of messy, so I apologize for that, but it was the best I could do.
Let me just say first, the guy who figured this out did an awesome job, and is a genius. And the harness is really nice quality. If you are interested in doing the retrofit, step 1 should be to track this guy down. If you can't find him, the info below may be helpful. Ok, so here is the harness: 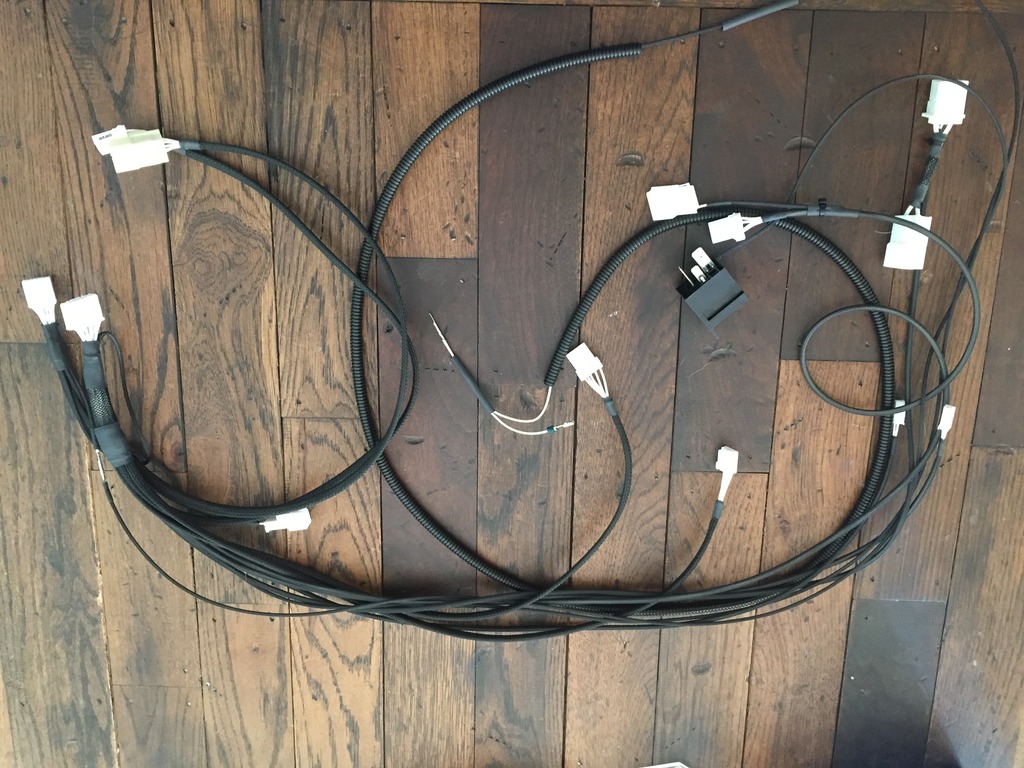 and here is a schematic of the thing: 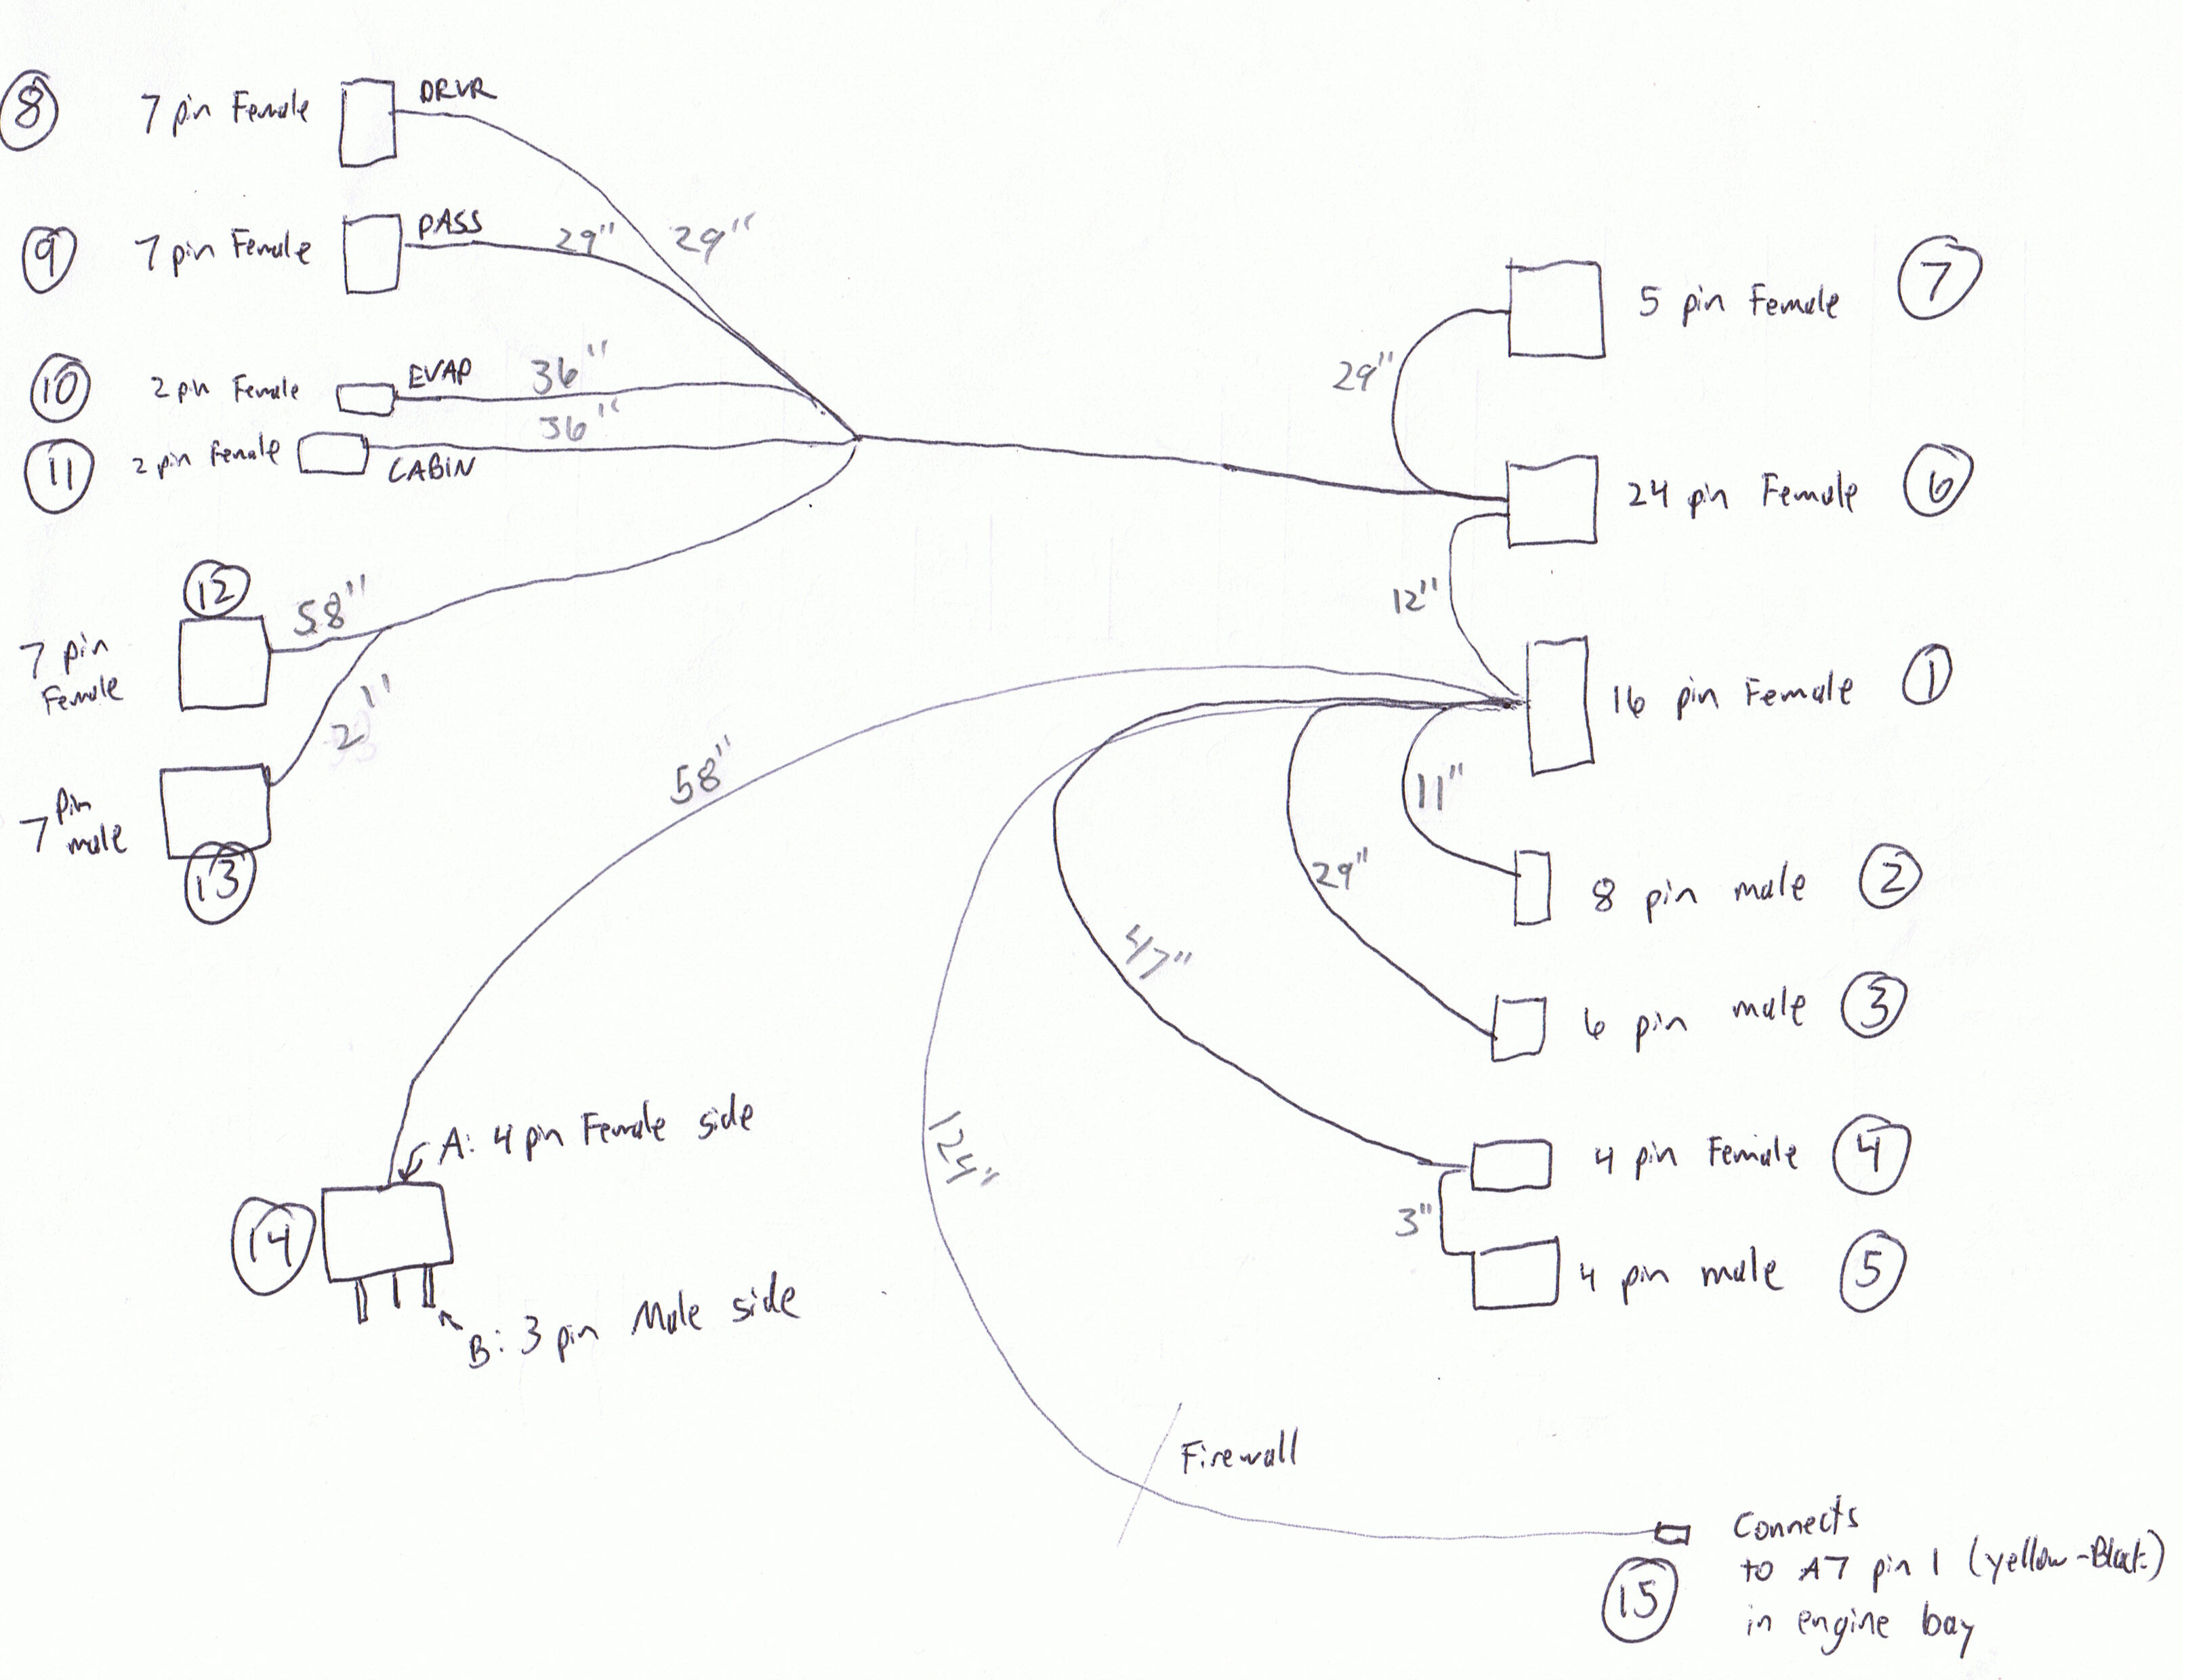 You will see I have numbered connectors 1-15, fairly arbitrarily. The two main connectors are number 1 (16 pin) and number 6 (24 pin), these plug into the control board, the rest plug into various A/C components. Also, I included the lengths (in inches) of the various wires from either the #1 connector (connectors 2-4, 14, 15) and from the #6 connector (connectors 7-12). There is also a wire which connects #6 and # 24, and a short wire connecting #4 and 5, and a short wire connecting # 12 and 13. Below is the pin map which shows the connections. I tried to lay them out in the manner they are in the BRZ wiring diagram (http://www.ft86club.com/files/BRZwiringi.pdf A/C starts on page 342). Female connector pins are numbered from left to right as you are looking at the front of the connector. Male are numbered from right to left as you are looking at the connector. If a pin is circled, it means it is used, if not it is empty. The little arrow then points to the corresponding pin in this format: connector # (pin #). So for example, 3(5) would mean connector number 3 PIN number 5. The connector numbers are based on my arbitrary numbering system above. A few pins are connected to multiple places. For example, pin 6 of connector 6 controls 7(1), 8(1), 9(3), 10(2), and 11(2). 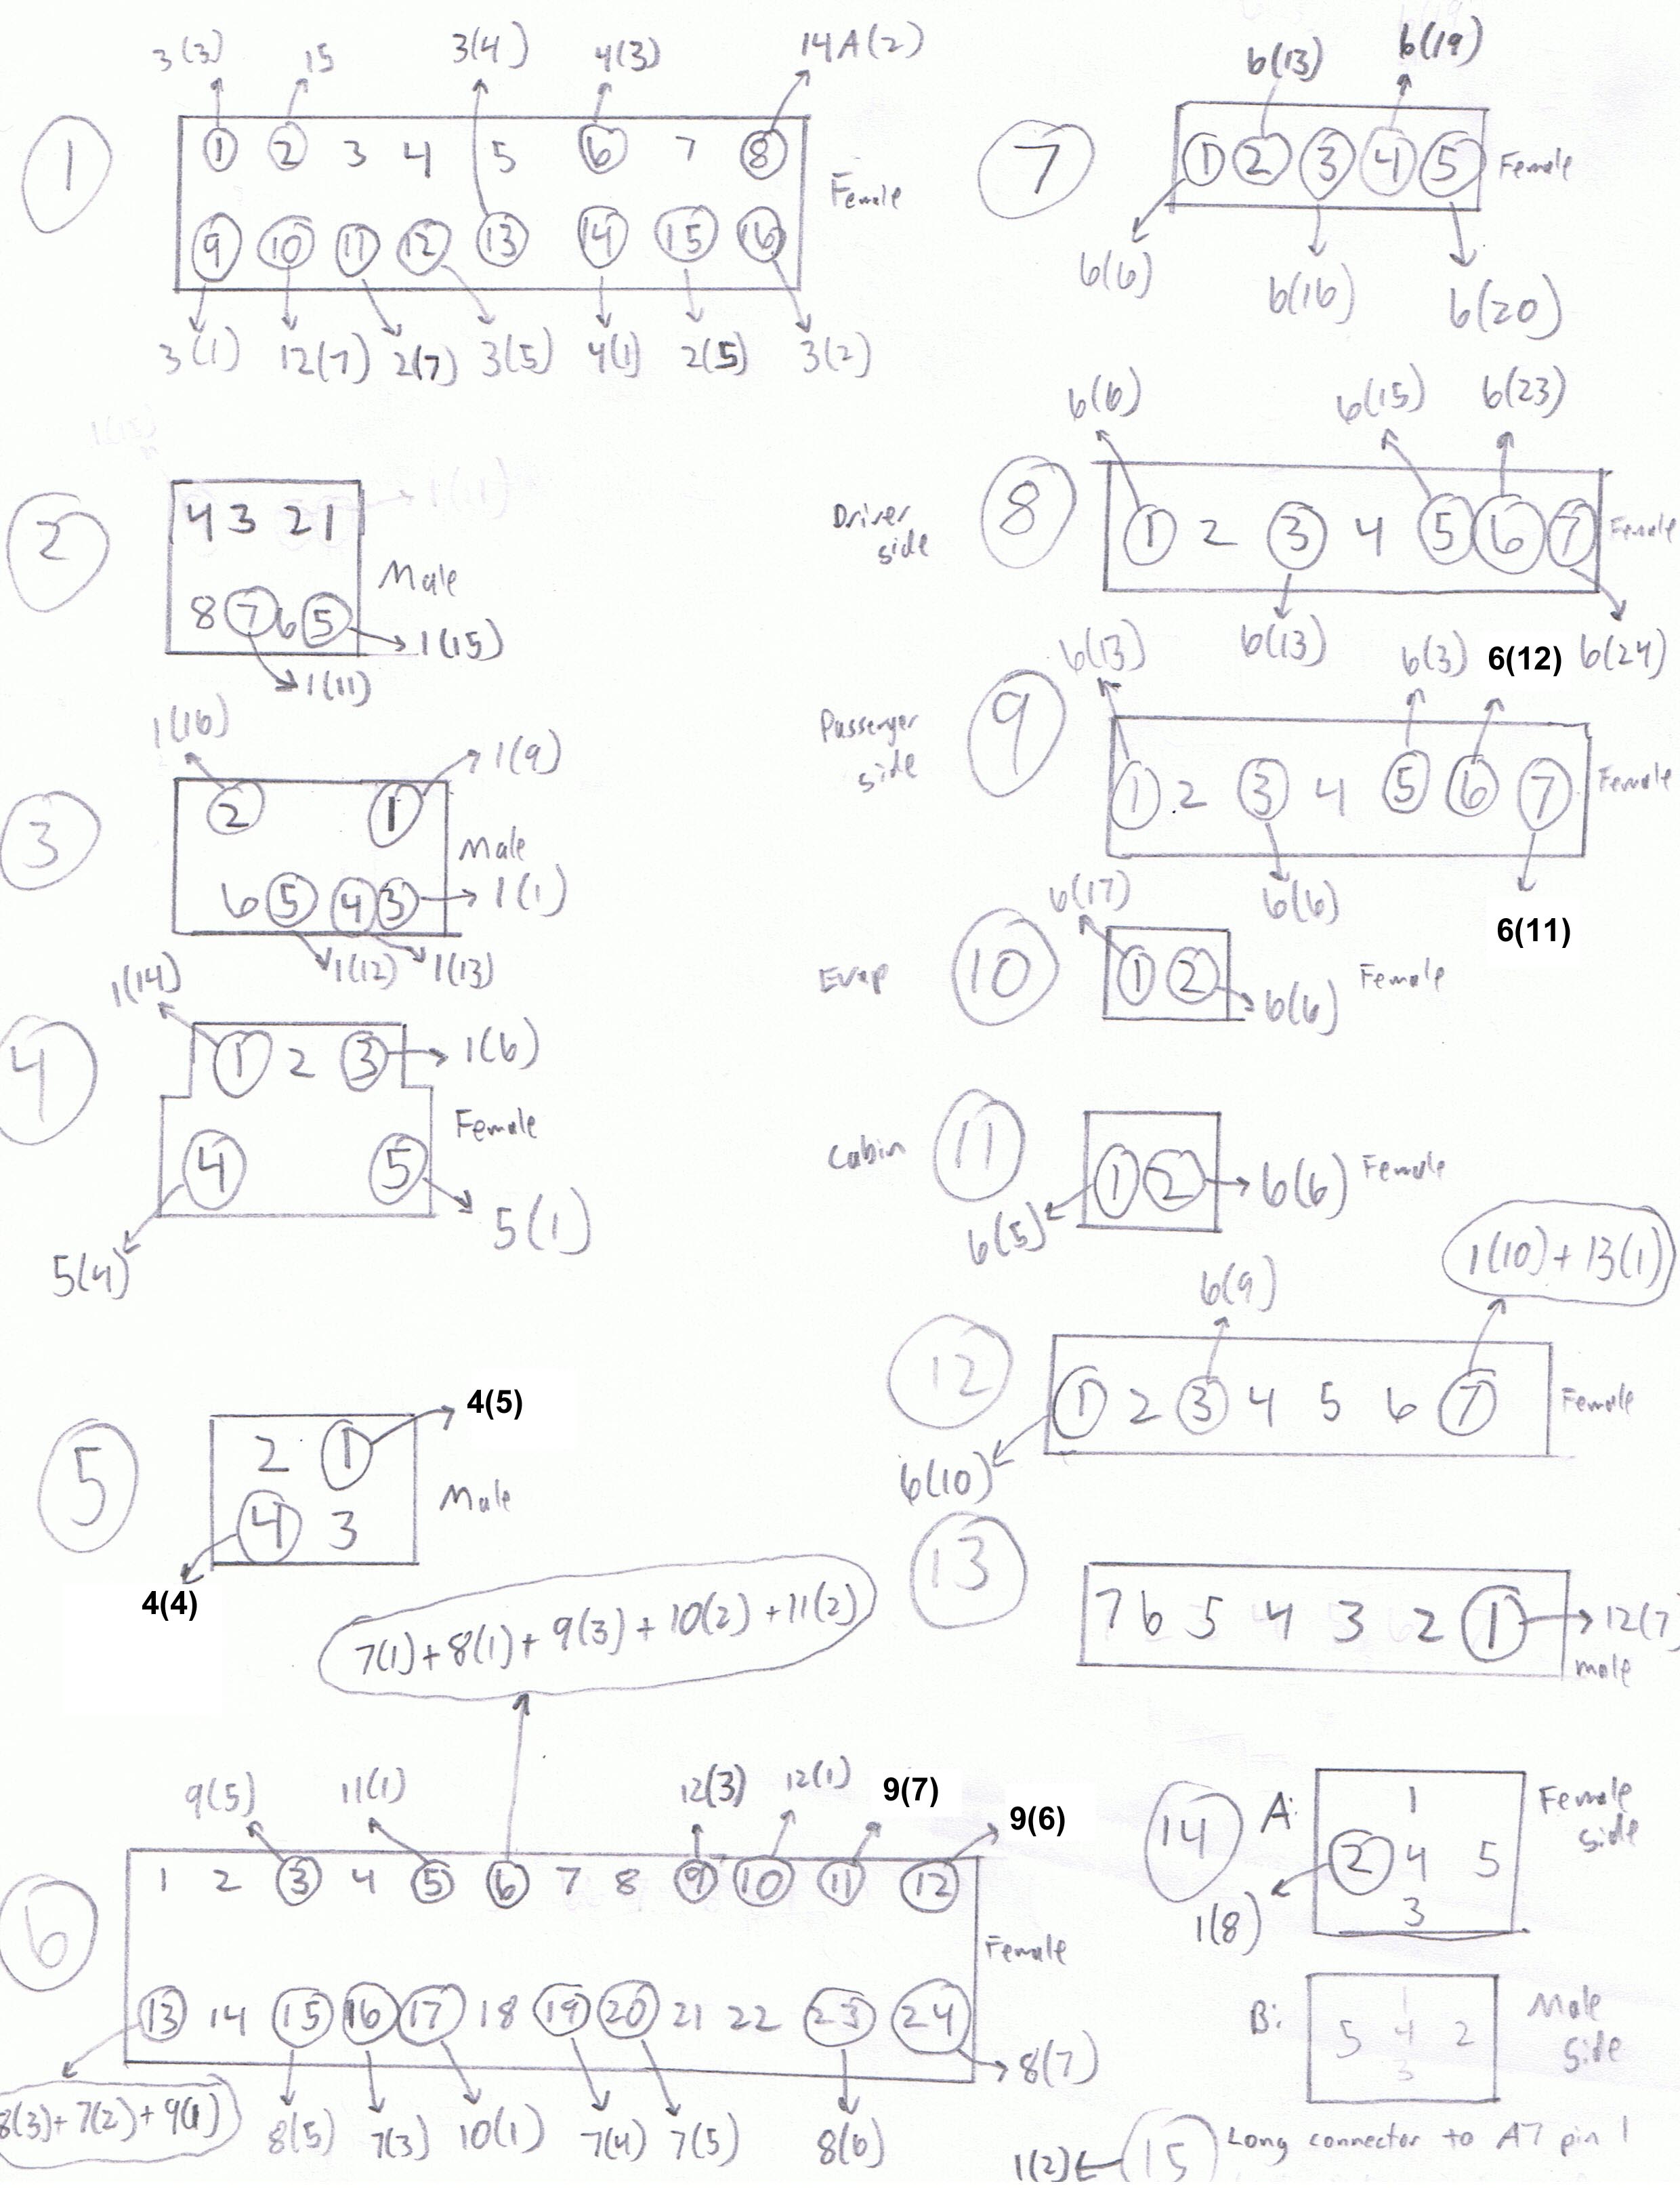 Edit: updated 7/25, had a minor error in the layout of connector 2 Updated again 9/12/15, errors in connector 5, 6, and 9. I've cross referenced this with the BRZ wiring diagram, so it should all be correct now Finally, below is a list of part numbers for the connectors which I think are correct, based on their shapes. What you do with this info is up to you and I don’t guarantee anything. 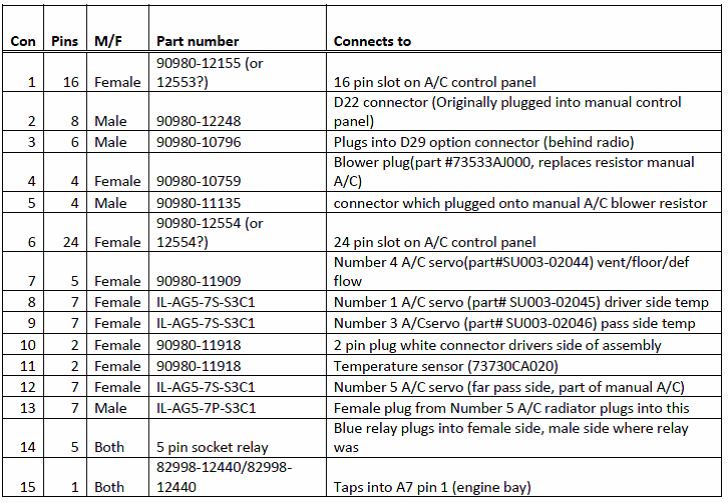 Connector #14 is a 5 pin socket relay which connects to the blue blower motor relay. Basically, the point of this thing is to reroute pin number 2 to pin 8 of connector #1. The middle pin of the relay is no longer used, and the remaining 3 plug into where they did before. 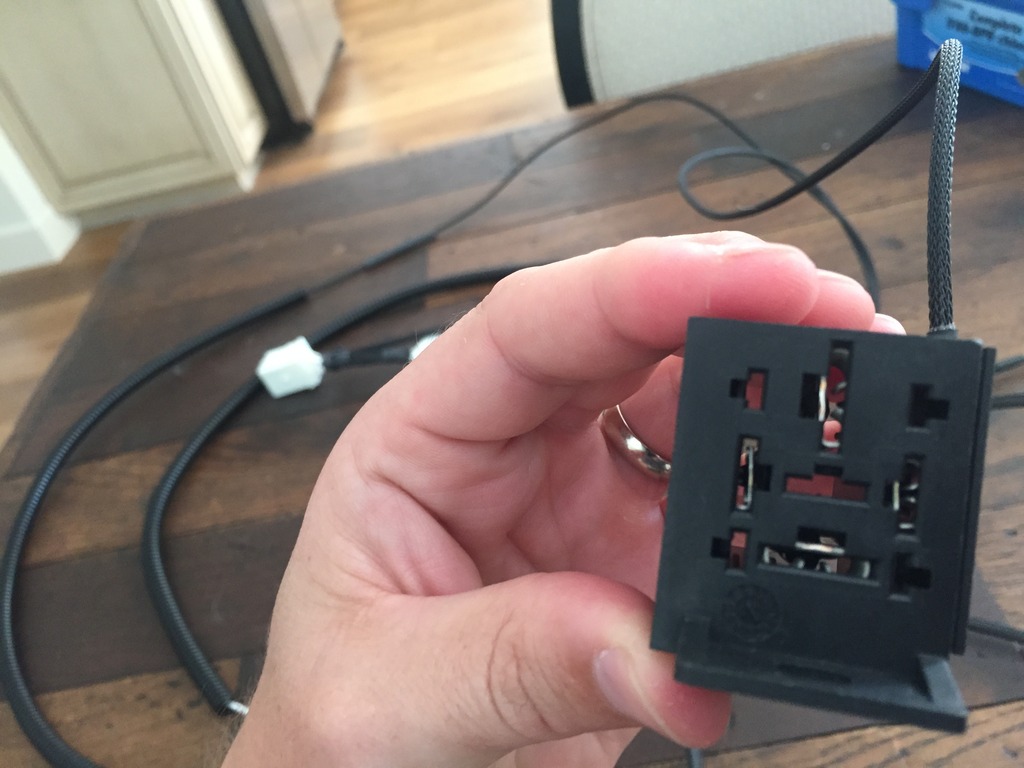 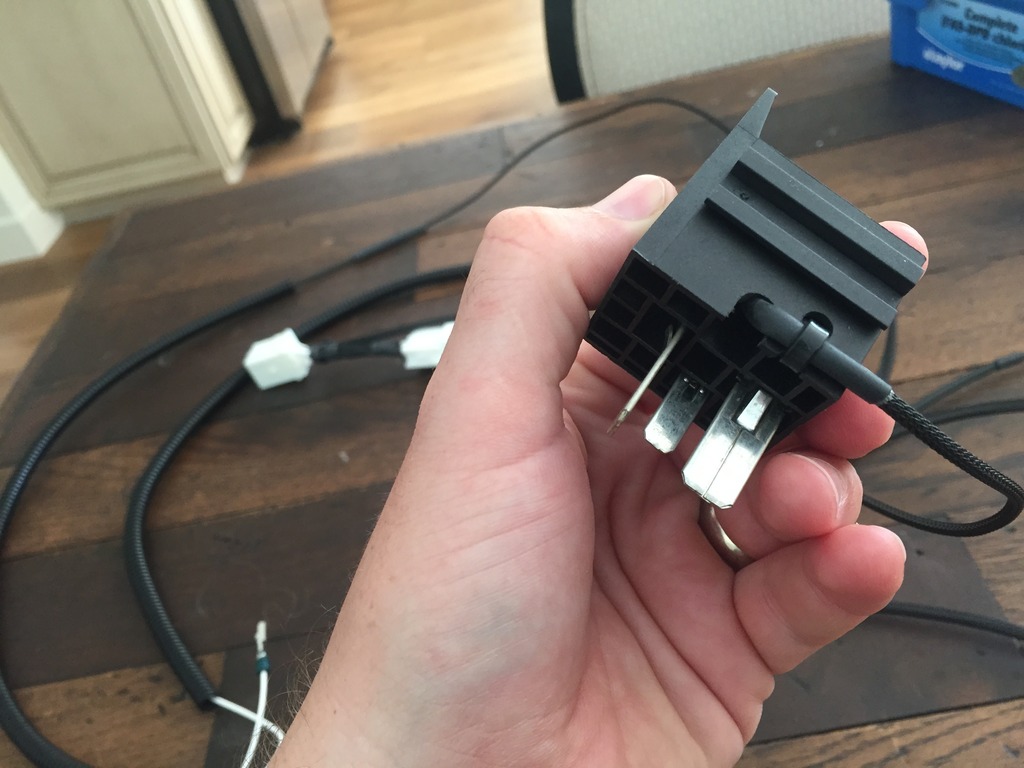 # 15 is a long wire which must pas through the firewall and replace the # 1 pin (yellow black wire) of connector A7 (see the BRZ wiring diagram). Then the pin which was pulled out of A7 connects to the male pin on the harness. Feel free to PM me with any questions. When I finally do this install, I will try to put together a DIY, but its super freaking hot out, so it’s unlikely I will do it anytime soon. Last edited by Chaetagnath; 07-09-2017 at 02:26 PM. |
|
|
|
| The Following 4 Users Say Thank You to Chaetagnath For This Useful Post: |
|
07-23-2015, 02:44 PM
|
#6 |
|
Senior Member

Join Date: Jul 2012
Drives: Scion FR-S Ultramarine
Location: San Jose, CA
Posts: 740
Thanks: 147
Thanked 291 Times in 194 Posts
Mentioned: 40 Post(s)
Tagged: 3 Thread(s)
|
i'm actually the first person that purchased the harness from him. i did the install not long after i got it. the only weird thing for me is that the air pushes through the footwell even if i don't want it to, but that's not a huge deal.
he did have a second harness planned to be just for single control, but i'm not sure what came of that. honestly i would recommend people go for the single control because going for the dual control is a lot more involved. you have to completely replace the part that controls the air flow because there is an extra denso unit as well as plastic pieces to separate the airflow. really it's all kind of messy and i'm starting to think maybe i screwed something up in there which is why i get air coming to the footwell... anyway. it does do what it's designed to do and i have the dual climate in my car and working. the entire dash MUST be removed if you're doing the dual climate since you'll have to swap the pieces. it's a huge PITA. you'll also need to refill your a/c. i was told that i should be able to do it without having the refill the a/c, but i couldn't see any possible way to remove what i needed to without disconnecting the a/c lines leading to the cabin from the engine. i mean i'm glad i did it, but if i were to do it again, i'd do just the single control harness. |
|
|
|
|
07-24-2015, 02:47 PM
|
#7 |
|
Senior Member

Join Date: Jul 2013
Drives: 2013 Scion FR-S (Raven) MT
Location: Kitchener
Posts: 535
Thanks: 99
Thanked 125 Times in 89 Posts
Mentioned: 4 Post(s)
Tagged: 0 Thread(s)
|
Would love to get more info on this...Especially the simpler single temp control harness
The only thing left in my FRS that I absolutely hate is that circa 90s corolla HVAC panel -- need to get it the hell outta there
__________________
--------------------------------------------------------
My Car Journal: Raven FR-S w/ TRD Flavour  Click for my AVIC Z150BH Head Unit DIY Install  |
|
|
|
|
07-24-2015, 07:32 PM
|
#8 |
|
Senior Member
Join Date: Jul 2012
Drives: FRS
Location: Cali
Posts: 1,558
Thanks: 188
Thanked 462 Times in 264 Posts
Mentioned: 9 Post(s)
Tagged: 0 Thread(s)
|
Thanks for the info.
I am sure someone could come up with something simpler ... Right? |
|
|
|
|
07-26-2015, 04:02 PM
|
#9 | |
|
Senior Member
Join Date: Nov 2012
Drives: Whiteout FRS
Location: Florida
Posts: 325
Thanks: 150
Thanked 272 Times in 120 Posts
Mentioned: 8 Post(s)
Tagged: 1 Thread(s)
|
Automatic dual climate control harness
Quote:
Driver side temp control servo: SU003-02045 Damper control servo: SU003-02044 Screws for the servos (need 5 total) SU003-02113 Blower transistor (73533AJ000) the climate control panel: 72311CA061 temperature sensor: 73730CA020 the hose assembly for the temperature sensor: 72313CA010 NOTE: Always be sure to disconnect the battery before doing anything like this. In particular you need to disconnect an airbag, which its best to have power off before doing so. Also, it is very easy to fry something accidentally. The manual A/C blower assembly and the automatic dual A/C blower assembly share many of the same parts, but have a couple of important differences. Temp and Direction (foot, def, face) are controlled by cables in the manual version, and controlled by servos in the auto A/C. Manual: 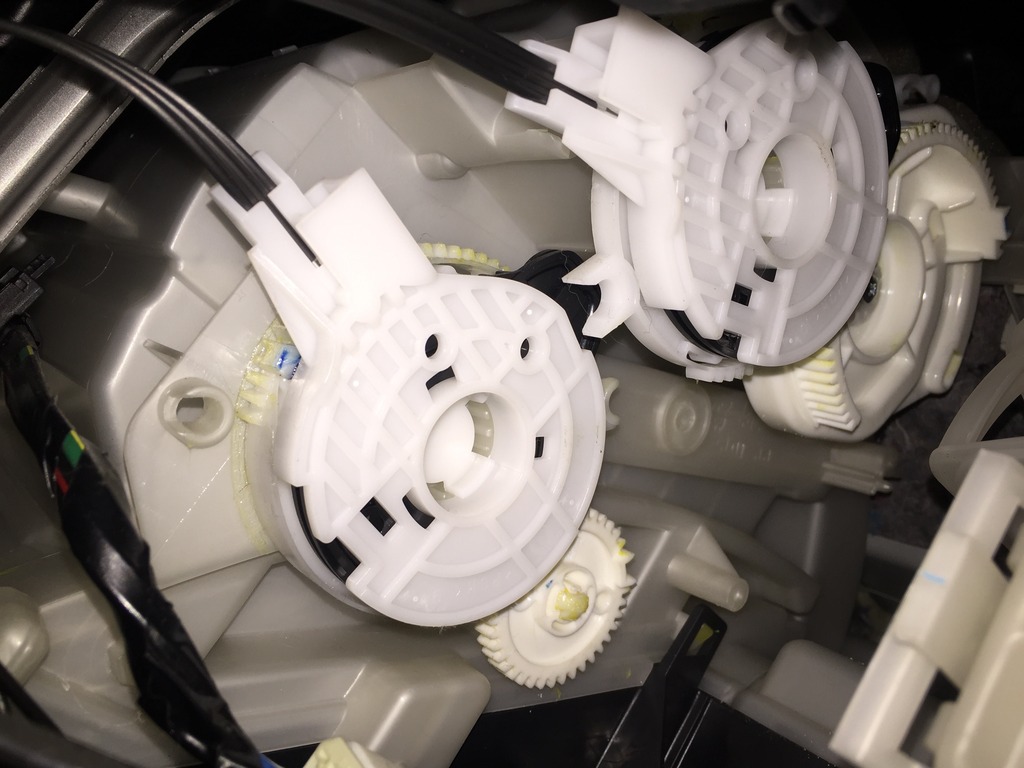 Auto: 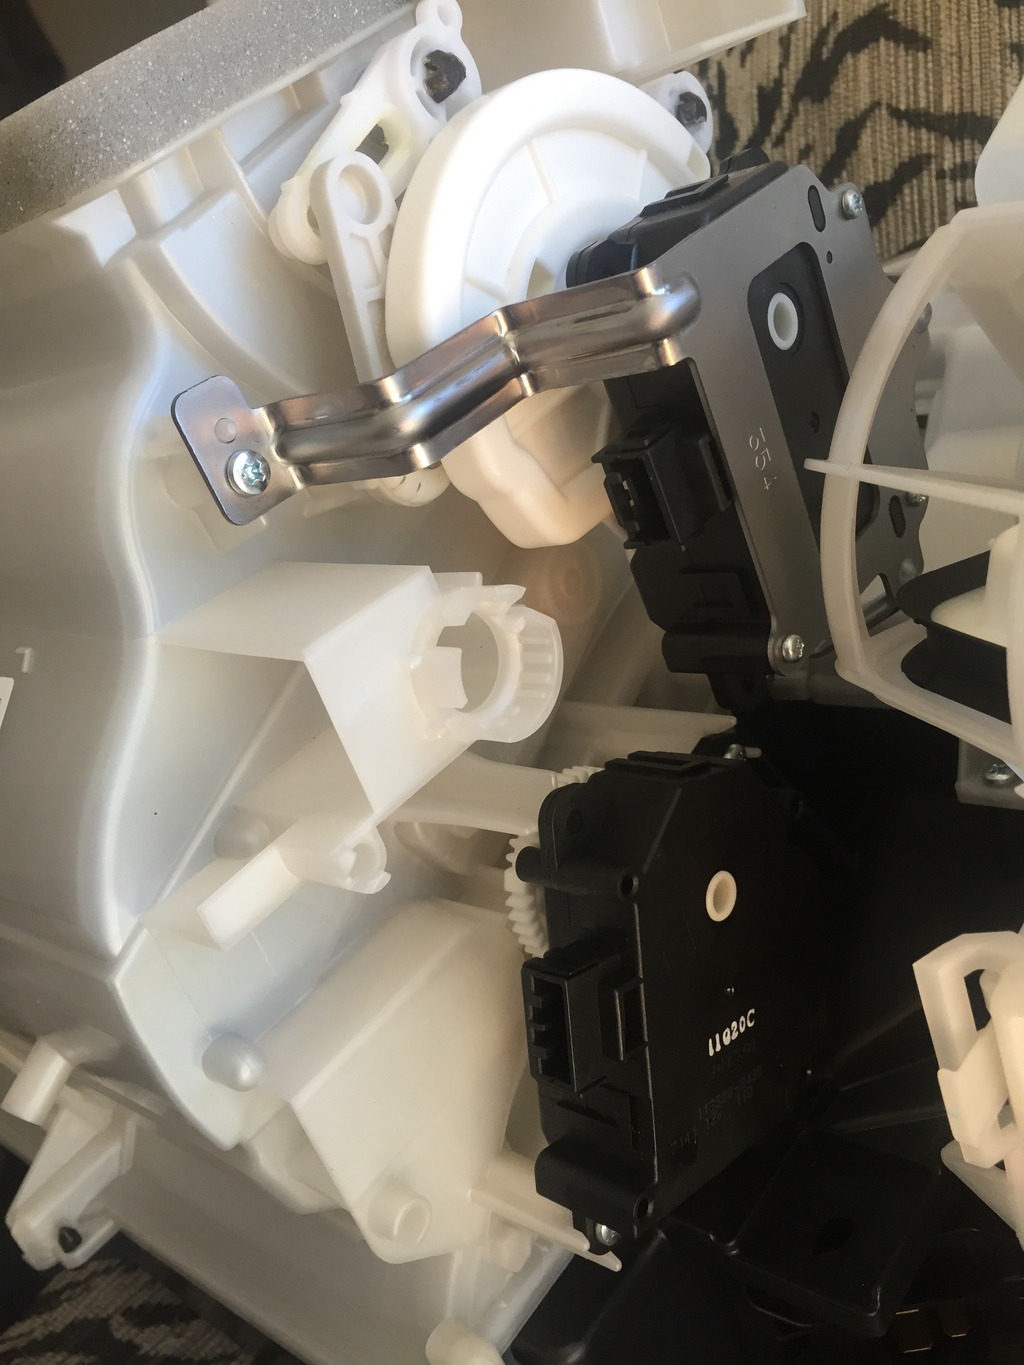 Thus, as far as I know, the auto/dual control panel cannot control the cables (which are moved by the dials on the manual one). So you need to replace them with the right servos. The driver side temp servo will fit on the manual A/C, and the direction damper servo should also fit (I haven't actually tried, but it looks like all the screw holes and pegs are there). The passenger side temp servo will not fit on the manual A/C though, which is why for true dual temperature, the top housing of the a/c unit must be replaced, requiring removal of the entire dash. But....for single temp, it is possible to add the driver side temp servo, remove the manual cable (which is on the passenger side), and because there is only 1 gear going across (or they are connected somehow), the driver side servo is able to move the temp just fine. As you can see in the picture below, the gear is there already, just add servo:    The gear on the servo has a tooth which is larger than the others. It should fit into the larger space on the A/C gear. As for the direction damper, you need to remove the manual cable, unscrew the white plastic gear thingy on the manual A/C (the larger round white gear on the top in the picture below)  Unfortunately, it is a really tight space. So, first you will need to remove the dash. This itself isn't so difficult. When pulling interior pieces out, I like to have blankets to place everything on outside of the car to avoid scratches. 1. First, remove the center console and center knee pads. There are plenty of threads elsewhere which show how to do this. 2. Remove the lower dash panels driver side first, then passenger side. This isn't too difficult either, and there are threads elsewhere which show you how to do this. However, a couple of screws are tricky because they are on the inside and face the other way. See the photos below: 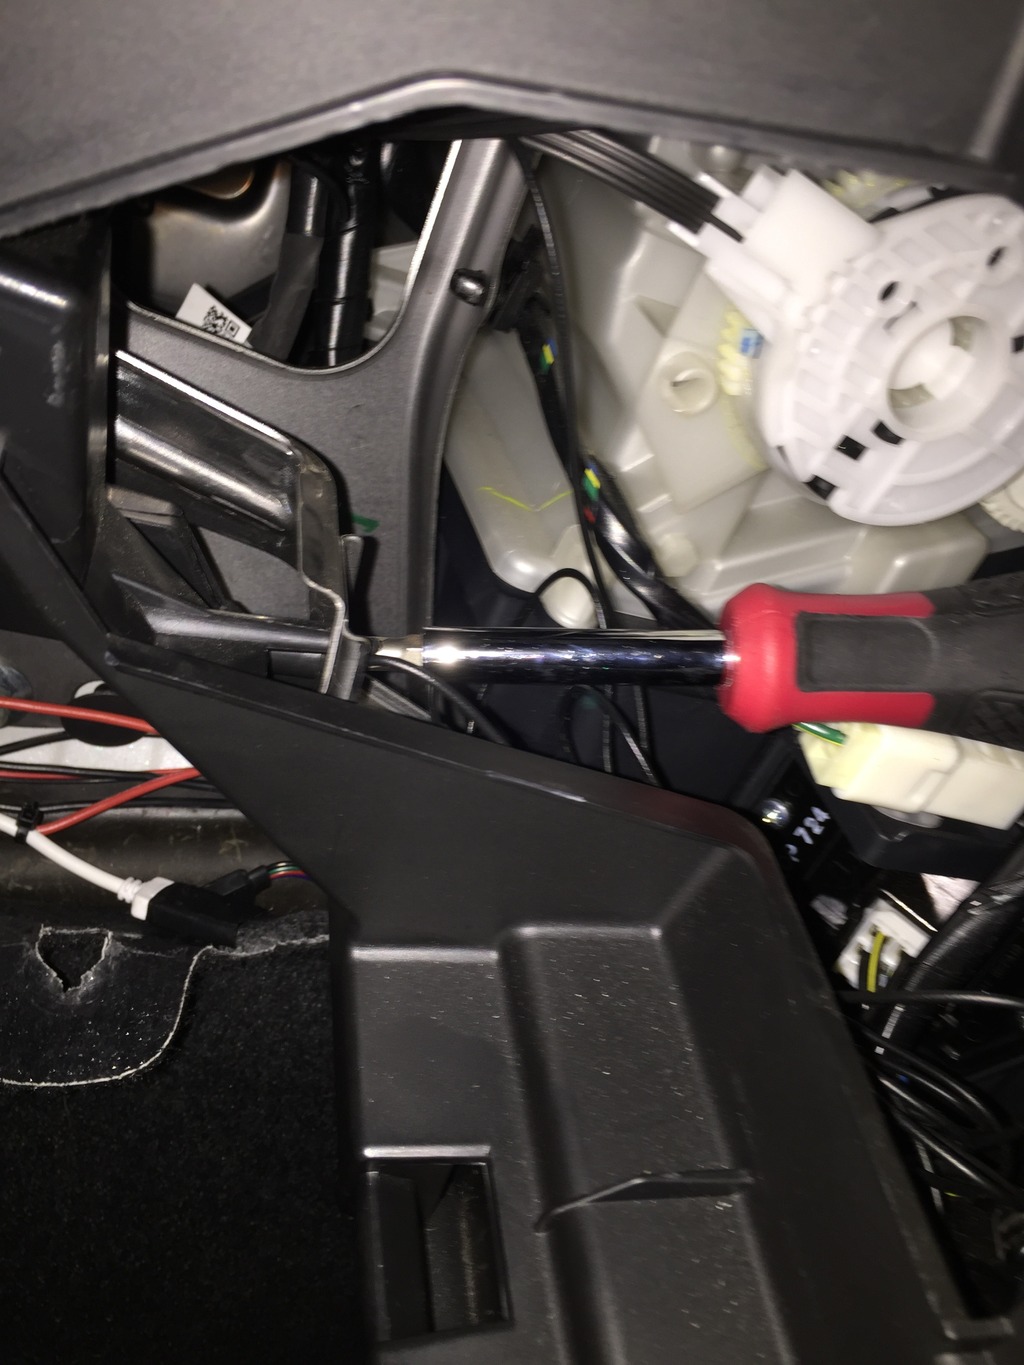 and on the driver's side: 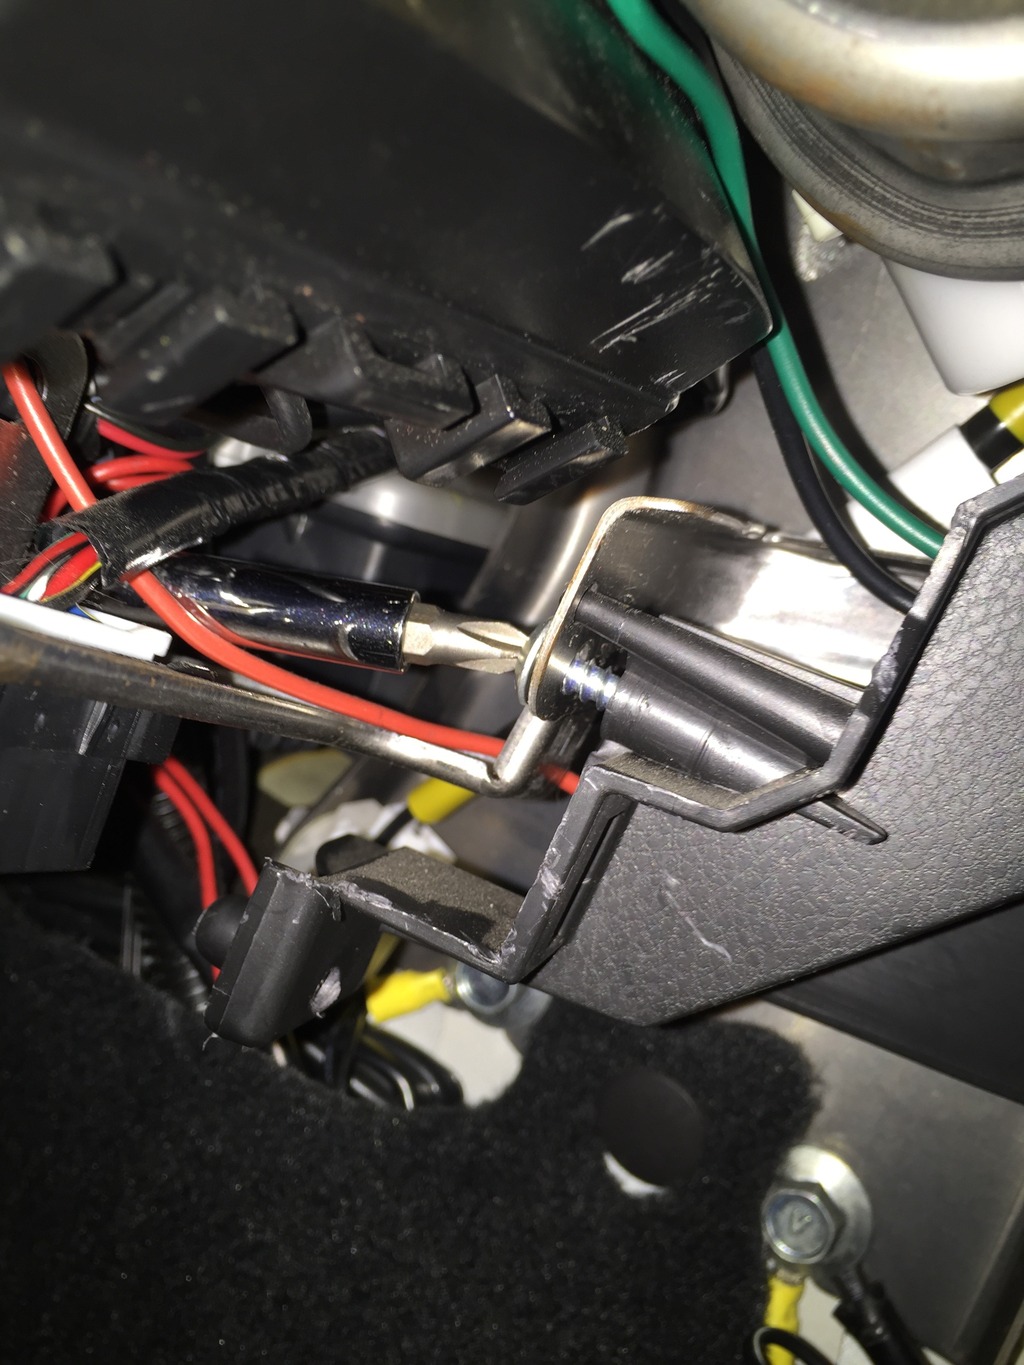 3. Remove the A-pillars from both sides. 4. Remove the front dash speaker covers. This is important because there are two screws under there which need to be removed. One is a large black screw, the other a regular dash screw. 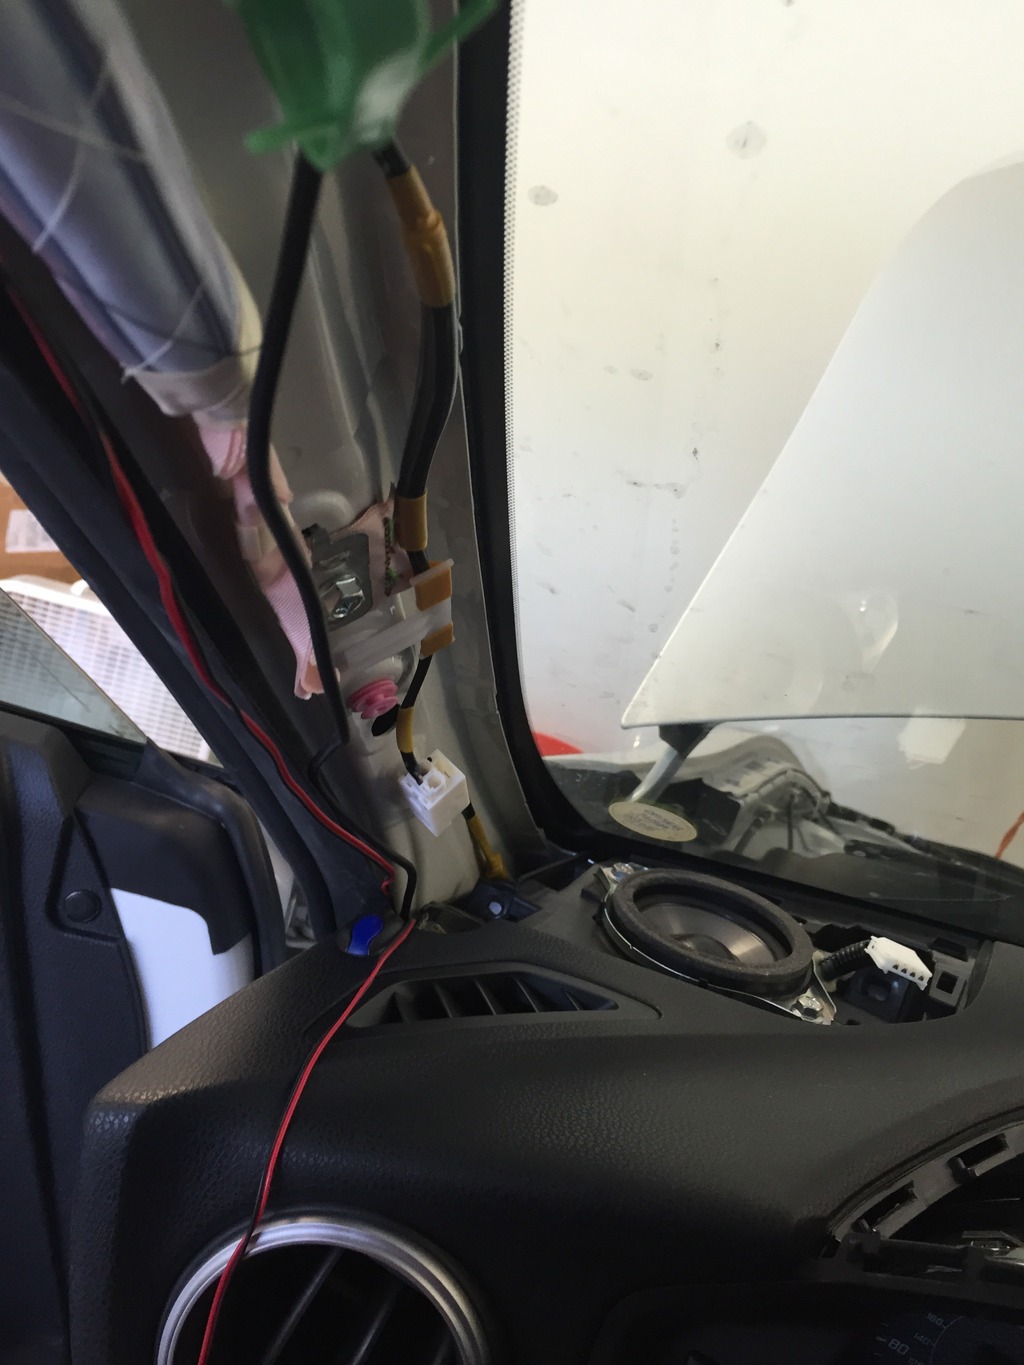 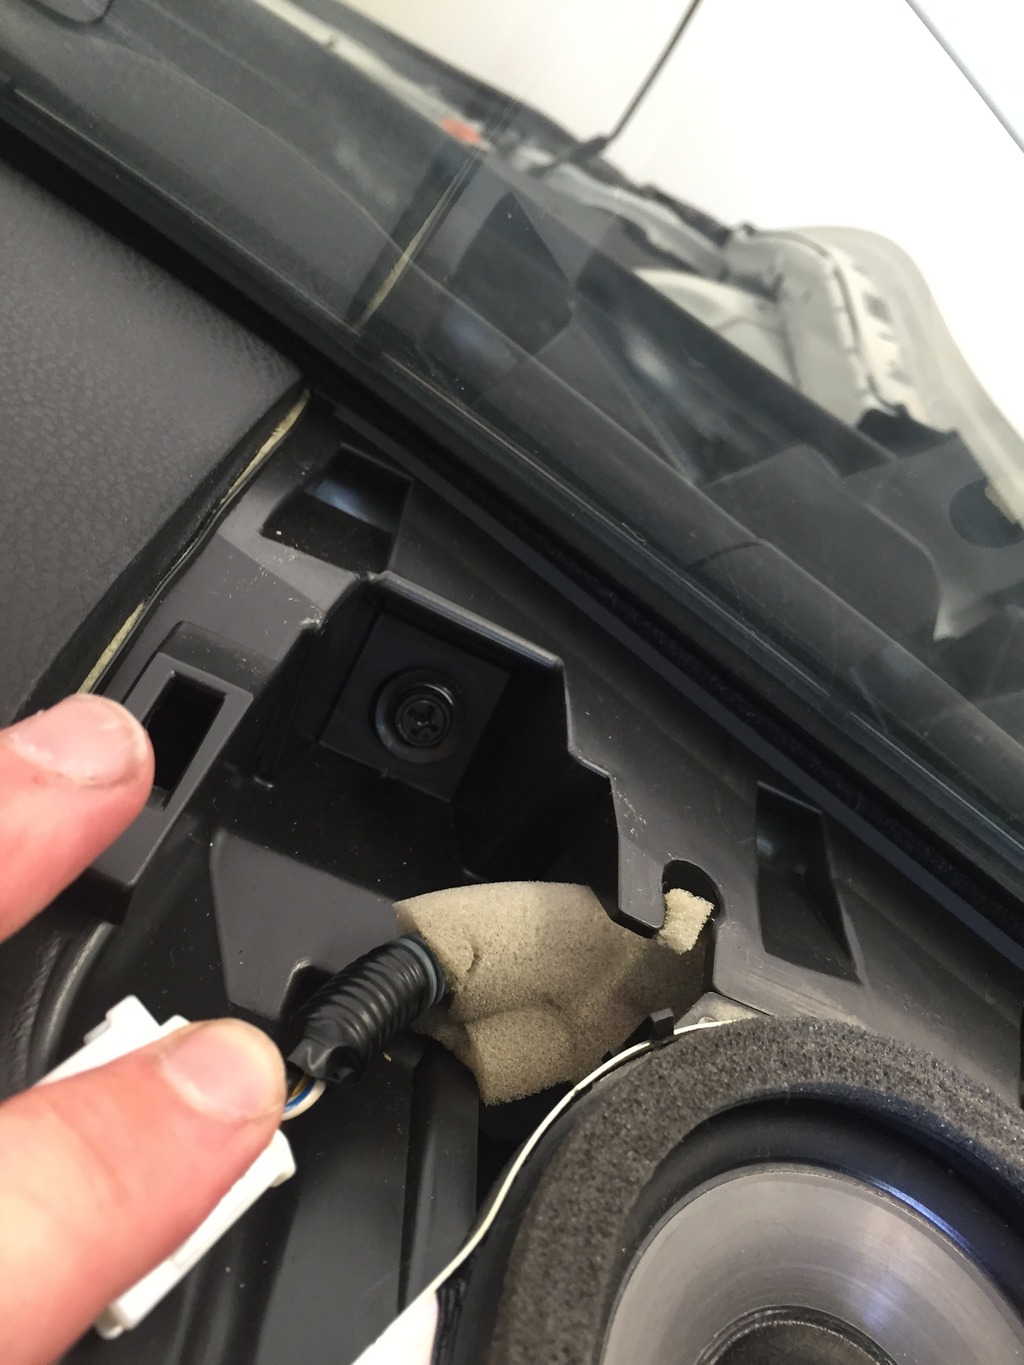 5. Remove panel above the steering wheel and the speedo panel. I believe there is a youtube video somewhere of somebody doing this. There is a screw behind this which needs to come out. 6. On the passenger side, if you look under where the glove box was, there is an airbag up there bolted to the dash. Unplug it, and unbolt it from big metal thingies. 7. Remove the radio, and the decorative dash panels. There is at least 1 screw back there 8. Be sure you have all the screws and bolts out in the front which hold the dash in place. You will also need to unhook the harnesses for the small speakers on either side. If all the bolts are out, it should slide out fairly easily. If it is not moving, you likely forgot a screw. I found it easiest to lift it over the steering wheel and pull it out through the passenger side door. Ok, it should now look something like this: 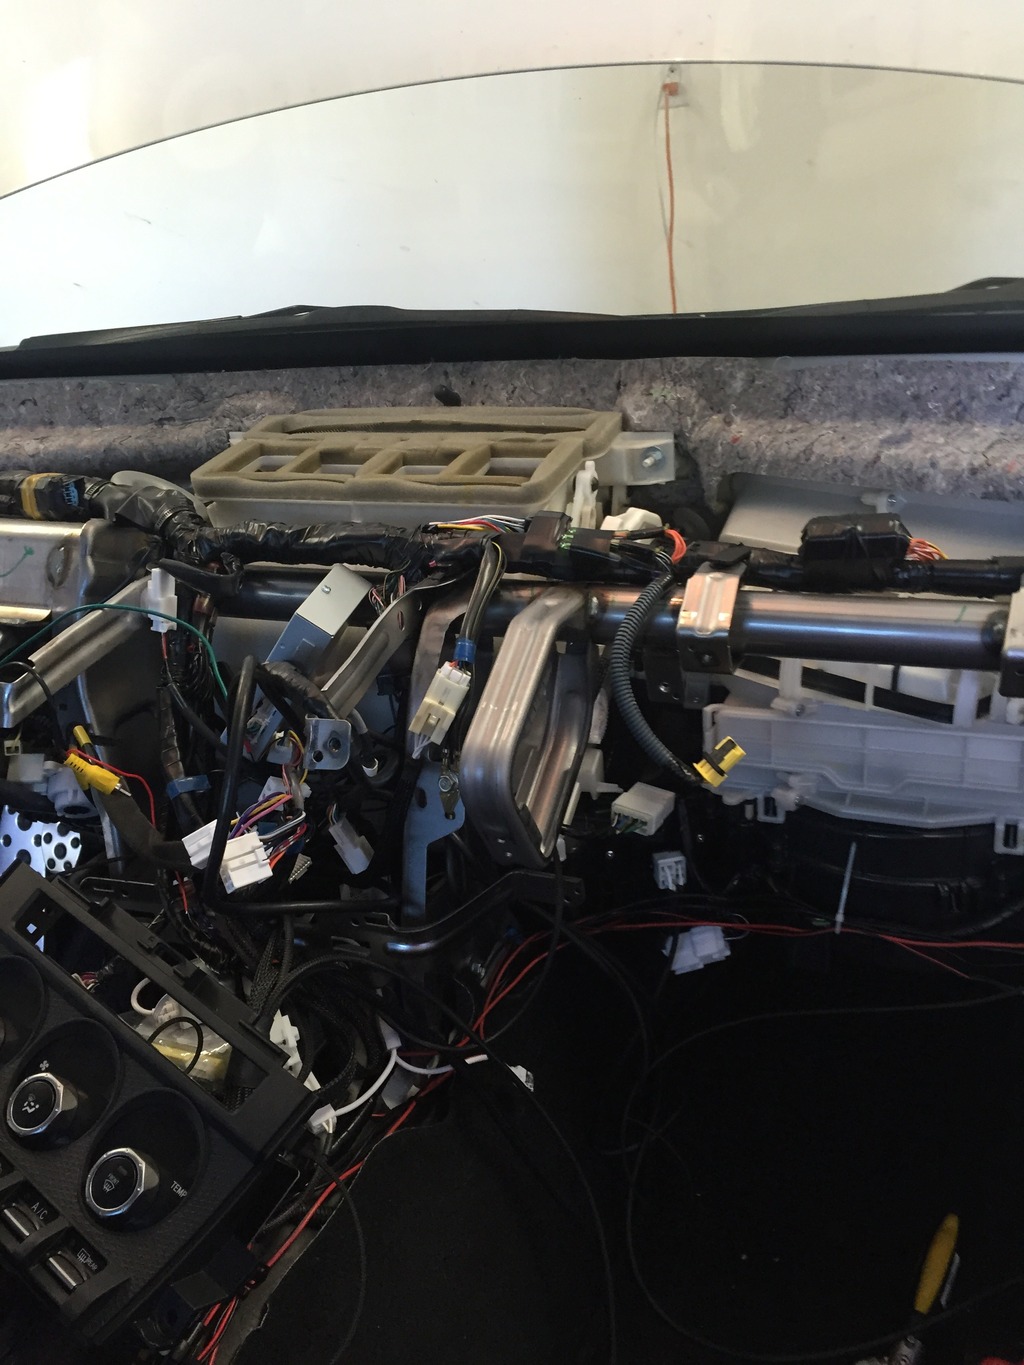 To do the true dual swap, you would need to remove that big metal bar as well, which I believe also involves removing the steering column somehow. Maybe I will do that someday, but not today. Ok, All of that needed to be done to install the damper servo (you will need some small screw drivers, or angled socket wrenches or something, it is a tight fit. I used this [ame="http://www.amazon.com/Neiko-03044A-Ratcheting-Screwdriver-Close-Quarters/dp/B000XYOUS6/ref=sr_1_3?s=hi&ie=UTF8&qid=1439057204&sr=1-3&keywords=small+socket+wrench"]Neiko 03044A Mini Ratcheting Screwdriver and Bit Set, Pocket Size Close-Quarters, 1/4-Inch Drive - Angle Screwdriver - Amazon.com[/ame]). 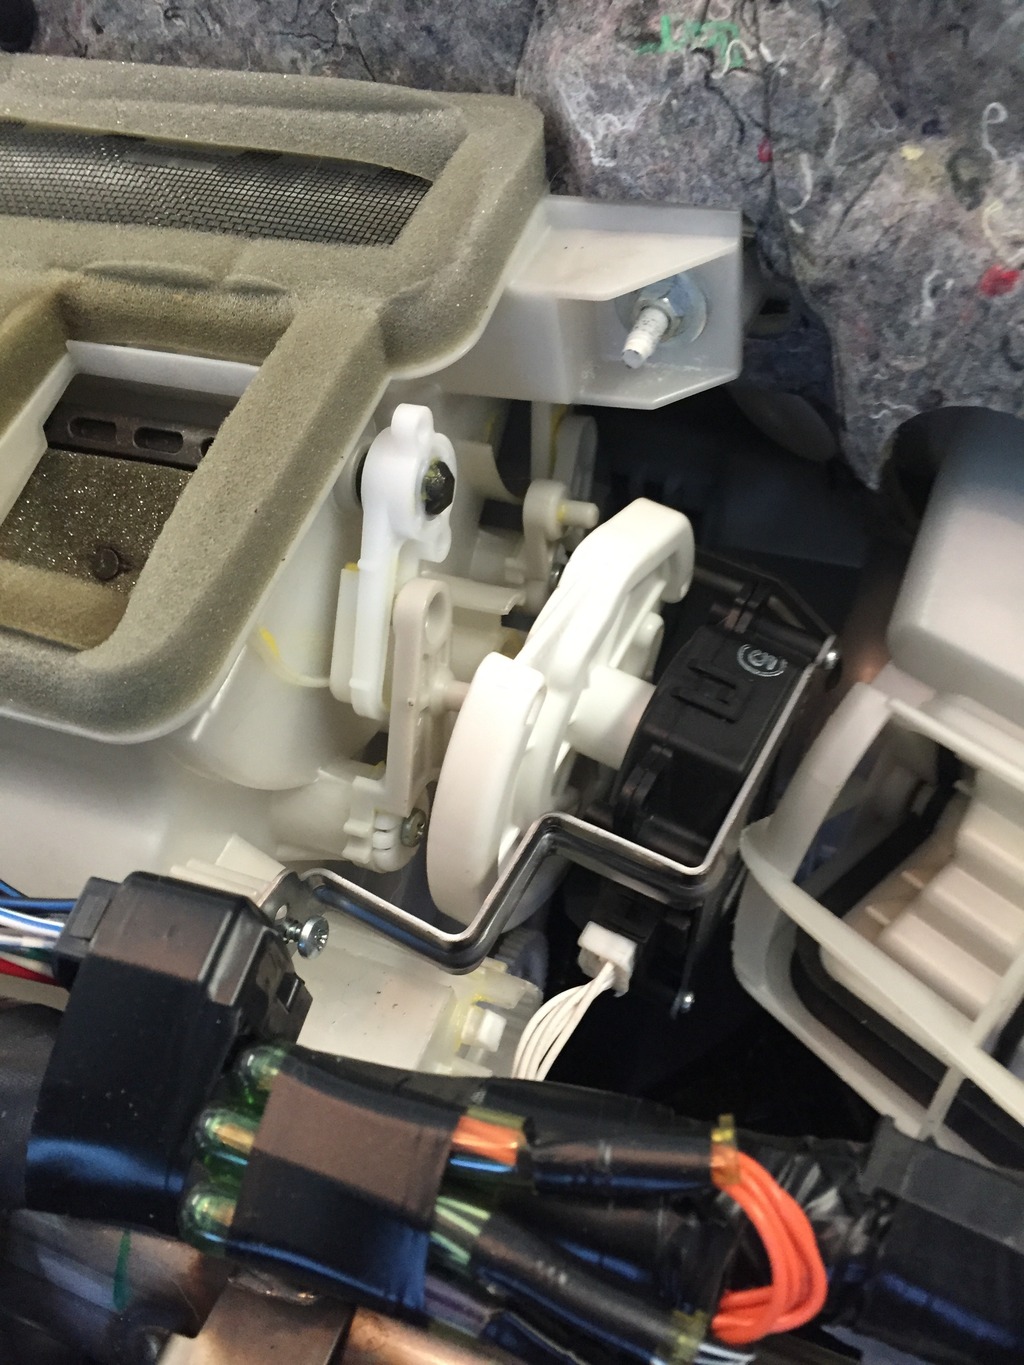 There are three screws. You can see one in the picture above, there is one underneath, and another on the other side. I was actually only able to get two front one and the bottom one, I could not get to the third. However, it seems to work, so if it is mounted properly, and the pegs are in the grooves properly, two screws will work. There are little pegs attached to arms that move the dampers, they fit into these grooved pathways on the white thing attached to the servo. With the dash out, I loosely put the two screws in, then guided the pegs into the proper grooves, held it in palce and tightened the screws. Then I plugged in the harness (see below) and the control panel and tested everything to be sure it was working (have to reconnect the battery). Better to check now, than put it together and find a problem. The defrost should come out the vent closest to the windshield. Front and side air come through the bigger vent in front. Footwells you should be able to feel coming out the bottom. Just cycle through everything and feel where the air is coming out. Also, test the temperature servo. Harness install: You need to swap out the manual blower resistor for the auto one. Just a couple of screws. It is located below the controls mentioned above. Manual one needs to come out: 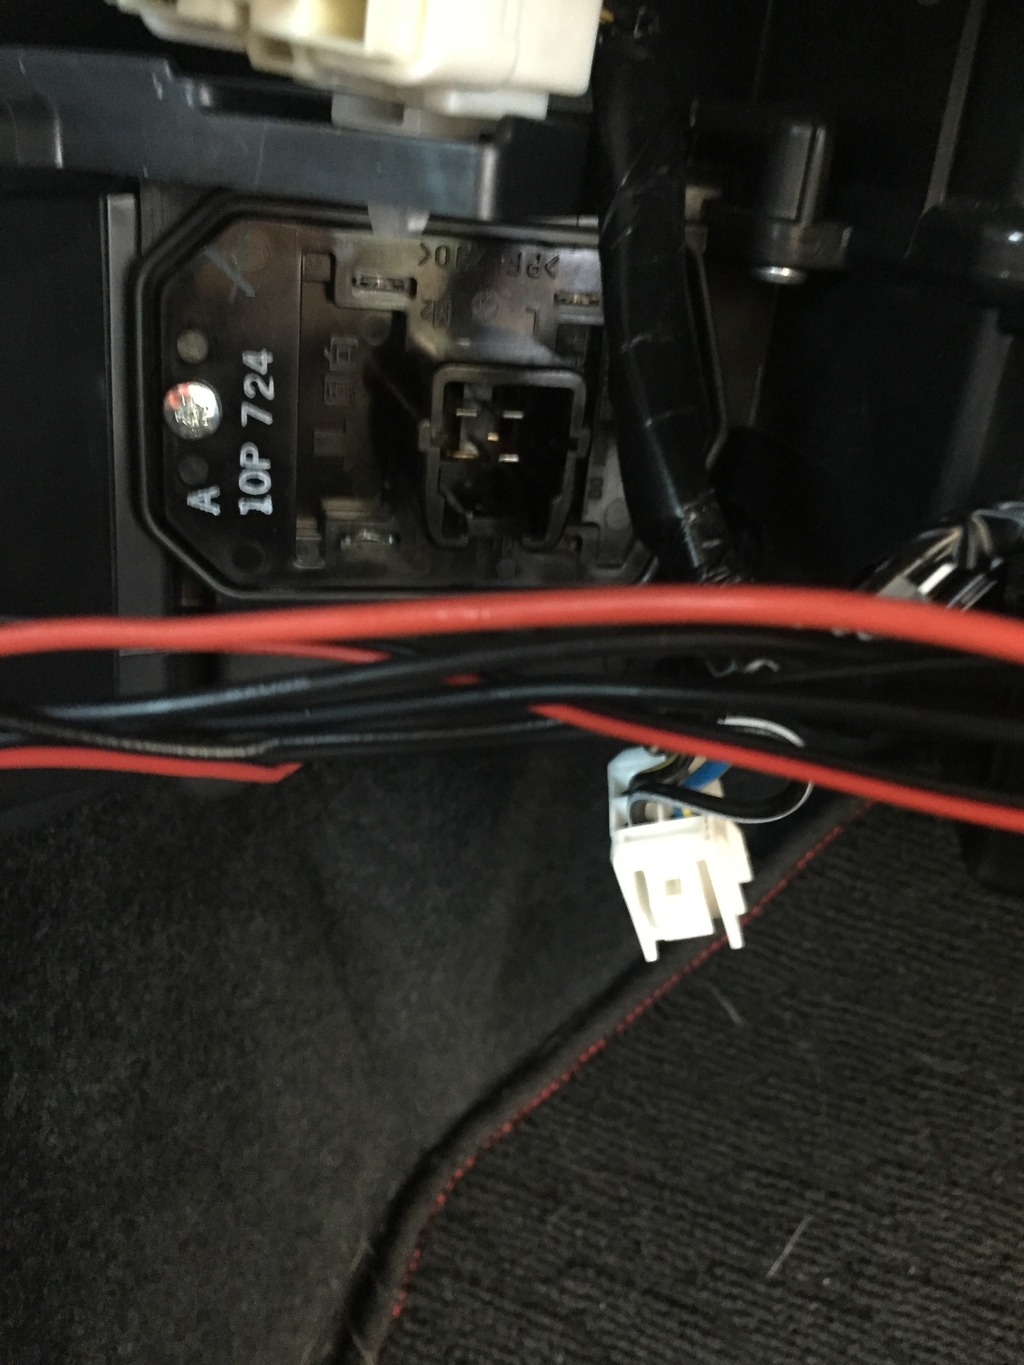 Here is what the automatic one looks like: Here is what the automatic one looks like: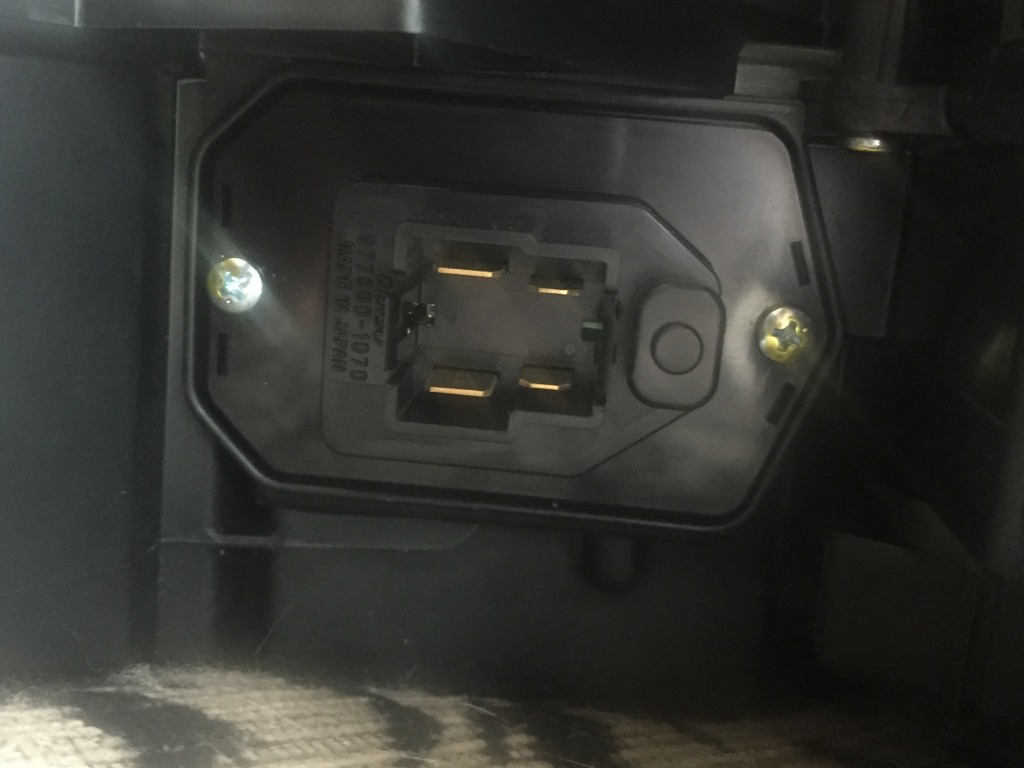 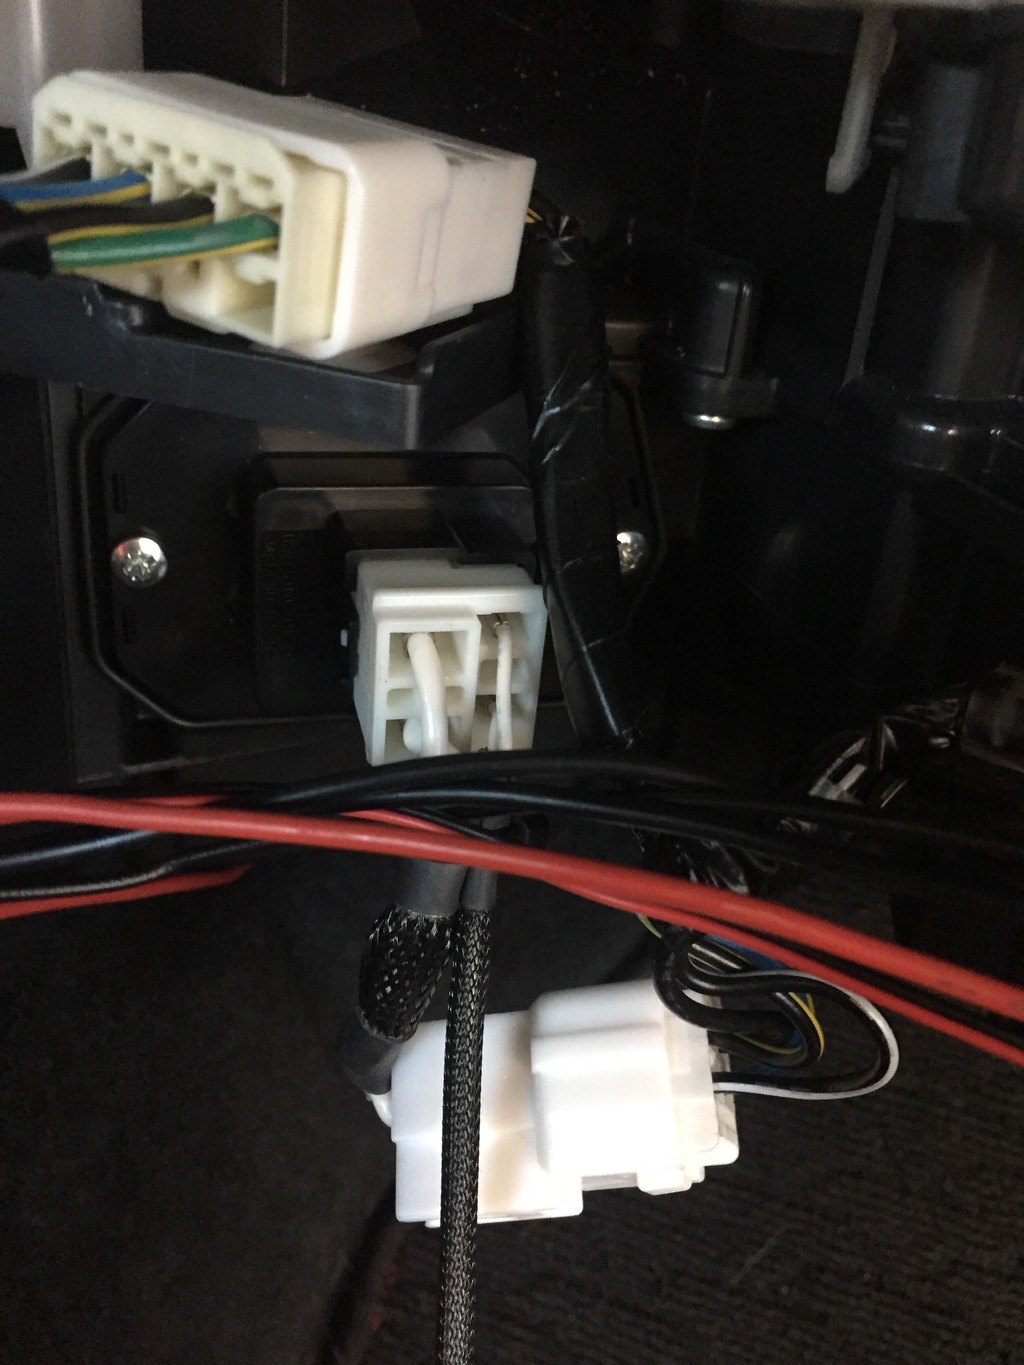 Then attach the temperature sensor tube next to the driver side servo. Add the temperature sensor to the end. The connector on the manual A/C is there, but is closed off: 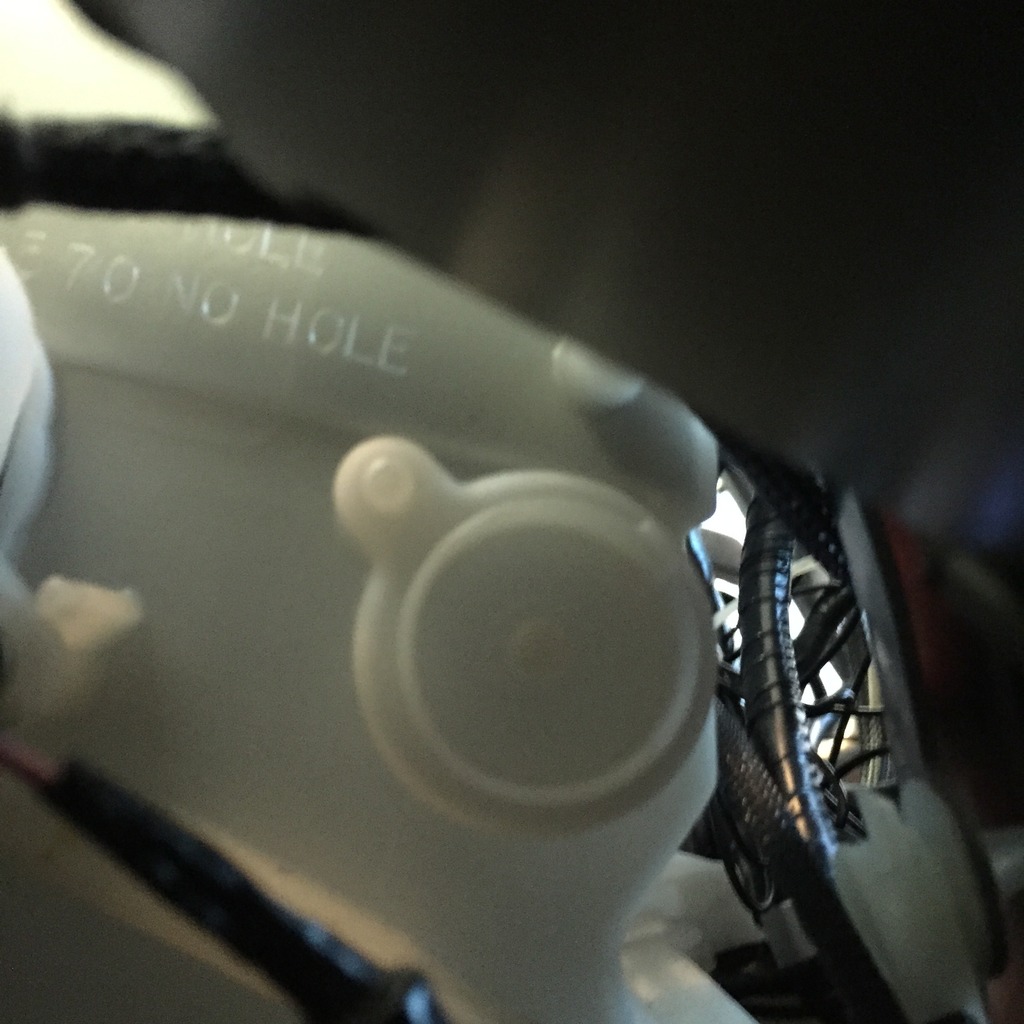 The inside of that should be a hole. This is what the auto looks like.  I dremmeled it out. A small pointy hand saw would work too. Its an awkward angle. 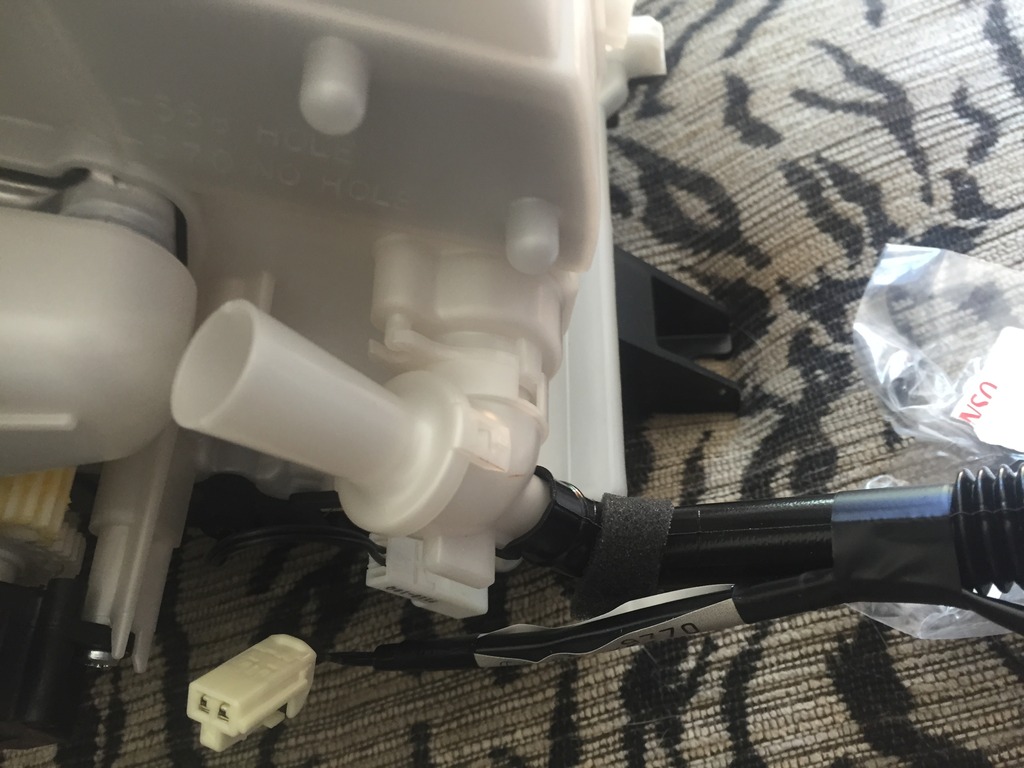 Then you simply need to plug in the harness everywhere. Should work. Also, I can confirm that the auto function works. The table in my earlier post has been modified to tell you where everything needs to be connected. Boom, single temp, auto A/C, nicer panel. 
Last edited by Chaetagnath; 07-09-2017 at 06:24 PM. |
|
|
|
|
| The Following 10 Users Say Thank You to Chaetagnath For This Useful Post: | 6spd (08-11-2015), Binary_fission (02-05-2016), DAEMANO (07-27-2015), Draco_PR23 (08-11-2015), DustinS (02-05-2016), Lonewolf (08-05-2015), Mike_ZN6 (04-24-2020), S84kam (08-12-2015), Twitchy313 (03-14-2019), weedtank (08-13-2015) |
|
07-26-2015, 09:56 PM
|
#10 | |
|
Senior Member
Join Date: Jul 2013
Drives: 2013 Scion FR-S (Raven) MT
Location: Kitchener
Posts: 535
Thanks: 99
Thanked 125 Times in 89 Posts
Mentioned: 4 Post(s)
Tagged: 0 Thread(s)
|
Quote:
Now all I need is that damn harness... Need to find someone that can make them- unless you want to sell me yours???
__________________
--------------------------------------------------------
My Car Journal: Raven FR-S w/ TRD Flavour Click for my AVIC Z150BH Head Unit DIY Install |
|
|
|
|
|
07-27-2015, 12:48 PM
|
#11 | |
|
Senior Member
Join Date: Nov 2012
Drives: Whiteout FRS
Location: Florida
Posts: 325
Thanks: 150
Thanked 272 Times in 120 Posts
Mentioned: 8 Post(s)
Tagged: 1 Thread(s)
|
Quote:
LOL, nope, think I will hang onto mine. |
|
|
|
|
|
07-28-2015, 08:33 AM
|
#12 | |
|
Senior Member
Join Date: Jul 2013
Drives: 2013 Scion FR-S (Raven) MT
Location: Kitchener
Posts: 535
Thanks: 99
Thanked 125 Times in 89 Posts
Mentioned: 4 Post(s)
Tagged: 0 Thread(s)
|
Quote:
In the meantime, we need to get someone who can figure out how to make these... I looked into my PMs from when I was talking to the guy who originally made this harness (accelerated was his forum name) Found his YouTube video.. [ame="https://www.youtube.com/watch?v=16CeY-ev7og"]https://www.youtube.com/watch?v=16CeY-ev7og[/ame] So his name is Rudy Compart We need to either track this guy down or find someone who can make a similar harness..
__________________
--------------------------------------------------------
My Car Journal: Raven FR-S w/ TRD Flavour Click for my AVIC Z150BH Head Unit DIY Install |
|
|
|
|
|
07-28-2015, 01:40 PM
|
#13 | |
|
Senior Member
Join Date: Jul 2012
Drives: Scion FR-S Ultramarine
Location: San Jose, CA
Posts: 740
Thanks: 147
Thanked 291 Times in 194 Posts
Mentioned: 40 Post(s)
Tagged: 3 Thread(s)
|
Quote:
|
|
|
|
|
|
07-28-2015, 01:50 PM
|
#14 | |
|
Senior Member
Join Date: Jul 2013
Drives: 2013 Scion FR-S (Raven) MT
Location: Kitchener
Posts: 535
Thanks: 99
Thanked 125 Times in 89 Posts
Mentioned: 4 Post(s)
Tagged: 0 Thread(s)
|
Quote:
Regardless - first is to find someone with the knowledge to build this thing. We can deal with that issue after that's taken care of...First things first haha
__________________
--------------------------------------------------------
My Car Journal: Raven FR-S w/ TRD Flavour Click for my AVIC Z150BH Head Unit DIY Install |
|
|
|
|
|
|
|
|
|
|
|
 Similar Threads
|
||||
| Thread | Thread Starter | Forum | Replies | Last Post |
| Wtb:pnp harness for automatic climate control for frs | Sangthing | Want-To-Buy Requests | 5 | 01-02-2015 04:11 PM |
| BRZ limited dual climate control | Sangthing | Interior Parts (Incl. Lighting) | 6 | 09-12-2014 06:01 AM |
| Ac knobs for BRZ limited / FRS with dual climate | dnizzle | Cosmetic Modification (Interior/Exterior/Lighting) | 3 | 08-15-2014 10:43 PM |
| FS - BRZ Dual Climate Control Unit | dvsidboy | Audio/Visual, Electronics, Infotainment, NAV | 4 | 01-12-2014 08:52 PM |


