


|
||||||
| DIY (Do-It-Yourself) Guides For all DIYs. |
 |
|
|
Thread Tools | Search this Thread |
 09-09-2014, 01:40 PM
|
#1 |
|
Senior Member
Join Date: Aug 2014
Drives: '14 981CS, '99 NB1
Location: Oregon
Posts: 1,274
Thanks: 1,234
Thanked 1,201 Times in 631 Posts
Mentioned: 114 Post(s)
Tagged: 2 Thread(s)
|
DIY: Single exit exhaust diffuser for less than $10
So I've had my FR-S for a little under a month, and already I felt the need to start tinkering with it. I'm going for weight saving mods first, and high on the list was a single exit exhaust. I picked up a Nameless muffled track pipe with tip from @PantsDants on Saturday and got to work.
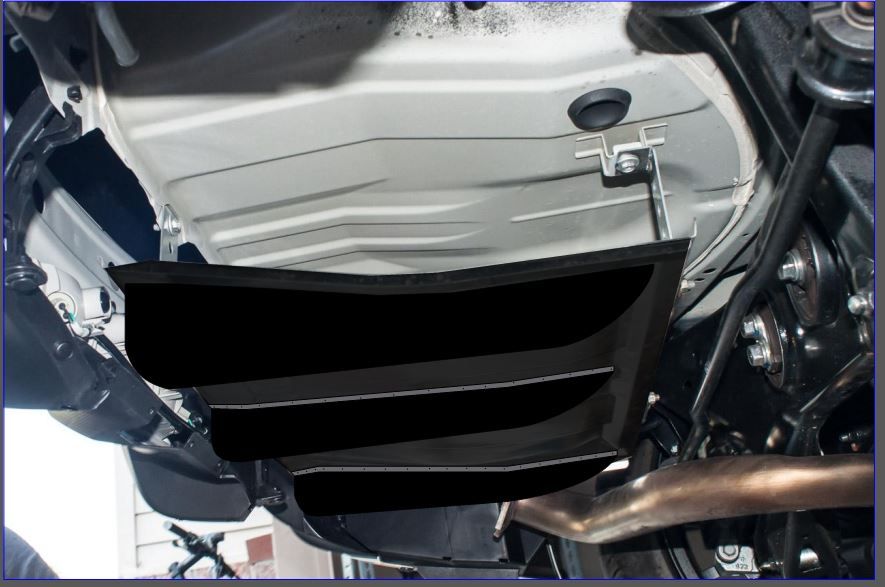
After talking to PantsDants and @Decay107 about swapping to a single exit, both of them mentioned concerns about the aerodynamic impact removing the stock exhaust can have. The idea that it basically turns the bumper into a parachute when you have a single exit exhaust was a little concerning... Well, as soon as I got under the car to look at removing the stock muffler, I realized there was a big heat shield directly above it that was held on by 4 evenly spaced out bolts. I had the crazy idea that maybe I could make some brackets to move the heat shield down into the airstream to use it as a diffuser. Even better, the heat shield already had the right shape of bend in it to lead the air up to the bumper in a semi-smooth fashion. The heat shield is a bit flimsy, but after making the brackets and bolting it down, it's really secure. Anyways to do this you need:
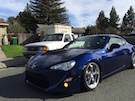
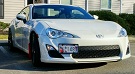
Of course you could use something else to make the brackets, although I wouldn't recommend aluminum, as in my experience - bending aluminum to make right angle brackets usually results in it cracking / breaking. I've never had a bent steel bracket break on me (and I've made a lot of these in the past for various car things). If you're worried about rust, rattle bomb them after you've verified they're the right length/shape. :shrug: First, flip the heat shield over so the bend is going the right direction. I had a friend hold up the heat shield while I measured the spacing I needed to make it sit at the angle I wanted. I made the rear brackets 4" from the L bend, and the front brackets 4.5" from the L bend. Ideally it would probably sit a little farther down, but I didn't want it to hit the exhaust piping. If you cut the heat shield a bit, you could probably put it lower so it was a smoother transition from the bottom of the car. I then bent my L into the brackets, measured the length from the L that I needed and cut them off the bar. Pretty straightforward. Bolted them up loosely so I could maneuver the shield a bit - the large holes in the punched bar allow you some play to move it up/down at each corner to get it just right. And then tightened it down. Stepped back and lol'd at how easy it was. Questions / Comments / Concerns? Too ghetto? lol  I took her out and took the car up to roughly 90mph and didn't feel the rear end get light at all... so yeah - hopefully it's doing it's job. Looking forward to someone that tracks more frequently to try this out and see if it makes a tangible difference for them. I took her out and took the car up to roughly 90mph and didn't feel the rear end get light at all... so yeah - hopefully it's doing it's job. Looking forward to someone that tracks more frequently to try this out and see if it makes a tangible difference for them.Pictures:        And just to show that you can't see it from any normal height - here is a picture of the car at rest. 
|

|

|
| The Following 10 Users Say Thank You to johan For This Useful Post: | D_Thissen (09-12-2014), eurominican (12-12-2014), FRS_Ken (09-15-2014), fstlane (06-26-2015), MyRx (09-15-2014), RehabJeff86 (09-12-2014), SpeedyJay (09-15-2014), Tristor (06-01-2019), Vracer111 (09-12-2014), whataboutbob (09-12-2014) |
|
09-09-2014, 01:49 PM
|
#2 |
|
Senior Member
Join Date: Jan 2013
Drives: 10 Series #845
Location: Stockton
Posts: 218
Thanks: 21
Thanked 44 Times in 38 Posts
Mentioned: 5 Post(s)
Tagged: 0 Thread(s)
|
Now that's cool and creative!
 
__________________
What Vtec?
| My build thread : http://www.ft86club.com/forums/showthread.php?t=48493 | |
|
|
|
|
09-09-2014, 02:11 PM
|
#3 |
|
Senior Member
Join Date: Apr 2014
Drives: 2014 FR-S 6MT Whiteout
Location: Southern Maryland
Posts: 950
Thanks: 234
Thanked 374 Times in 260 Posts
Mentioned: 9 Post(s)
Tagged: 0 Thread(s)
|
Several of us have done something similar though not to the same level with brackets and things as you have done
http://www.ft86club.com/forums/showthread.php?t=66581 I like this though. You could go get a big piece of sheet metal, pop a few holes in it and the stock heat shield, then attach another piece of cardboard to it to cut a form to fill in all the open area - then use that as a pattern to cut the metal. Just a few more $$ than what you've already spent and it would really fill in the openings in the bottom. Might have something to go do this weekend now. Also be careful at Home Depot, they just got hacked like Target did...
__________________
|
|
|
|
|
09-09-2014, 02:35 PM
|
#4 | |
|
Senior Member
Join Date: Aug 2014
Drives: '14 981CS, '99 NB1
Location: Oregon
Posts: 1,274
Thanks: 1,234
Thanked 1,201 Times in 631 Posts
Mentioned: 114 Post(s)
Tagged: 2 Thread(s)
|
Quote:

|
|
|
|
|
|
09-12-2014, 01:14 PM
|
#5 |
|
Senior Member

Join Date: Mar 2013
Drives: 2013 WhiteOut FR-S
Location: Dublin,CA
Posts: 969
Thanks: 899
Thanked 492 Times in 306 Posts
Mentioned: 67 Post(s)
Tagged: 2 Thread(s)
|
Very nice!!! Thx for the write up!!
Sent from my iPhone using TapatalkfQ
__________________
 2013 Scion FR-S whiteout 2012 Porsche Panamera S carbon grey 2008 Range Rover Sport SS black - sold 2004 BMW M3 alpine wies - sold |
|
|
|
|
09-12-2014, 01:48 PM
|
#6 |
|
Member
Join Date: Jul 2014
Drives: 13 DGM BRZ 04 WRB STi
Location: Arizona
Posts: 10
Thanks: 3
Thanked 4 Times in 4 Posts
Mentioned: 0 Post(s)
Tagged: 0 Thread(s)
|
Looks good!
|
|
|
|
|
09-12-2014, 07:51 PM
|
#7 |
|
Senior Member

Join Date: Mar 2012
Drives: '13 Nissan Frontier (4.0L 6spd 2WD)
Location: In the desert...
Posts: 1,645
Thanks: 179
Thanked 1,245 Times in 669 Posts
Mentioned: 21 Post(s)
Tagged: 1 Thread(s)
|
Ingenious! Not sure if it's sturdy enough for track use (the thin, flexible heatshield material and minimal spot welds at the heat shield mounting locations), but I really like the idea! At a minimum I'd beef up the mounting locations with some type of bonding epoxy to act like a weld joint. Might not be ideal for laminar flow, but better than not having one and catching air with the rear bumper "diffusor" section! Wonder how it would work and look with the "diffusor" part of the bumper cut out - I'd be curious to try it but unfortunately my SRT exhaust is in the way...
__________________
Had a '13 FR-S Asphalt 6spd manual (bought new 5/25/12, sold 6/10/20) but needed to let her go... she will be missed.
|
|
|
|
|
09-13-2014, 05:16 PM
|
#8 | |
|
Senior Member
Join Date: Apr 2014
Drives: 2014 FR-S 6MT Whiteout
Location: Southern Maryland
Posts: 950
Thanks: 234
Thanked 374 Times in 260 Posts
Mentioned: 9 Post(s)
Tagged: 0 Thread(s)
|
Quote:
http://www.ft86club.com/forums/showthread.php?t=42284
__________________
|
|
|
|
|
| The Following User Says Thank You to phobos512 For This Useful Post: | Tristor (06-01-2019) |
|
09-14-2014, 06:26 AM
|
#9 |
|
Senior Member
Join Date: May 2014
Drives: Scion FRS
Location: Mass
Posts: 107
Thanks: 9
Thanked 21 Times in 13 Posts
Mentioned: 2 Post(s)
Tagged: 0 Thread(s)
|
Brilliant!
A little off topic but could I ask you to post a sound clip of the muffled track pipe? Is that the 4" or 5"? |
|
|
|
|
09-14-2014, 01:13 PM
|
#10 |
|
Senior Member
Join Date: Aug 2014
Drives: '14 981CS, '99 NB1
Location: Oregon
Posts: 1,274
Thanks: 1,234
Thanked 1,201 Times in 631 Posts
Mentioned: 114 Post(s)
Tagged: 2 Thread(s)
|
It is the 5". I bought it brand new last weekend. In a former life, I was a sound engineer, so I'm generally disappointed in sound clips for exhaust. Was thinking about trying to make some sound bytes with some of my pro audio equipment...
|
|
|
|
|
09-14-2014, 07:55 PM
|
#11 | |
|
Senior Member
Join Date: Mar 2012
Drives: '13 Nissan Frontier (4.0L 6spd 2WD)
Location: In the desert...
Posts: 1,645
Thanks: 179
Thanked 1,245 Times in 669 Posts
Mentioned: 21 Post(s)
Tagged: 1 Thread(s)
|
Quote:
__________________
Had a '13 FR-S Asphalt 6spd manual (bought new 5/25/12, sold 6/10/20) but needed to let her go... she will be missed.
|
|
|
|
|
|
09-15-2014, 12:20 PM
|
#12 | |
|
Senior Member
Join Date: May 2014
Drives: Scion FRS
Location: Mass
Posts: 107
Thanks: 9
Thanked 21 Times in 13 Posts
Mentioned: 2 Post(s)
Tagged: 0 Thread(s)
|
Quote:
So what you're saying is that I asked the right guy 
|
|
|
|
|
|
09-15-2014, 01:04 PM
|
#13 | |
|
FR Noob

Join Date: Jun 2013
Drives: FR-S
Location: DFW
Posts: 792
Thanks: 218
Thanked 614 Times in 318 Posts
Mentioned: 2 Post(s)
Tagged: 3 Thread(s)
|
Quote:
__________________
"I'm having too much fun to care about horsepower" - Unknown
6MT FR-S Whiteout:OFT- OTS V2 Stage 2 (93oct & E85), Tomei UEL, Invidia OP, JDL UltraQuiet FP, Ark Grip catback, GS hood struts, Perrin Inlet & K&N drop-in Last edited by fang_gt86; 09-15-2014 at 02:20 PM. |
|
|
|
|
|
09-15-2014, 01:29 PM
|
#14 | |||
|
Senior Member
Join Date: Aug 2014
Drives: '14 981CS, '99 NB1
Location: Oregon
Posts: 1,274
Thanks: 1,234
Thanked 1,201 Times in 631 Posts
Mentioned: 114 Post(s)
Tagged: 2 Thread(s)
|
Quote:
Quote:
Quote:
|
|||
|
|
|
|
|
|
|
|
|
|
 Similar Threads
|
||||
| Thread | Thread Starter | Forum | Replies | Last Post |
| SINGLE EXIT EXHAUST | karma003 | Engine, Exhaust, Transmission | 163 | 06-28-2018 02:48 PM |
| Single-Exit Exhaust Diffuser/Hole Problem... Solution! | Anthony | Cosmetic Modification (Interior/Exterior/Lighting) | 75 | 10-13-2016 07:40 PM |
| Another project teaser. Exhaust hole covers for single exit exhaust! | Wonderbar | Cosmetic Modification (Interior/Exterior/Lighting) | 57 | 05-30-2014 01:46 AM |
| Single exit rear diffuser/valance? | gabeg86 | Cosmetic Modification (Interior/Exterior/Lighting) | 9 | 02-20-2014 05:14 PM |
| Single exit diffuser poll | adprokid | Cosmetic Modification (Interior/Exterior/Lighting) | 19 | 11-08-2012 10:03 PM |


 FR-S
FR-S
