


 12-30-2013, 03:01 AM
|
#435 | |
|
Senior Member

Join Date: Jan 2013
Drives: frs
Location: garden grove
Posts: 241
Thanks: 249
Thanked 81 Times in 45 Posts
Mentioned: 7 Post(s)
Tagged: 0 Thread(s)
|
Quote:
|
|

|

|
|
12-30-2013, 10:01 AM
|
#436 |
|
Member
Join Date: Oct 2013
Drives: 2013 Subaru BRZ SSM
Location: Tampa, FL
Posts: 85
Thanks: 18
Thanked 47 Times in 31 Posts
Mentioned: 0 Post(s)
Tagged: 0 Thread(s)
|
To cover the signals was simple,
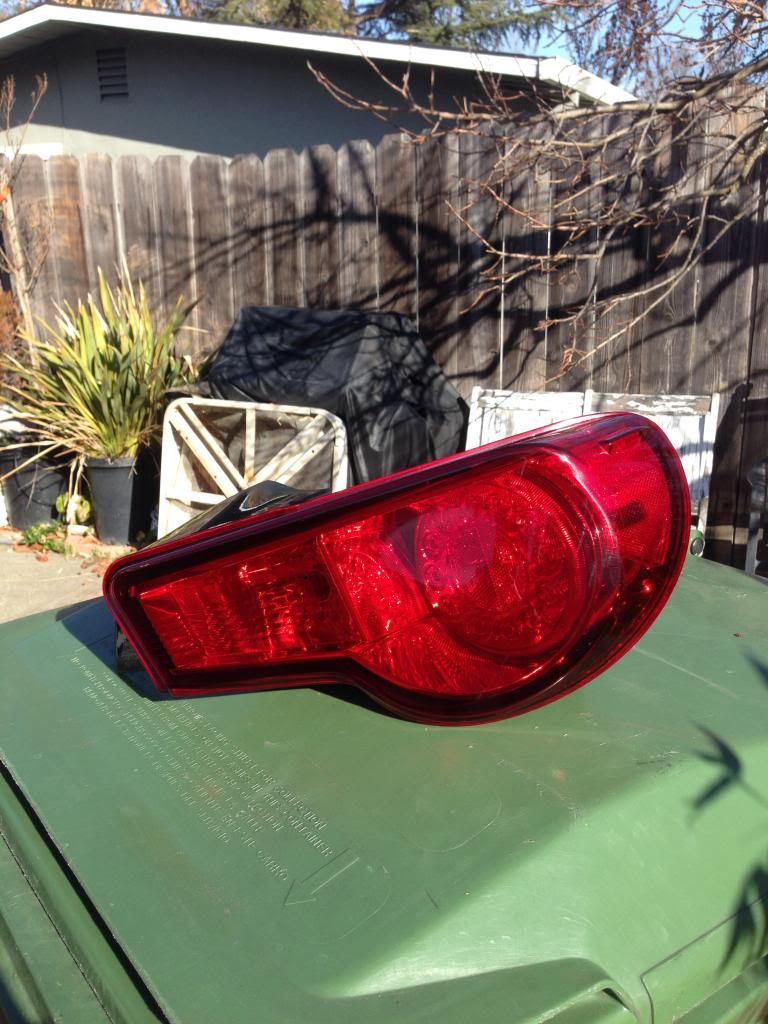
1) First tape the the square with one color tape (I used green painters tape) 2) cover the inside with maybe 2 layers of blue tape 3) lift the green tape which should also lift the blue since it's on top 4) flip and cut the green out (this should leave the signal shape left) 5) stick it back on the tail light and repeat process for the other side I used 2000 grit to smooth everything out, just don't over do it, you can't feel it on mines, just take your time when doing ur tails, buy all the stuff the day before and wake up early the next day if you need your car ready for next day. |
|
|
|
| The Following User Says Thank You to Ric0 For This Useful Post: | vincent201089 (12-31-2013) |
|
12-30-2013, 12:41 PM
|
#437 | |
|
Senior Member

Join Date: Sep 2013
Drives: 2013 Scion FRS Raven Black M/T
Location: Winston Salem, NC
Posts: 156
Thanks: 43
Thanked 43 Times in 29 Posts
Mentioned: 2 Post(s)
Tagged: 0 Thread(s)
|
Quote:
 Sent from my SCH-I545 using Tapatalk |
|
|
|
|
| The Following User Says Thank You to Danny86 For This Useful Post: | vincent201089 (12-31-2013) |
|
12-30-2013, 08:03 PM
|
#438 | |
|
Member
Join Date: Oct 2013
Drives: 2013 Subaru BRZ SSM
Location: Tampa, FL
Posts: 85
Thanks: 18
Thanked 47 Times in 31 Posts
Mentioned: 0 Post(s)
Tagged: 0 Thread(s)
|
Quote:
|
|
|
|
|
|
12-31-2013, 12:57 PM
|
#439 | |
|
Senior Member
Join Date: Sep 2013
Drives: 2013 Scion FRS Raven Black M/T
Location: Winston Salem, NC
Posts: 156
Thanks: 43
Thanked 43 Times in 29 Posts
Mentioned: 2 Post(s)
Tagged: 0 Thread(s)
|
Quote:
 Sent from my SCH-I545 using Tapatalk |
|
|
|
|
|
01-02-2014, 03:36 PM
|
#440 |
|
Senior Member

Join Date: Jun 2012
Drives: 13 Brz Jrsc
Location: Bay Area, Ca
Posts: 255
Thanks: 78
Thanked 76 Times in 48 Posts
Mentioned: 6 Post(s)
Tagged: 0 Thread(s)
|
what kid of polishing compound / wax is everyone using? i got it pretty shinny but there are some fine scratches i cant get out.
|
|
|
|
|
01-02-2014, 05:56 PM
|
#441 |
|
Senior Member
Join Date: Oct 2013
Drives: Asphalt Monogram Fr-s
Location: Chantilly VA
Posts: 328
Thanks: 48
Thanked 138 Times in 72 Posts
Mentioned: 5 Post(s)
Tagged: 2 Thread(s)
|
So i got a question, does anyone know if you try to do like frs8six's, could you do the vht niteshade black with a really light coat and then cover the signal with tape and do 3 medium coats of red nite shade(or 4) will work out? Then sand it and then do clear coat?
edit: oh i meant to put that you take off the tape before clear coat
__________________
|
|
|
|
|
01-03-2014, 02:09 AM
|
#442 |
|
Serial Cone Killer

Join Date: Jul 2013
Drives: '14 BRZ - WRB Premium 6MT
Location: Austin, TX
Posts: 1,326
Thanks: 1,081
Thanked 656 Times in 441 Posts
Mentioned: 19 Post(s)
Tagged: 0 Thread(s)
|
Some vht diy videos I have seen on youtube did some wetsanding prior to applying coats of the nightshades. Based off your results here, it seems that isn't necessary? I would prefer to not do that incase I eff up and want to reverse it. Ultimately, I want to do this right. If I permanently eff up, I guess I am going to buy those valenti tails a hell of a lot earlier than I originally planned LOL. Great write up, definitely impressed with all of your write ups; ESPECIALLY that wheel directory which is amazing, especially when trying to figure out offset.
__________________
|
|
|
|
|
01-03-2014, 09:56 AM
|
#443 |
|
Member
Join Date: Oct 2013
Drives: 2013 Subaru BRZ SSM
Location: Tampa, FL
Posts: 85
Thanks: 18
Thanked 47 Times in 31 Posts
Mentioned: 0 Post(s)
Tagged: 0 Thread(s)
|
Tape off the blinker, paint tails, once dried removed tape from blinker and tape off te rest of the tails, smoke blinker, let it dry, remove tape and sand everything lightly with 2000grit sand paper then clear everything, once done, sand again lightly, then rubbing compound, polishing compound, and wax... Should be just as clear and glossy as a pro shop
|
|
|
|
| The Following 2 Users Say Thank You to Ric0 For This Useful Post: | illicitstylz (06-11-2014), vincent201089 (01-03-2014) |
|
01-03-2014, 10:12 AM
|
#444 | |
|
Senior Member

Join Date: Apr 2013
Drives: 2013 SWP BRZ
Location: Forsyth, GA
Posts: 1,008
Thanks: 224
Thanked 681 Times in 302 Posts
Mentioned: 26 Post(s)
Tagged: 0 Thread(s)
|
Quote:
Also, if you plan on doing the clearcoat, wait about 7 days or more before wetsanding.
__________________
-----------------------------------
2013 SWP BRZ Build Thread: http://www.ft86club.com/forums/showthread.php?t=38781 |
|
|
|
|
|
01-03-2014, 11:01 PM
|
#445 | |
|
Senior Member
Join Date: Sep 2013
Drives: 2013 FRS
Location: Bay Area
Posts: 105
Thanks: 35
Thanked 28 Times in 17 Posts
Mentioned: 2 Post(s)
Tagged: 0 Thread(s)
|
Quote:
|
|
|
|
|
|
01-03-2014, 11:12 PM
|
#446 |
|
Senior Member
Join Date: Oct 2013
Drives: Asphalt Monogram Fr-s
Location: Chantilly VA
Posts: 328
Thanks: 48
Thanked 138 Times in 72 Posts
Mentioned: 5 Post(s)
Tagged: 2 Thread(s)
|
So far i've done pretty good with this.
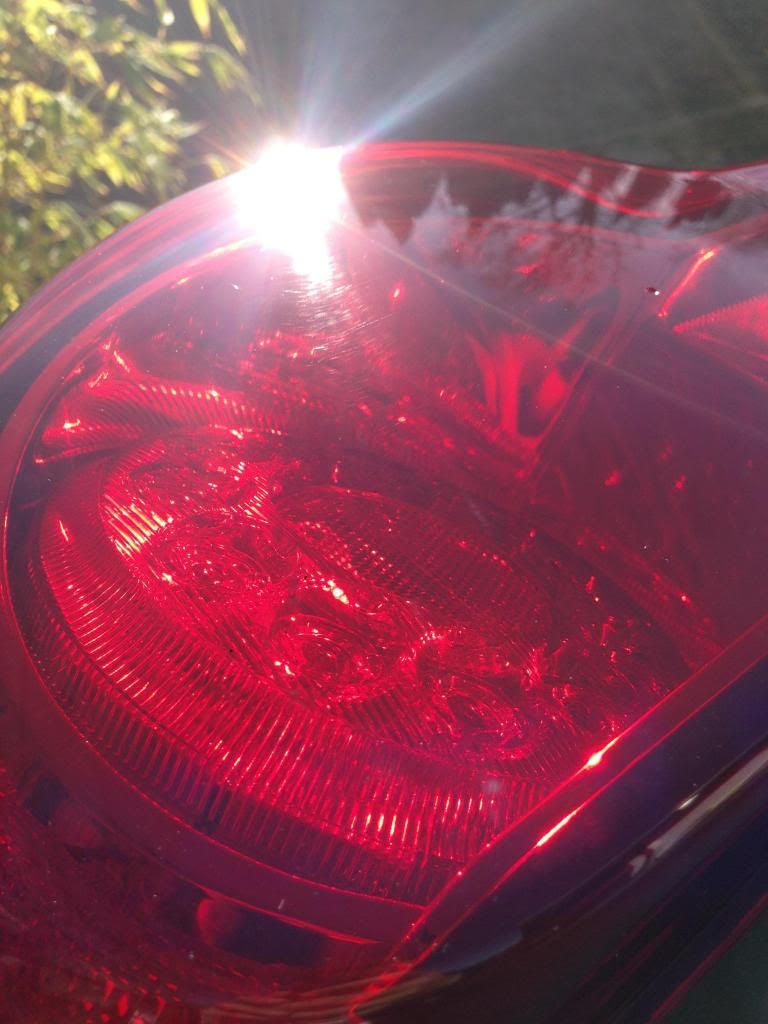
Step 1: i did was to tape it  Step 2: I used mineral spirits to clean it off from any bacteria/dirt/anything bad off of the tail light.  Step 3: I put it out on card board and started using VHT nite shade-red This was right after a coat or two.  Step 4: I did 4 coats of the red and waited around 15-25 minutes in between each(pretty sure i should've waited longer because it's pretty cold over here) but this was right after that  I'm getting 2000 grit paper tomorrow and i'll finish it up by smoothening it out (little fisheyes and etc.) and then i'll do the clear coat.
__________________
|
|
|
|
| The Following 2 Users Say Thank You to MrMarinakos For This Useful Post: | hmong337 (01-04-2014), illicitstylz (06-11-2014) |
|
01-03-2014, 11:19 PM
|
#447 | |
|
Senior Member
Join Date: Apr 2013
Drives: 2013 SWP BRZ
Location: Forsyth, GA
Posts: 1,008
Thanks: 224
Thanked 681 Times in 302 Posts
Mentioned: 26 Post(s)
Tagged: 0 Thread(s)
|
Quote:
When I waited 7 days, the clearcoat was still a little soft, and started with a heavier polish to remove the wetsand marks, then had to follow up with a very good polish that removes light haze (3M Ultrafina) on a soft finishing buffer pad at a low RPM on the rotary, and that did the trick.
__________________
-----------------------------------
2013 SWP BRZ Build Thread: http://www.ft86club.com/forums/showthread.php?t=38781 |
|
|
|
|
|
|
|
|
|
|
 Similar Threads
|
||||
| Thread | Thread Starter | Forum | Replies | Last Post |
| Are you going to smoke out your tail lights? | Liquidsnake | Cosmetic Modification (Interior/Exterior/Lighting) | 8 | 06-06-2012 10:02 AM |
| HKS head and tail lamps | DIG1992 | Cosmetic Modification (Interior/Exterior/Lighting) | 5 | 05-19-2012 02:04 PM |
| Tail of the Dragon | Tomcat9700 | Scion FR-S / Toyota 86 GT86 General Forum | 32 | 02-10-2012 03:30 PM |
| Optional coloured tail lights? | m_life | Scion FR-S / Toyota 86 GT86 General Forum | 9 | 11-30-2011 07:20 PM |


 C'thulhu II