


|
||||||
| DIY (Do-It-Yourself) Guides For all DIYs. |
 |
|
|
Thread Tools | Search this Thread |
 04-03-2013, 10:50 AM
|
#1 |
|
Senior Member

Join Date: Jul 2012
Drives: 2013 Whiteout Scion FRS
Location: Orlando FL
Posts: 1,275
Thanks: 101
Thanked 525 Times in 307 Posts
Mentioned: 10 Post(s)
|
APR Rear Carbon Fiber Spats DIY
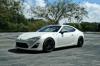
n my mad rush to get as much as I can done in time for the UTI Torque meet I have been working on the car at a frantic pace. Last night I installed my APR Rear Spats. They came with no instructions but I figured, hey how hard could this be?
 Well they go under the rear bumper. Under there the bumper is held to the inner splash guard via two pop tabs. I figured you pop these out and use them to attach the APR pieces. I figured wrong. The pop tabs, which are a huge pain to get out, are too big to fit in the holes in the CF APR piece. In the package with the CF pieces there was a bag of blots, washers and lock nuts. The problem is there is no physical way to get the bolt through the bumper splash guard and cf piece and have access to it to tighten it.   After scratching my head for a while and contemplating developing a phase shift mechanism so I could put a wrench trough the splash guard I gave up and called APR. APR said that they recommend putting the car up on a lift, taking the rear wheels off, removing the top of the fender liner and attaching everything through the top. They said that this is the most stable way to attach them and they dont trust the pop tabs.  That just seemed like overkill to me. I made a quick stop at harbor freight to pick up a unibit and then stopped by autozone to pick up some 3M automotive double sided tape. When I got home I threw some painters tape over the CF and drilled the holes out. Then I crawled under the car, pulled the pop tabs out and cleaned the bumper with some denatured alcohol.  I cleaned the CF with the same denatured alcohol and applied the 3m tape. I then climbed back under the car, lined up the holes in the CF, bumper and splash. I popped the tabs back in and pushed hard on the piece to firmly attach the tape.  They seem very solid and those pop tabs are super strong in there. I see no issue with attaching it this way. |

|

|
|
04-05-2013, 07:15 PM
|
#2 |
|
VTEC just kicked in, yo!

Join Date: Jan 2013
Drives: World Rally Blue BRZ - 6MT
Location: SoCal
Posts: 253
Thanks: 83
Thanked 124 Times in 58 Posts
Mentioned: 3 Post(s)
|
Those are nice!! I might also get these eventually
 Where did you get yours from? |
|
|
|
|
04-05-2013, 07:25 PM
|
#3 | |
|
DADA

Join Date: Jun 2012
Drives: 2013
Location: Kanada
Posts: 1,500
Thanks: 47
Thanked 388 Times in 249 Posts
Mentioned: 10 Post(s)
|
Quote:
|
|
|
|
|
|
07-07-2013, 08:06 AM
|
#4 |
|
Senior Member
Join Date: Jul 2013
Drives: 2013 Fr-S
Location: Orlando FL
Posts: 143
Thanks: 14
Thanked 26 Times in 22 Posts
Mentioned: 1 Post(s)
|
Nice, clean, and simple exterior mod. I likes!
|
|
|
|
|
02-07-2018, 07:18 PM
|
#5 |
|
Senior Member
Join Date: Apr 2017
Drives: 2017 BRZ
Location: CA
Posts: 662
Thanks: 200
Thanked 392 Times in 236 Posts
Mentioned: 3 Post(s)
|
I was gonna ask how this install has held up but it looks like OP hasn't been online in a few months. Anyone have a good way to install the APR spats? I tried popping out the fender liner so I could get in there from the front but still couldn't get enough access to get to the front bolt hole to get the nut started. Might have been able to get a socket with an extension on the nut once it was started but couldn't get that far along. Not sure if I would have been able to reach to get the nut in there for the middle bolt, though the rear seemed to be accessible enough.
Also, on a side note, that little pocket the spats bolt onto seems to collect quite a bit of stuff inside it. The one on my right side was completely full, though the one on the left was empty. Must be the tree I have to park under at home. This entire pile was in the right side (painters tape for scale). |
|
|
|
|
|
|
|
|
|
|
 Similar Threads
|
||||
| Thread | Thread Starter | Forum | Replies | Last Post |
| Version Select - NEW Carbon Fiber Parts - Rear Diffuser Hotness and more! | FT-86 SpeedFactory | Cosmetic Modification (Interior/Exterior/Lighting) | 75 | 01-27-2016 12:06 PM |
| Carbon Fiber Mirrors - Shark fin Antenna - Carbon Fiber Accessories-PRICES LISTED!!! | F-T | Exterior Parts - The Rest | 285 | 08-24-2015 04:42 PM |
| Carbon Fiber dash like a BMW? (pictures of M3 carbon fiber interior included) | master345 | Cosmetic Modification (Interior/Exterior/Lighting) | 56 | 05-04-2014 11:10 AM |
| Carbon Fiber Rear Diffuser | Tomzilla | Cosmetic Modification (Interior/Exterior/Lighting) | 5 | 11-17-2012 02:14 PM |
| FT86 Carbon Fiber Rear Valance | ACSAUTOMOTIVE | Exterior Parts - The Rest | 57 | 10-07-2012 08:23 AM |


 Project86

