


|
||||||
| DIY (Do-It-Yourself) Guides For all DIYs. |
 |
|
|
Thread Tools | Search this Thread |
 02-04-2013, 06:30 AM
|
#1 |
|
Member

Join Date: Apr 2012
Drives: Toyota 86 GTS
Location: Sydney
Posts: 66
Thanks: 12
Thanked 31 Times in 21 Posts
Mentioned: 0 Post(s)
Tagged: 0 Thread(s)
|
Modellista Antenna Instructions
Does anyone have the instructions for the Modellista antenna in English?
I have the Japanese instructions and it would take some time for me to translate it.
__________________
 Car journal: http://www.ft86club.com/forums/showthread.php?t=48756 Photos on my Dropbox: https://www.dropbox.com/sh/gp2l71j5erii8zh/UWZSwaIWZZ |

|

|
|
02-07-2013, 03:54 AM
|
#2 |
|
Member
Join Date: Apr 2012
Drives: Toyota 86 GTS
Location: Sydney
Posts: 66
Thanks: 12
Thanked 31 Times in 21 Posts
Mentioned: 0 Post(s)
Tagged: 0 Thread(s)
|
Modellista Antenna Instruction Translation
Disclaimer: I am not responsible for any damage you may do to your vehicle, this is just a rough translation from the instruction manual provided with the modellista antenna. Page 3-2:
Page 3-3:

__________________
Car journal: http://www.ft86club.com/forums/showthread.php?t=48756 Photos on my Dropbox: https://www.dropbox.com/sh/gp2l71j5erii8zh/UWZSwaIWZZ |
|
|
|
| The Following 2 Users Say Thank You to Pvt AJ For This Useful Post: | Ammunition (02-21-2014), Bonburner (03-16-2013) |
|
03-02-2013, 12:11 AM
|
#3 | |
|
Member
Join Date: Jan 2013
Drives: Scion FR-S Firestorm
Location: Canada
Posts: 55
Thanks: 7
Thanked 13 Times in 9 Posts
Mentioned: 0 Post(s)
Tagged: 0 Thread(s)
|
Quote:
|
|
|
|
|
|
03-02-2013, 02:51 AM
|
#4 | |
|
Member
Join Date: Apr 2012
Drives: Toyota 86 GTS
Location: Sydney
Posts: 66
Thanks: 12
Thanked 31 Times in 21 Posts
Mentioned: 0 Post(s)
Tagged: 0 Thread(s)
|
Quote:
__________________
Car journal: http://www.ft86club.com/forums/showthread.php?t=48756 Photos on my Dropbox: https://www.dropbox.com/sh/gp2l71j5erii8zh/UWZSwaIWZZ |
|
|
|
|
|
03-02-2013, 04:10 AM
|
#5 | |
|
I Love custom Turbo kits

Join Date: Mar 2012
Drives: Limited BRZ
Location: Miami
Posts: 10,770
Thanks: 20,004
Thanked 8,346 Times in 4,361 Posts
Mentioned: 441 Post(s)
Tagged: 12 Thread(s)
|
Quote:
|
|
|
|
|
|
03-02-2013, 05:12 AM
|
#6 | |
|
Member
Join Date: Apr 2012
Drives: Toyota 86 GTS
Location: Sydney
Posts: 66
Thanks: 12
Thanked 31 Times in 21 Posts
Mentioned: 0 Post(s)
Tagged: 0 Thread(s)
|
Quote:
__________________
Car journal: http://www.ft86club.com/forums/showthread.php?t=48756 Photos on my Dropbox: https://www.dropbox.com/sh/gp2l71j5erii8zh/UWZSwaIWZZ |
|
|
|
|
| The Following 2 Users Say Thank You to Pvt AJ For This Useful Post: | spgrizz22 (03-02-2013), Sportsguy83 (03-02-2013) |
|
03-02-2013, 09:51 AM
|
#7 | |
|
Senior Member
Join Date: Nov 2012
Drives: Scion FR-S
Location: Olive Branch
Posts: 257
Thanks: 153
Thanked 46 Times in 38 Posts
Mentioned: 8 Post(s)
Tagged: 0 Thread(s)
|
Quote:
|
|
|
|
|
|
03-02-2013, 06:54 PM
|
#8 |
|
Member
Join Date: Apr 2012
Drives: Toyota 86 GTS
Location: Sydney
Posts: 66
Thanks: 12
Thanked 31 Times in 21 Posts
Mentioned: 0 Post(s)
Tagged: 0 Thread(s)
|
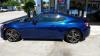
Here are the pictures:
__________________
Car journal: http://www.ft86club.com/forums/showthread.php?t=48756 Photos on my Dropbox: https://www.dropbox.com/sh/gp2l71j5erii8zh/UWZSwaIWZZ |
|
|
|
| The Following 4 Users Say Thank You to Pvt AJ For This Useful Post: | Bonburner (03-16-2013), FT_86_SM_GP (05-23-2015), IntotheOcean (06-06-2013), Sportsguy83 (03-03-2013) |
|
03-02-2013, 07:06 PM
|
#9 |
|
Member
Join Date: Apr 2012
Drives: Toyota 86 GTS
Location: Sydney
Posts: 66
Thanks: 12
Thanked 31 Times in 21 Posts
Mentioned: 0 Post(s)
Tagged: 0 Thread(s)
|
next lot:
__________________
Car journal: http://www.ft86club.com/forums/showthread.php?t=48756 Photos on my Dropbox: https://www.dropbox.com/sh/gp2l71j5erii8zh/UWZSwaIWZZ |
|
|
|
| The Following 3 Users Say Thank You to Pvt AJ For This Useful Post: |
|
03-02-2013, 07:29 PM
|
#10 | |
|
Senior Member
Join Date: Nov 2012
Drives: Scion FR-S
Location: Olive Branch
Posts: 257
Thanks: 153
Thanked 46 Times in 38 Posts
Mentioned: 8 Post(s)
Tagged: 0 Thread(s)
|
Quote:
|
|
|
|
|
|
03-14-2013, 06:03 PM
|
#12 | |
|
Senior Member
Join Date: Sep 2012
Drives: 2013 BRZ SWP 6AT Ltd
Location: Alexandria, VA.
Posts: 1,607
Thanks: 859
Thanked 776 Times in 485 Posts
Mentioned: 37 Post(s)
Tagged: 1 Thread(s)
|
Quote:
The US antenna base is to large for the Tom's, Modellista or "normal" sized Beat Sonic piggy back antennas to fit. VG and Beat Sonic make one that is large to accept the US BRZ antenna. |
|
|
|
|
|
03-14-2013, 06:39 PM
|
#13 | |
|
Member

Join Date: Oct 2012
Drives: BRZ - Dark Grey
Location: Orlando, FL
Posts: 71
Thanks: 7
Thanked 31 Times in 20 Posts
Mentioned: 5 Post(s)
Tagged: 0 Thread(s)
|
Quote:
|
|
|
|
|
|
03-14-2013, 06:52 PM
|
#14 | |
|
Senior Member
Join Date: Sep 2012
Drives: 2013 BRZ SWP 6AT Ltd
Location: Alexandria, VA.
Posts: 1,607
Thanks: 859
Thanked 776 Times in 485 Posts
Mentioned: 37 Post(s)
Tagged: 1 Thread(s)
|
Quote:
|
|
|
|
|
|
|
|
|
| Tags |
| antenna, diy, fin, instructions, modellista |
|
|
 Similar Threads
|
||||
| Thread | Thread Starter | Forum | Replies | Last Post |
| TRD bumper garnish fitting instructions in English | APS86 | Cosmetic Modification (Interior/Exterior/Lighting) | 9 | 11-16-2018 12:29 PM |
| Wheel Directory: OEM Toyota 86 (JDM Modellista Wing Dancer II) 18x7.5 +46 | quik1987 | Wheels | Tires | Spacers | Hub -- Sponsored by The Tire Rack | 5 | 09-23-2013 08:22 PM |
| WTT: Beat-Sonic Antenna for Modelista Antenna | joergasm | Canada Classifieds | 4 | 12-10-2012 10:13 AM |
| Instructions for dash disassembly | whataboutbob | Cosmetic Modification (Interior/Exterior/Lighting) | 3 | 07-01-2012 08:03 PM |
| Modellista for FR-S | vividracing | Exterior Parts - The Rest | 15 | 06-27-2012 09:53 PM |


 Toyota 86 GTS
 The One