


|
||||||
| Cosmetic Modification (Interior/Exterior/Lighting) Discussions about cosmetic mods. |
 |
|
|
Thread Tools | Search this Thread |
 01-23-2013, 01:54 PM
|
#1 |
|
Negative Mass

Join Date: May 2012
Drives: Orange Metallic AVO Turbo GT86 6MT
Location: Arlington VA
Posts: 702
Thanks: 272
Thanked 346 Times in 201 Posts
Mentioned: 56 Post(s)
|
OEM BRZ Limited Spoiler Template:
Hey guys,
So I managed to acquire the JDM GT86 spoiler (same as the BRZ Limited spoiler) for my H8R orange FRS. Because of a hiccough with the vendor it arrived without hardware to install it or a template with which to determine where to drill holes in the trunk. I'm not making this post to complain about this fact, but rather to see if anyone who has a BRZ Limited could give me the following info: What hardware is required in detail (screws, bolts, thread sizes, head sizes) other than the 3 push pins which I already have? What are the exact positions of the holes in as much detail as you can provide? I know it's asking a lot for someone to just randomly do this, but if someone can create some kind of template for me to use then I'd be willing to pay for it. Subaru parts dealers claim they can't sell me the installation kit separate from their spoiler, so I can't really go that route. Any help is appreciated! Matt |

|

|
|
01-24-2013, 01:32 PM
|
#2 |
|
Negative Mass
Join Date: May 2012
Drives: Orange Metallic AVO Turbo GT86 6MT
Location: Arlington VA
Posts: 702
Thanks: 272
Thanked 346 Times in 201 Posts
Mentioned: 56 Post(s)
|
I didn't really expect to hear much from anyone as I'm stuck in kind of an impossible situation. I'm thinking I'll probably just tape the spoiler on with some VHB. It looks like it's really flush with the trunk if I remove the center push pegs, so it should have lots of contact area for the tape.
I'll post a DIY if I end up doing the taping, just in case anyone else gets stuck in the same situation I did. Can't wait to have the thing attached regardless of how it gets done! |
|
|
|
|
01-24-2013, 01:41 PM
|
#3 | |
|
Site Moderator

Join Date: Oct 2009
Drives: ichi 86 Project
Location: Middle of No where
Posts: 21,058
Thanks: 7,738
Thanked 19,285 Times in 8,392 Posts
Mentioned: 697 Post(s)
|
Quote:
Good luck & we'll be waiting for your successful DIY thread 
__________________
 |
|
|
|
|
|
01-24-2013, 05:22 PM
|
#4 | |
|
Negative Mass
Join Date: May 2012
Drives: Orange Metallic AVO Turbo GT86 6MT
Location: Arlington VA
Posts: 702
Thanks: 272
Thanked 346 Times in 201 Posts
Mentioned: 56 Post(s)
|
Quote:
The only thing that would make me hesitate a bit is that my car enjoys getting regular car washes. I go to a Flagship at least once a week because I have their monthly unlimited washes deal, but they have spinny brush things. With the spoiler bolted on I'd be comfortable with it, but taped on I'm not so sure. Anyone had a nightmarish experience with this? |
|
|
|
|
|
01-24-2013, 07:26 PM
|
#5 |
|
Senior Member

Join Date: Jul 2012
Drives: 2013 BRZ limited SWP
Location: USA
Posts: 338
Thanks: 94
Thanked 166 Times in 99 Posts
Mentioned: 12 Post(s)
|
Hey I am going to have my spoiler off the car to wrap my trunk this weekend so I can help you out. I will take some pics of the holes and hardware to get you as much info as I can.
Sent from my DROID RAZR using Tapatalk 2 |
|
|
|
| The Following 2 Users Say Thank You to Area86 For This Useful Post: | nataku (01-25-2013), Sportsguy83 (01-24-2013) |
|
01-25-2013, 09:13 AM
|
#6 | |
|
Negative Mass
Join Date: May 2012
Drives: Orange Metallic AVO Turbo GT86 6MT
Location: Arlington VA
Posts: 702
Thanks: 272
Thanked 346 Times in 201 Posts
Mentioned: 56 Post(s)
|
Quote:
|
|
|
|
|
|
01-26-2013, 05:13 PM
|
#7 |
|
Senior Member
Join Date: Jul 2012
Drives: 2013 BRZ limited SWP
Location: USA
Posts: 338
Thanks: 94
Thanked 166 Times in 99 Posts
Mentioned: 12 Post(s)
|
Ok here are the pics and measurements that i took when i had my spoiler off today. Im not that great at DIY write ups but I hope this helps you out.
First pic just shows the 2 rubber plugs on each side that cover the screws and the next two pics show it with the plugs removed. 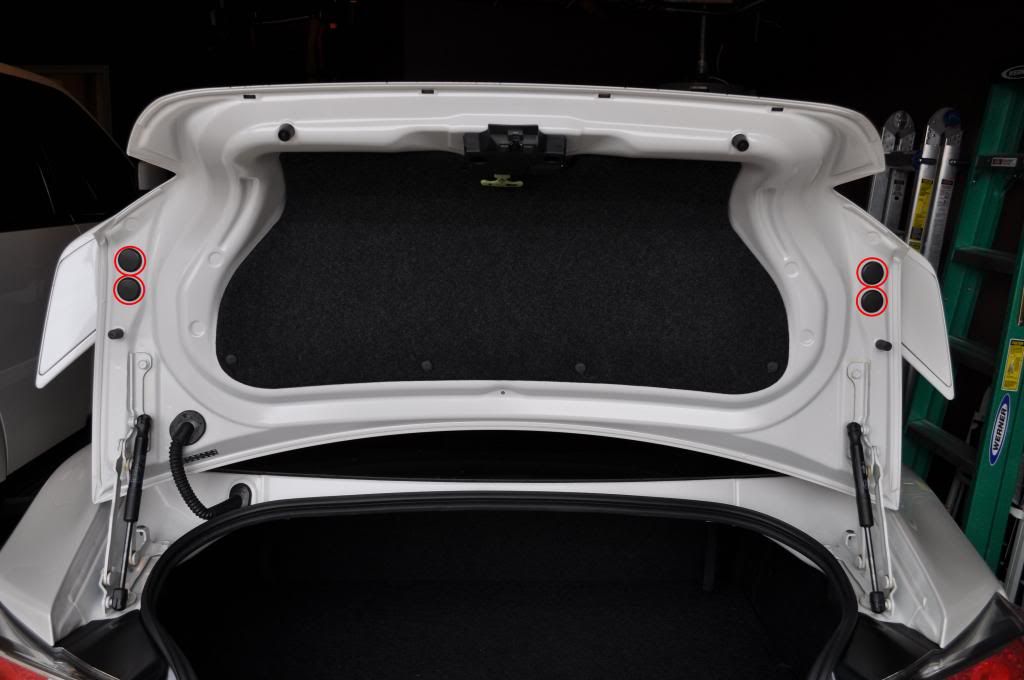  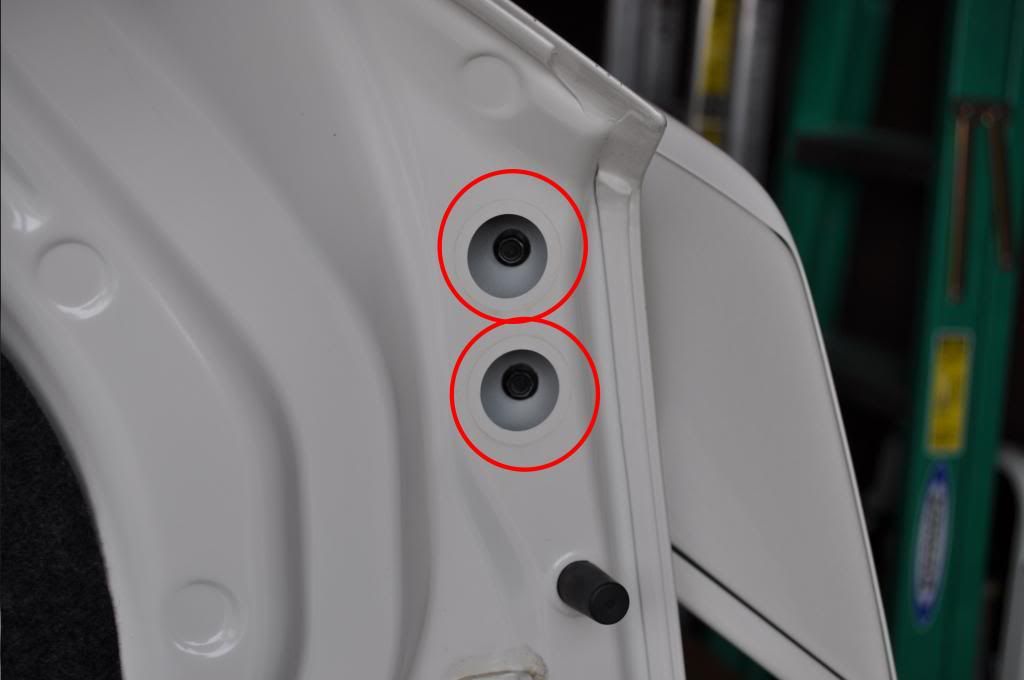 Here is the underside of the spoiler with the push pins. You mentioned you only have three which im assuming are the three circled in blue. There are two more that are different from the other three which I circled in green. 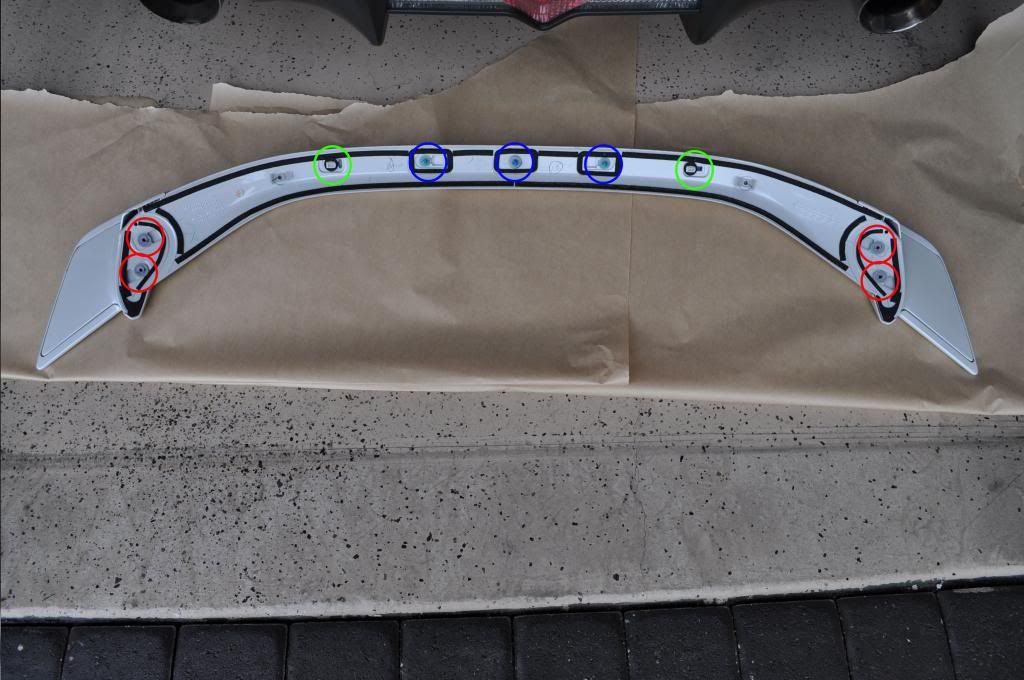 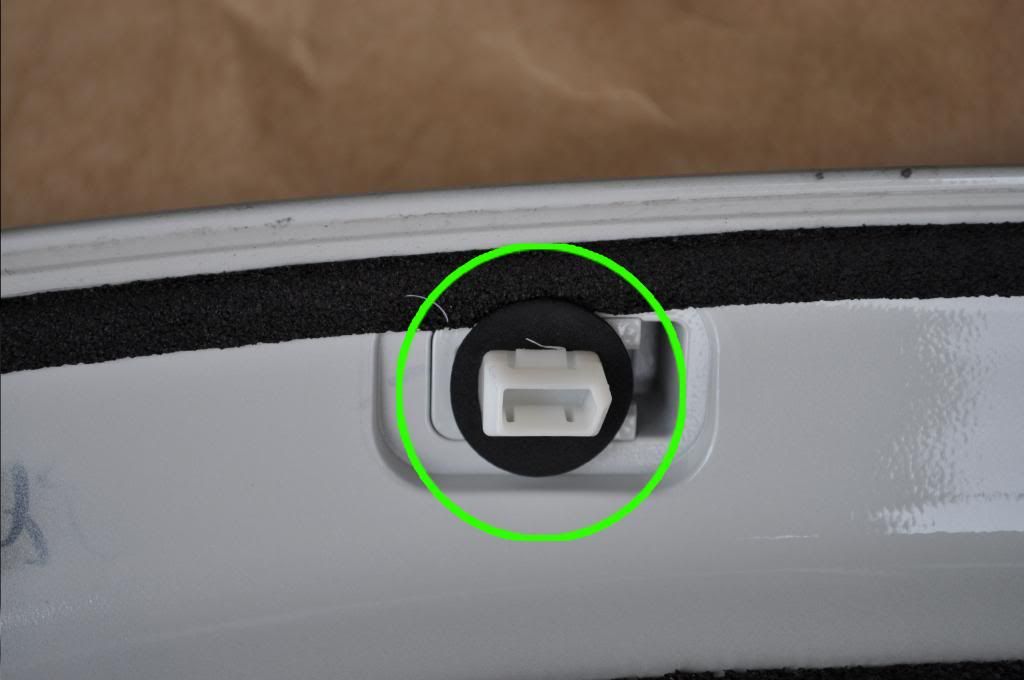 Here are the measurements of the holes for the push pins in the middle. They are measured to the center of the holes. For the outer holes where the screws go it was kinda hard to get spot to go off of so i would recommend doing the ones shown here first and then with the spoiler in place mark the outer holes. 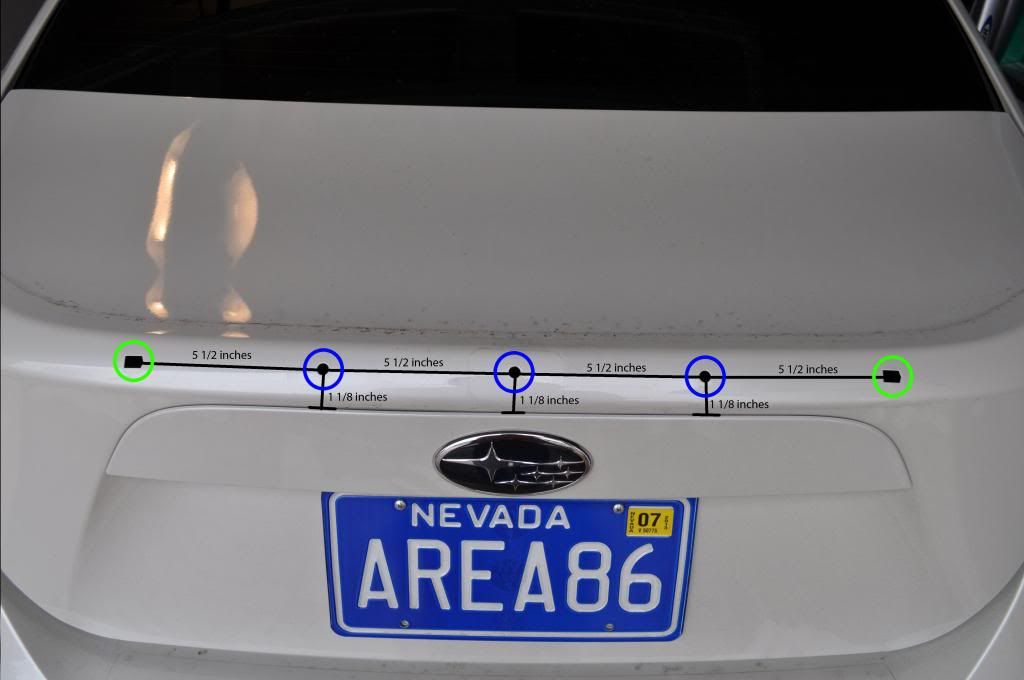 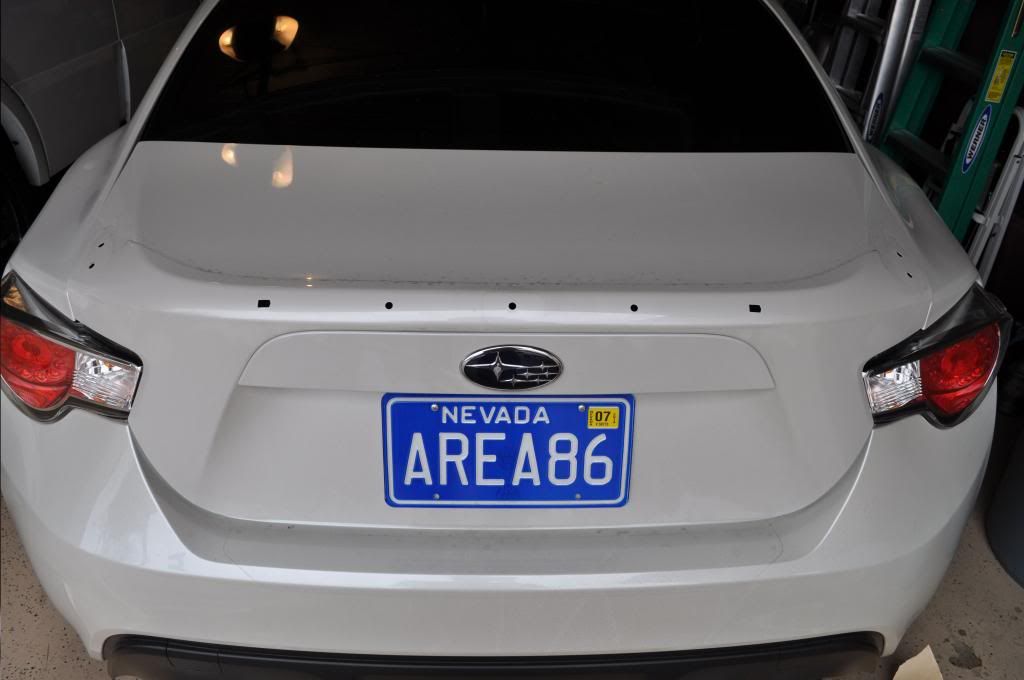 Here are the 4 screws used on the outer holes. Not sure what thread type it is but its a 8mm head. 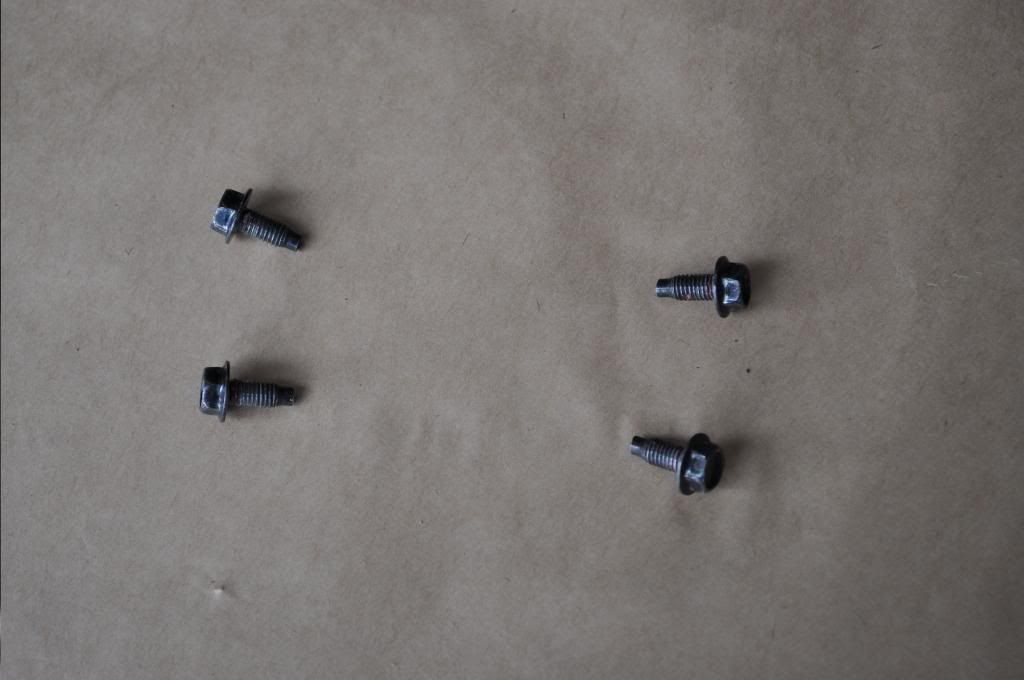
|
|
|
|
| The Following 4 Users Say Thank You to Area86 For This Useful Post: |
|
01-27-2013, 09:59 PM
|
#8 | |
|
Negative Mass
Join Date: May 2012
Drives: Orange Metallic AVO Turbo GT86 6MT
Location: Arlington VA
Posts: 702
Thanks: 272
Thanked 346 Times in 201 Posts
Mentioned: 56 Post(s)
|
Quote:
 ! I have tape on the way already so maybe I'll combine the bolting and taping lol. Very secure spoiler install incoming... I'll do my best to document the process and post a DIY for those in need. ! I have tape on the way already so maybe I'll combine the bolting and taping lol. Very secure spoiler install incoming... I'll do my best to document the process and post a DIY for those in need.Thanks for the excellent detail on measuring the push-pin holes. I can figure out the thread of the bolts by being the awkward asshole in Home Depot with a spoiler in his hand testing every bolt lol. Just to be absolutely sure, when you measured the 1 1/8 inch to the holes, that was with tape measure laying flush with the curve of the trunk? |
|
|
|
|
|
01-28-2013, 01:59 AM
|
#9 |
|
Senior Member
Join Date: Jul 2012
Drives: 2013 BRZ limited SWP
Location: USA
Posts: 338
Thanks: 94
Thanked 166 Times in 99 Posts
Mentioned: 12 Post(s)
|
Yes it was flush on the curve and that's to the center of the hole as well. Good luck with the install and let us know how it goes.
Sent from my DROID RAZR using Tapatalk 2 |
|
|
|
|
01-28-2013, 04:04 PM
|
#10 |
|
Negative Mass
Join Date: May 2012
Drives: Orange Metallic AVO Turbo GT86 6MT
Location: Arlington VA
Posts: 702
Thanks: 272
Thanked 346 Times in 201 Posts
Mentioned: 56 Post(s)
|
Well I can't really figure out how to substitute the rectangular push pins and I had already cut off and sanded down the middle one thinking I was going to tape the spoiler on. Just gonna drill two holes for the two push pins in the center.
As for how I'm going to go about measuring, does anyone know a safe way to mark on the car? I'll need it to track my measurements for the center peg holes. I also need some way to leave marks from the 4 side bolt points on the spoiler when I position it. I was thinking colored Elmer's glue or something but I wanted to make sure whatever I use is safe.
__________________
Build thread for my Lovely Lady.
|
|
|
|
|
01-28-2013, 04:18 PM
|
#11 | |
|
Senior Member
Join Date: Nov 2012
Drives: 2013 Ultramarine FR-S, 2015 RS 1.0
Location: SF Bay Area
Posts: 532
Thanks: 285
Thanked 174 Times in 110 Posts
Mentioned: 13 Post(s)
|
Quote:
|
|
|
|
|
| The Following User Says Thank You to cdo221 For This Useful Post: | nataku (01-28-2013) |
|
01-28-2013, 04:48 PM
|
#12 | |
|
Negative Mass
Join Date: May 2012
Drives: Orange Metallic AVO Turbo GT86 6MT
Location: Arlington VA
Posts: 702
Thanks: 272
Thanked 346 Times in 201 Posts
Mentioned: 56 Post(s)
|
Quote:
|
|
|
|
|
|
01-30-2013, 02:27 AM
|
#13 |
|
Negative Mass
Join Date: May 2012
Drives: Orange Metallic AVO Turbo GT86 6MT
Location: Arlington VA
Posts: 702
Thanks: 272
Thanked 346 Times in 201 Posts
Mentioned: 56 Post(s)
|
A thousand thanks for the help. I have learned some frustrating but hilarious-in-retrospect lessons over the course of the install. I am truly exhausted at this point and will put together my DIY tomorrow or the following day. Let's just say Home Depot didn't know how to sell me a proper hole saw, so it was rather difficult to find a way to access the back of the bolt holes in order to install the bolts. Spoiler is currently a glorified hole sealer, attached with VHB tape. The two push pins I had helped to align it regardless.
BTW the measurements were spot on. Can't wait to post this DIY so you guys can see the seriously stupid life-hack solution my roommate and I attempted in order to position those bolt holes. It's probably going to end up just being an hilarious story of how NOT to DIY... 
|
|
|
|
|
01-30-2013, 02:34 AM
|
#14 |
|
Negative Mass
Join Date: May 2012
Drives: Orange Metallic AVO Turbo GT86 6MT
Location: Arlington VA
Posts: 702
Thanks: 272
Thanked 346 Times in 201 Posts
Mentioned: 56 Post(s)
|
Oh but the most important part!!

|
|
|
|
|
|
|
|
|
|
 Similar Threads
|
||||
| Thread | Thread Starter | Forum | Replies | Last Post |
| CARSMO duckbill spoiler installed on BRZ Limited | Draco-REX | Cosmetic Modification (Interior/Exterior/Lighting) | 53 | 01-28-2016 01:26 AM |
| Limited WRB BRZ factory spoiler. | chadstyle | Exterior Parts (Aero, Lighting, Etc.) | 8 | 01-27-2013 01:53 PM |
| 5 axis spoiler - limited brz | cantaloupe | Cosmetic Modification (Interior/Exterior/Lighting) | 8 | 09-28-2012 06:50 PM |
| Do you want Subaru of America to offer rear spoiler delete option on the Limited BRZ? | Hanzo | BRZ First-Gen (2012+) General Topics | 95 | 06-01-2012 10:04 AM |
| Limited spoiler: better IRL than photos? | Sport-Tech | BRZ First-Gen (2012+) General Topics | 27 | 05-15-2012 01:31 AM |


