


 08-04-2012, 08:31 PM
|
#57 |
|
Senior Member
Join Date: Oct 2011
Drives: Firestorm FRS
Location: Louisiana
Posts: 322
Thanks: 6
Thanked 80 Times in 42 Posts
Mentioned: 3 Post(s)
|
Bought a Pioneer 80prs! Which means no processor, which means less weight, one less component and one less thing to hide. Which means someone needs to make a single din kit for this car. Hopefully with a pocket under the radio. This car needs a cubby hole in the dash.
|

|

|
|
08-18-2012, 08:07 PM
|
#58 |
|
Senior Member
Join Date: Oct 2011
Drives: Firestorm FRS
Location: Louisiana
Posts: 322
Thanks: 6
Thanked 80 Times in 42 Posts
Mentioned: 3 Post(s)
|
Baby steps. Lol
Well I finally have all the gear in. Pioneer 80prs Alpine pdx-v9 Focal krx2 mids Dynaudio md130 tweets DIYMA 12 The 80 looks pretty cheap. But as long as it sounds good I will deal with it for a while. The Alpine in nice and small and I think fits in with the car better than the full size ID amps. Hope it sound the part also. Guess ill find out. Setting my car up for Autocross has taken most of my spare time, not a whole lot to begin with, but I got a little done today. |
|
|
|
|
08-18-2012, 08:08 PM
|
#59 |
|
Senior Member
Join Date: Oct 2011
Drives: Firestorm FRS
Location: Louisiana
Posts: 322
Thanks: 6
Thanked 80 Times in 42 Posts
Mentioned: 3 Post(s)
|
Started by soldering the wiring harness together and taping it up.
 
|
|
|
|
|
08-18-2012, 08:09 PM
|
#60 |
|
Senior Member
Join Date: Oct 2011
Drives: Firestorm FRS
Location: Louisiana
Posts: 322
Thanks: 6
Thanked 80 Times in 42 Posts
Mentioned: 3 Post(s)
|
Next ill share my super secret method of dealing with large gauge wire.
First I get my tool. Think gone in 60 sec.  Add a chisel.  Also works on large crimp connectors. Multipurpose tool!  And here is the last thing I did today. Finished off the lead of wire that will connect the circuit breaker to the battery with some teckflex and heat shrink tube. 
|
|
|
|
|
08-18-2012, 08:10 PM
|
#61 |
|
Senior Member
Join Date: Oct 2011
Drives: Firestorm FRS
Location: Louisiana
Posts: 322
Thanks: 6
Thanked 80 Times in 42 Posts
Mentioned: 3 Post(s)
|
Now for the battery. The positive terminal has 2 fused lead connected to it and a red cover. Connecting to the top post will be easy, I just don't see any way to make it look good.
Open to any suggestions.  
|
|
|
|
|
08-19-2012, 08:58 AM
|
#62 |
|
Senior Member

Join Date: Jul 2012
Drives: 2013 Subaru BRZ Limited in WRB
Location: Wilmington, DE
Posts: 204
Thanks: 17
Thanked 86 Times in 48 Posts
Mentioned: 0 Post(s)
|
Awesome to see you getting started! I'm really interested to hear your reaction to that Alpine amp you have.
I wound up cutting a slit in the red plastic so I could just use the bolt that keeps the terminal on the post. My ring connector is much different and not very forgiving. You may be able to do the same and run the wire towards the bottom instead of out on top of the battery (like mine). Here's my 0awg run: With cover removed: Passenger grommet is a beautiful thing:
__________________
|
|
|
|
|
08-19-2012, 06:39 PM
|
#63 | |
|
Senior Member
Join Date: Oct 2011
Drives: Firestorm FRS
Location: Louisiana
Posts: 322
Thanks: 6
Thanked 80 Times in 42 Posts
Mentioned: 3 Post(s)
|
Quote:
My plan is to do little things all week and then finally try to make some noise on Friday when I have the day off. |
|
|
|
|
|
08-25-2012, 07:50 AM
|
#64 |
|
Senior Member
Join Date: Oct 2011
Drives: Firestorm FRS
Location: Louisiana
Posts: 322
Thanks: 6
Thanked 80 Times in 42 Posts
Mentioned: 3 Post(s)
|
Got some done yesterday.
Took texzen advice on the power wire. Terminal off the battery.  The whole fused thingy comes off.  Bent the ring connector to rum straight down the front of the battery.  The fused thingy goes right back in top and you can hardly tell is there. Plus the red cover goes back on without issue. 
|
|
|
|
| The Following User Says Thank You to -max- For This Useful Post: | sure74 (09-27-2012) |
|
08-25-2012, 07:51 AM
|
#65 |
|
Senior Member
Join Date: Oct 2011
Drives: Firestorm FRS
Location: Louisiana
Posts: 322
Thanks: 6
Thanked 80 Times in 42 Posts
Mentioned: 3 Post(s)
|
Next moved on to run the wires through the doors.
I like to use a welding rod to stick through the boot. 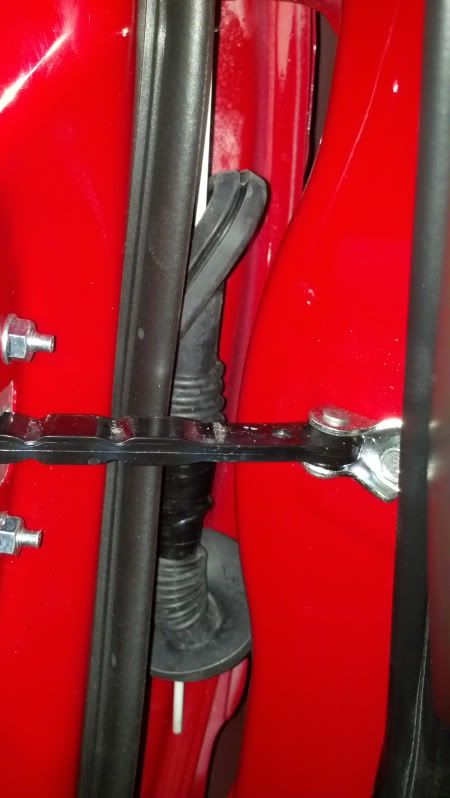 Then tape the wire to the rod and pull it through. Little lube helps here. 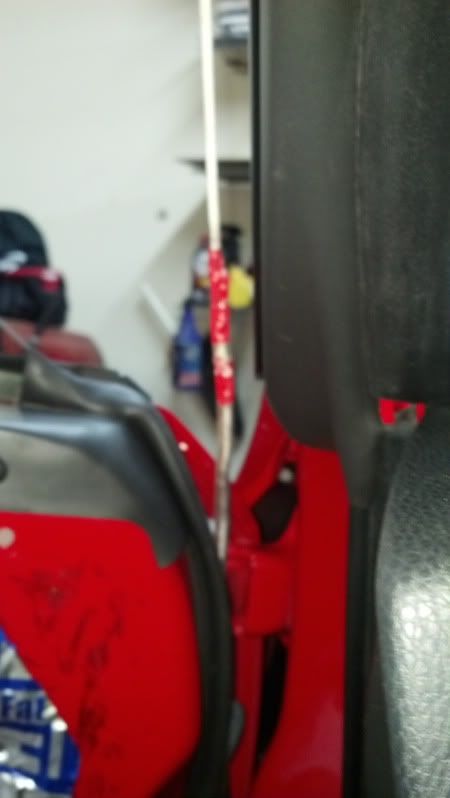 The boot pops back into the door easily, but getting it back on the car is a bitch unless you pop out the white thing that the boot goes on. Pop it off the car and make sure you line of up right with the boot, as it will only go on one way. Then it pops back on easily. |
|
|
|
| The Following User Says Thank You to -max- For This Useful Post: | Redmist (05-25-2013) |
|
08-27-2012, 03:25 PM
|
#66 | |
|
Senior Member
Join Date: Aug 2012
Drives: Silica BRZ 6MT
Location: 06103
Posts: 650
Thanks: 97
Thanked 115 Times in 92 Posts
Mentioned: 0 Post(s)
|
Quote:
 Glad you're taking so many pics...great thread... |
|
|
|
|
| The Following User Says Thank You to gily25 For This Useful Post: | Efferalgan (01-16-2013) |
|
08-27-2012, 07:03 PM
|
#67 |
|
That Guy
Join Date: Dec 2011
Drives: 2013 asphalt FRS MT
Location: Halifax, Nova Scotia
Posts: 4,865
Thanks: 5,058
Thanked 2,868 Times in 1,499 Posts
Mentioned: 82 Post(s)
|
Max, nice build.
I've gotta offer a better way to make your large wire connections though. I've been using these & the associated solder slugs, for years now and have never had to worry about corrosion. Before I started using them I had a ton of issues even had wires separate, not good. http://www.delcity.net/store/Heavy!d...ugs/p_1012.a_1 |
|
|
|
|
08-27-2012, 08:06 PM
|
#68 |
|
Member
Join Date: Aug 2012
Drives: really slow
Location: Southern California
Posts: 28
Thanks: 2
Thanked 1 Time in 1 Post
Mentioned: 0 Post(s)
|
Nice build, it seems like a tedious job finding out where to put all the sound mats
|
|
|
|
|
09-07-2012, 11:57 PM
|
#69 |
|
Senior Member
Join Date: Oct 2011
Drives: Firestorm FRS
Location: Louisiana
Posts: 322
Thanks: 6
Thanked 80 Times in 42 Posts
Mentioned: 3 Post(s)
|
Here is a pic of what I had to do to a Toyota kit to make it work with the FRS brackets. Just had to cut some material out.
 And here is a pic of the 80 mounted with the Toyota kit and no 1/2 din pocket. I have a couple pockets left over from other kits, but none match up with any holes. I might rig something up when I get a minute, but this will probably be it till a real kit comes out.  
|
|
|
|
|
09-07-2012, 11:59 PM
|
#70 |
|
Senior Member
Join Date: Oct 2011
Drives: Firestorm FRS
Location: Louisiana
Posts: 322
Thanks: 6
Thanked 80 Times in 42 Posts
Mentioned: 3 Post(s)
|
Here is a finished baffle for the door speaker. Made of 3/4" mdf and coated with about 5 coats of bedliner.
 Then I tried something I have not done before. Added a layer of 1/4" ccf to the back of the baffle and a layer of thin, not sure of thickness, to the front. The rear serving to seal and decouple the baffle to the door, the front as a speaker gasket.  And here is the finished Focal mid in the door. 
|
|
|
|
|
|
|
|
|
|
 Similar Threads
|
||||
| Thread | Thread Starter | Forum | Replies | Last Post |
| Looking for an FRS/BRZ in the SE For Audio | SpeakBeck | Southeast | 8 | 02-17-2013 12:57 PM |
| OEM Audio Plus Subwoofer | K2 | Electronics | Audio | NAV | Infotainment | 28 | 12-21-2012 10:28 AM |
| Audio Options? | SpeakBeck | Electronics | Audio | NAV | Infotainment | 13 | 06-04-2012 01:06 AM |
| Audio setup | 315FR-S | Electronics | Audio | NAV | Infotainment | 20 | 05-17-2012 06:23 PM |
| Audio Options | Aznek | CANADA | 2 | 02-26-2012 03:17 AM |


