


 04-07-2019, 03:33 AM
|
#183 |
|
Senior Member
Join Date: Sep 2015
Drives: 2015 frs
Location: Ca
Posts: 511
Thanks: 426
Thanked 196 Times in 148 Posts
Mentioned: 5 Post(s)
Tagged: 0 Thread(s)
|
Looking good. We're not building show cars, but I know how you feel. I hate when my welds don't look as clean as they could. At least they hold that's the important thing.
Sent from my Moto Z (2) using Tapatalk
__________________
|

|

|
| The Following User Says Thank You to Zer0 For This Useful Post: | DIY (04-07-2019) |
|
04-07-2019, 04:32 AM
|
#184 | |
|
Senior Member

Join Date: Jul 2016
Drives: BRZ, WRX
Location: Sydney, Australia
Posts: 291
Thanks: 105
Thanked 962 Times in 233 Posts
Mentioned: 2 Post(s)
Tagged: 0 Thread(s)
|
Quote:
 Here is one of many photos I took. 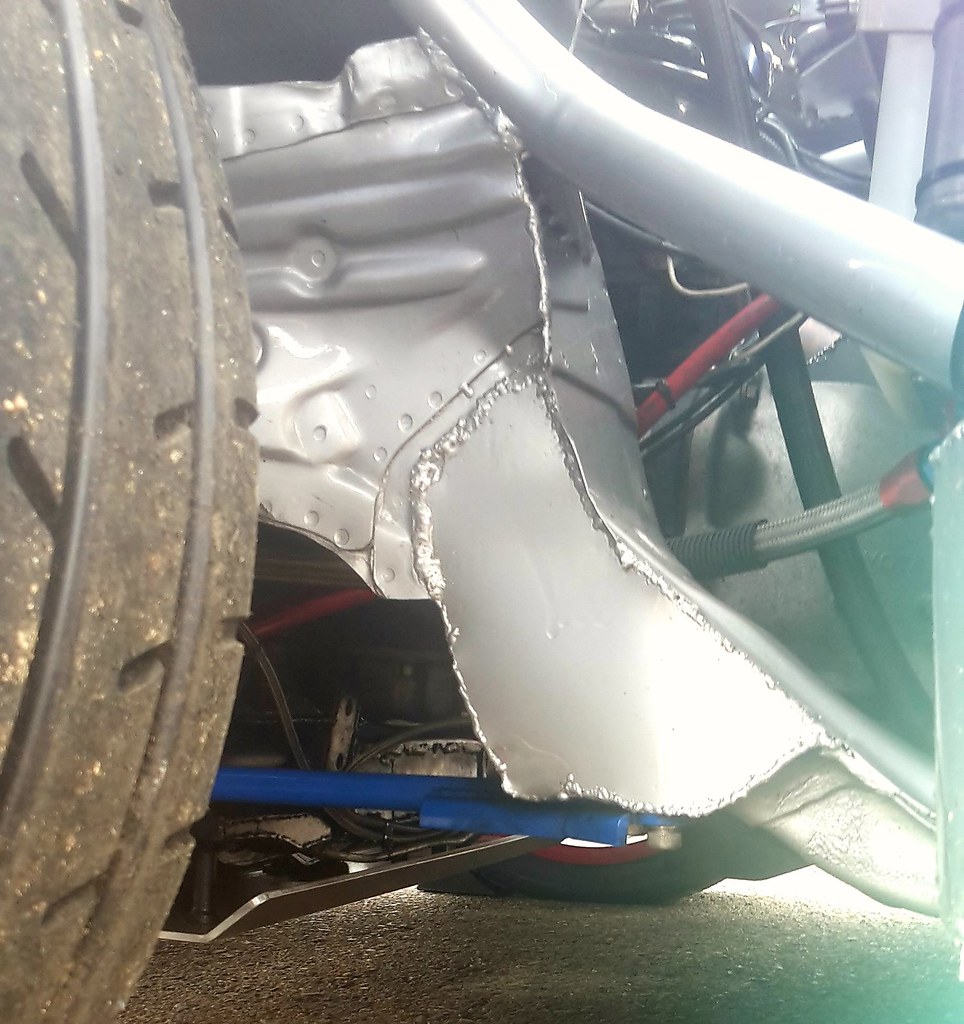
__________________
|
|
|
|
|
| The Following 3 Users Say Thank You to DIY For This Useful Post: |
|
04-14-2019, 05:14 AM
|
#185 |
|
Senior Member
Join Date: Jul 2016
Drives: BRZ, WRX
Location: Sydney, Australia
Posts: 291
Thanks: 105
Thanked 962 Times in 233 Posts
Mentioned: 2 Post(s)
Tagged: 0 Thread(s)
|
I got the shell up on my vehicle positioning jacks today and spun it around so I could work on the passenger side double wishbone conversion.
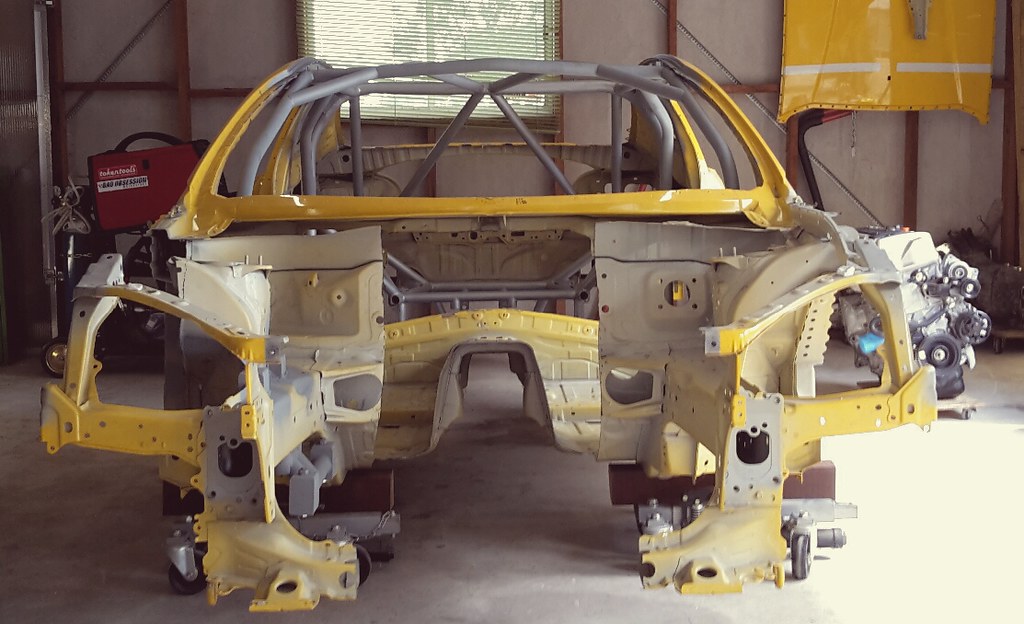 The drivers side took a lot longer because I was kind of figuring out how much metal to remove as I was going. With the passenger side I was just copying so I chopped it all out rather quickly, still a days work though. 
__________________
|
|
|
|
| The Following 4 Users Say Thank You to DIY For This Useful Post: |
|
04-22-2019, 03:41 AM
|
#186 |
|
Senior Member
Join Date: Jul 2016
Drives: BRZ, WRX
Location: Sydney, Australia
Posts: 291
Thanks: 105
Thanked 962 Times in 233 Posts
Mentioned: 2 Post(s)
Tagged: 0 Thread(s)
|
I've spent the past 2 days working on the passenger side upper control arm mounts.
Many hours were spent making sure the passenger side mount location exactly matched the driver's side.  Once again my MIG welds look a bit shit but a slight improvement on the other side. I think my main issue is I can't really see the puddle, possibly my auto-darkening helmet settings are way off.  I have placed a large online order of rod ends and spherical bearings and tomorrow I will be picking up some more steel tube to start building the control arms.
__________________
|
|
|
|
| The Following 4 Users Say Thank You to DIY For This Useful Post: |
|
04-24-2019, 05:09 AM
|
#187 |
|
Senior Member
Join Date: Jul 2016
Drives: BRZ, WRX
Location: Sydney, Australia
Posts: 291
Thanks: 105
Thanked 962 Times in 233 Posts
Mentioned: 2 Post(s)
Tagged: 0 Thread(s)
|
Yesterday I went and picked up some more 1.5" roll cage tube as I had almost ran out and there is still a lot more to be done. I also picked up some 1.25" tube to make the front control arms and modify the factory rear arms so they are adjustable and no longer contain rubber bushings.
In other news my order of rod ends and associated parts has arrived so I pretty much have everything I need to get started. The only but missing is some 4140 chrome-moly solid bar that will be turned down on a lathe by a friend of mine to make uniball tapered adapters to replace the factory ball joints in the front knuckles and studs in the rear upper control arms. This is the full order, its enough to do the whole car. They are all racing series ultra high performance chrome-moly steel rod ends with a Teflon/Kevlar liner. 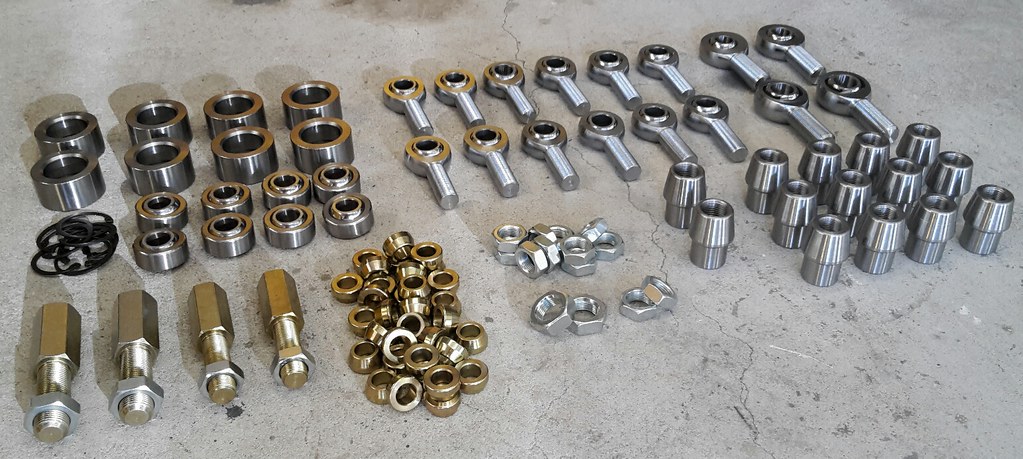 This shot shows the 1.25" DOM tube with a weld in bung and 5/8" rod end. Everything will be adjustable. 
__________________
|
|
|
|
| The Following 4 Users Say Thank You to DIY For This Useful Post: |
|
04-24-2019, 08:37 AM
|
#188 |
|
Senior Member
Join Date: Sep 2015
Drives: 2015 frs
Location: Ca
Posts: 511
Thanks: 426
Thanked 196 Times in 148 Posts
Mentioned: 5 Post(s)
Tagged: 0 Thread(s)
|
Nice quality parts. Can't wait to see your progress.
__________________
|
|
|
|
| The Following User Says Thank You to Zer0 For This Useful Post: | DIY (04-24-2019) |
|
04-25-2019, 05:54 PM
|
#189 |
|
sleep, drive, eat, repeat

Join Date: Mar 2012
Drives: '13 BRZ, '12 Outback
Location: Sack of Potatoes
Posts: 4,431
Thanks: 2,630
Thanked 3,797 Times in 1,981 Posts
Mentioned: 188 Post(s)
Tagged: 4 Thread(s)
|
WHEW! just binged all your updates since last year. I would see you updates on IG every once in a while on my feed but missed all the fine detail. Keep up the excellent work!
No to figure out what to do to fill the empty void until your next update lol |
|
|
|
|
05-04-2019, 07:41 AM
|
#191 |
|
Senior Member
Join Date: Jul 2016
Drives: BRZ, WRX
Location: Sydney, Australia
Posts: 291
Thanks: 105
Thanked 962 Times in 233 Posts
Mentioned: 2 Post(s)
Tagged: 0 Thread(s)
|
Trailing Arms
I have officially started making my control arms today, starting with the rear trailing arms.
I started by making a simple welding jig with some scrap metal. 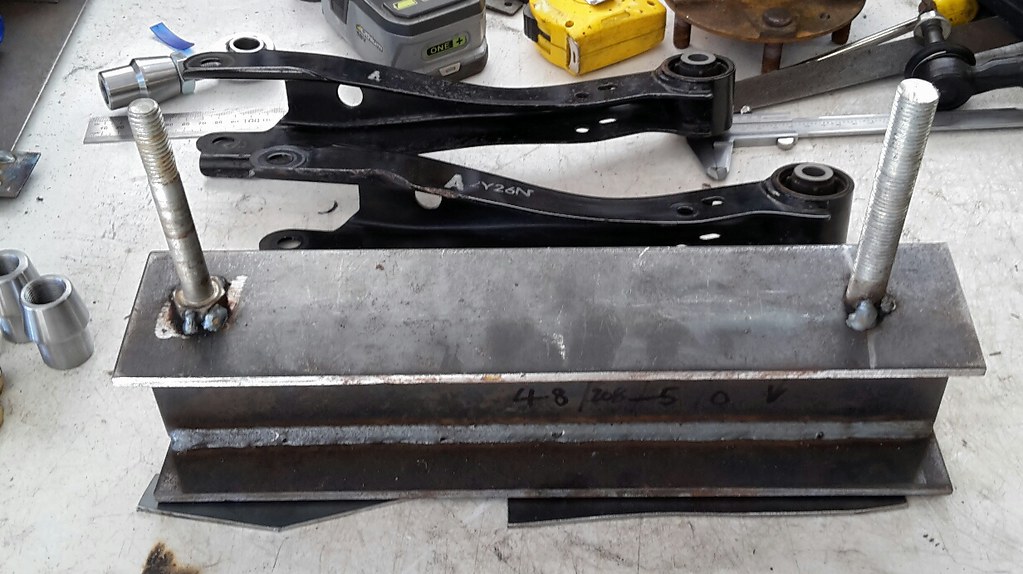 Then I cut the OEM arms at the kink. I no longer need the kink as I have lowered the trailing arm pickup point similar to what the MCA Suspension "traction mod" does. Also this car will run much less droop travel than a road going car.  The jig keeps the original length but I have adjusted the rod end so that I can mostly lengthen the link as this is most likely what will be needed as I adjust camber.  Then I cut some tube to fill the gap and trimmed part of the OEM arm so the tube could slide in. 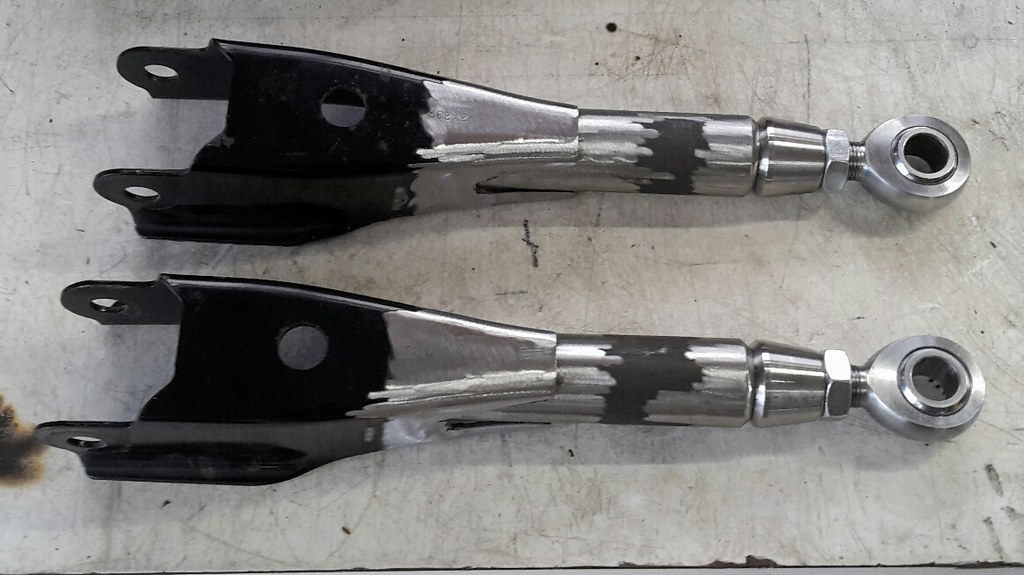 Here it is after welding, you can see I also boxed in the lower part for some extra strength.  Side detail 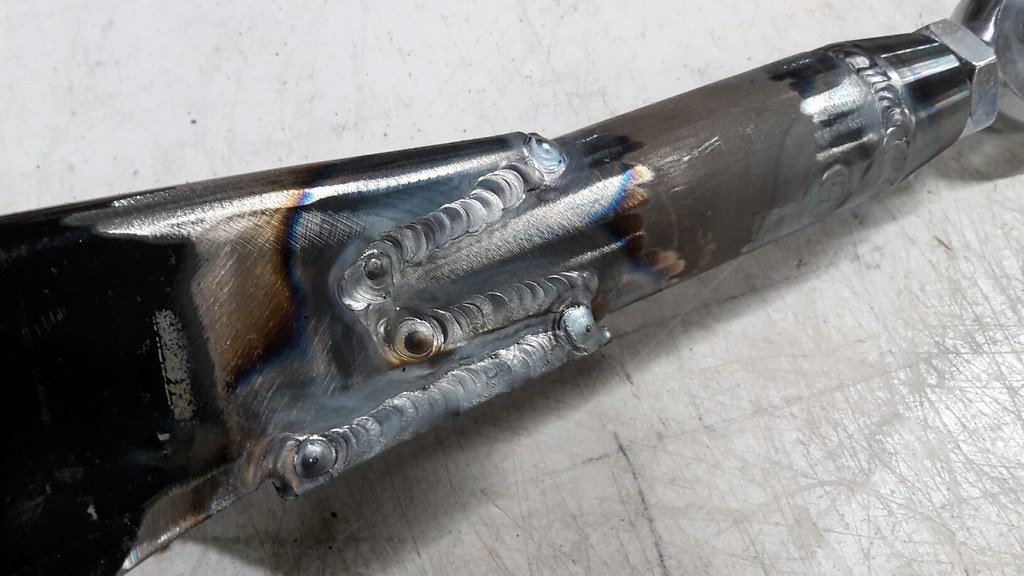 Then I quick clean up with the wire wheel and some cold gal primer. 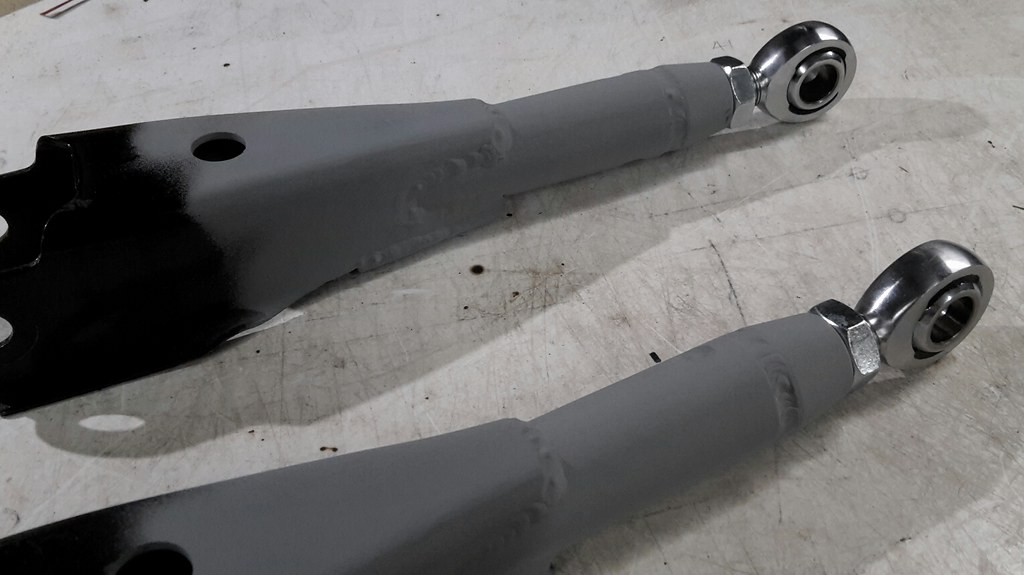 These arms ended up being 230 grams heavier than the originals and cost about $50 AUD to make.
__________________
|
|
|
|
|
05-12-2019, 07:40 AM
|
#192 |
|
Senior Member
Join Date: Jul 2016
Drives: BRZ, WRX
Location: Sydney, Australia
Posts: 291
Thanks: 105
Thanked 962 Times in 233 Posts
Mentioned: 2 Post(s)
Tagged: 0 Thread(s)
|
Rear Lower Arms
I made a start on my rear lower arms today but ended up running out of argon gas for my welder so didn't completely finish them.
They are similar to what I did with the trailing arms except this time I added a ladder bar adjuster which basically gives you extra adjustment length and allows adjustment without having to remove the rod end from the mount. This photo shows the arms after I cut them and the small welding jig I made.  I ended up cutting some more length off the arms after my initial cuts just to make the welding easier.  I used a bit of CAD to make the sheet metal pieces that hold the tube into the factory arms.  I mocked it up in my jig and then tacked this inside piece in place, then removed it from the jig to weld it properly to the back of the tube. 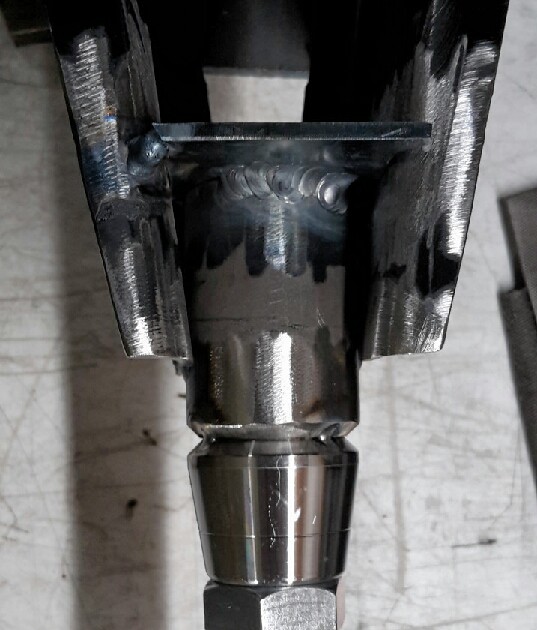 This is as far as I got before the gas ran out. There is probably another 30 minutes of welding to go and then they are done.  I'll pick up some more gas this week and finish them off before priming and doing the weights.
__________________
|
|
|
|
| The Following 5 Users Say Thank You to DIY For This Useful Post: | Ash_89 (03-02-2021), BigFatFlip (05-29-2019), DustinS (05-13-2019), Opie (05-12-2019), Zer0 (05-13-2019) |
|
05-19-2019, 04:56 AM
|
#193 |
|
Senior Member
Join Date: Jul 2016
Drives: BRZ, WRX
Location: Sydney, Australia
Posts: 291
Thanks: 105
Thanked 962 Times in 233 Posts
Mentioned: 2 Post(s)
Tagged: 0 Thread(s)
|
Picked up some more gas this week for the TIG welder and managed to get the rear lower control arms finished.
I finished the remaining welds first and then leveled the tops off with a flap disc for a cleaner look.  Then I hit them with the wire wheel, some wax and grease remover and a couple of coats of cold-gal.  [/url] [/url]They came out about 250g heavier than the factory arms, I guess this is the weight penalty I'll have to take for the solid mounts and adjustability I require.  Moving on I made a start on the rear toe arms. Again I am using the ladder bar adjusters, the original ball joints and some old control arms off my WRX that I have cut down and cleaned up with the wire wheel.  All I need to do now to finish these is get my friend to turn a female left hand thread into the cut down control arm pieces to suit the thread on the ladder bar and then I will weld the ball joints into them. I really wish I could afford my own lathe.  The final thing I was playing with today was the A-pillar gusset design for my roll cage. I don't really like the usual circular dimple die style so spent the time to come up with something a little more unique and streamlined. 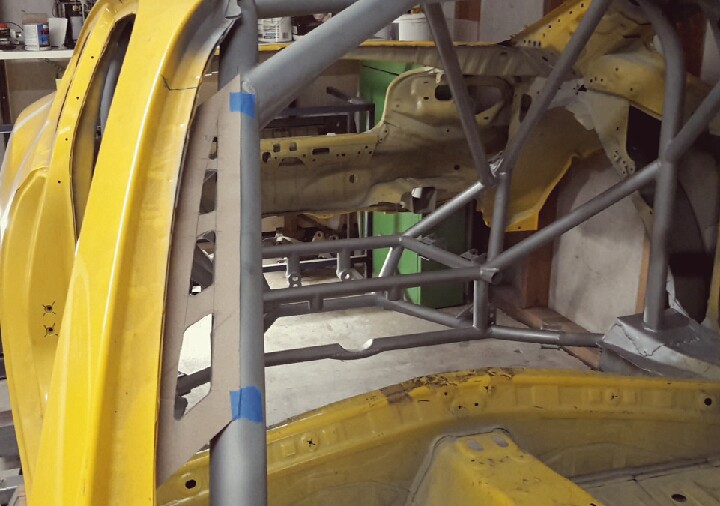
__________________
|
|
|
|
| The Following 4 Users Say Thank You to DIY For This Useful Post: |
|
05-19-2019, 05:12 AM
|
#194 |
|
Senior Member
Join Date: Sep 2015
Drives: 2015 frs
Location: Ca
Posts: 511
Thanks: 426
Thanked 196 Times in 148 Posts
Mentioned: 5 Post(s)
Tagged: 0 Thread(s)
|
Nice alternative to the usual simple die. It looks good.
__________________
|
|
|
|
|
05-20-2019, 10:02 AM
|
#195 |
|
Senior Member
Join Date: Nov 2016
Drives: 2013 BRZ Limited 6MT
Location: Nashville, TN
Posts: 208
Thanks: 36
Thanked 80 Times in 58 Posts
Mentioned: 1 Post(s)
Tagged: 0 Thread(s)
|
Great work, keep it up!
|
|
|
|
|
05-20-2019, 10:07 AM
|
#196 |
|
Senior Member

Join Date: Jun 2015
Drives: 2013 WRB BRZ
Location: Ohio
Posts: 672
Thanks: 258
Thanked 477 Times in 275 Posts
Mentioned: 4 Post(s)
Tagged: 0 Thread(s)
|
This thread makes me want a welder so bad.
Awesome build!
__________________
|
|
|
|
|
|
|
|
 |
|
|


 Inferno

