


|
||||||
| DIY (Do-It-Yourself) Guides For all DIYs. |
 |
|
|
Thread Tools | Search this Thread |
 05-21-2015, 10:52 PM
|
#1 |
|
Senior Member

Join Date: Dec 2014
Drives: 22 BRZ
Location: Austin TX
Posts: 122
Thanks: 4
Thanked 119 Times in 45 Posts
Mentioned: 2 Post(s)
Tagged: 0 Thread(s)
|
Installing GT86 TRD Side Skirts
TRD Side Skirt Install Tutorial.
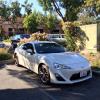
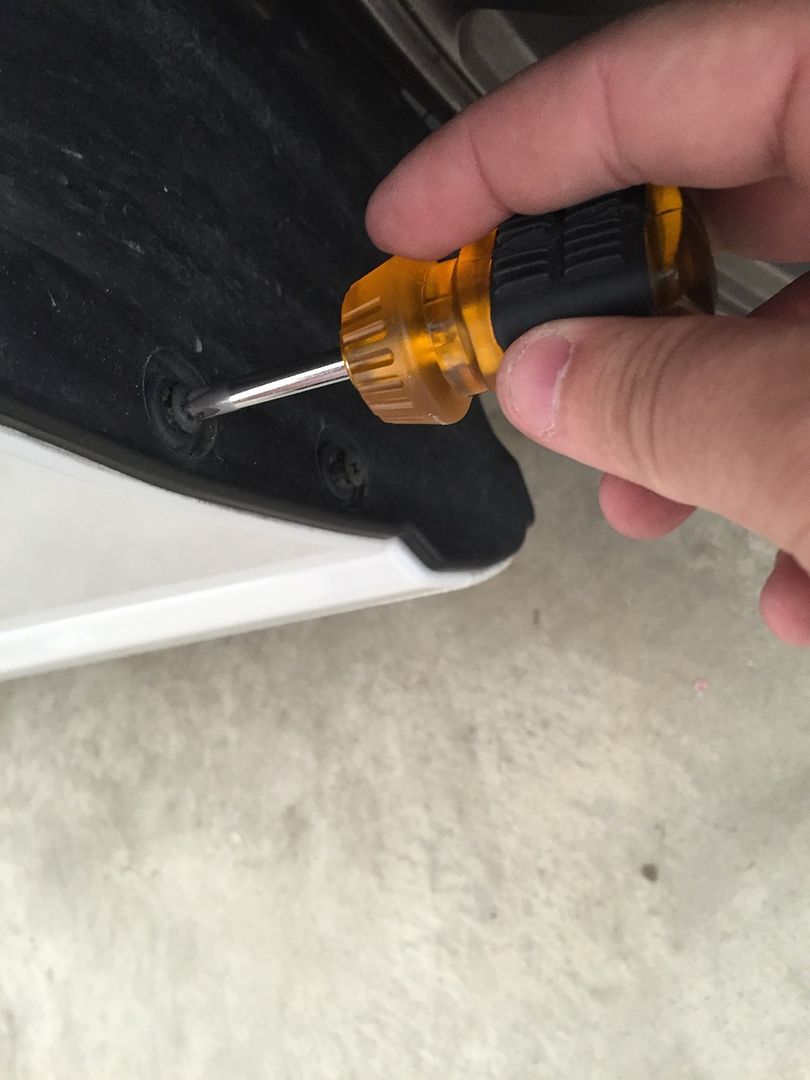
So when I was doing research about installing the trd stuff I noticed no ones had done a write up for the side skirts. Im going to attempt to document the steps to maybe give those thinking about going this route some insight. (its really simple but i take no responsibility for what you do...) Side Skirts Time (1-2.5 hours) Parts needed: TRD side skirt clip and install kit (included if you buy from a dealership) Tools Needed: Philips screwdriver, trim removal tool (recommended but not required) Step 1: Look at the bottom of the rocker panel and you will see a series of rubber plugs. You will want to remove the three middle plugs via a trim removal tool. Mine had what it looks like some rubberized spray on the panel so dont be afraid that it peels off when you remove the plugs (there us paint underneath).  Step2: Clean the areas around the three holes so that there isnt any hanging paint around the holes and apply the rubber washers that have 3m on the backing. Its not super critical to get these to line up perfectly since they are larger than the holes themselves.   Step 3: Remove the push clip from the rocker panel towerds the front wheel well with your trim piece remover.  Step 4: Remove two (top 2) of three screws at the front fender that holds the fender liners to the back of the front wheel well.  (picture is of the screws at the front bumper but they are the same) Step 5: Using the template (sticker paper) provided in the install kit. Cut it out and apply it to the front of the rear wheel well. Note where the horizontal lines on the template are with some painters tape since you will use these to place the two clips that will hold the shirt at the back.   Step 6: Remove the template and install the two fender clips in their correct place (use the painters tape for reference)  Step 7: Test fit the shirt to make sure the holes line up with the clip. Step 8: Prep the mounting surface with some wax/degreaser. Step 9: Remove part the 3m double sided tape from the back of the side skirt. It is recommended to peel off a small part and tape (the red overlay) and bend it over to the outside of the skirt. (This will make it easier or move it around if it doesnt line up correctly as well as help with the adhesion in the next step). refer to 6:31 of this video if you dont understand. [ame="https://www.youtube.com/watch?v=WONfkALskKs"]FRS/GT-86 TRD Front Lip Install - YouTube[/ame] Step 10: Screw In the skirt via the supplied screws that come in the kit (Rear) and attach the front via the 2 push clips. REAR:  FRONT:  Step 11: Place the three plugs that go into the bottom of the rocker panel, that attach the skirt at the bottom. At this time also replaced the front push clip on the rocker near the front wheel well. Step 12: Check for fitment if it all looks good start removing the rest of the red film from the double sided tape while apply pressure to the tape as you move across the side skirt. Thats it. Super simple 
|

|

|
| The Following 14 Users Say Thank You to ZX88 For This Useful Post: | 86geek (10-08-2019), chaoskaze (06-16-2016), FiRStsc10n (05-22-2015), funwheeldrive (05-27-2015), G-awesome (01-05-2016), JamesssSmith (06-01-2017), MCTeeJ (12-26-2019), MisterSheep (01-05-2016), NABoxer (05-07-2016), nzbrooke (11-25-2016), shiumai (05-21-2015), spike021 (05-18-2018), swarb (08-01-2015), ysr50guy (07-19-2015) |
|
12-29-2015, 01:38 PM
|
#2 |
|
Senior Member
Join Date: Mar 2014
Drives: 2013 Subaru BRZ Limited (CBS)
Location: Seattle, WA
Posts: 187
Thanks: 9
Thanked 62 Times in 47 Posts
Mentioned: 2 Post(s)
Tagged: 2 Thread(s)
|
Nice! Thanks for the write-up! If I'm not mistaken, the side skirt looks completely reversible, is that right?
__________________
2006 Lotus Exige Aspen White (Supercharged Honda K24A2 swapped.)
1994 Autozam AZ-1 Mazdaspeed 1996 Mazda Miata (Track car.) 2007 Suzuki SV650 (Track bike.) |
|
|
|
|
01-05-2016, 12:44 PM
|
#3 | |
|
Killed Scion

Join Date: Jun 2015
Drives: 2013 FR-S Whiteout
Location: East Bay, CA
Posts: 7,721
Thanks: 8,285
Thanked 7,307 Times in 4,485 Posts
Mentioned: 334 Post(s)
Tagged: 185 Thread(s)
|
Nice write up. Been looking at the TRD sideskirt for awhile, where did you get yours that had the instal kit included?
__________________
Miyuki みゆき "Beautiful Snow" The Whiteout FR-S Instagram: trevor.parque Quote:
|
|
|
|
|
|
01-06-2016, 10:42 PM
|
#4 | |
|
Senior Member
Join Date: Dec 2014
Drives: 22 BRZ
Location: Austin TX
Posts: 122
Thanks: 4
Thanked 119 Times in 45 Posts
Mentioned: 2 Post(s)
Tagged: 0 Thread(s)
|
Quote:
|
|
|
|
|
|
01-06-2016, 10:44 PM
|
#5 | |
|
Senior Member
Join Date: Dec 2014
Drives: 22 BRZ
Location: Austin TX
Posts: 122
Thanks: 4
Thanked 119 Times in 45 Posts
Mentioned: 2 Post(s)
Tagged: 0 Thread(s)
|
Quote:
You can alse get the kit from japanparts.com (i used them a couple of times) most recently for modellista rear spats. 
|
|
|
|
|
| The Following 2 Users Say Thank You to ZX88 For This Useful Post: | 86geek (10-08-2019), MisterSheep (01-07-2016) |
|
01-06-2016, 11:08 PM
|
#6 | |
|
Senior Member
Join Date: Mar 2014
Drives: 2013 Subaru BRZ Limited (CBS)
Location: Seattle, WA
Posts: 187
Thanks: 9
Thanked 62 Times in 47 Posts
Mentioned: 2 Post(s)
Tagged: 2 Thread(s)
|
Quote:
I mean, the side skirts look like you can remove them and return the car to stock pretty easily?
__________________
2006 Lotus Exige Aspen White (Supercharged Honda K24A2 swapped.)
1994 Autozam AZ-1 Mazdaspeed 1996 Mazda Miata (Track car.) 2007 Suzuki SV650 (Track bike.) |
|
|
|
|
|
01-07-2016, 12:18 AM
|
#7 | |
|
Member

Join Date: Jan 2013
Drives: GT86
Location: Sydney
Posts: 78
Thanks: 156
Thanked 29 Times in 23 Posts
Mentioned: 1 Post(s)
Tagged: 0 Thread(s)
|
Quote:
Yeah you can remove them easily. It is only held on by clips and some 3m tape. Sent from my iPad using Tapatalk |
|
|
|
|
|
06-16-2016, 01:35 AM
|
#8 | |
|
Killed Scion
Join Date: Jun 2015
Drives: 2013 FR-S Whiteout
Location: East Bay, CA
Posts: 7,721
Thanks: 8,285
Thanked 7,307 Times in 4,485 Posts
Mentioned: 334 Post(s)
Tagged: 185 Thread(s)
|
My trd side skirts came in the mail yesterday

__________________
Miyuki みゆき "Beautiful Snow" The Whiteout FR-S Instagram: trevor.parque Quote:
|
|
|
|
|
|
10-05-2016, 11:12 PM
|
#9 | |
|
Member
Join Date: Feb 2014
Drives: 2013 Scion FR-S 10-Series
Location: Troy, AL
Posts: 65
Thanks: 116
Thanked 9 Times in 7 Posts
Mentioned: 1 Post(s)
Tagged: 0 Thread(s)
|
Clips?
Quote:
|
|
|
|
|
|
10-06-2016, 10:41 PM
|
#10 | |
|
Senior Member
Join Date: Dec 2014
Drives: 22 BRZ
Location: Austin TX
Posts: 122
Thanks: 4
Thanked 119 Times in 45 Posts
Mentioned: 2 Post(s)
Tagged: 0 Thread(s)
|
Quote:
|
|
|
|
|
| The Following User Says Thank You to ZX88 For This Useful Post: | Insurme1 (10-08-2016) |
|
10-09-2016, 07:04 AM
|
#11 | |
|
Junior Member
Join Date: Sep 2016
Drives: 2013 Toyota GT86 with Aero Kit
Location: Qatar
Posts: 3
Thanks: 0
Thanked 0 Times in 0 Posts
Mentioned: 0 Post(s)
Tagged: 0 Thread(s)
|
Side skirt clips part numbers
Quote:
I'm looking for the clip numbered 75867C if anybody came across it. |
|
|
|
|
|
|
|
|
|
|
|
 Similar Threads
|
||||
| Thread | Thread Starter | Forum | Replies | Last Post |
| DIY side skirts | ML | Cosmetic Modification (Interior/Exterior/Lighting) | 46 | 04-11-2016 10:11 PM |
| WTB: STI lip-side skirts. | Jive Turkey | Want-To-Buy Requests | 4 | 04-04-2015 12:51 PM |
| Best Sub 200$ Side skirts | Border7 | Cosmetic Modification (Interior/Exterior/Lighting) | 5 | 09-19-2014 10:45 PM |
| WTB: STI Side Skirts | Chee-Hu | Want-To-Buy Requests | 0 | 07-22-2014 10:44 AM |
| Side skirts | Ryan86 | AFRICA | 6 | 01-17-2013 08:08 AM |


 Miyuki みゆき

 [/
[/