


 03-28-2016, 12:40 AM
|
#71 |
|
Member

Join Date: Nov 2014
Drives: GT86
Location: Japan / UK
Posts: 286
Thanks: 17
Thanked 320 Times in 130 Posts
Mentioned: 4 Post(s)
|
Soo everything got put on hold due to a super urgent business trip to Hong Kong that was meant to take a long weekend but turned into a whole month, the entire time NY 86 sat unloved in the long term parking at naruta airport, while I whipped around Hong Kong in the world's shittest Suzuki Carry
As you might imagine getting home Saturday and driving home in the 86 felt amazing, hindered only by what felt like a loose bolt on the front driver's side coilover, a problem that I've had on and off since installing them, thing is whenever I would check the bolts they were all tight and to spec, there were no obvious signs of wear or contact anywhere on the various bars and supports, so I ended up grabbing the spring and trying to rattle that, and sure enough, at the top of the spring where it sits under the upper perch there was about 1.4mm of play, enough, under load to make a "your shit is loose" sound. Pulled into an autobacs half way home and, still in a work suit, installed some tien silencer rings but rather than use them in the prescribed way to stop "spring slap" as intended, I installed them at the very top and bottom of the spring, with a little piece cut out so they would sit cleanly, with them installed and the adjustment rings tightened back up there was zero play in the spring around the perch and as you can probably guess, the rattle is now completely gone. So I'd suggest that if anyone else is having weird low speed rattling,to check if their springs have any slop around the perches, if they do you'll probably want to fix it. Technically you could get away with using 3 or 4 thick zip ties spaced out to fill the gap but personally I felt using the tien rings was a more long-term solution. Looking forward to next weekend so I can finish off my laser install! Remind me to buy a tool for cutting a small hole in the bumper support bars to pass the wiring through! |

|

|
| The Following User Says Thank You to Futaba For This Useful Post: | Clipdat (03-29-2016) |
|
07-29-2016, 04:22 PM
|
#72 | |
|
Proud of BOXER

Join Date: Dec 2012
Drives: Subaru Boxer
Location: Bay Area
Posts: 8,152
Thanks: 7,087
Thanked 6,874 Times in 3,680 Posts
Mentioned: 201 Post(s)
|
Bump for updates!
__________________
 Quote:
|
|
|
|
|
|
08-01-2016, 08:20 AM
|
#74 |
|
Member
Join Date: Nov 2014
Drives: GT86
Location: Japan / UK
Posts: 286
Thanks: 17
Thanked 320 Times in 130 Posts
Mentioned: 4 Post(s)
|
Haha! I am, but lagging a little on the build!
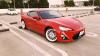
Ripped out the interior to find some frustrating rattles and squeaks, installed sound deadening in the foot wells while I was at it. Planning on restoring and installing some 6pot calipers with bigger rotors soon! Also thanks to the 86 event I attended yesterday, my plans for the rest of the year are: Rocketbunny v1 Tomei UEL Different wheels (maybe??) Replacing the Blitz Spec-C's with something else, potentially Ohlins or KW v2s As for the lasers project, I tried with 3d printed parts and the mechanisms just a little too fragile, so i'm in the process of having the parts I designed milled from aluminium so I can build a much more reliable unit! How she sits as of last week:  I do love the white wheels but holy shit am I getting bored of cleaning them every other week! And then of course... there's this... shhh 
|
|
|
|
| The Following User Says Thank You to Futaba For This Useful Post: | Clipdat (08-01-2016) |
|
08-04-2016, 05:04 AM
|
#75 |
|
Member
Join Date: Nov 2014
Drives: GT86
Location: Japan / UK
Posts: 286
Thanks: 17
Thanked 320 Times in 130 Posts
Mentioned: 4 Post(s)
|
Update time!
Been considering engine upgrades for a while but I wanted to do some basic safety groundwork before doing that, such as exhaust upgrades and the most important part of a faster car, the ability to stop faster. Saw a set of runduce calipers on yahoo auctions japan and bit the bullet, both drivers and passengers side front calipers, more or less brand new pads, and more or less brand new (ignoring surface rust) rotors, for 1/7th of the RRP online, the only catch being while one rotor is more or less minty fresh, the other was badly burned (calipers were pulled off of a fire damaged 86), I'm in the process of stripping down the burned caliper now after inspecting the good side (which is perfectly fine), and so far it seems all the burned side really needs is the paint stripping and re-painting, and a fresh set of rubber seals for the pots, which I already have ordered. When the parts come I'll put up a restoration thread documenting the process, then get them installed! 
|
|
|
|
| The Following User Says Thank You to Futaba For This Useful Post: | zeal86 (08-25-2016) |
|
08-04-2016, 08:37 AM
|
#76 | |
|
Senior Member

Join Date: Jul 2014
Drives: 2020 Hakone
Location: London, Ont
Posts: 69,838
Thanks: 61,656
Thanked 108,295 Times in 46,456 Posts
Mentioned: 2499 Post(s)
|
Quote:
__________________
Racecar spelled backwards is Racecar, because Racecar.
|
|
|
|
|
|
08-04-2016, 09:19 AM
|
#77 | |
|
Member
Join Date: Nov 2014
Drives: GT86
Location: Japan / UK
Posts: 286
Thanks: 17
Thanked 320 Times in 130 Posts
Mentioned: 4 Post(s)
|
Quote:
I've checked the pots with a micrometer and inspected the ports they slide in to and they are thankfully immaculate and not distorted, the sliders look to be fine too but i've ordered a new set of mounting hardware regardless just to be on the safe side, the seals on the outer side of the caliper were in more or less factory condition, so i dont think the caliper overall spent too long in the fire! Got the rotors in an an oxalic acid bath to clean out the vents and take off the crap, was a lot of soot down the cooling channels i'm guessing from the tyre burning in close proximity! Took a bunch of pictures when I received them so it'll be interesting to do the before and after shots once i'm done rescuing the gnarly one! |
|
|
|
|
| The Following User Says Thank You to Futaba For This Useful Post: | Tcoat (08-04-2016) |
|
08-04-2016, 09:34 AM
|
#78 | |
|
Senior Member
Join Date: Jul 2014
Drives: 2020 Hakone
Location: London, Ont
Posts: 69,838
Thanks: 61,656
Thanked 108,295 Times in 46,456 Posts
Mentioned: 2499 Post(s)
|
Quote:
__________________
Racecar spelled backwards is Racecar, because Racecar.
|
|
|
|
|
| The Following User Says Thank You to Tcoat For This Useful Post: | Futaba (08-25-2016) |
|
08-05-2016, 07:07 AM
|
#79 |
|
Member
Join Date: Nov 2014
Drives: GT86
Location: Japan / UK
Posts: 286
Thanks: 17
Thanked 320 Times in 130 Posts
Mentioned: 4 Post(s)
|
Caliper restoration log!
For reference, here is the condition the burned caliper was it was when I bought it.   First task was to remove the pots and check the seals, the result of this I logged down for reference, partly so I could print it out and lay the seals on it for reference, and partly so I had documentation of which pots were exposed to the most heat, for later checks.  Next up I removed the brakes and bleed valves to see if they could be cleaned, thankfully they came out nice!     I ran brake cleaner and then brake fluid through the valves and line to insure all fluid and contaminates were removed after cleaning, it should be good to go now, also sprayed the crossover tube with high temp black to prevent rust.  That's all for now until I hit the hardware store and buy a hex spanner big enough to further dismantle the calipers!, Also need to pick up some threadlock, copper grease and new rubber caps for the bleed valves, and some sort of high temp rubber to act as a vibration inhibitor for the crossover tube. <Edit> Caliper dismantled, cleaned up, sanded all the burnt junk off and lightly sanded the inner side to smooth everything out, more or less ready for paint now! 
Last edited by Futaba; 08-06-2016 at 08:11 AM. |
|
|
|
| The Following User Says Thank You to Futaba For This Useful Post: | DustinS (08-05-2016) |
|
08-09-2016, 07:07 AM
|
#80 |
|
Member
Join Date: Nov 2014
Drives: GT86
Location: Japan / UK
Posts: 286
Thanks: 17
Thanked 320 Times in 130 Posts
Mentioned: 4 Post(s)
|
Got some free time off work today so finally prepped and sprayed the stripped caliper, finished off with some by-hand filling in on the text/logo, now its all done going to leave it a few days before i throw the clearcoat layer on, then after about a week or so i'll get them installed!
 Got a few layers down over the initial primer layer then knocked them back with some fine wet and dry before continuing, end results pretty similar to the stock paintjob, should be spot on once the clearcoats applied!  Turned out well if you ask me! Last edited by Futaba; 08-09-2016 at 08:44 AM. |
|
|
|
| The Following User Says Thank You to Futaba For This Useful Post: | batlwagn (08-25-2016) |
|
08-09-2016, 08:14 AM
|
#81 |
|
Senior Member

Join Date: Nov 2014
Drives: 2016 Subaru BRZ WRB
Location: Hooksett, NH
Posts: 199
Thanks: 158
Thanked 63 Times in 46 Posts
Mentioned: 3 Post(s)
|
Looks great!
__________________
|
|
|
|
|
08-25-2016, 08:17 AM
|
#82 |
|
Member
Join Date: Nov 2014
Drives: GT86
Location: Japan / UK
Posts: 286
Thanks: 17
Thanked 320 Times in 130 Posts
Mentioned: 4 Post(s)
|
 After being patronized about how the calipers and rotors would not fit, I was then quoted close to $200 by my local yellowhat branch to install and bleed the calipers with the rotors, I drove back home and did it my damn self. All good, bled with $2 worth of random crap from a hardware store slapped together!  Just remember to put a breather hole at the top of the catch bottle so you don't get pressure building in it. Quoted $200 Cost me $13 ish to do it myself, including fresh brake fluid and bleeding parts.. yeah, DIY in Japan is the way to go if you are brave enough. |
|
|
|
|
08-25-2016, 05:09 PM
|
#83 |
|
That Guy

Join Date: Jun 2016
Drives: Fast and Hard
Location: South Texas
Posts: 120
Thanks: 30
Thanked 42 Times in 37 Posts
Mentioned: 0 Post(s)
|
Man id love to go for a drive in japan
__________________
"Knowledge will give you power, but character respect.."
DD: 2007 Suzuki Sv650 Weekend Car: 1969 Chevelle Summer/Weekend Car: 2014 BRZ |
|
|
|
| The Following User Says Thank You to AdrianSaldana For This Useful Post: | Futaba (08-25-2016) |
|
08-25-2016, 05:27 PM
|
#84 |
|
Senior Member

Join Date: May 2012
Drives: Firestorm FT-86
Location: I.E./Nagoya,JP
Posts: 203
Thanks: 22
Thanked 74 Times in 54 Posts
Mentioned: 4 Post(s)
|
Great looking car! Man, I miss driving my S15 on the mountain roads in Japan.
 When I return, we should meet up! I'll hopefully have another car waiting for me When I return, we should meet up! I'll hopefully have another car waiting for me
|
|
|
|
| The Following User Says Thank You to Thefear13 For This Useful Post: | Futaba (08-25-2016) |
|
|
|
|
|
|
 Similar Threads
|
||||
| Thread | Thread Starter | Forum | Replies | Last Post |
| NASA PW event with fellow forum member "rice_classic" - 2014-7-19 | glamcem | Tracking / Autocross / HPDE / Drifting | 19 | 08-22-2014 04:58 AM |
| Fittedtho presents: "What the hell is wintermode?" Introduction to 2014 car meet | YDNA | Southern California | 14 | 01-19-2014 03:58 AM |
| Which Markets have "GT86" and "Toyota" badges on trunk? | Tanuki | Scion FR-S / Toyota 86 GT86 General Forum | 20 | 02-10-2013 05:23 PM |
| Taking my GT86 "Wingo" and a GoPro3 Videocam for a Sunday Drive | Killerbee | FR-S & 86 Photos, Videos, Wallpapers, Gallery Forum | 9 | 01-02-2013 08:30 AM |
| how far in advance did you get "the call" | pr086 | Scion FR-S / Toyota 86 GT86 General Forum | 17 | 11-13-2012 12:07 PM |


 Celica 86
