


|
||||||
| Cosmetic Modification (Interior/Exterior/Lighting) Discussions about cosmetic mods. |
 |
|
|
Thread Tools | Search this Thread |
 03-09-2016, 08:04 PM
|
#1 |
|
Indulgent Tormenter

Join Date: Dec 2015
Drives: 15' LTD Subaru BRZ DGM
Location: FL
Posts: 496
Thanks: 335
Thanked 129 Times in 88 Posts
Mentioned: 4 Post(s)
Tagged: 2 Thread(s)
|
Fender Trim Removal
My next modification will be an aesthetics upgrade. I am looking to get rid of those ugly chrome fender trims.
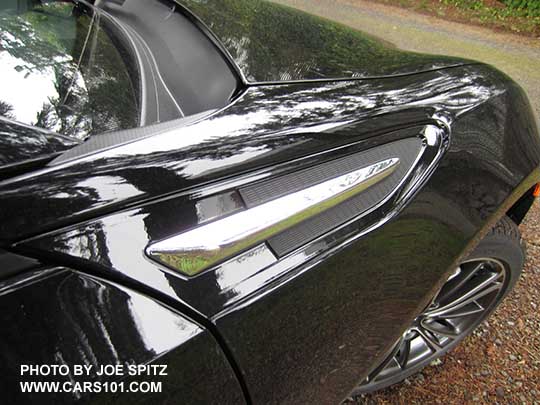 Since fender garnishes are, if you ask me, somewhat expensive for what it is, like this one...  I am probably going to get rid of just the chrome trim and install a black on like this one. 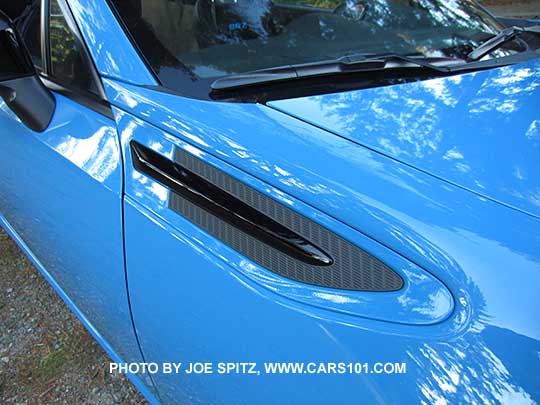 My question is how are these trims removed and how are the replacements place on perfectly so that it does not look slanted. I have heard of using soft fishing line and ripping through the tape, but I didn't find anything on how the placement for these goes after.
__________________
 Instagram: Gabe.it.the.ole.college.try |

|

|
|
03-09-2016, 08:10 PM
|
#2 |
|
Senior Member

Join Date: Sep 2012
Drives: 2013 FR-S
Location: Durham Region, Canukistan.
Posts: 506
Thanks: 224
Thanked 154 Times in 111 Posts
Mentioned: 13 Post(s)
Tagged: 0 Thread(s)
|
The factory units use both double sided tape and clips. Probably some gentle prying will be just the ticket.
I'll be replacing mine in a couple of months once the weather warms up.
__________________
.o0+Eric+0o.
2016 Chrysler 200S 3.6 2013 FRS 6MT |
|
|
|
|
03-09-2016, 08:19 PM
|
#3 |
|
Senior Member

Join Date: Oct 2014
Drives: A work in progress.
Location: DFW
Posts: 144
Thanks: 37
Thanked 181 Times in 66 Posts
Mentioned: 0 Post(s)
Tagged: 0 Thread(s)
|
Shave them off
  They are just held on by tape and clips, just a bit of force and they should come off. And the clips should align themselves so you don't really have to worry too much about it being slanted or anything. |
|
|
|
|
03-09-2016, 08:41 PM
|
#4 | |
|
Indulgent Tormenter
Join Date: Dec 2015
Drives: 15' LTD Subaru BRZ DGM
Location: FL
Posts: 496
Thanks: 335
Thanked 129 Times in 88 Posts
Mentioned: 4 Post(s)
Tagged: 2 Thread(s)
|
Quote:
__________________
Instagram: Gabe.it.the.ole.college.try |
|
|
|
|
|
03-09-2016, 08:43 PM
|
#5 | |
|
Indulgent Tormenter
Join Date: Dec 2015
Drives: 15' LTD Subaru BRZ DGM
Location: FL
Posts: 496
Thanks: 335
Thanked 129 Times in 88 Posts
Mentioned: 4 Post(s)
Tagged: 2 Thread(s)
|
Quote:
__________________
Instagram: Gabe.it.the.ole.college.try |
|
|
|
|
|
03-10-2016, 01:22 AM
|
#7 |
|
Custom User Title

Join Date: Jun 2012
Drives: Asphalt FR-S MT
Location: Buford, GA/Daytona Beach, FL
Posts: 2,793
Thanks: 395
Thanked 1,182 Times in 697 Posts
Mentioned: 49 Post(s)
Tagged: 0 Thread(s)
|
To avoid any confusion with the way the previous posters worded their statement:
The chrome is just a cover. There is still a fully shaped piece under. To remove the chrome, simply pry from the edges of the chrome cover itself. To remove the entire panel (fake vent and surround), start from the rear (pointy side) and pull straight out from the fender. There will be about 6? clips. When you get to the front (rounded side), there will be a big patch of double sided tape. Just pull straight out.
__________________
 |
|
|
|
|
03-10-2016, 02:14 AM
|
#8 | |
|
Indulgent Tormenter
Join Date: Dec 2015
Drives: 15' LTD Subaru BRZ DGM
Location: FL
Posts: 496
Thanks: 335
Thanked 129 Times in 88 Posts
Mentioned: 4 Post(s)
Tagged: 2 Thread(s)
|
Quote:
__________________
Instagram: Gabe.it.the.ole.college.try |
|
|
|
|
|
03-10-2016, 02:22 AM
|
#9 |
|
Custom User Title
Join Date: Jun 2012
Drives: Asphalt FR-S MT
Location: Buford, GA/Daytona Beach, FL
Posts: 2,793
Thanks: 395
Thanked 1,182 Times in 697 Posts
Mentioned: 49 Post(s)
Tagged: 0 Thread(s)
|
No. The chrome is JUST a cover. That shape still exists as paint matched plastic underneath.
__________________
|
|
|
|
|
03-10-2016, 02:29 AM
|
#10 | |
|
The Fail Boat

Join Date: Aug 2011
Drives: CWP S.B.
Location: LasVegas
Posts: 3,028
Thanks: 4,720
Thanked 1,294 Times in 874 Posts
Mentioned: 19 Post(s)
Tagged: 0 Thread(s)
|
Quote:
Ya chrome piece is just a chrome plastic with double side tape that dealer put on for you for 70 buck. 😆 Sent from my iPhone using Tapatalk |
|
|
|
|
|
03-10-2016, 02:44 AM
|
#11 | |
|
Indulgent Tormenter
Join Date: Dec 2015
Drives: 15' LTD Subaru BRZ DGM
Location: FL
Posts: 496
Thanks: 335
Thanked 129 Times in 88 Posts
Mentioned: 4 Post(s)
Tagged: 2 Thread(s)
|
Quote:
__________________
Instagram: Gabe.it.the.ole.college.try |
|
|
|
|
|
03-10-2016, 02:44 AM
|
#12 |
|
Custom User Title
Join Date: Jun 2012
Drives: Asphalt FR-S MT
Location: Buford, GA/Daytona Beach, FL
Posts: 2,793
Thanks: 395
Thanked 1,182 Times in 697 Posts
Mentioned: 49 Post(s)
Tagged: 0 Thread(s)
|
If you go prying with no regard, you'll probably damage (scratch, scrape, gouge) the part underneath which is why I tried to go to such a great length to explain it.
If I had no idea and "just pried it off" (cough comment above), I probably would have damaged my garnish. I'm not really sure you can actually replace it. You can just plasti dip it the way it is now. Maybe spray paint the cover and reapply.
__________________
|
|
|
|
|
03-10-2016, 03:53 AM
|
#13 | |
|
Indulgent Tormenter
Join Date: Dec 2015
Drives: 15' LTD Subaru BRZ DGM
Location: FL
Posts: 496
Thanks: 335
Thanked 129 Times in 88 Posts
Mentioned: 4 Post(s)
Tagged: 2 Thread(s)
|
Quote:
I have no experience with plasti dip, but I wonder if it will look bad, compared to if I order a black one. 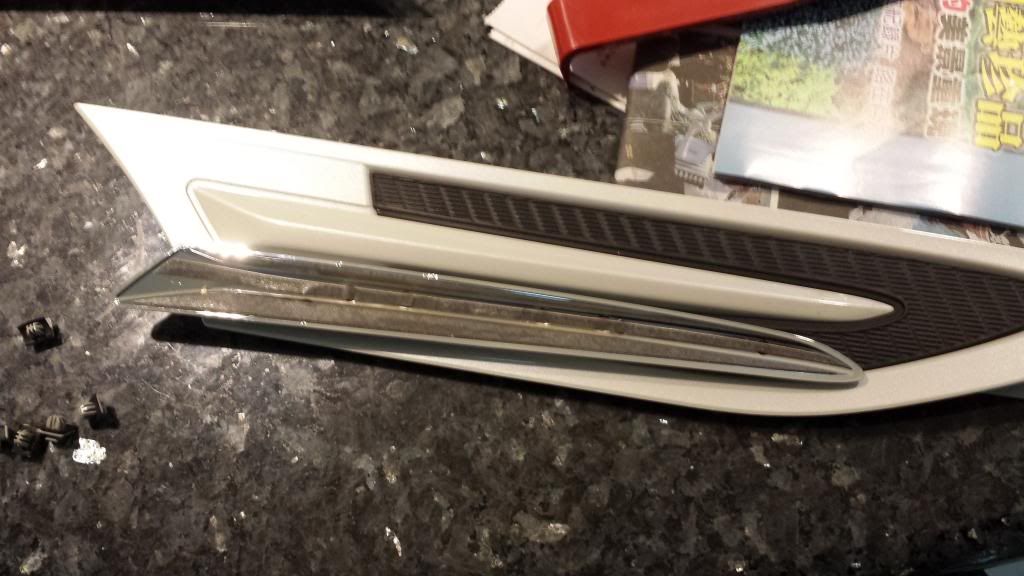
__________________
Instagram: Gabe.it.the.ole.college.try Last edited by ShadowReaper; 03-10-2016 at 04:13 AM. |
|
|
|
|
|
03-10-2016, 04:15 AM
|
#14 |
|
FT86Club Vancouver

Join Date: Jun 2012
Drives: BRZ Sport-Tech; Drove: MR-S, AE86
Location: Vancouver, BC
Posts: 2,533
Thanks: 391
Thanked 1,180 Times in 634 Posts
Mentioned: 16 Post(s)
Tagged: 2 Thread(s)
|
And if you're curious, this is what underneath the garnish looks like: 6 clips and double sided tape to remove, if you plan on taking off the whole piece.

__________________
1984 AE86 BT 20V 5MT 2007-2012
2000 MR-S 5MT 2010-2012 2013 BRZ Sport-Tech 6AT Since '12 (OEM+ STI tS Build) 2015 Lexus IS250 AWD F-Sport 2 2015-2018 2018 Lexus NX300 F-Sport 3 Since '18 |
|
|
|
| The Following User Says Thank You to DaJo For This Useful Post: | ShadowReaper (03-10-2016) |
|
|
|
|
|
|
 Similar Threads
|
||||
| Thread | Thread Starter | Forum | Replies | Last Post |
| DIY Silver Gauge Cluster trim removal | Jake_86 | DIY (Do-It-Yourself) Guides | 4 | 08-15-2015 01:31 PM |
| B pillar trim removal | lmabee | Scion FR-S / Toyota 86 GT86 General Forum | 4 | 03-21-2015 11:36 PM |
| Center air conditioner trim removal? | Jake_86 | Cosmetic Modification (Interior/Exterior/Lighting) | 6 | 03-13-2015 05:17 PM |
| Trim removal DIY (Request) | PrDarkKnight | DIY (Do-It-Yourself) Guides | 32 | 01-22-2013 08:21 PM |
| Silver interior trim removal for plasti-dipping | ph0en1xtk | Cosmetic Modification (Interior/Exterior/Lighting) | 1 | 10-06-2012 09:54 AM |


 Ashley