


 05-09-2014, 01:32 PM
|
#253 |
|
Senior Member

Join Date: Aug 2012
Drives: FR-S
Location: IL
Posts: 2,857
Thanks: 519
Thanked 2,998 Times in 1,095 Posts
Mentioned: 159 Post(s)
|
Essex Parts Tour and Interviews
[ame="https://www.youtube.com/watch?v=vz8usUhhzgQ"]Brake Tech and Interviews | AP Racing Essex | SE0203 - YouTube[/ame] Most of us who enjoy a performance car usually have to deal with some type of brake upgrade or at the very least pad changes for autox and track.  SUPPORT After spending the past 10 years with sporty cars one thing I absolutely have to say is that no matter what brand or product you are loyal to, when it comes to key components on your car once you modify them your warranty is long gone.  One of the critical things to choosing a brand or product is that you can get help, replacement parts and tech support with minimal BS. Essex is the North American Distributor for AP Racing products which is actually owned by Brembo. However AP Racing operates completely separate much like how Hyundai and Kia do. They even compete with each other. The difference is they share technical resources, which is why you will see Brembo dust boots on an AP Caliper. Much like our trip to Ohlins, we found your product is only as good as your support network. As it relates to this platform a majority of the key players on this forum run AP Racing brakes and the one major reason for it is because they work and have some of the cheapest consumables and pad choices. For example if you happened to be at a track weekend, and realized on Friday you had a cracked rotor or a caliper failure, you could call Essex and they could have you parts shipped to the track next day or to your hotel with no drama. They have the stock and parts to make sure you don't sit with the car parked for a week or two waiting on parts from over seas.   This sometimes can be the case with more esoteric kits from brands like Alcon or Project Mu. The bottom line is a place like Essex has a long standing history of supporting race teams in America and have been around for a long time. This is not some internet drop ship establishment that disappears in 2 years. Even though Essex is the distributor you can also get these parts from credible vendors on this site like CounterSpace Garage, RaceCompEngineering and get full support from them.  BURNISHING/BEDDING SERVICE One area we saw that was unique to Essex was a computer controlled burnishing machine. Its for customers who want their pads and rotors pre-bedded before they use them. They place the rotor of your choice on a machine with the pads you will use, and run it through a series of computer controlled bedding. The result is a perfected bedded pad a rotor set they ship to you so all you have to do is put it on your car and start lapping. The service was between $50-$75 per rotor. 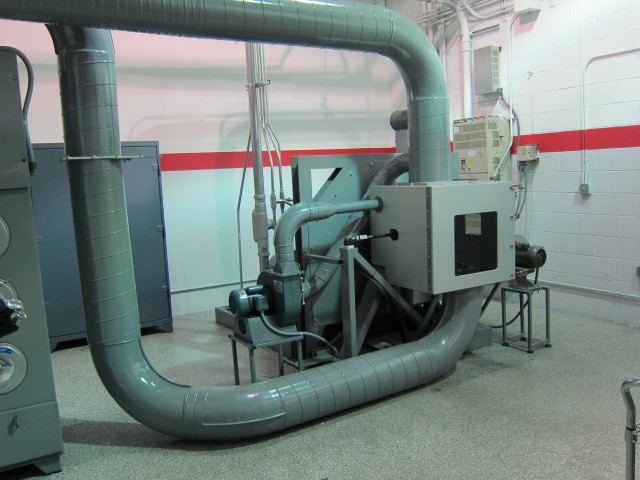 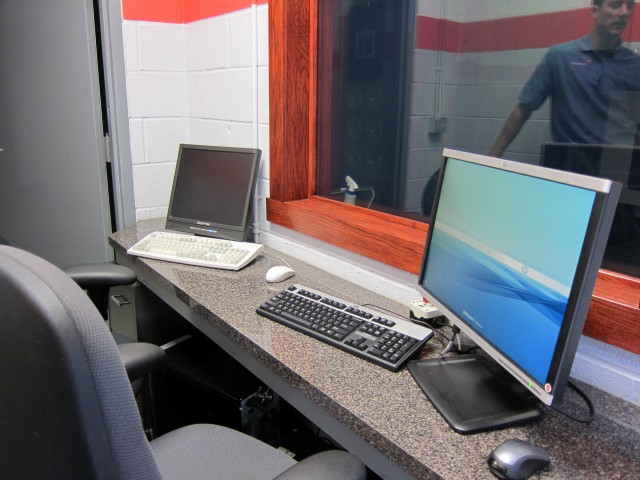 CHOOSING A KIT The biggest thing to walk away from when choosing brakes for this car or any car is to know exactly what you are actually going to be doing. WINTER AND COLD CLIMATE ISSUES The other massive consideration is climate, if you are choosing a big brake kit, and see cold climates with road salt you can count on having to remove the brakes in the winter to avoid destroying the finish/caliper or seals. Even if you choose a street caliper with a power coated finish you will likely have a two piece rotor. As soon as that road salt gets in between that iron disk and aluminum hat it starts to corrode the hardware and hat. Again with all performance parts we have the fine print you have to deal with. 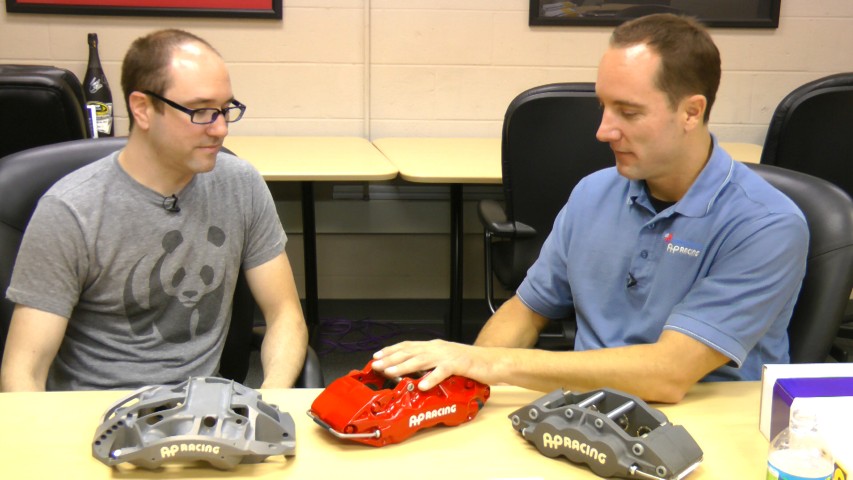 Pad choices carry similar trade offs: "There is no unicorn brake pad that will have a 2000F operating range that will also be usable on the street."  CONCLUSION If you are in the market for a brake upgrade the best thing to do is talk to people about brakes for your platform who actually have experience with on the track and street. Places like Essex have massive experience with multiple platforms. Companies like CSG have the practical experience on the 86 platform. And people like use try and gather information from multiple sources to show different perspectives. Between all of this drivers should be able to make a more educated choice on what will work and what the trade offs are before dumping money on something that may not work for your needs. "Remember there is no magic bullet for all climates and all drivers in the world of brakes."
__________________
|

|

|
| The Following User Says Thank You to Dezoris For This Useful Post: | Anomie (05-23-2014) |
|
05-12-2014, 06:16 PM
|
#254 |
|
Senior Member
Join Date: Aug 2012
Drives: FR-S
Location: IL
Posts: 2,857
Thanks: 519
Thanked 2,998 Times in 1,095 Posts
Mentioned: 159 Post(s)
|
Radium Strut Brace
Install and Review VIDEO DIY [ame="https://www.youtube.com/watch?v=AOfcKqJYYMc"]Scion FR-S BRZ Radium Strut Bar Install Review | S02E04 - YouTube[/ame] Install Instructions: http://data.radiumauto.com/PublicDocs/19-0071.PDF _________________________________________________ The truth is I have not installed a strut tower brace since I had my 90s Civic. That bar was a complete joke, pivot points and the fastest color possible. (yellow) That $60 piece of junk was nothing more than something to fool myself into thinking the car was somehow a Fast and the Furious showcase car. Fast forward maybe 17 years and here I am with my first strut tower brace since then.   INSTALLATION: (See Video) Installation instructions included are about as good as you can get. Included are torque values for all fasteners and helpful hints written in plain English. However I did run into a few minor issues I put in the video and also emailed Radium to update. But overall this will be a straight forward 25 minute or less process with very little drama. TOOLS NEEDED:
     AREAS OF CAUTION:
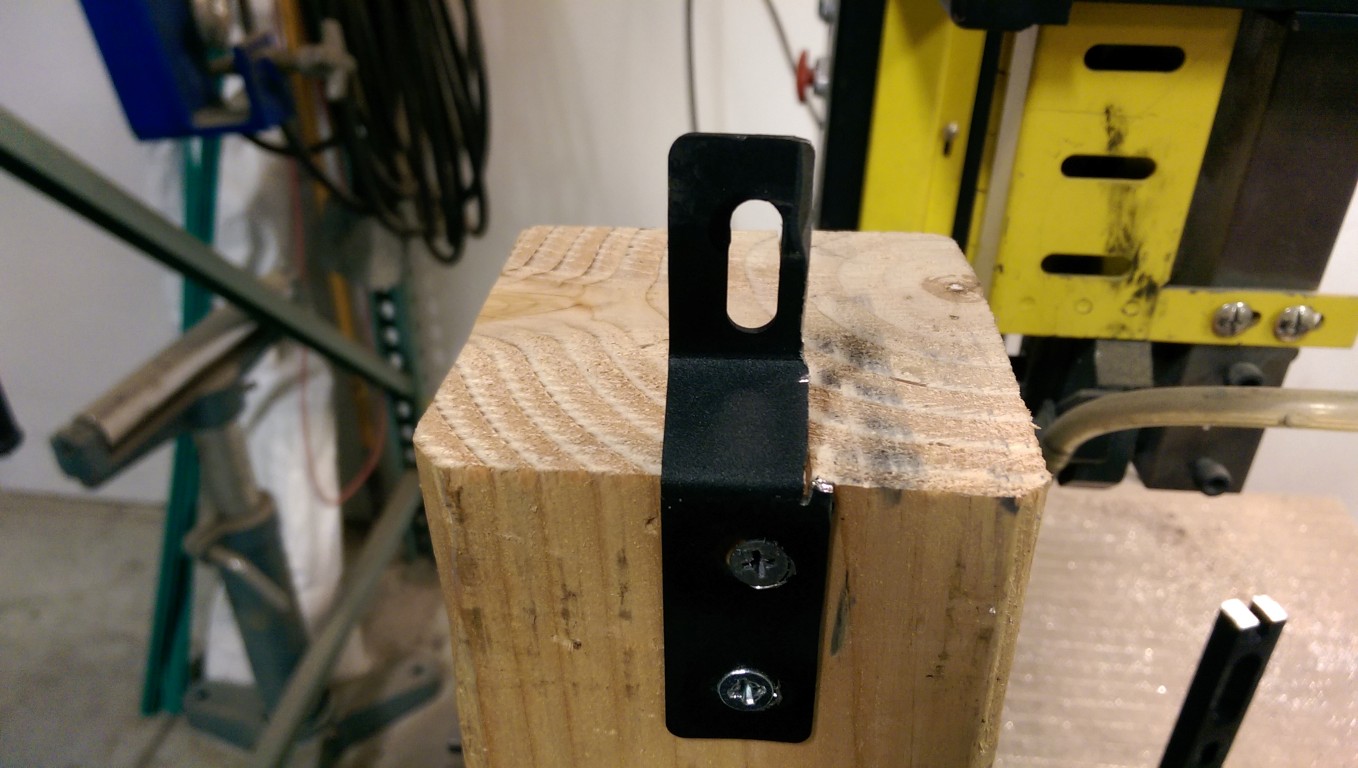
    ADJUSTING PRE-LOAD: This is the first bar of it's type for the FRS/BRZ with pre-load adjustment. Now at the price point this adds some value for those looking to tune out chassis flex from extreme lowering or very hard core track suspension. You rotate the bar with the locking nuts loose which moves the rod ends towards the corner of the car which exerts pressure against the shock towers, pre-loading force on them. Which depending on your application could potentially remove the load already placed on the towers from lowering or high spring rates. Alternatively this could help reduce more extreme flexing from track cars. The reality it's not much use for the common man or woman with more stockish cars. But Radium radium assumes this will be installed on more performance oriented vehicles. PRICE POINT AND OVERALL IMPRESSIONS: Radium does not design products to a price point. With that said it's the most expensive strut bar for the car. GrimmSpeed, FT86SpeedFactory and Perrin all make solid bars with no Pivot Points which are cheaper alternatives. There are plenty if cheap strut bars around the $150 price point however don't be fooled as they have those pivot mounting points which make them glorified appearance pieces. I think Radium did a good job designing a bar with a few extra features like pre-load adjustment and also a higher height so you can get at your map sensor if needed. So in this regard it may be worth it for more users with modified setups. This big issue becomes is all this worth the extra cash for most buyers? PROS
CONS
__________________
|
|
|
|
|
05-23-2014, 02:08 AM
|
#255 |
|
Senior Member
Join Date: Aug 2012
Drives: FR-S
Location: IL
Posts: 2,857
Thanks: 519
Thanked 2,998 Times in 1,095 Posts
Mentioned: 159 Post(s)
|
Perrin Oil Cooler Install Tips and Tricks
What is a thermostatic oil cooler setup? Its a liquid to air cooler that uses a thermostatic plate to mechanically control oil flow to an oil cooler. The thermostat inside this sandwich plate can open at a specified temperature to allow full oil flow to the cooler. Most of these plates go full open at 185F. Although this depends on manufacturer, also the thermostats and plates can be custom ordered. THERMOSTATIC SANDWICH PLATE BY MOCAL (185F FULL OPEN)  PERRIN MOCAL PLATE FILTER AND LINES INSTALLED:   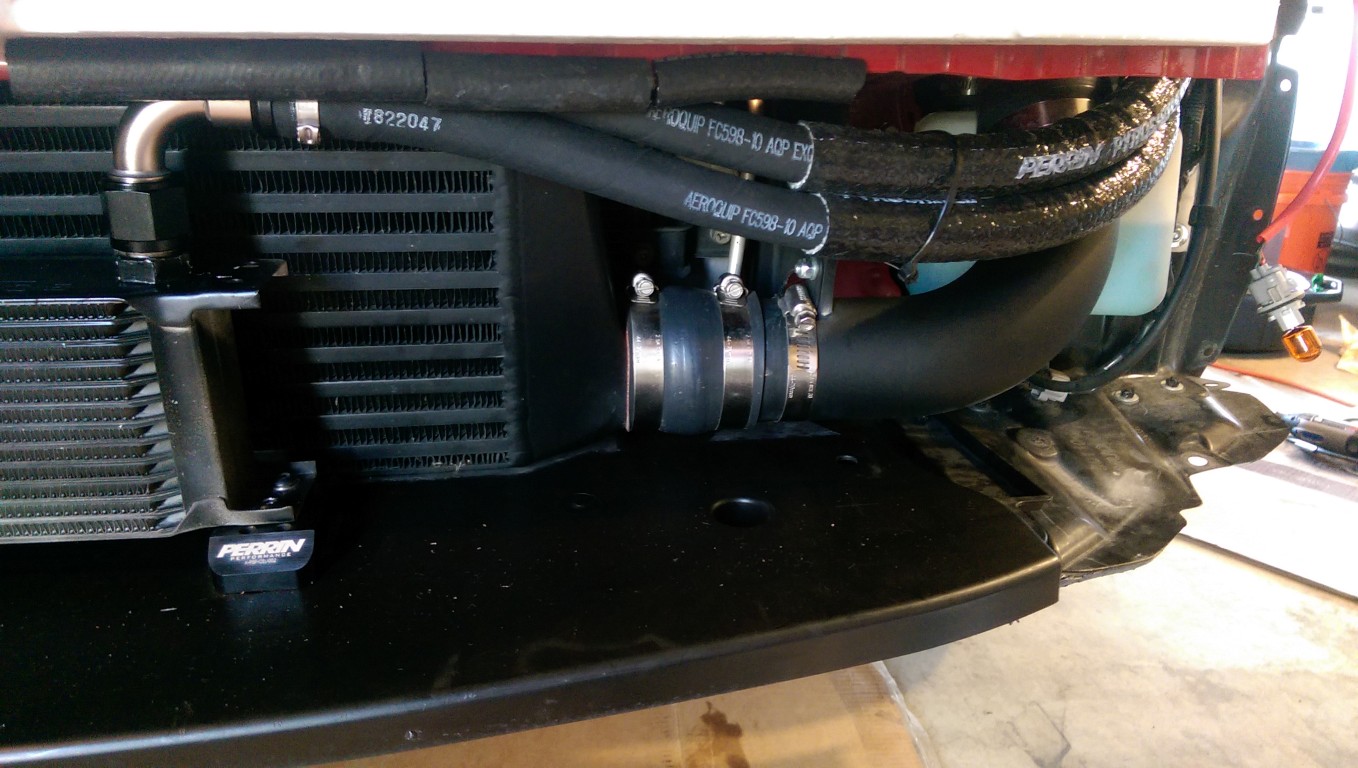  Why do I need an oil cooler? The short answer is the FRS/BRZ/GT86 in stock unmodified form tend to have higher oil temperature when the vehicle is run hard on track or autox, and tends to have very slow temperature recovery times Running forced induction means you need to keep the oil at normal levels 170-220F on 0w20 oil for street driving. That can be very hard to do in hot climates or those who tear through the gears often. If you drive this car on the track with the Vortech kit without an oil cooler your oil temps will reach near dangerous levels within 10-15 minutes. 270F+. From most research after the past year optimal track oil temps are 220-250F (265F being the acceptable upper limit) What thermostatic oil coolers fit?
Tips and Tricks for making the oil cooler lines fit properly: If you are running a thermostatic kit the biggest problem is line clearance over the Vortech airbox bracket, ABS module, airbox, headlamp assembly and bumper beam. VORTECH BRACKET TOUCHING OIL LINES: 

     
Tips and Tricks line and AN Fittings:
 Set of 5 AN Wrenches: http://www.amazon.com/gp/product/B003BZLLUE/ref=oh_details_o08_s00_i00?ie=UTF8&psc=1 Adjustable AN Wrench: http://www.amazon.com/gp/product/B003BZR6E4/ref=oh_details_o08_s01_i00?ie=UTF8&psc=1
FINAL TIPS AND ADVICE:

WARNINGS AND EFFECTS OF LEAKS 1. Oil will pool on bypass valve if plate is leaking. 2. Oil will pool on skid plate  3. Oil can contact drive belt 4. Oil can cause fire if enough collects on exhaust 5. Oil can leak out of skid plate and coat tires and cause loss of control
__________________
|
|
|
|
| The Following User Says Thank You to Dezoris For This Useful Post: | Anomie (05-23-2014) |
|
05-23-2014, 02:52 AM
|
#256 |
|
Senior Member
Join Date: Aug 2012
Drives: FR-S
Location: IL
Posts: 2,857
Thanks: 519
Thanked 2,998 Times in 1,095 Posts
Mentioned: 159 Post(s)
|
Oil Pressuring Testing Part 1
Interesting initial data collection, its clear oil temp plays a major roll in pressures. 0W20 Redline (Fresh Change) IDLE OIL PRESSURES 175F = 19PSI  190F = 15PSI  198F = 11PSI  210F = 9PSI
__________________
|
|
|
|
| The Following User Says Thank You to Dezoris For This Useful Post: | dp1 (05-23-2014) |
|
05-23-2014, 10:19 AM
|
#257 |
|
Senior Member
Join Date: May 2012
Drives: 2020 SS1LE (previous 13 BRZ owner)
Location: North Pole
Posts: 2,753
Thanks: 328
Thanked 1,463 Times in 802 Posts
Mentioned: 20 Post(s)
|
Man you have some great stuff in here. Awesome job.
|
|
|
|
|
05-23-2014, 11:05 AM
|
#258 |
|
Senior Member

Join Date: Feb 2013
Drives: 13 BRZ Limited WRB
Location: Fargo, ND
Posts: 723
Thanks: 17
Thanked 296 Times in 195 Posts
Mentioned: 12 Post(s)
|
Quick Question -
I have my Vortech Kit on Order. I have already acquired the Perrin Oil cooler. I will get a Radiator and Catch cans or AOS. I am going to install everything at once. Any tips for installing all of that together? Thanks!
__________________
I plan to live forever. So far, so good.
My Build - http://www.ft86club.com/forums/showthread.php?t=31925  |
|
|
|
|
05-23-2014, 11:26 AM
|
#259 |
|
Senior Member
Join Date: Jul 2012
Drives: FRS
Location: Cali
Posts: 1,558
Thanks: 188
Thanked 462 Times in 264 Posts
Mentioned: 9 Post(s)
|
Any chance you can measure your clearance from strut bar to engine cover? Curious if it would work with Crawford power blocks...?
|
|
|
|
|
05-23-2014, 11:52 AM
|
#260 | |
|
corolla specs/GTR looks
Join Date: May 2013
Drives: ooh oooh pretty tail lights
Location: slower than a accord V6
Posts: 490
Thanks: 229
Thanked 113 Times in 79 Posts
Mentioned: 5 Post(s)
|
Quote:
I simply removed the bracket that interferes with oil path My car tracks just fine without it FYI air box stays where it should be If you don't put a header in front of it's hard to justify. Once you go catless header it makes total sense tho. Oil pressure in my ride varies relative to temp and it will vary more as you use different oil cooler setups. Adding the robispec oil water cooler was awesome for me in my climate, hotter the oil lower the off track idle pressure so keep an eye on that, don't shut down just after a hot lap. Fwiw near 100 psi on cold startup presented some challenge for my oil fed setup but thanks to Jeff Perrin and the in line restrictor he sent me it's fine now.
__________________
SOLD THEM BOTH
Hers: 2007 987S Mine: 2012 991S That was fun, thanks Hachi  |
|
|
|
|
| The Following User Says Thank You to kiichiro For This Useful Post: | Dezoris (05-23-2014) |
|
05-23-2014, 02:32 PM
|
#261 |
|
Member

Join Date: May 2014
Drives: Diesel daily / FR-S
Location: United States
Posts: 81
Thanks: 5
Thanked 25 Times in 23 Posts
Mentioned: 0 Post(s)
|
Nice reviews...
I literally spent like 2.5 hours skimming. 
|
|
|
|
| The Following User Says Thank You to Roxy86 For This Useful Post: | Dezoris (05-23-2014) |
|
05-23-2014, 04:21 PM
|
#262 | |
|
Senior Member
Join Date: Aug 2012
Drives: FR-S
Location: IL
Posts: 2,857
Thanks: 519
Thanked 2,998 Times in 1,095 Posts
Mentioned: 159 Post(s)
|
Quote:
__________________
|
|
|
|
|
|
05-23-2014, 04:27 PM
|
#263 | |
|
Senior Member
Join Date: Aug 2012
Drives: FR-S
Location: IL
Posts: 2,857
Thanks: 519
Thanked 2,998 Times in 1,095 Posts
Mentioned: 159 Post(s)
|
Quote:
I have to use the bracket for the discharge pipe or mine starts banging around on the bumper beam, tried it already. I am sure I could bracket it in the wheel well but, tired of ****ing with things. Why is your car apart you building motor? Are you still using Pentosin?
__________________
|
|
|
|
|
|
05-23-2014, 04:46 PM
|
#264 | |
|
Senior Member
Join Date: Aug 2012
Drives: FR-S
Location: IL
Posts: 2,857
Thanks: 519
Thanked 2,998 Times in 1,095 Posts
Mentioned: 159 Post(s)
|
Quote:
Break up the install to like 2-3 days if possible. Take the time to do the detail work properly, like adjusting the pipes and moving things around where you have zero clearance issues, things you would rush through if you try and do it in one day. Thinks like the washer fluid tube, make sure your hose clamp is not digging into frame while also making sure its not rubbing on your oil line or discharge pipe like mine was here: 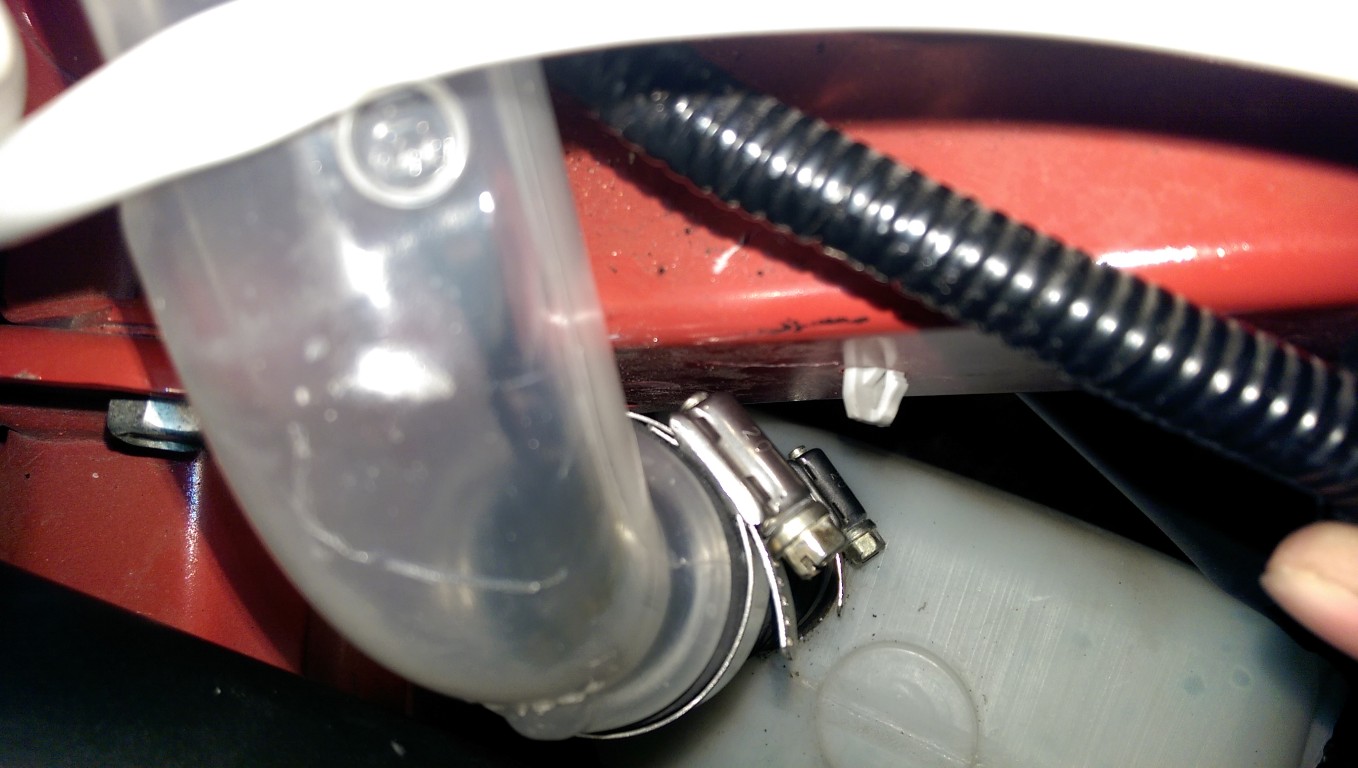 Also another little thing is to make sure you don't over tighten that hose clamp on the washer fluid neck because anything more than even remotely snug will crush it like pictured and will leak, something not mentioned in instructions:  My oil cooler thread above has some tips on how to get clearance and install. Get your catch cans first so you can do all the hose work right away its much easier that way namely the breather tube, and so you have to cut the PCV hose so its better to do the PCV can right away. I don't believe in the Crawford AOS it separates the unburned fuel and blown by oil and dumps it back into the block, which will help to contaminate oil on a street car. The two cans I recommend are Saikou Michi and Radium, as they are pressure tested for boost etc. Finally when you change SC oil, the easiest way I found to get the right amount without ****ing around was to leave one bottle laying around at the level it took to get the dipstick at the middle mark. So when I drain and refill, I just fill to the bottle was at the level of my tester bottle as pictured. 
__________________
|
|
|
|
|
| The Following User Says Thank You to Dezoris For This Useful Post: | sato (05-23-2014) |
|
05-23-2014, 10:13 PM
|
#265 |
|
corolla specs/GTR looks
Join Date: May 2013
Drives: ooh oooh pretty tail lights
Location: slower than a accord V6
Posts: 490
Thanks: 229
Thanked 113 Times in 79 Posts
Mentioned: 5 Post(s)
|
Love my pentosin, it's in both cars
Car is fine I'm at the track this weekend I'm think I gonna commit to a full build up soon motor wise. Yeah, I think that makes one of them a keeper, let me figure out the heat management thing a bit better before I really put money where mouth is.
__________________
SOLD THEM BOTH
Hers: 2007 987S Mine: 2012 991S That was fun, thanks Hachi |
|
|
|
| The Following User Says Thank You to kiichiro For This Useful Post: | Dezoris (05-24-2014) |
|
05-24-2014, 02:11 AM
|
#266 | |
|
Senior Member
Join Date: Aug 2012
Drives: FR-S
Location: IL
Posts: 2,857
Thanks: 519
Thanked 2,998 Times in 1,095 Posts
Mentioned: 159 Post(s)
|
Quote:
Here you go from the higher point of the manifold pictured and the top cover.
__________________
|
|
|
|
|
|
|
|
|
| Tags |
| ap racing, daily driver track, dezoris, ohlins, perrin, properly built 86, vortech supercharger |
|
|
 Similar Threads
|
||||
| Thread | Thread Starter | Forum | Replies | Last Post |
| TWINCHARGED (Supercharged & Turbocharged) Widebody "WTF-86" 86/FRS *MASSIVE* build :D | WTF | Member's Car Journals | 224 | 08-18-2016 09:39 PM |
| Pneubs HKS Supercharged BRZ Build Thread | Pneub | Member's Car Journals | 62 | 03-30-2016 09:47 AM |
| (Boosted) FRS vs S2000... Dezoris strikes again. | CSG Mike | FR-S / BRZ vs.... | 156 | 09-08-2014 01:16 AM |
| Morpheus, Scion dream Build. Supercharged FR-S by TuneCast | scionsalesjay | Member's Car Journals | 51 | 07-07-2014 12:05 PM |
| Supercharged Rocket Bunny Widebody Conversion Build Thread | RWDRIFT | Member's Car Journals | 278 | 01-06-2014 12:12 AM |


