


 04-29-2014, 09:03 AM
|
#253 |
|
Senior Member

Join Date: Jun 2013
Drives: Vortech Supercharged FR-S
Location: Central Jersey
Posts: 1,515
Thanks: 597
Thanked 934 Times in 428 Posts
Mentioned: 17 Post(s)
|
I search for these part number on Amayama. And I found all of them.
However, it shows"cover, plastic"on these item? They are leather correct? Anyone has any idea? ----------------- Door Panel Knee Pads: (LH) SU003-04437 (RH) SU003-04436 Centre Console Knee Pads: (LH) SU003-01920 (RH) SU003-01919 Speaker Grilles: (LH) SU003-04433 (RH) SU003-04432 Speaker Grille Trim Rings: (LH) SU003-03287 (RH) SU003-03286 6 X Speaker Grille Screws (Required for Installation of Pads): SU003-02917 (x6)
__________________
I'd rather lose by a mile because I built my own car,
than win by an inch because someone else built it for me. Your car is your story, so don't let someone else write the book. ( White Tiger ) - FiGo's 車誌.  |

|

|
|
04-30-2014, 10:09 AM
|
#254 | |
|
Senior Member
Join Date: Nov 2012
Drives: Whiteout FRS
Location: Florida
Posts: 325
Thanks: 150
Thanked 273 Times in 120 Posts
Mentioned: 8 Post(s)
|
Quote:
Yep, those are correct if you want the red trim items. They are the same material as what covers the armrests on the doors (I'm not sure if that is real leather, but it looks like leather). |
|
|
|
|
|
04-30-2014, 10:30 AM
|
#255 | |
|
Senior Member
Join Date: Jun 2013
Drives: Vortech Supercharged FR-S
Location: Central Jersey
Posts: 1,515
Thanks: 597
Thanked 934 Times in 428 Posts
Mentioned: 17 Post(s)
|
Quote:
__________________
I'd rather lose by a mile because I built my own car,
than win by an inch because someone else built it for me. Your car is your story, so don't let someone else write the book. ( White Tiger ) - FiGo's 車誌. |
|
|
|
|
|
05-09-2014, 12:01 PM
|
#256 | |
|
Drive From Home

Join Date: Dec 2013
Drives: BRZ STI Performance
Location: Filth City
Posts: 4,912
Thanks: 2,368
Thanked 3,111 Times in 2,007 Posts
Mentioned: 30 Post(s)
|
Quote:
I ordered all the parts, thinking I should let the dealer install them for me. I just want to screw together as much bits as I can before giving the stuff to the dealer. Thanks! |
|
|
|
|
|
05-09-2014, 12:31 PM
|
#257 | |
|
Snow Don't Hurt!

Join Date: Jul 2012
Drives: 2013 BRZ Limited 6MT CBS
Location: Anchorage, Alaska, USA
Posts: 2,538
Thanks: 6,416
Thanked 1,497 Times in 902 Posts
Mentioned: 42 Post(s)
|
Quote:
|
|
|
|
|
| The Following User Says Thank You to chanomatik For This Useful Post: | krayzie (05-09-2014) |
|
05-09-2014, 02:42 PM
|
#258 | |
|
Drive From Home
Join Date: Dec 2013
Drives: BRZ STI Performance
Location: Filth City
Posts: 4,912
Thanks: 2,368
Thanked 3,111 Times in 2,007 Posts
Mentioned: 30 Post(s)
|
Quote:
I plan to do the center console knee pads first. I was originally going to let the dealer do this too but I figured I should try this myself (had a really bad experience messing up the center console cupholder install with the Golf so now I'm soured). 
|
|
|
|
|
| The Following User Says Thank You to krayzie For This Useful Post: | chanomatik (05-09-2014) |
|
05-09-2014, 05:09 PM
|
#259 | |
|
Snow Don't Hurt!
Join Date: Jul 2012
Drives: 2013 BRZ Limited 6MT CBS
Location: Anchorage, Alaska, USA
Posts: 2,538
Thanks: 6,416
Thanked 1,497 Times in 902 Posts
Mentioned: 42 Post(s)
|
Quote:
|
|
|
|
|
|
05-12-2014, 12:18 PM
|
#260 | |
|
Drive From Home
Join Date: Dec 2013
Drives: BRZ STI Performance
Location: Filth City
Posts: 4,912
Thanks: 2,368
Thanked 3,111 Times in 2,007 Posts
Mentioned: 30 Post(s)
|
Quote:
I'm still worried about the doors, especially with the locking cables, are the cable ends just hooks? I found a door removal DIY that seems to be more detailed here: http://www.ft86club.com/forums/showthread.php?t=27471 |
|
|
|
|
| The Following User Says Thank You to krayzie For This Useful Post: | chanomatik (05-12-2014) |
|
05-12-2014, 01:13 PM
|
#261 | |
|
Snow Don't Hurt!
Join Date: Jul 2012
Drives: 2013 BRZ Limited 6MT CBS
Location: Anchorage, Alaska, USA
Posts: 2,538
Thanks: 6,416
Thanked 1,497 Times in 902 Posts
Mentioned: 42 Post(s)
|
Quote:
|
|
|
|
|
| The Following User Says Thank You to chanomatik For This Useful Post: | krayzie (05-12-2014) |
|
05-12-2014, 01:18 PM
|
#262 | |
|
Senior Member

Join Date: Apr 2013
Drives: 2013 BRZ Limited
Location: Utah
Posts: 631
Thanks: 447
Thanked 350 Times in 168 Posts
Mentioned: 5 Post(s)
|
Quote:
I don't recommend disconnecting the cables. Once the door panel is off, the entire handle assembly is removed with 2 screws and the cables remain attached to the handle assembly.
__________________
Instagram: @zdr_93523
Youtube: https://www.youtube.com/user/zdr93523 Pink Ribbon Racing 2013 BRZ Limited NASA ST2 and TT2 race car www.makesmodels.com www.camautomag.com |
|
|
|
|
| The Following User Says Thank You to zdr93523 For This Useful Post: | krayzie (05-12-2014) |
|
05-14-2014, 11:28 AM
|
#263 | |
|
Drive From Home
Join Date: Dec 2013
Drives: BRZ STI Performance
Location: Filth City
Posts: 4,912
Thanks: 2,368
Thanked 3,111 Times in 2,007 Posts
Mentioned: 30 Post(s)
|
Quote:
I'll try and pull the door cards later in the day. Are the cables hard to release / and put back on? How do the ball joints get held in place? Sorry for the stupid questions. |
|
|
|
|
| The Following User Says Thank You to krayzie For This Useful Post: | unsurety (06-23-2014) |
|
05-14-2014, 12:09 PM
|
#264 | |
|
Snow Don't Hurt!
Join Date: Jul 2012
Drives: 2013 BRZ Limited 6MT CBS
Location: Anchorage, Alaska, USA
Posts: 2,538
Thanks: 6,416
Thanked 1,497 Times in 902 Posts
Mentioned: 42 Post(s)
|
Quote:
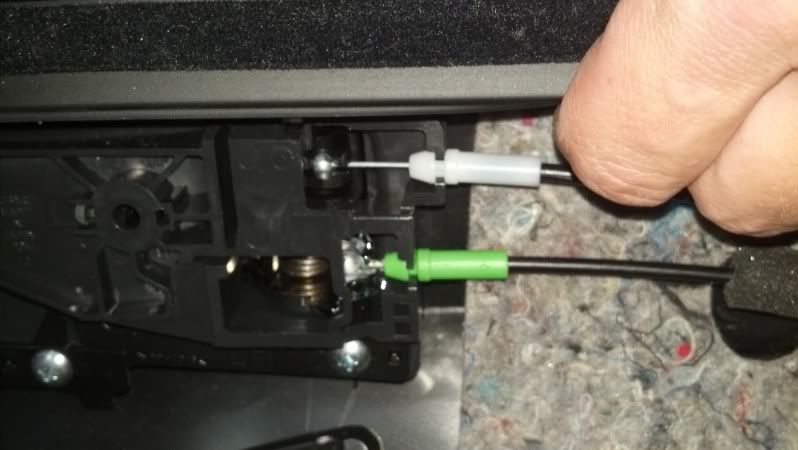 Lift the colored sheaths out of their placement and pull the metal ends out and you're good! Cables released! When putting back on, put the metal ends in first, then click in the colored sheaths. Make sure they click or are at least held firmly in place. |
|
|
|
|
|
05-14-2014, 12:43 PM
|
#265 | |
|
Senior Member
Join Date: Apr 2013
Drives: 2013 BRZ Limited
Location: Utah
Posts: 631
Thanks: 447
Thanked 350 Times in 168 Posts
Mentioned: 5 Post(s)
|
Quote:
Sent from my LG-D800 using Tapatalk
__________________
Instagram: @zdr_93523
Youtube: https://www.youtube.com/user/zdr93523 Pink Ribbon Racing 2013 BRZ Limited NASA ST2 and TT2 race car www.makesmodels.com www.camautomag.com |
|
|
|
|
| The Following User Says Thank You to zdr93523 For This Useful Post: | chanomatik (05-14-2014) |
|
05-14-2014, 01:10 PM
|
#266 |
|
Snow Don't Hurt!
Join Date: Jul 2012
Drives: 2013 BRZ Limited 6MT CBS
Location: Anchorage, Alaska, USA
Posts: 2,538
Thanks: 6,416
Thanked 1,497 Times in 902 Posts
Mentioned: 42 Post(s)
|
I found the releasing of the cables to be much quicker.
|
|
|
|
|
|
|
|
|
|
 Similar Threads
|
||||
| Thread | Thread Starter | Forum | Replies | Last Post |
| Toyota Japan 86, FRS, Air Bag, Frameless Mirror, Knee Pad, Sun Visor, Door sill, MOR | nigel-jdmparts | Interior Parts (Incl. Lighting) | 89 | 02-01-2013 04:00 PM |
| HID Retrofit Kit install | Jidonsu | NY / NJ / CT / PA | 1 | 08-04-2012 01:24 AM |
| How do you install the mud guards? | Moshpit37 | Scion FR-S / Toyota 86 GT86 General Forum | 11 | 07-27-2012 11:13 PM |
| FS: console knee foam pads | 86_ZN6 | Interior Parts (Incl. Lighting) | 9 | 07-21-2012 09:46 AM |
| Spoiler Install | CharlieChaos | Cosmetic Modification (Interior/Exterior/Lighting) | 1 | 07-07-2012 10:43 AM |


