


 04-07-2014, 06:13 PM
|
#869 | ||
|
Senior Member

Join Date: Apr 2013
Drives: 2005 Toyota Camry
Location: 91745
Posts: 6,562
Thanks: 493
Thanked 6,099 Times in 3,030 Posts
Mentioned: 95 Post(s)
Tagged: 3 Thread(s)
|
Quote:
Quote:
|
||

|

|
|
04-09-2014, 05:43 PM
|
#870 |
|
Senior Member

Join Date: Apr 2012
Drives: 2015 CWP Subaru BRZ Series.Blue
Location: Connecticut
Posts: 244
Thanks: 113
Thanked 131 Times in 58 Posts
Mentioned: 10 Post(s)
Tagged: 0 Thread(s)
|
No response from Subaru yet...
|
|
|
|
|
04-09-2014, 08:44 PM
|
#871 |
|
Senior Member

Join Date: Aug 2012
Drives: 2013 Raven FRS MT
Location: KY
Posts: 857
Thanks: 351
Thanked 302 Times in 185 Posts
Mentioned: 4 Post(s)
Tagged: 0 Thread(s)
|
Just found it in my passenger tail light yesterday. Yeaaa! Now I have chirps under my hood and splashing in the back. This one is going to be a Tom's tail light replacement and self seal.
|
|
|
|
|
04-09-2014, 09:51 PM
|
#872 |
|
Member
Join Date: Nov 2013
Drives: 2013 FRS
Location: Colonia, NJ
Posts: 47
Thanks: 5
Thanked 17 Times in 14 Posts
Mentioned: 1 Post(s)
Tagged: 0 Thread(s)
|
my dealer just ordered me a new light. I just went in, they took pictures and new light is on the way
|
|
|
|
| The Following User Says Thank You to mmsracing For This Useful Post: | ftc~brz (04-11-2014) |
|
04-10-2014, 11:23 AM
|
#873 |
|
Senior Member
Join Date: Nov 2012
Drives: 86
Location: uae
Posts: 403
Thanks: 202
Thanked 67 Times in 56 Posts
Mentioned: 10 Post(s)
Tagged: 0 Thread(s)
|
Just u have remove it and install it but with more harder torque
|
|
|
|
|
04-10-2014, 03:36 PM
|
#874 | |
|
Senior Member

Join Date: Nov 2012
Drives: 2023 Toyota GR86 Premium
Location: Richmond, VA, USA
Posts: 291
Thanks: 60
Thanked 143 Times in 66 Posts
Mentioned: 20 Post(s)
Tagged: 0 Thread(s)
|
Quote:
That's not necessarily the case and I wouldn't be telling people that. You have to be very careful how much you torque the nuts, because if you go too far you'll crack the housings. It's listed a few times in this thread, but the torque specs are: 3.25 ftlbs / 39 inlbs / 4.4 Nm You might get away with a little tighter than that, but I wouldn't push the limit.
__________________
2023 Toyota GR86 Premium, Neptune Blue Gasket Ninja.
|
|
|
|
|
|
04-10-2014, 04:08 PM
|
#875 |
|
Senior Member

Join Date: Sep 2012
Drives: Scion FR-S
Location: California
Posts: 120
Thanks: 90
Thanked 22 Times in 18 Posts
Mentioned: 1 Post(s)
Tagged: 0 Thread(s)
|
I just had mine replaced yesterday, and Toyota replaced both. Although, it was in one of the lights. They said that they're putting in a new gasket, and this supposedly fixes the issue.
|
|
|
|
|
04-10-2014, 04:27 PM
|
#876 |
|
Senior Member

Join Date: Mar 2013
Drives: Scion FR-S Raven
Location: Bloomfield, CT
Posts: 167
Thanks: 23
Thanked 17 Times in 14 Posts
Mentioned: 2 Post(s)
Tagged: 0 Thread(s)
|
I'm on my second taillight with the third on order threw the dealer under warranty. If this one is bad I give up!!
|
|
|
|
|
04-10-2014, 04:40 PM
|
#877 | |
|
Senior Member

Join Date: Oct 2013
Drives: 2019 BMW ///M4
Location: Los Angeles, CA
Posts: 2,332
Thanks: 102
Thanked 1,167 Times in 714 Posts
Mentioned: 28 Post(s)
Tagged: 0 Thread(s)
|
Quote:

__________________
N1rve
2019 BMW ///M4 - Alpine White | Sakhir Orange/Black Leather | M-DCT | Executive Package | 19" Black 437M Wheels | Carbon Fiber Trim | Sunroof | Active Blind Spot | Heated Steering Wheel | Adaptive M Suspension |
|
|
|
|
|
04-11-2014, 12:01 AM
|
#878 | |
|
Senior Member
Join Date: Aug 2012
Drives: 2013 Raven FRS MT
Location: KY
Posts: 857
Thanks: 351
Thanked 302 Times in 185 Posts
Mentioned: 4 Post(s)
Tagged: 0 Thread(s)
|
Quote:
Could be a little zoo in my car if I can get some fish in my tail light housing to go along with the crickets. |
|
|
|
|
|
04-11-2014, 02:13 PM
|
#879 | |
|
Senior Member
Join Date: Nov 2012
Drives: 86
Location: uae
Posts: 403
Thanks: 202
Thanked 67 Times in 56 Posts
Mentioned: 10 Post(s)
Tagged: 0 Thread(s)
|
Quote:
|
|
|
|
|
|
04-11-2014, 03:09 PM
|
#880 | |
|
Senior Member
Join Date: Nov 2012
Drives: 2023 Toyota GR86 Premium
Location: Richmond, VA, USA
Posts: 291
Thanks: 60
Thanked 143 Times in 66 Posts
Mentioned: 20 Post(s)
Tagged: 0 Thread(s)
|
Quote:
You did say to torque it more. How is someone going to know how much "too much" torque is? That's why the torque specs exist. As I said, you can go a little tighter than the specs, but not too much. There are a lot of factors and variables at play, including the temperature you're working in. Plastic breaks more easily in cold temps, for example. Do whatever you'd like with your own tail lights. I just want people to be aware that you can easily over torque the tail light post nuts. We're trying to prevent condensation in this thread, not potentially cause more. G'day.
__________________
2023 Toyota GR86 Premium, Neptune Blue Gasket Ninja.
|
|
|
|
|
|
04-11-2014, 09:32 PM
|
#881 |
|
Senior Member
Join Date: Oct 2013
Drives: 2013 Scion FR-S - Argento
Location: 805
Posts: 504
Thanks: 8
Thanked 216 Times in 143 Posts
Mentioned: 3 Post(s)
Tagged: 0 Thread(s)
|
My driver's side has had water in it since the one and only decent storm we had in Ca. Today I decided to start doing something about it. I got some removable adhesive (so-called snowman snot, but mine's blue!), and alcohol to dry out the existing water. Intending to get some new gasket material too, just didn't do it today.
CRITICAL WORD OF CAUTION - Be careful what you use for your drying agent. More below. First off, here's the gasket after I took it off. Lots of crap stuck on the tiny adhesive area. Of course this isn't going to hold up when it is the runoff path for half the back end of the car! It is lighter though because racecar! 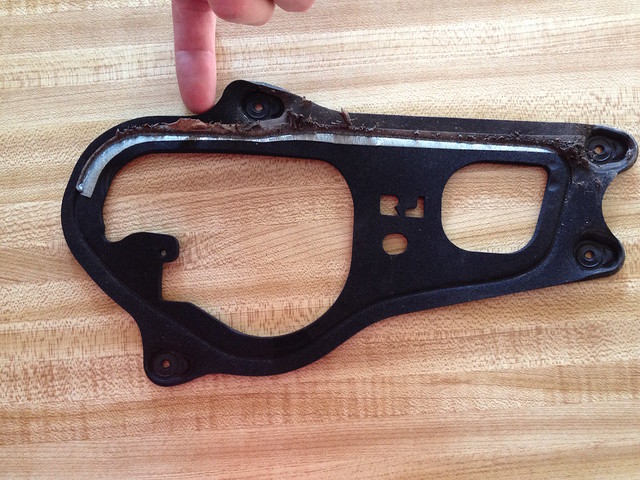 So I pulled one bulb from the housing and couldn't figure out how the water got in because it looks like the lights are an enclosure-within-an-enclosure - they aren't! Next, I poured in a little of my alcohol with a funnel to dry out the existing puddle and drops in there. CAUTION - MAKE SURE WHAT YOU USE FOR THIS HAS NO SOLVENT IN IT! To put it mildly, I fucked up big! I couldn't find methanol easily, so I got denatured alcohol at Home Depot. Should be just fine though as it is similar enough. Well, what I got apparently has a tiny bit of acetone in it (from Home Depot, supposedly "greener" denatured alcohol. MY ASS!). I didn't notice the smell right away when I opened it and poured it in, but I did a few seconds later. Hoped for the best, but today is not my day! 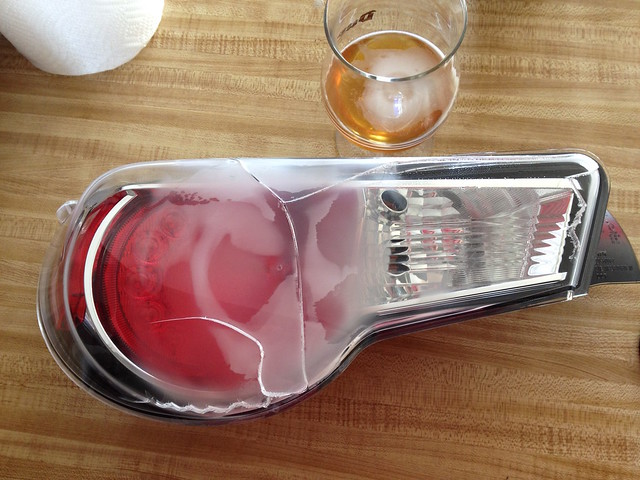 Eff You See Kay! Shit! Crap!  Well, looking on the bright side it appears I'll be getting some aftermarket tail lights very soon. I guess I have to figure out which ones I like. On the downside, I wasn't planning on spending that $ on that mod. . . 
|
|
|
|
| The Following User Says Thank You to cycleboy For This Useful Post: | kodyo (04-11-2014) |
|
04-11-2014, 11:18 PM
|
#882 |
|
Senior Member
Join Date: Jan 2013
Drives: Scion FR-S
Location: Los Angeles
Posts: 686
Thanks: 597
Thanked 257 Times in 174 Posts
Mentioned: 6 Post(s)
Tagged: 0 Thread(s)
|
Get OEM tails for cheap then. $150 for a set is common.
|
|
|
|
|
|
|
|
|
|
 Similar Threads
|
||||
| Thread | Thread Starter | Forum | Replies | Last Post |
| Red tail light photoshops | OwenK | FR-S & 86 Photos, Videos, Wallpapers, Gallery Forum | 68 | 02-06-2013 03:48 PM |
| HKS head and tail lamps | DIG1992 | Cosmetic Modification (Interior/Exterior/Lighting) | 5 | 05-19-2012 01:04 PM |
| Tail of the Dragon | Tomcat9700 | Scion FR-S / Toyota 86 GT86 General Forum | 32 | 02-10-2012 02:30 PM |
| headlight condensation | MRZ415 | Off-Topic Lounge [WARNING: NO POLITICS] | 1 | 01-23-2012 02:24 AM |
| Optional coloured tail lights? | m_life | Scion FR-S / Toyota 86 GT86 General Forum | 9 | 11-30-2011 06:20 PM |


