


|
||||||
| Cosmetic Modification (Interior/Exterior/Lighting) Discussions about cosmetic mods. |
 |
|
|
Thread Tools | Search this Thread |
 02-25-2014, 05:45 AM
|
#1 |
|
Senior Member

Join Date: May 2013
Drives: Rocket Bunny'd GT86
Location: Dubai
Posts: 556
Thanks: 68
Thanked 144 Times in 100 Posts
Mentioned: 1 Post(s)
|
Hey guys,
To the rocket bunny guys, whoever did it him/herself or had someone to do it for them and knows what tips to give that would be really great. I'm clear on most of the install process, although, after cutting the fenders I've heard and/or seen there will be a gap between the fender and the inner wheel well, what did you guys do to cover it up or did you just leave the gap open? Plus, the guys who are doing the kit for me did wide body conversions before but are still doubtful about the cutting/trimming part, how can we know how much precisely to cut/trim? Another question is, did you have to lower it more because after fitting the fenders there was a bigger gap than before or was it the same gap as it was when it wasn't widebody? An example would be, let's suppose the car was lowered 1" overall, do you have to lower the car more because there will be a bigger gap between the fender and the wheel or that has nothing to do with the fender and it's all up to the tire+wheel combo? ANY other tips would be appreciated and let's think of this thread as a reference thread to anyone having the same doubt as I've searched about this and haven't found anything very informative about it. |

|

|
|
02-28-2014, 02:01 PM
|
#2 |
|
Senior Member
Join Date: May 2013
Drives: Rocket Bunny'd GT86
Location: Dubai
Posts: 556
Thanks: 68
Thanked 144 Times in 100 Posts
Mentioned: 1 Post(s)
|
No one o_o?
|
|
|
|
|
02-28-2014, 02:16 PM
|
#3 |
|
Senior Member
Join Date: Mar 2013
Drives: 2013 Raven FRS 2JZ-GTE/V160 swapped
Location: Hampton, VA
Posts: 960
Thanks: 376
Thanked 623 Times in 315 Posts
Mentioned: 18 Post(s)
|
I won't be any help but I've only seen a handful of people DIY with an RB kit. Most people go to a shop and have them do it.
Good luck though. |
|
|
|
|
02-28-2014, 09:55 PM
|
#4 |
|
Member
Join Date: Dec 2013
Drives: 2014 BRZ Limited
Location: Tacoma WA
Posts: 48
Thanks: 1
Thanked 10 Times in 10 Posts
Mentioned: 4 Post(s)
|
I have not yet installed my version 2 kit, however i have spoken with a shop that has installed 6 kits i believe.
First off, i was told the kit will need blocked as it is a bit wavey and not perfectly smooth. So if you want a nice paint finish, begin with a nice surface. As far as cutting the body, most importantly the rear. MAKE SURE you weld in a plate to enclose the body back up. Take you time, once its cut its cut. I was told to put the entire kit on with one bolt on either end of each panel while lining it up. Tape off where you will need cutting while the panels are on. Hopefully i can get to installing mine sometime soon as i am very excited for this!!! Good luck and hope to see pics soon |
|
|
|
|
03-01-2014, 02:38 AM
|
#5 | ||
|
Senior Member
Join Date: May 2013
Drives: Rocket Bunny'd GT86
Location: Dubai
Posts: 556
Thanks: 68
Thanked 144 Times in 100 Posts
Mentioned: 1 Post(s)
|
Quote:
Quote:
I'm not sure I understand what you mean by welding in a plate? Alright so once I've mounted the fenders on each panel I look for the extra bit that's poking out under the fenders and that is what's going to be cut correct? mark that with tape and start cutting the edges, correct? Thank you and I will have a build thread once it's done hopefully. |
||
|
|
|
|
03-01-2014, 03:45 PM
|
#6 |
|
Senior Member

Join Date: Jun 2013
Drives: 2013 Rocketbunny GT86
Location: Newport News, VA
Posts: 310
Thanks: 74
Thanked 180 Times in 87 Posts
Mentioned: 18 Post(s)
|
Follow this link, The first post has been updated.
http://www.ft86club.com/forums/showthread.php?t=58327 |
|
|
|
|
03-01-2014, 04:10 PM
|
#7 | |
|
Senior Member
Join Date: May 2013
Drives: Rocket Bunny'd GT86
Location: Dubai
Posts: 556
Thanks: 68
Thanked 144 Times in 100 Posts
Mentioned: 1 Post(s)
|
Quote:
|
|
|
|
|
|
03-03-2014, 09:07 PM
|
#8 | |
|
Senior Member
Join Date: Jun 2013
Drives: 2013 Rocketbunny GT86
Location: Newport News, VA
Posts: 310
Thanks: 74
Thanked 180 Times in 87 Posts
Mentioned: 18 Post(s)
|
Quote:
|
|
|
|
|
|
03-04-2014, 05:48 AM
|
#9 | |
|
Senior Member
Join Date: May 2013
Drives: Rocket Bunny'd GT86
Location: Dubai
Posts: 556
Thanks: 68
Thanked 144 Times in 100 Posts
Mentioned: 1 Post(s)
|
Quote:
 
|
|
|
|
|
|
03-22-2014, 03:44 PM
|
#10 | |
|
Senior Member
Join Date: Jun 2013
Drives: 2013 Rocketbunny GT86
Location: Newport News, VA
Posts: 310
Thanks: 74
Thanked 180 Times in 87 Posts
Mentioned: 18 Post(s)
|
Quote:
|
|
|
|
|
|
03-23-2014, 07:04 AM
|
#11 | |
|
Senior Member
Join Date: May 2013
Drives: Rocket Bunny'd GT86
Location: Dubai
Posts: 556
Thanks: 68
Thanked 144 Times in 100 Posts
Mentioned: 1 Post(s)
|
Quote:
|
|
|
|
|
|
06-24-2014, 05:16 PM
|
#12 |
|
Senior Member

Join Date: Apr 2013
Drives: White out FRS
Location: Orlando Florida
Posts: 103
Thanks: 14
Thanked 99 Times in 42 Posts
Mentioned: 2 Post(s)
|
Hey guys, I'm planning on installing the rb kit myself soon and wanted to know what most people with rb kits did to close up the gap in the rear quarters.
I rather not weld it closed myself but if I have to I will. I've seen some people do it without welding like this: 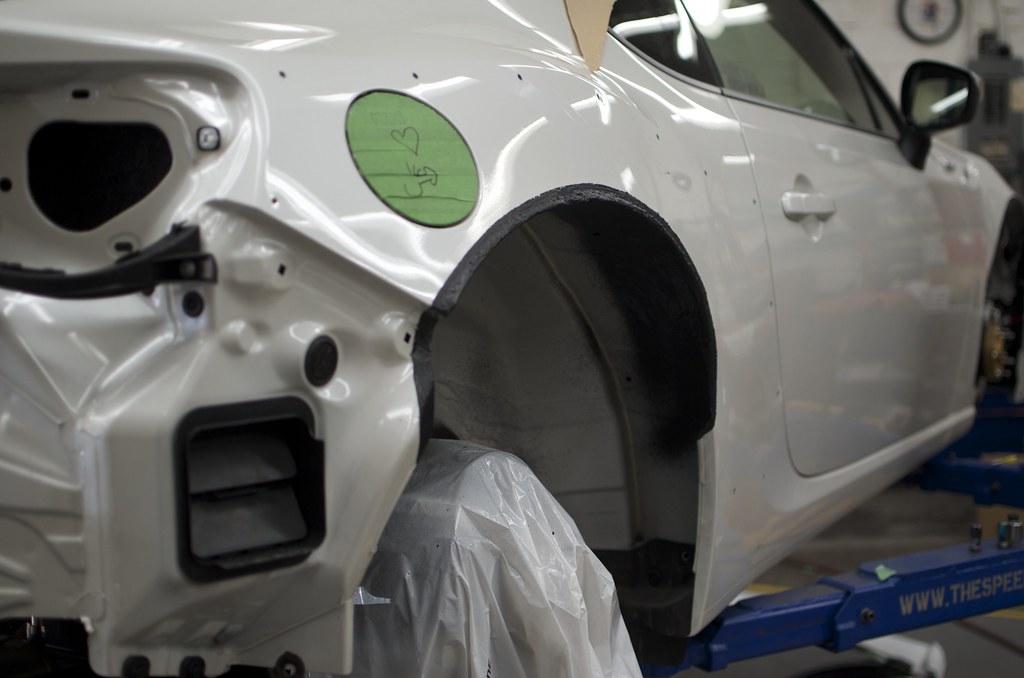 What type of sealant is that and does it last for a long time? |
|
|
|
|
06-24-2014, 07:26 PM
|
#13 |
|
Senior Member

Join Date: Jun 2013
Drives: RX-7 / BRZ
Location: USA
Posts: 2,349
Thanks: 1,031
Thanked 2,501 Times in 1,081 Posts
Mentioned: 27 Post(s)
|
A 2-part epoxy. Off the top of my head, something like 3M Pannel Bond (#8116) or SEMS Multi Purpose Panel Adhesive/Weld Bond (#35937.) Or if you can find it SpeedGrip panel bond or LORD Fuzor brands work.
These Are NOT you home depot epoxy resin glues. These are the glues used to put on some aluminum/fiberglass/steel quarter panels in the automotive collision industry. They (most of them.) will require a dual mix applicator gun which is somewhere between $39-150. And the respected brands mixing tips as you will have to use a new mixing tip each time it is used if you do not do everything at the same time. You may also want to use some 2-part foam that is sold/packaged by the same brands. This will help cut-down on some 'chatter' of the panels if they are poorly bonded. Don't use a cheap foam like "Great Stuff" remember most foams will hold moisture. Moisture = rust on metal.
__________________
//2013 World Rally Blue BRZ Limited FBM Turbo--gone
//2018 Crystal White Pearl BRZ Ts 2.2l Harrop Supercharged |
|
|
|
|
12-18-2014, 10:01 PM
|
#14 |
|
Senior Member

Join Date: Oct 2014
Drives: 2015 Fr-s Firestorm
Location: San Diego/Central Valley
Posts: 367
Thanks: 208
Thanked 118 Times in 77 Posts
Mentioned: 1 Post(s)
|
Anyone have tips for putting back the fender liner or are you guys just taking that out of the front fenders?
|
|
|
|
|
|
|
|
|
|
 Similar Threads
|
||||
| Thread | Thread Starter | Forum | Replies | Last Post |
| Rocket Bunny Kit | ??? | Cosmetic Modification (Interior/Exterior/Lighting) | 29 | 04-01-2014 05:21 AM |
| Second FR-S Rocket Bunny Kit | sraggs42 | Scion FR-S / Toyota 86 GT86 General Forum | 48 | 03-14-2014 06:50 PM |
| rocket bunny kit install | FRS-HHH | Cosmetic Modification (Interior/Exterior/Lighting) | 0 | 02-23-2014 11:05 AM |
| How wants or install a Greddy Rocket Bunny Kit?. | Emyl | Cosmetic Modification (Interior/Exterior/Lighting) | 5 | 05-24-2013 05:16 PM |
| WTB Rocket Bunny kit | Yamajee | Exterior Parts (Aero, Lighting, Etc.) | 5 | 05-21-2013 09:23 AM |


 Selena Gomez