08-07-2013, 02:41 AM
|
#197 | |
|
Senior Member

Join Date: Oct 2012
Drives: 2013 Scion FRS
Location: Arizona
Posts: 1,418
Thanks: 260
Thanked 502 Times in 297 Posts
Mentioned: 31 Post(s)
Tagged: 0 Thread(s)
|
Quote:
And ok ill check the passenger bulb
__________________
|
|

|

|
|
08-07-2013, 09:34 AM
|
#198 |
|
Senior Member

Join Date: Jun 2012
Drives: Scion fr-s asphalt M/T
Location: Phoenix, AZ
Posts: 4,192
Thanks: 1,416
Thanked 1,631 Times in 941 Posts
Mentioned: 96 Post(s)
Tagged: 0 Thread(s)
|
Rotation instructions would be great. My alignment has settled since the install and his looks great.
Sent from a Motorola DynaTAC 8000X |
|
|
|
|
08-07-2013, 03:26 PM
|
#199 |
|
Senior Member
Join Date: May 2013
Drives: Scion FR-S Whiteout
Location: Hollywood, CA
Posts: 962
Thanks: 297
Thanked 241 Times in 137 Posts
Mentioned: 22 Post(s)
Tagged: 0 Thread(s)
|
Uhh..I forgot, if it's the retroquick set for our cars you wont be able to rotate, not without opening up the headlights and adjusting the shields.
Sorry. Mini H1s aren't meant to be full performance, 100% aligned projectors.
__________________
2013 Scion FR-S
|
|
|
|
|
08-07-2013, 03:29 PM
|
#200 |
|
Senior Member
Join Date: May 2013
Drives: Scion FR-S Whiteout
Location: Hollywood, CA
Posts: 962
Thanks: 297
Thanked 241 Times in 137 Posts
Mentioned: 22 Post(s)
Tagged: 0 Thread(s)
|
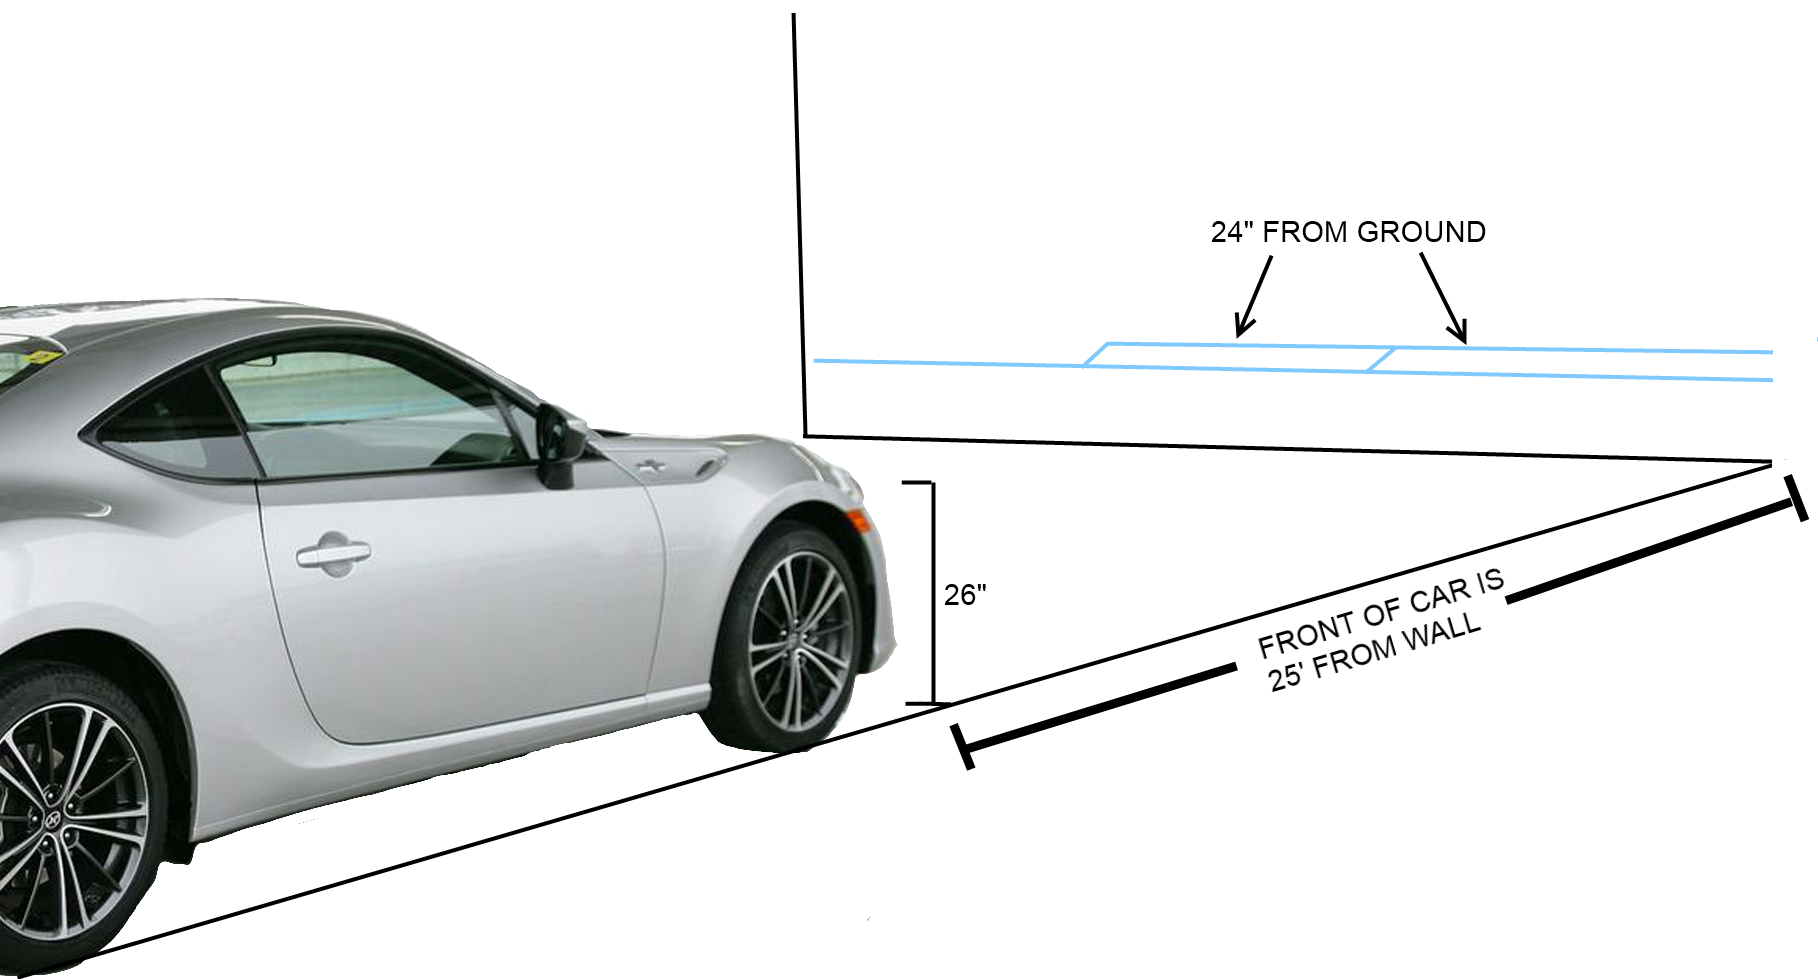
If you still want to rotate it, here's a quick and dirty breakdown:
Open up the headlights. Remove the projector lens. Widen the holes of the metal shield. Hand-adjust against a wall. Screw the projector lens back tight to retain new alignment. Put everything back together. Will take you about 5-6 hours. At night.
__________________
2013 Scion FR-S
|
|
|
|
|
08-07-2013, 03:33 PM
|
#201 |
|
Senior Member

Join Date: May 2012
Drives: 2013 Scion FR-S Raven
Location: Lake Worth Florida
Posts: 1,182
Thanks: 76
Thanked 373 Times in 253 Posts
Mentioned: 13 Post(s)
Tagged: 1 Thread(s)
|
Great Advice! No thank you, lol
__________________
May'12 AT Raven, OFT V2, Perrin IntakeTube, Pulley & Overpipe,HKS Snorkel,FA20 EL Header,Nameless Frontpipe w/ Helmholtz, Crawford AOS, Cusco O2W Cooler, Grimmspeed Strut/MC Brace, Winjets w/D2S 3.0 HID by Illuminating Lighworkx, Fogs w/EU Stalk, LED's, JDM UnderPanels, Diffuser, Rigid Collars, Whiteline, HVT Camber Plates, Koni's, Swift Springs, GTSpec LCA, SPC Toearms, DBA 4K T-Slot Rotors, Ferodo DS2500, Vorshlag BrakeLines, MichelinPSS, 5Axis Wing, Raammat, Ensolite, JPM Coachworks, OEM+Ref400, 20mmspacers, TOMS
|
|
|
|
|
08-08-2013, 06:06 PM
|
#202 |
|
Senior Member

Join Date: Mar 2012
Drives: 2018 Golf R
Location: Richmond, VA
Posts: 2,807
Thanks: 5,386
Thanked 1,095 Times in 647 Posts
Mentioned: 68 Post(s)
Tagged: 7 Thread(s)
|
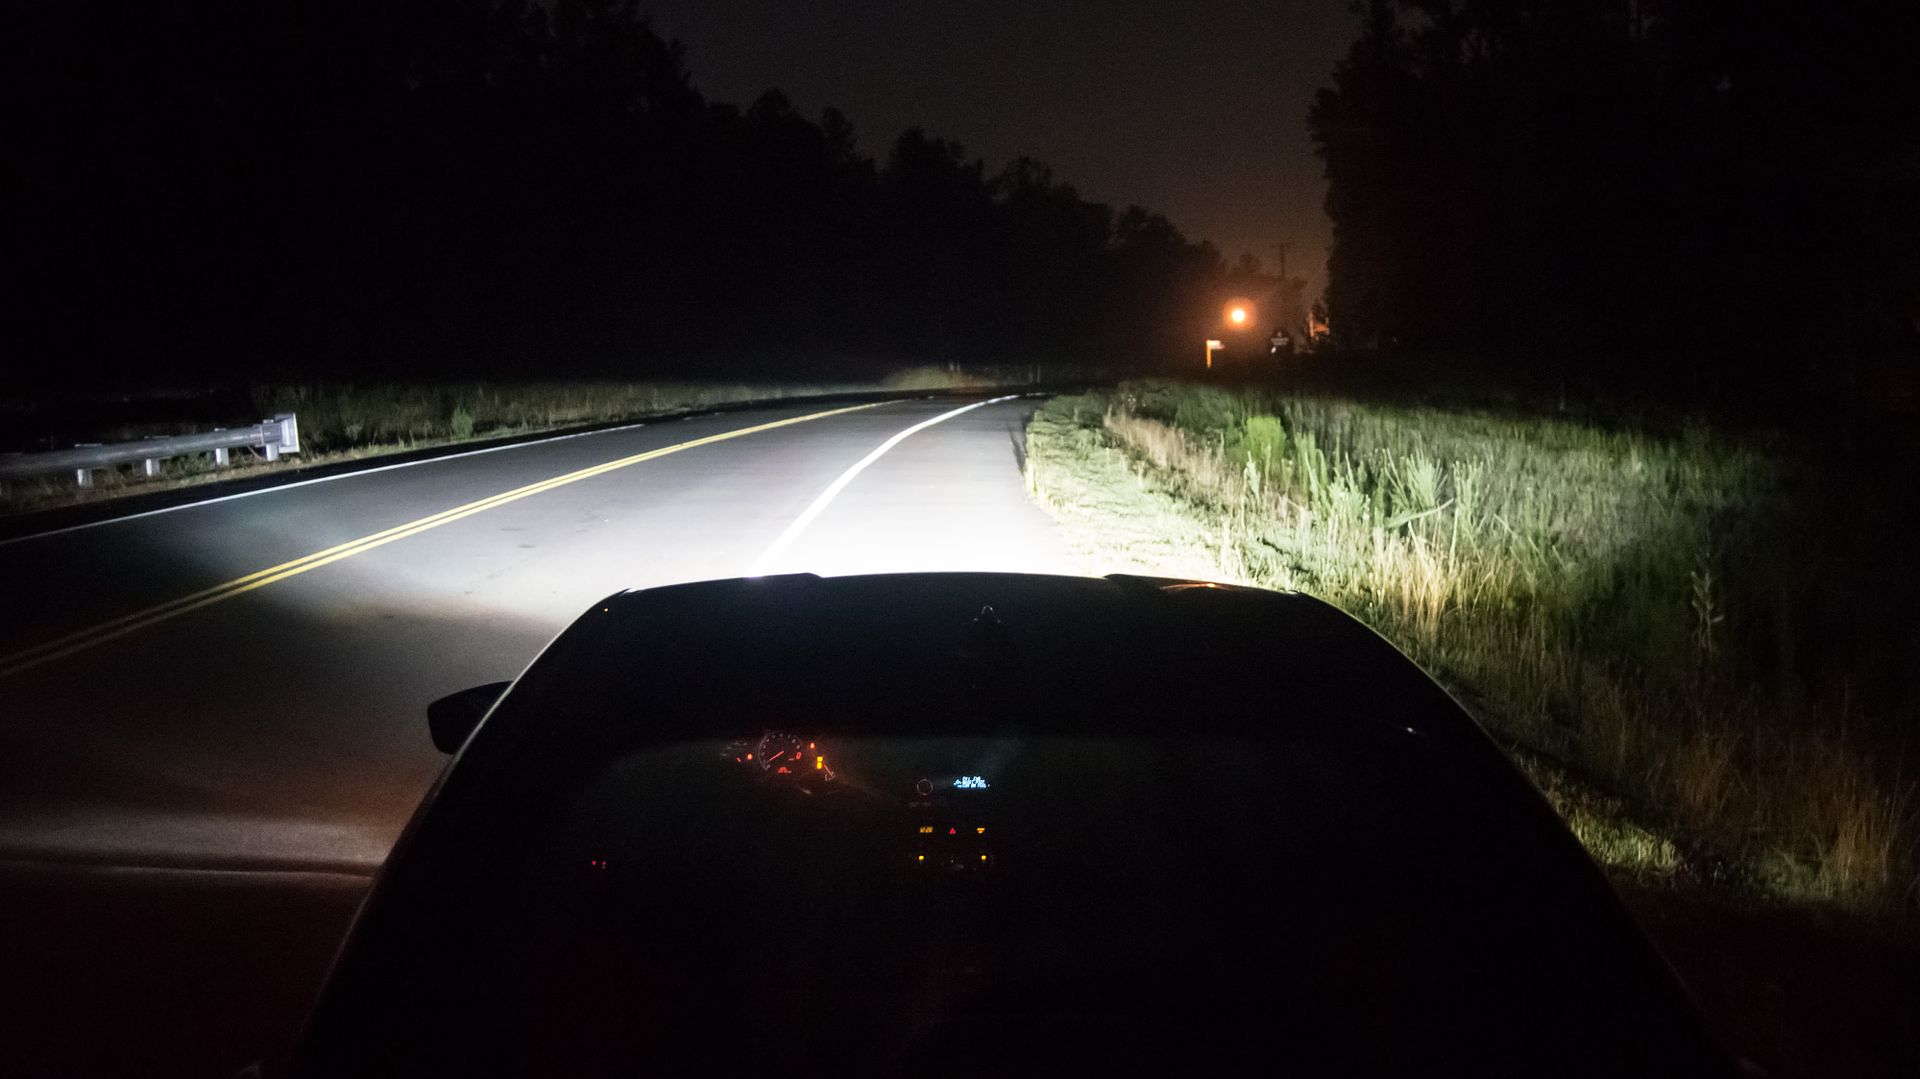
@FR-Shadow - Your alignment looks pretty good. As @retrosmiths mentioned, the MH1s aren't going to be perfectly aligned. Mine taper off to the extreme ends of the beam, but it's not worth my time to make them perfect. If I do end up cracking the headlights open again, Im replacing the projectors with something else entirely.
__________________
Parting out HERE
Last edited by civicdrivr; 08-08-2013 at 08:18 PM. |
|
|
|
|
08-08-2013, 08:03 PM
|
#203 |
|
Senior Member
Join Date: May 2013
Drives: Scion FR-S Whiteout
Location: Hollywood, CA
Posts: 962
Thanks: 297
Thanked 241 Times in 137 Posts
Mentioned: 22 Post(s)
Tagged: 0 Thread(s)
|
^ "aren't"
__________________
2013 Scion FR-S
|
|
|
|
| The Following User Says Thank You to retrosmiths For This Useful Post: | civicdrivr (08-08-2013) |
|
08-08-2013, 08:18 PM
|
#204 | |
|
Senior Member
Join Date: Mar 2012
Drives: 2018 Golf R
Location: Richmond, VA
Posts: 2,807
Thanks: 5,386
Thanked 1,095 Times in 647 Posts
Mentioned: 68 Post(s)
Tagged: 7 Thread(s)
|
Quote:
Sent from my Nexus 4 using Tapatalk 2
__________________
Parting out HERE
|
|
|
|
|
|
11-24-2013, 07:33 PM
|
#205 | |
|
Senior Member

Join Date: Jul 2012
Drives: 2023 WRB BRZ (MT)
Location: Coral Springs, SoFlo
Posts: 2,252
Thanks: 1,503
Thanked 534 Times in 430 Posts
Mentioned: 42 Post(s)
Tagged: 5 Thread(s)
|
Quote:
|
|
|
|
|
|
11-25-2013, 03:22 PM
|
#206 | |
|
Senior Member
Join Date: Mar 2012
Drives: 2018 Golf R
Location: Richmond, VA
Posts: 2,807
Thanks: 5,386
Thanked 1,095 Times in 647 Posts
Mentioned: 68 Post(s)
Tagged: 7 Thread(s)
|
Quote:
__________________
Parting out HERE
|
|
|
|
|
| The Following User Says Thank You to civicdrivr For This Useful Post: | lbroskee (11-25-2013) |
|
02-17-2014, 12:18 AM
|
#207 |
|
Senior Member

Join Date: Dec 2012
Drives: Firestorm Red FRS/86 MT
Location: So Cal South Bay LA/ 626
Posts: 182
Thanks: 177
Thanked 57 Times in 31 Posts
Mentioned: 1 Post(s)
Tagged: 0 Thread(s)
|
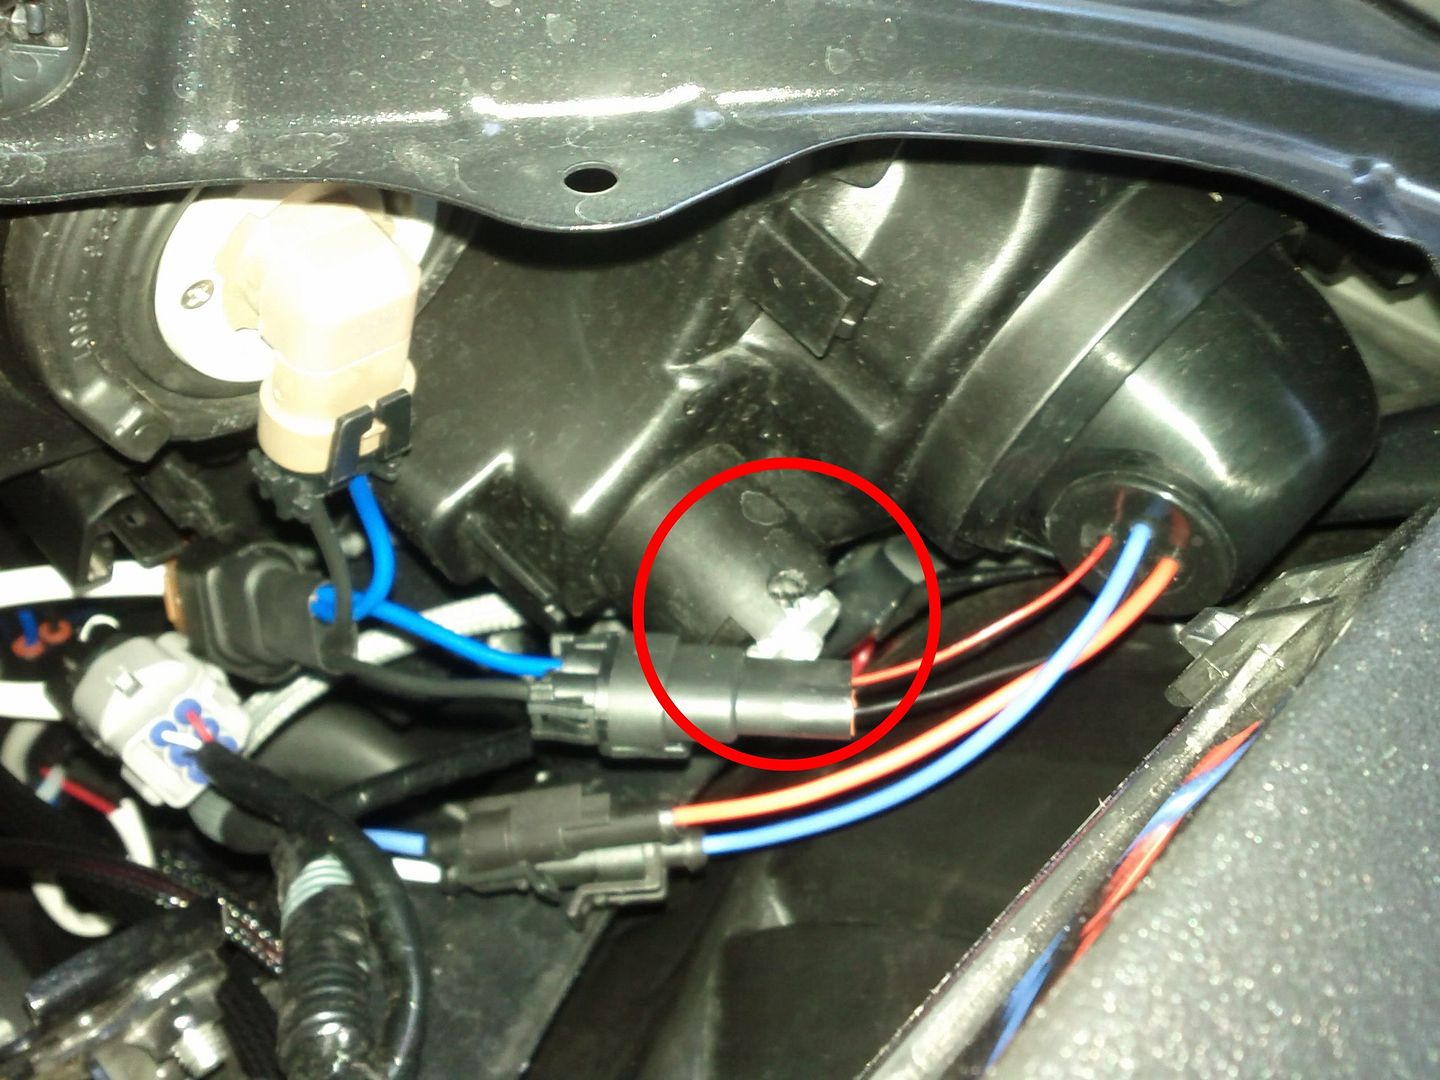
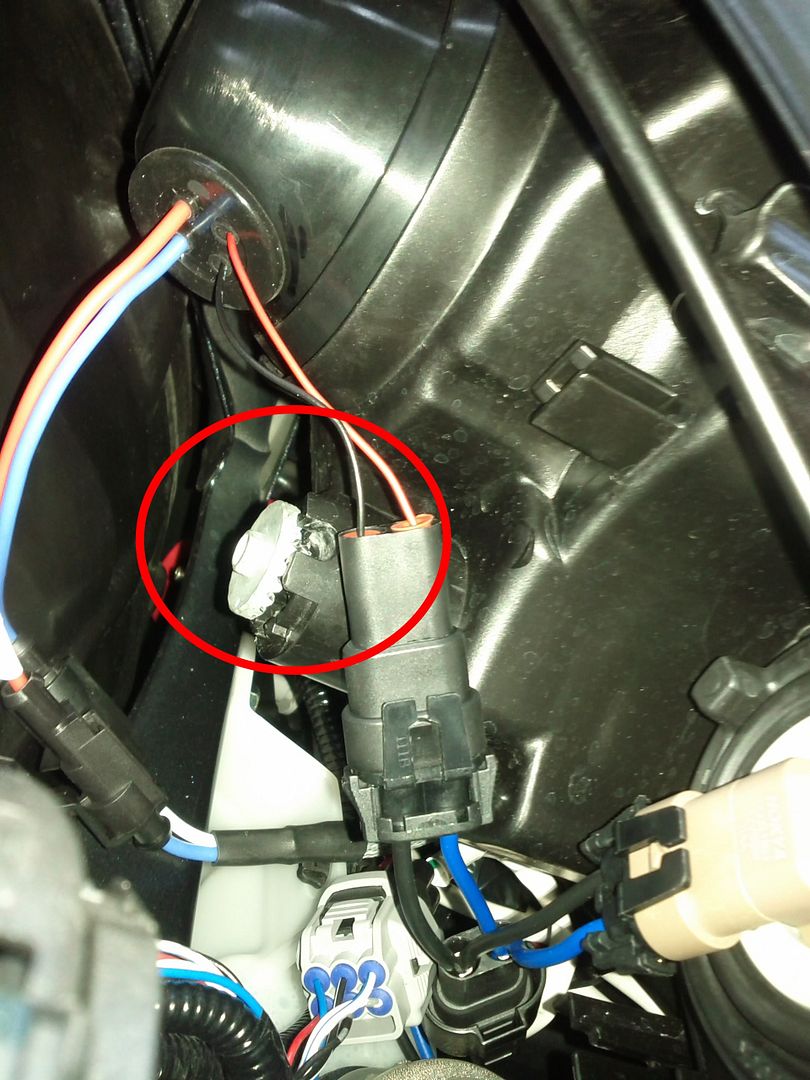
Does anyone know what this connection is? It came attached to the harness, the wired that plug into the car's low beam connection. Is that the wrong adapter?
__________________
 |
|
|
|
|
02-17-2014, 12:20 AM
|
#208 | |
|
Senior Member
Join Date: Jul 2012
Drives: 2023 WRB BRZ (MT)
Location: Coral Springs, SoFlo
Posts: 2,252
Thanks: 1,503
Thanked 534 Times in 430 Posts
Mentioned: 42 Post(s)
Tagged: 5 Thread(s)
|
Quote:
|
|
|
|
|
| The Following User Says Thank You to lbroskee For This Useful Post: | Techfl3x (02-17-2014) |
|
02-17-2014, 12:33 AM
|
#209 | |
|
Senior Member
Join Date: Dec 2012
Drives: Firestorm Red FRS/86 MT
Location: So Cal South Bay LA/ 626
Posts: 182
Thanks: 177
Thanked 57 Times in 31 Posts
Mentioned: 1 Post(s)
Tagged: 0 Thread(s)
|
Quote:
I took it off but the two connectors aren't compatible (low beam cable from harness and low beam cable from vehicle). Did you end up tapping directly into the vehicles low beam positive and ground wires?
__________________
|
|
|
|
|
|
02-17-2014, 04:35 AM
|
#210 | |
|
Senior Member
Join Date: Jul 2012
Drives: 2023 WRB BRZ (MT)
Location: Coral Springs, SoFlo
Posts: 2,252
Thanks: 1,503
Thanked 534 Times in 430 Posts
Mentioned: 42 Post(s)
Tagged: 5 Thread(s)
|
Quote:
|
|
|
|
|
| The Following User Says Thank You to lbroskee For This Useful Post: | Techfl3x (02-18-2014) |
|
|
|
|
|
|
 Similar Threads
|
||||
| Thread | Thread Starter | Forum | Replies | Last Post |
| Morimoto Retro-Quik Xenon Retrofit System for FR-S | Xenocide117 | Cosmetic Modification (Interior/Exterior/Lighting) | 63 | 07-18-2014 07:37 PM |
| The Retrofit Source Bi-Xenon FR-S Retro-Quik Conversion | Andrew @ TRS | Exterior Parts - The Rest | 84 | 07-23-2012 09:43 PM |
| OEM Fog Light install! ON and working! | 86design | FR-S & 86 Photos, Videos, Wallpapers, Gallery Forum | 38 | 07-04-2012 07:11 PM |
| How to install Homelink mirror? | Grimlock | Electronics | Audio | NAV | Infotainment | 10 | 06-10-2012 06:07 PM |
| Five axis limited retro | Hawaiian | Scion FR-S / Toyota 86 GT86 General Forum | 28 | 05-18-2012 03:16 PM |