|
||||||
| Member's Car Journals Car journals by our members. |
 |
|
|
Thread Tools | Search this Thread |
 10-17-2013, 02:06 PM
|
#29 | |
|
dedicated enthusiast

Join Date: Oct 2009
Drives: Surreptitious(AE71), & Grunt(AE95)
Location: PDX
Posts: 85
Thanks: 2
Thanked 41 Times in 24 Posts
Mentioned: 0 Post(s)
|
Quote:
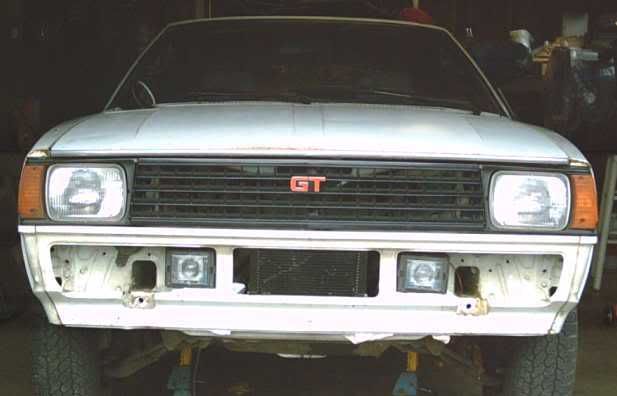
The only problem with using that airbox was I lost the original location for the overflow, and washer fluid reservoirs. 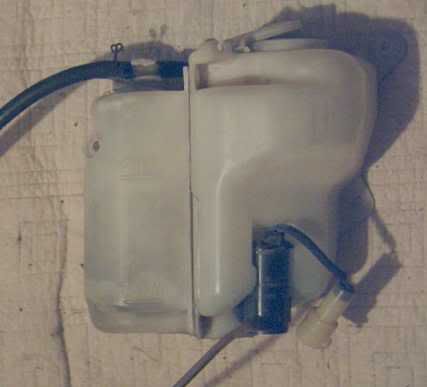 At first I tried to separate them 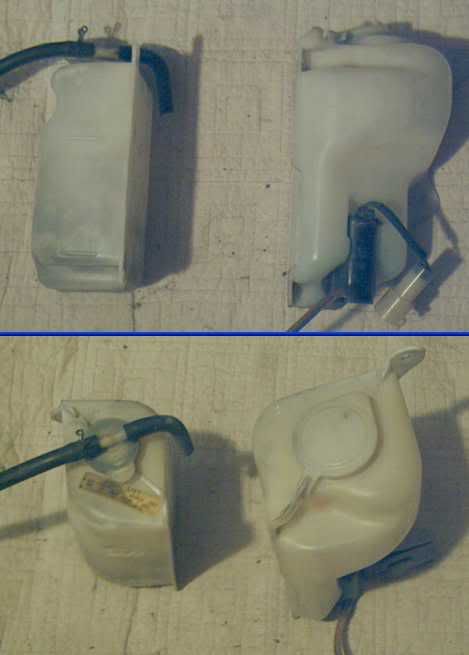 and find alternative locations... 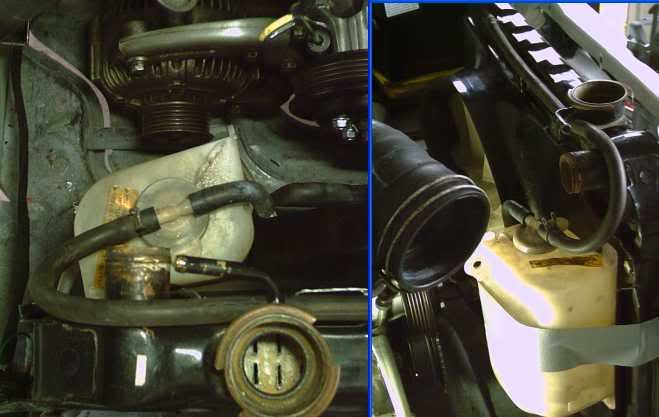 but that just didn't cut it..... so... upon another offer from my boneyarding friend... Johnny, I stumbled upon the solution... another Honda part... again from a Civic... 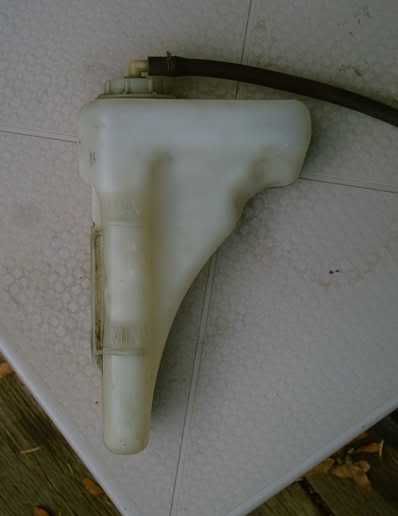 Apologies in advance for the following photo... it was cobbled together and blown up a bit too much for clarity... but if you look closely you can see.... 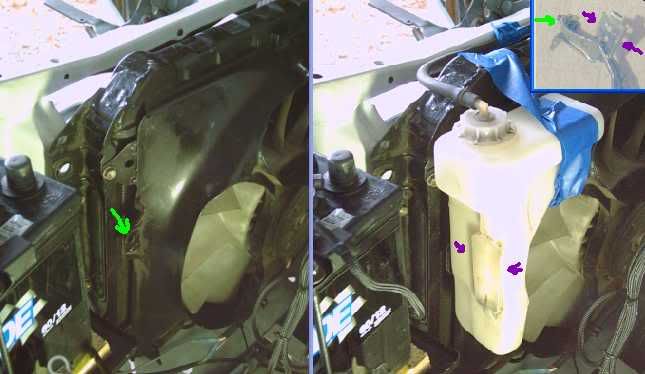 green arrow on left view, and upper right inset, and then purple view in right, and upper right inset And when fully plumbed in....  More to come...... 
__________________
Information is POWER - LEARN the facts!
|
|

|

|
|
10-18-2013, 10:00 PM
|
#30 |
|
dedicated enthusiast
Join Date: Oct 2009
Drives: Surreptitious(AE71), & Grunt(AE95)
Location: PDX
Posts: 85
Thanks: 2
Thanked 41 Times in 24 Posts
Mentioned: 0 Post(s)
|
A few more modifications.... this time on the interior. When I got the car the interior was actually pretty good... quite a bit dated.... but for a 26 year old car it was fine.
  The dash had a few cracks... that would require either a replacement... or something a little custom  Rebuilt with a hand stitched cover... Oh... and why not add a nice Nardi flat spoke to jazz it up just a bit  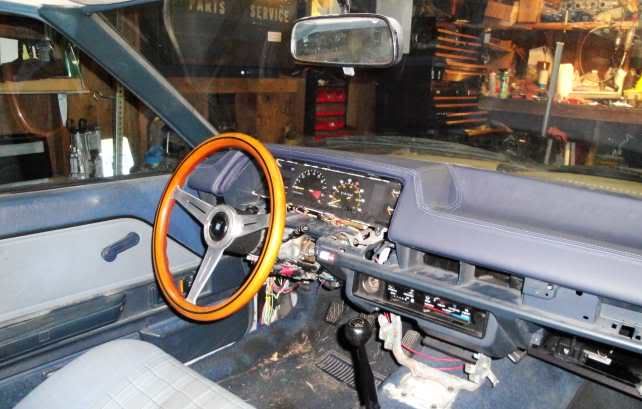 Now... besides the new dash cover... and the vintage Nardi... on a vintage potmetal hub - very old... these were outlawed and the collapsible type was used there after I also had my friend David... remember David? I still owe you his photo.... Anyway David is also into building custom guitars... and so he knows woods, and inlays.... 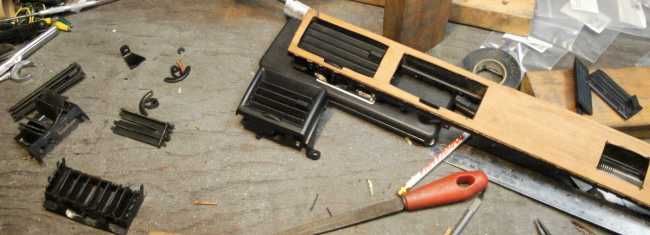 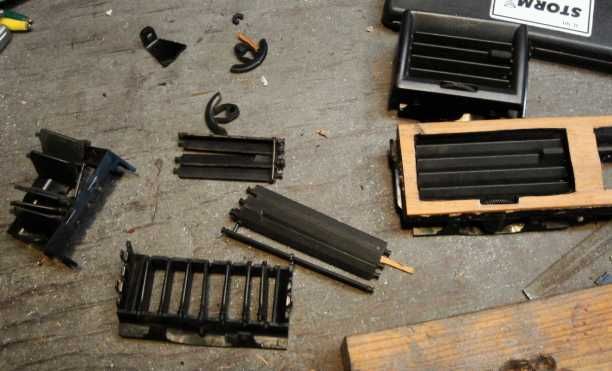 With David's help we built the only real wood dash veneer in an E7 Corolla in existence... (at least as far as I know) 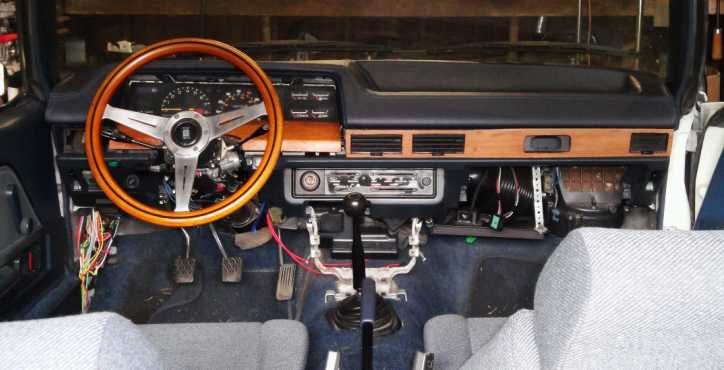 The piece in front of the driver has gotten a tung oil rub while the piece in front of the passenger side is prior to tung oil. More on the interior to come....
__________________
Information is POWER - LEARN the facts!
|
|
|
|
|
10-22-2013, 12:21 PM
|
#31 |
|
dedicated enthusiast
Join Date: Oct 2009
Drives: Surreptitious(AE71), & Grunt(AE95)
Location: PDX
Posts: 85
Thanks: 2
Thanked 41 Times in 24 Posts
Mentioned: 0 Post(s)
|
Interior Part Deux....
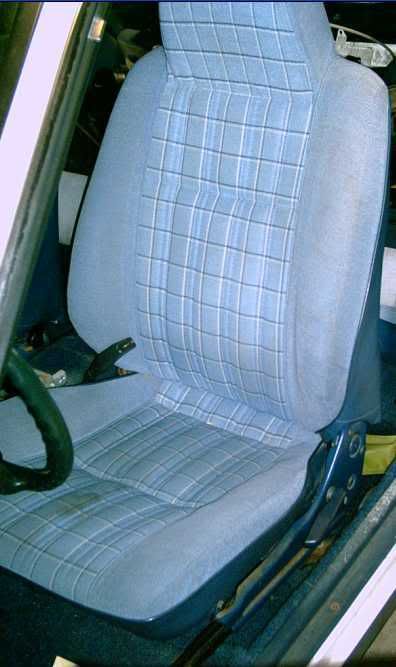
 Although the original seats were in decent shape... 30 year old Corolla seat offered little support for any kind of "spirited" driving.... so I was on the hunt for a set of Recaros. Why Recaros?? Why not some cheap a$$ seat? I have a fair amount of experience with driving, and seats... I've had a few cars with garbage seats (70s Capri... 67 Mustang... 66 Shelby... and a few others) and I've had cars with great seats.. (85 VW GTI, same Capri, but now with Volvo 242 GT seats, 1980 Capri RS w Recaro interior) So I was on the hunt for a set of Recaros I could slip into Surreptitious... My first choice....  period correct Recaro.... period correct Recaro.... To borrow a quote from Maxwell Smart... " I missed them by that much........" I saw them and inquired about them about 45 days after they sold.... Oh well....  My next option came from a craigslist search... down in San Diego... a decent set of solid blue Recaros....  They needed cleaning... but that wasn't the biggest problem... it seems that someone was selling another persons stuff.... long story short... I didn't lose any money... but I also didn't get any seats from San Diego. With San Diego a failure.... I next found a set locally.... an odd set too... 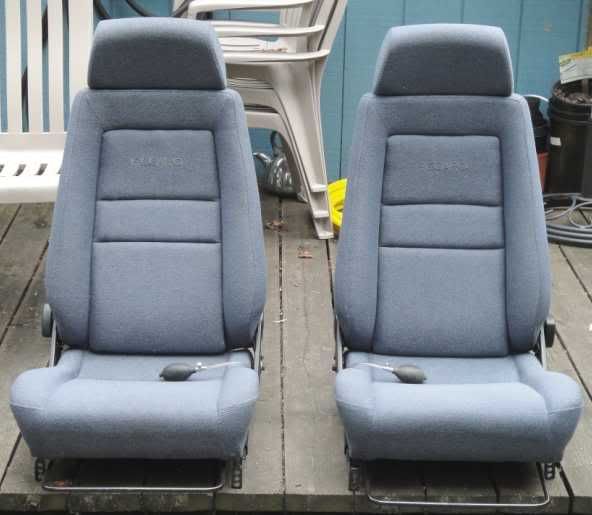 This set of Recaros I've nicknamed "CCR" - Cop Car Recaros.... it appears that this set of Recaro seats likely were originally fitted to a mid 90s Lumina Cop car.... The top half is unique, not nearly as aggressive as the typical Recaro. Not only is the top less aggressive, but I've retro-fitted a set of Corbeau air bladders to improve lumbar support. Here is the driverside installed... with the original Toyota seat on the passenger side. 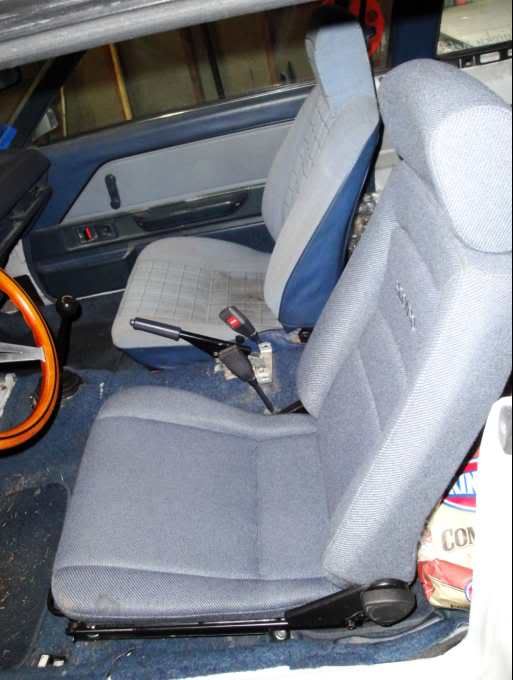 Although looking quite similar... the Recaro supports the body far better then the soft OEM seat. Now with both seats fitted... 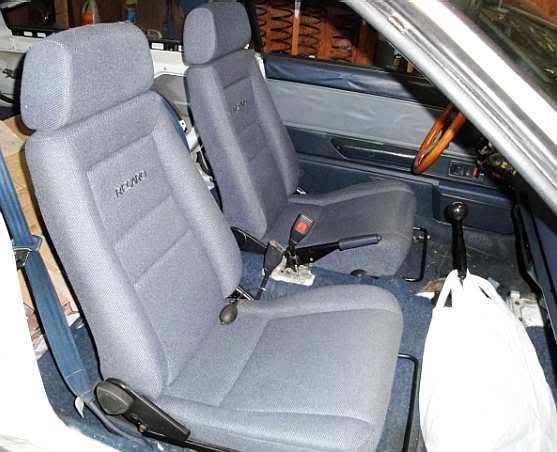 LEARN about Recaros from someone who worked there!! - http://www.toymods.org.au/forums/sho...Resource-Guide Even more interior to come.... along with a few more mechanical improvements/u[dates.........
__________________
Information is POWER - LEARN the facts!
|
|
|
|
|
10-26-2013, 02:11 PM
|
#32 |
|
dedicated enthusiast
Join Date: Oct 2009
Drives: Surreptitious(AE71), & Grunt(AE95)
Location: PDX
Posts: 85
Thanks: 2
Thanked 41 Times in 24 Posts
Mentioned: 0 Post(s)
|
Continuing with the interior... I was not a fan of the deluxe interior (two tone). So I went on a hunt for a replacement interior.... 3/4 of it(one door panel and 2 rear panels)
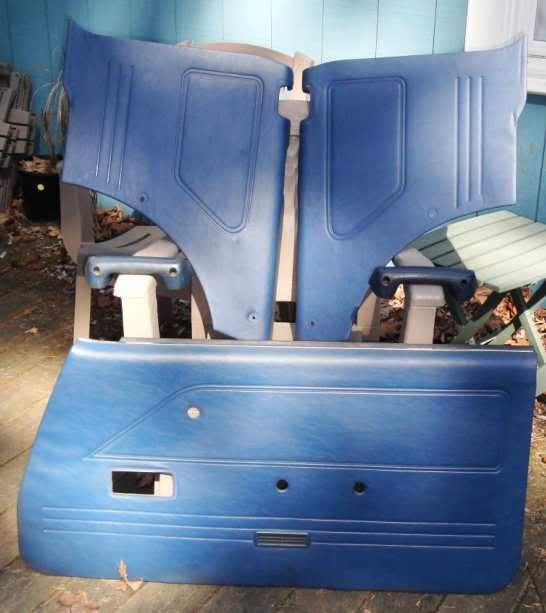 were found within 3 months........ short The last part of the interior took me 3 YEARS to find!!! and that is with the internet   So the interior ideas are almost complete... wooden dash, custom stitched dash cover, vintage Nardi wheel on a vintage pot metal wheel adapter, Cop Car Recaros..... .... but what to do behind the 2 front seats??? The Corolla originally had a rear folding seat. Do I retain it, or remove it? If I retain it it allows me to transport 4 people... kinda (not much rear leg room with the Recaros) If I retain it it folds down... but because it is a seat first, it doesn't lay flat. If I retain it I'd like to find matching cloth to recover the rear seats to match the Recaros - I never could find matching material... Do I WANT to: carry 4, have a folding seat, with mismatched interior patterns... OR with all the other custom touches... the missing rear seat will just make this a 2 seater... what it should have been all along...  I'll have to build something... because without the seat the space is useless 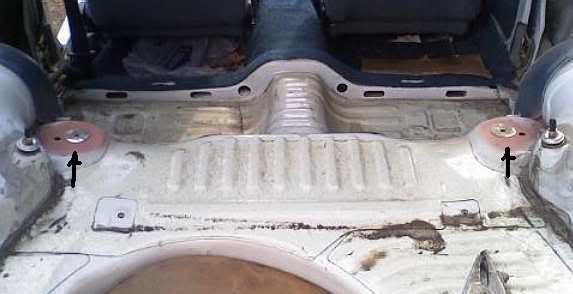 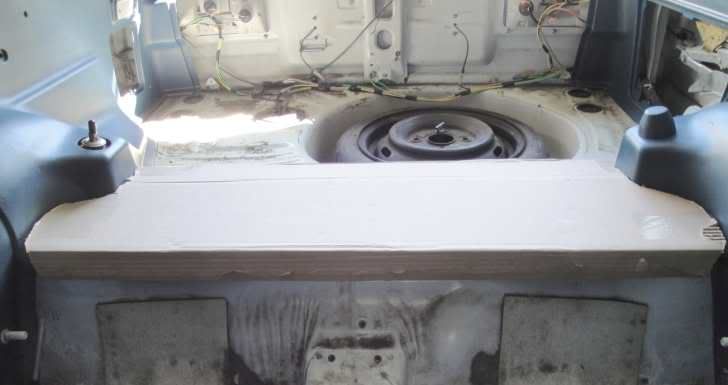 Above, besides showing the space and how it needs to be better used, are the seeds of my first idea... originally I was intending to mount a hard panel over the wheels(cardboard layout) and then add hinged panels front and rear and lay out the entire area in a wood (Teak?) deck - kinda like an old pick up truck... or even a deck on an older wooden boat - https://www.google.com/search?q=teak...w=1274&bih=896 I soon came to realize that would be like putting lipstick on a pig... gaudy at best  But... what then to better utilize the space.......  take what was a good from the idea and remove the gaudy... The wood deck is gaudy... but better utilizing the space isn't..... At first a design is done in my head.... 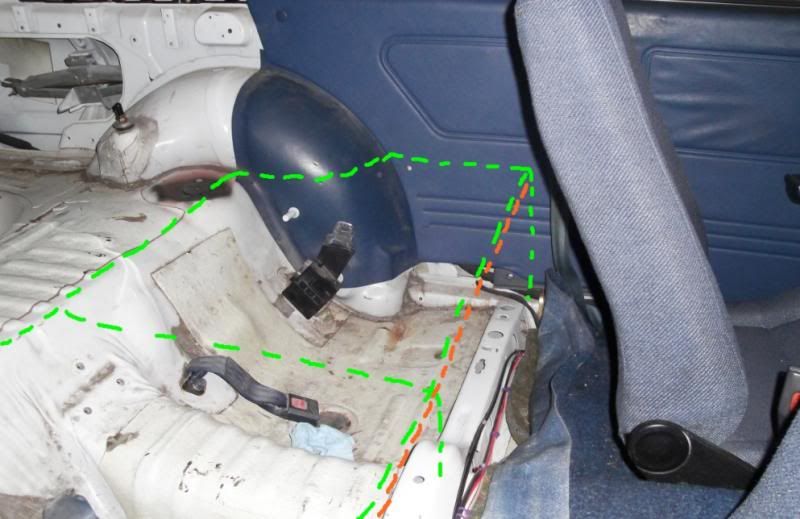 That design is then moved on to C.A.D. (cardboard aided design) 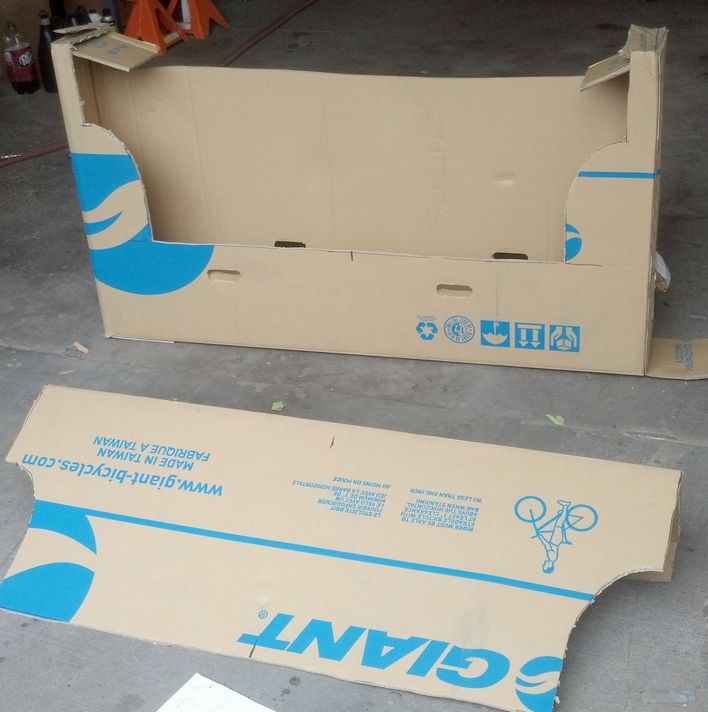 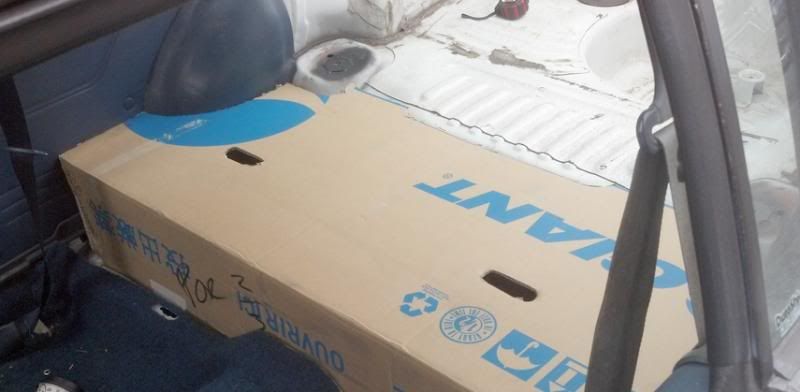 Note the design now lays up to the section of the floor over the axle, and not above the section like in the original idea. The design is then transferred to 5/8" plywood. The front panel is cut and fitted into the car using clip nuts fitted to the rear interior crossmember. 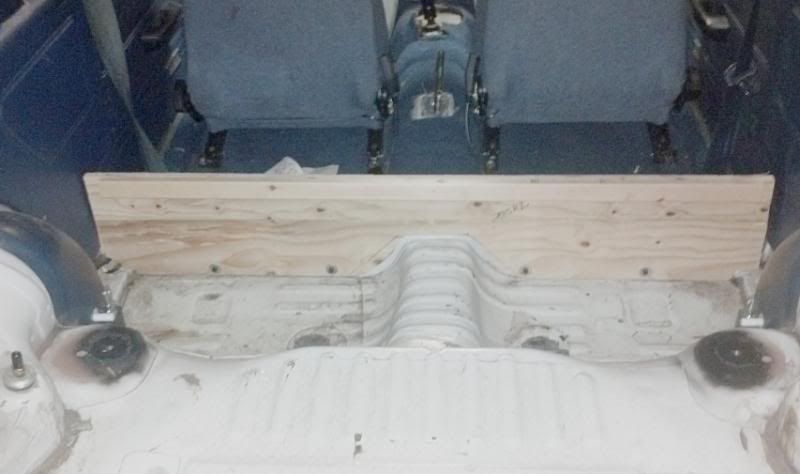 Next came the top.... 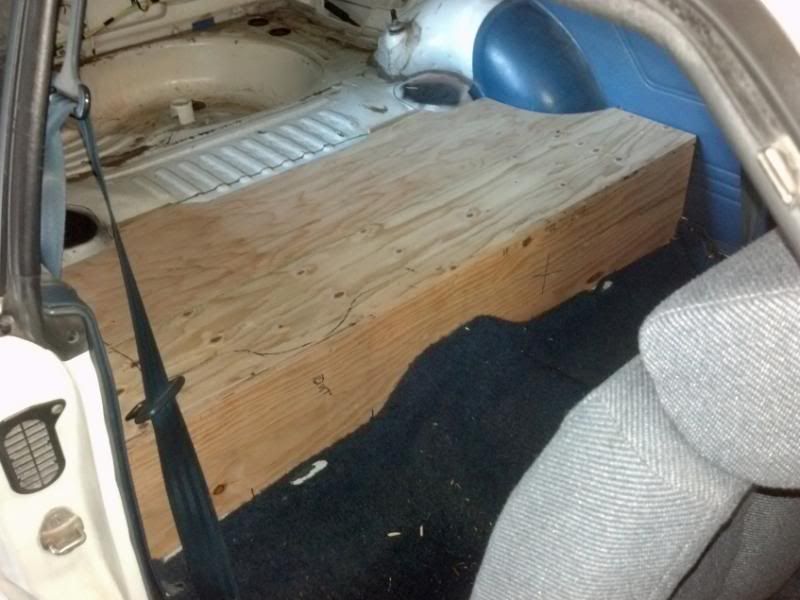 the top will fasten to the edge of the front, but how to mount the rear edge of the top???? A shaped 2x4 of course  Below is the rear mounting propped up, the lines/hash marks show areas needing material removal prior to mounting. Below is the rear mounting propped up, the lines/hash marks show areas needing material removal prior to mounting.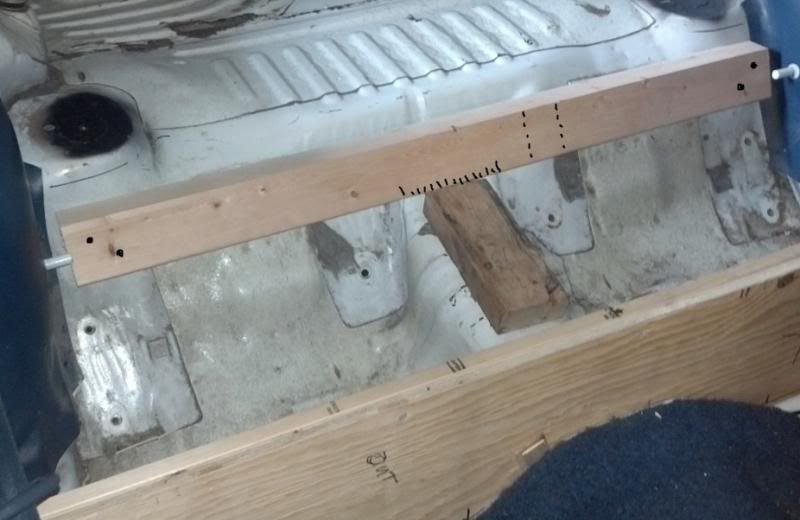 part of the shaping required 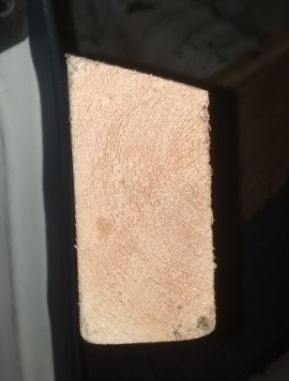 The hardware required.... 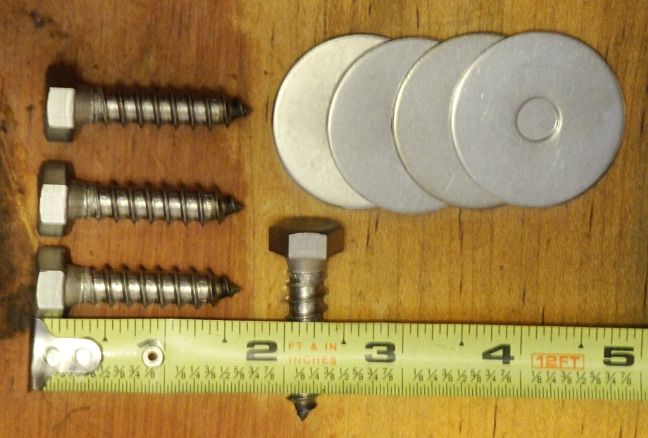 So now it makes the space far more utilizable... but more could be done.... The Corolla has only a limited amount of hidden storage space, and by using the solid door panels, I removed some of it.... now I thought I'd add some. 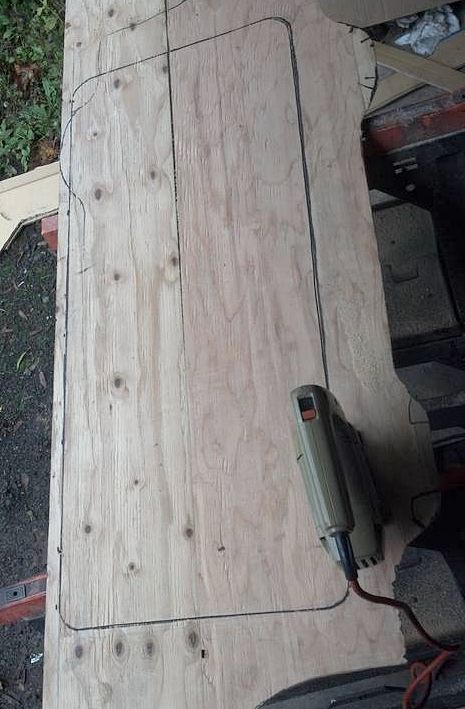 I added a hatch 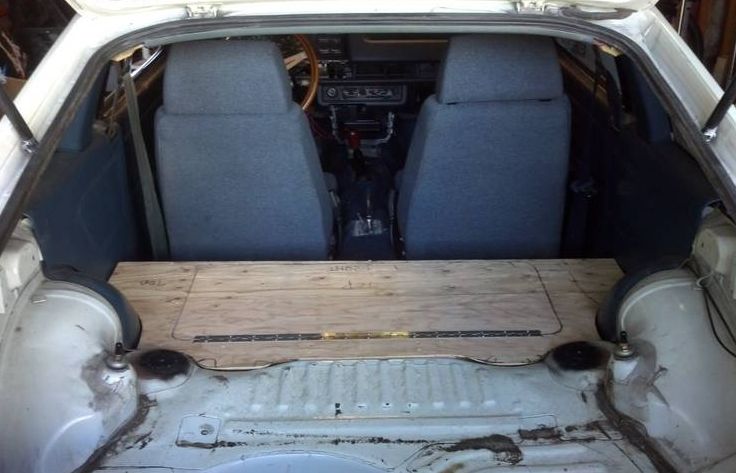 installed a continuous (aka piano) hinge 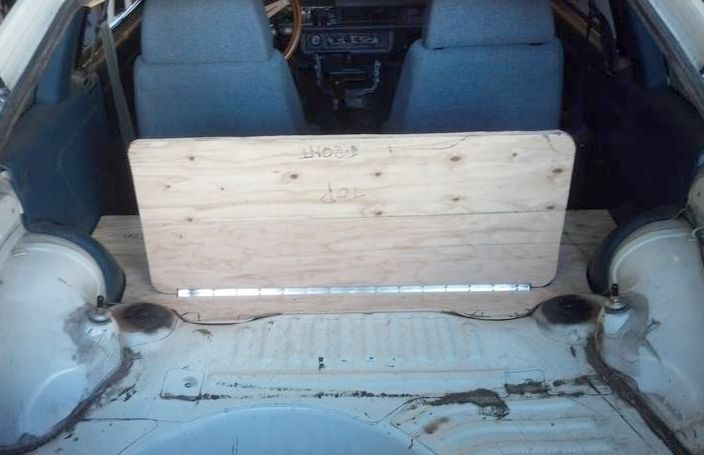 enough concealed room now for just about anything I'd conceal or want too... in a car. 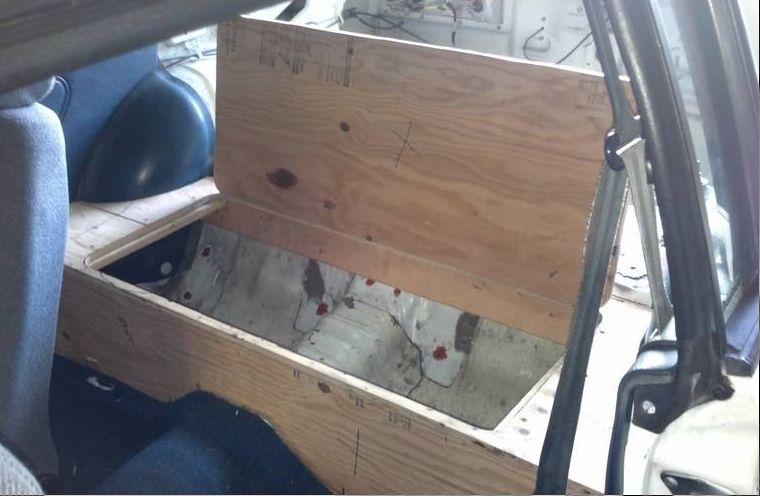 Once the rear panels are refitted, a custom cut piece of carpeting will be fitted. This work I expect to finish over THIS winter, and coming spring So with the re-design I can now carry 6 tires, tools, jackstands, a floor jack, etc... etc... as well as a hidden place for the tuning laptop or valuables edit: OH... not that it is a huge deal... but the back seat weight was about 32#, the plywood platform about 12#s. A savings of about 20#s....... More to come.......
__________________
Information is POWER - LEARN the facts!
Last edited by oldeskewltoy; 10-26-2013 at 06:27 PM. |
|
|
|
|
10-26-2013, 03:09 PM
|
#33 |
|
Senior Member

Join Date: Jul 2012
Drives: 2013 Scion FR-S-Asphalt
Location: Sin City
Posts: 134
Thanks: 24
Thanked 42 Times in 29 Posts
Mentioned: 2 Post(s)
|
Very cool build!
|
|
|
|
|
10-27-2013, 03:33 PM
|
#34 | |
|
dedicated enthusiast
Join Date: Oct 2009
Drives: Surreptitious(AE71), & Grunt(AE95)
Location: PDX
Posts: 85
Thanks: 2
Thanked 41 Times in 24 Posts
Mentioned: 0 Post(s)
|
Quote:
 So the interior(including new carpeting) should be finished, and fully assembled... hopefully... by this spring.  Ohhhh... I forgot... I promised a photo of David..... remember ALL the body modifications are his handy work..... 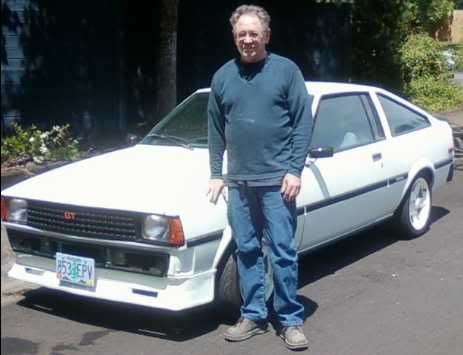 Speaking about David's handy work.... I haven't yet shown you the rear end modifications. As I've already noted... I did have some luck with this project.... the replica FOHA spoiler on the front (remember FOHA, the Austrian aero company?). Well I managed to score(lucky part) a genuine FOHA rear lip(aka "ducktail") spoiler. 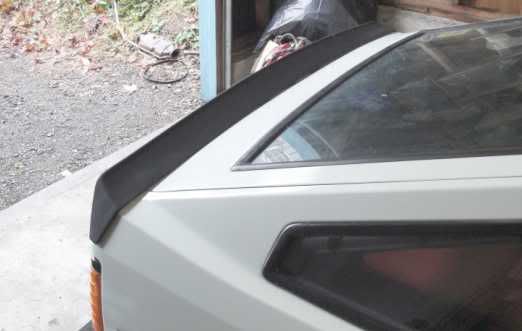 and then you look at the behemoth bumper 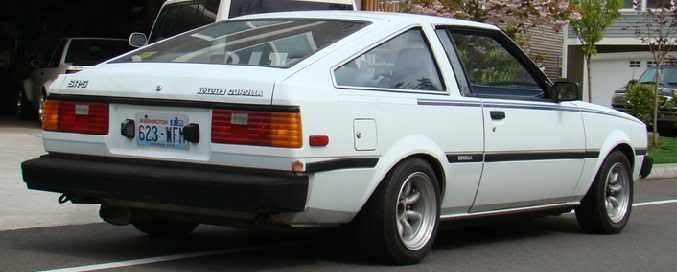 (sorry that ugly ass bumper requires 2 sets of barfers....) David took care of that as well.... utilizing the original bumper, the 6" padded extension(about 35#s) was removed to expose the steel structure underneath. He then made filet panels to enclose the original steel structure in a more tailored fit 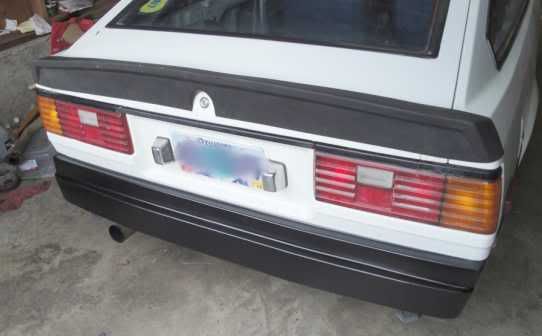 Before.... 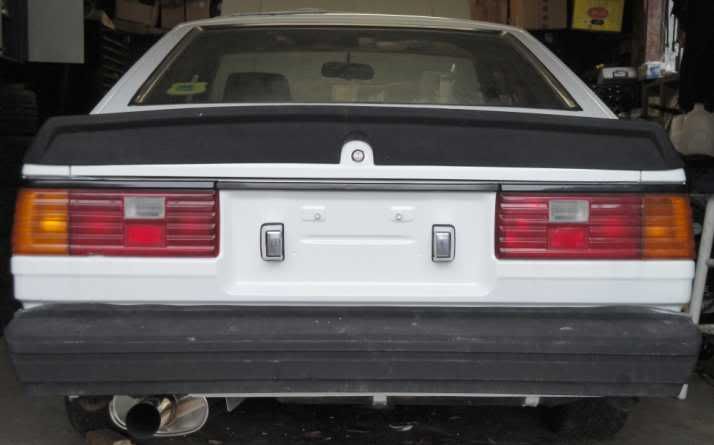 After.... 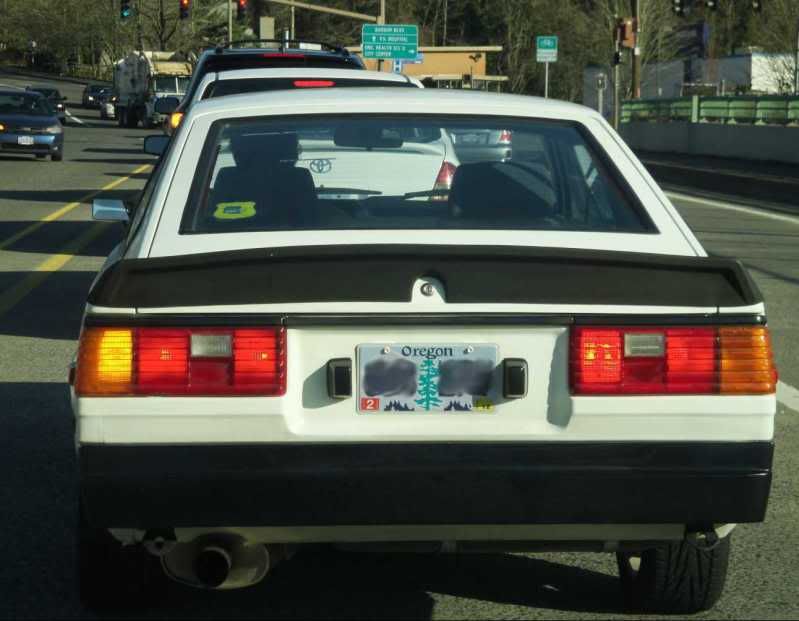 Also worth noting the blacked out license plate lamps... chrome before, matt black now. More to come....
__________________
Information is POWER - LEARN the facts!
|
|
|
|
|
|
10-30-2013, 07:39 PM
|
#35 | |
|
dedicated enthusiast
Join Date: Oct 2009
Drives: Surreptitious(AE71), & Grunt(AE95)
Location: PDX
Posts: 85
Thanks: 2
Thanked 41 Times in 24 Posts
Mentioned: 0 Post(s)
|
Quote:
something like this  Above is an oil cooler typically used on motorcycles. I called Earl's and asked them if their curved coolers would work in a car, they asked me for the engine size... and placement on the vehicle. Once they saw where it was going, and knew the engine size was 1606cc, the Earl's rep saw no reason it wouldn't work.... he was right it has worked beautifully for the past 3+ years. So now that I had a cooler... brackets are needed. Using aluminum plywood edging cut, bent, doubled up.... Some parts you get at the dealer... some parts you get in the aftermarket.... some parts you get at the junk yard, or a friends.... but some parts are just not available unless they are built expressly by, or for you. These are one of those parts... weighing in at under 4 ounces!!! 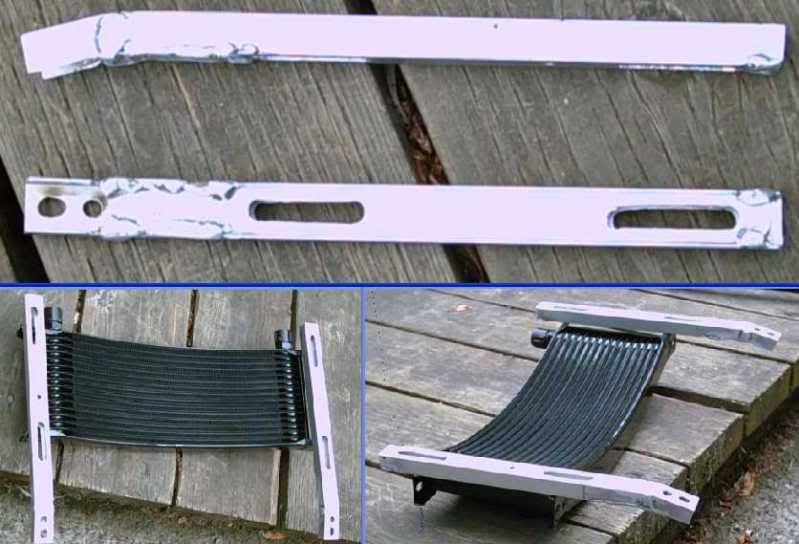 The welding could be better, but they are structurally fine - and free beats paying! Oh... the holes(down on the bent end) are purposely shaped the way they are. Each allows some adjustment so that when I install the rivet nuts*, machine perfection isn't required. The holes, all of them, are designed to accept a 6mm(10mm wrench size) fastener. * - Rivet Nut... self-explanatory 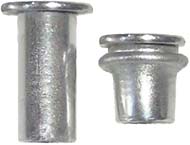 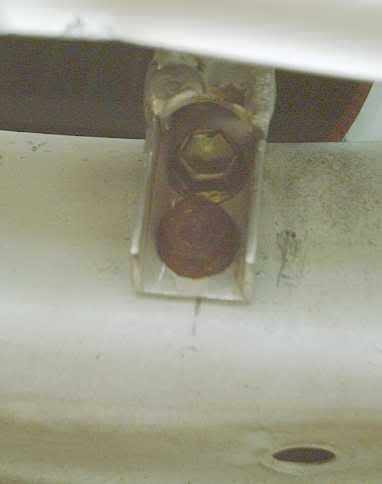 ...and here is the finished job. I forgot to take pics as I was doing this... and I wasn't going to disassemble it just to take pics! What you see in the above photo is one of the brackets double bolted to the front cross member. 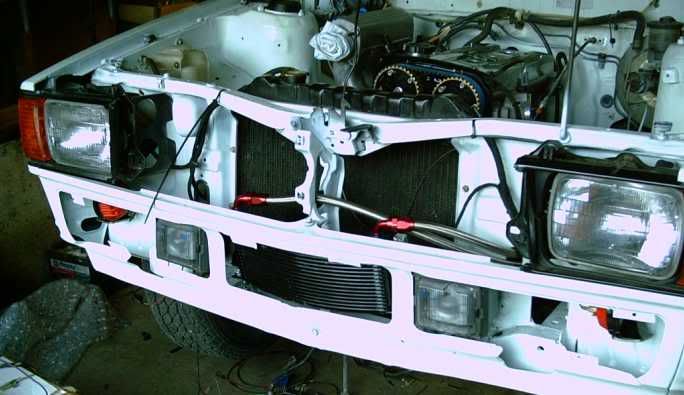 Here is the cooler no longer "supported" by lumber, or shop rags, but fully mounted with the brackets. Note the cooler hose is routed thru the grill support - can you see the custom grommet?? The hose mounted through the grill support will help somewhat in minimizing any frequency vibration that may occur, it is a nice snug vibration free mount. If you think the routing of the one hose is creative.... the routing through the firewall, and how that was finished goes a step beyond. Many cars of that era might be manufactured for many markets, and so some parts might be universal, and made to fit. The front radiator support is one of these parts. Note I used an unused pass though to get the oil cooler lines from the engine compartment to the front of the car where the cooler resides. 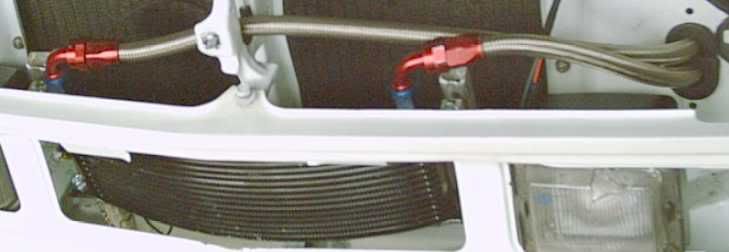 What is unique, and creative.... I used a common sway bar bushing, split and carved to allow for a custom plug to isolate the cooler lines from any chance of rubbing on the radiator supports sheet metal. 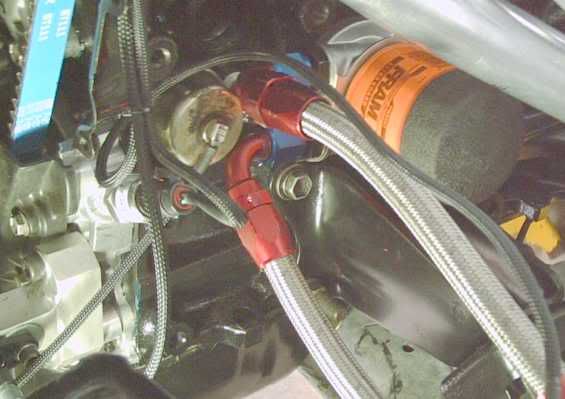 The tap off the engine is at the oil filter housing, I'm using a thermostatically controlled Mocal adapter. 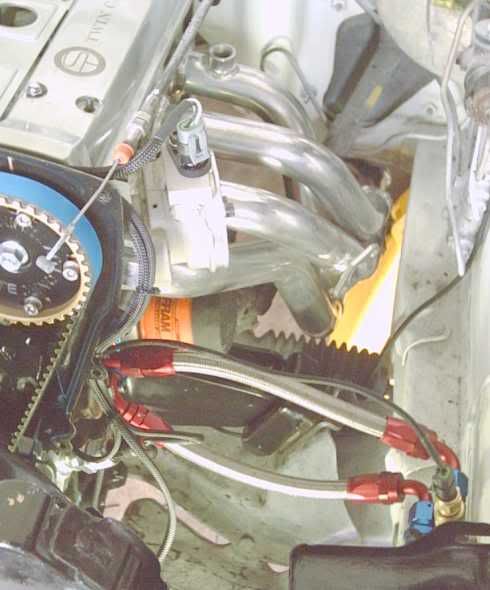 The lines "jump" to the inner frame rail... mounted with a "P" clip 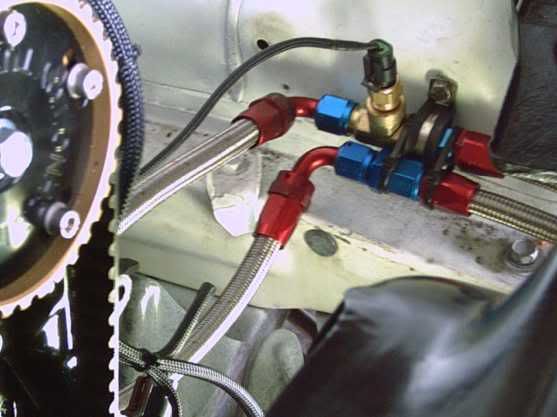 Along with the cooler the engine management monitors engine oil temp... and can shut the engine down if the oil temps get too hot More to come......
__________________
Information is POWER - LEARN the facts!
|
|
|
|
|
|
10-31-2013, 05:06 PM
|
#36 |
|
dedicated enthusiast
Join Date: Oct 2009
Drives: Surreptitious(AE71), & Grunt(AE95)
Location: PDX
Posts: 85
Thanks: 2
Thanked 41 Times in 24 Posts
Mentioned: 0 Post(s)
|
In 1983.... the only rwd Corolla with fuel injection... was not sold in the USA.
Surreptitious began life as a carbureted 1.6, and so the fuel system was designed to accommodate carburetion... NOT efi. More luck... the AE86 GTS was the first rwd Corolla to have fuel injection, and as with quite a few other parts the fuel tanks are VERY similar to the earlier E7 cars. Surreptitious's original fuel tank 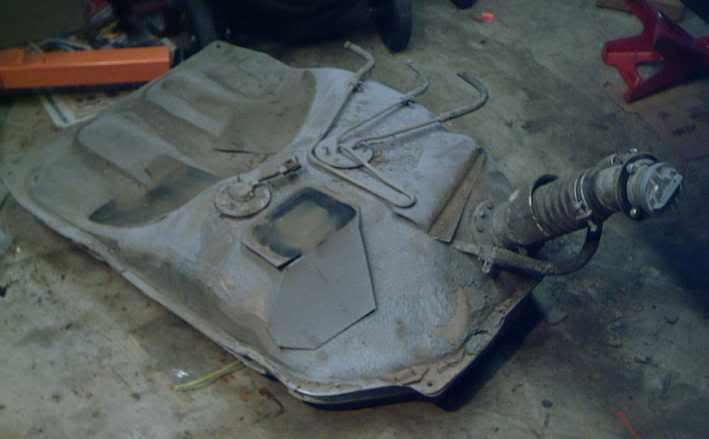 A replacement/donor from an AE86 GTS 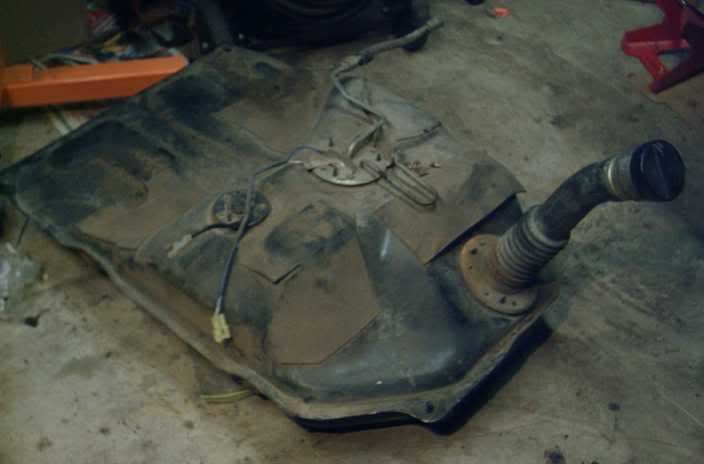 Why did I do it this way? Why not just mount an inline pump and be done with it? The original fuel system was designed for an engine producing 80hp(+ or -)... not more than twice that much. The fuel system was going to need more than an inline pump, it was going to need a larger diameter line. If you look carefully at the top of both tanks you can see the efi output line is more substantial then any of the carb based lines. Now for some "bad" luck. As much as Surreptitious is similar to an AE86... I bound squarely into, "Nope... not quite". The fuel lines, along with the brake line run the length of the car. All the lines are bound together inside metal clamps. Since the cars are so similar just swap them all............ Nope... not quite. The brake tube terminus for both cars is on the fire wall... but for some reason, the E7 tube mounts in 180 degrees differently then the AE86 tube. We, Jeff the shy guy from earlier, and I disassemble the line assemblies, we remove the AE86 brake line and incorporate the AE71 brake line into the AE86 fuel lines, then mounting them all where they were mounted originally. That wasn't the only problem to overcome... the original tank has a flexible filler neck, while the GTS tank has a hard pipe filler.... and since this is the bad news section of this post... the two filler necks are NOT swappable... the bolt pattern and overall diameter just don't allow swapping the necks. So... some "neck surgery" by David... 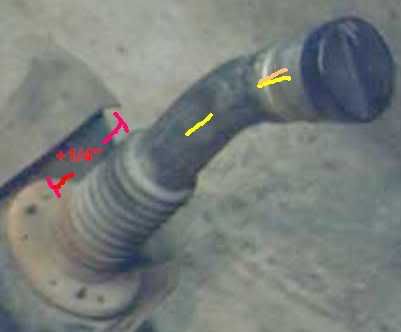 The filler neck was cut across the underside of the curve, and it was "opened" up and a small wedge of steel was welded changing the angle of the filler neck so it would fit.... Once the original filler neck upper mount was cut away... the EFI cap is neatly nestled behind the fuel door 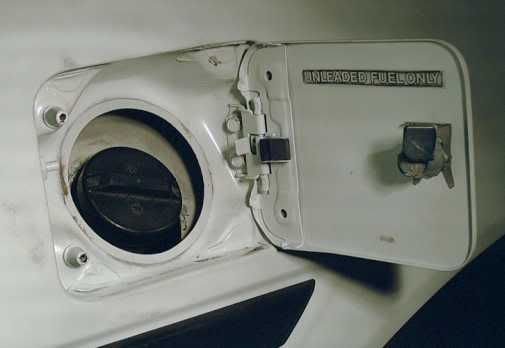 and now that the AE86 EFI lines are incorporated, a slight change in the pressure line terminus allows for a "floating mount" away from the inner fender allowing more space for other needed components 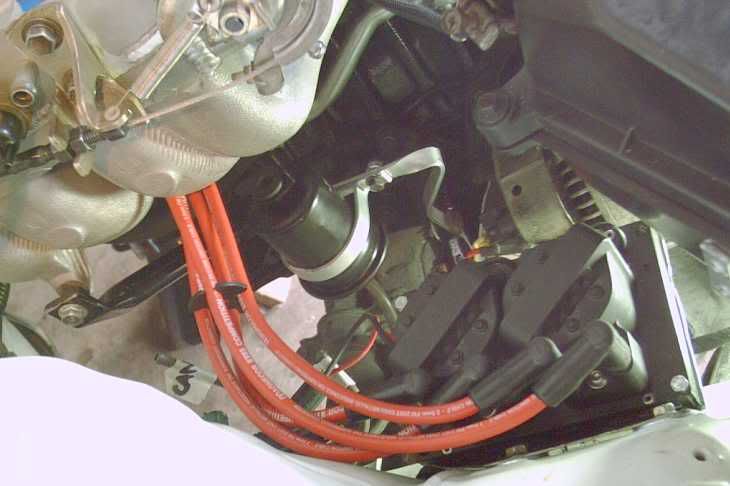 More to come.......
__________________
Information is POWER - LEARN the facts!
|
|
|
|
|
11-01-2013, 05:27 PM
|
#37 |
|
dedicated enthusiast
Join Date: Oct 2009
Drives: Surreptitious(AE71), & Grunt(AE95)
Location: PDX
Posts: 85
Thanks: 2
Thanked 41 Times in 24 Posts
Mentioned: 0 Post(s)
|
The car has an engine(with oil cooler), wiring, a fuel system, a management system but as of yet there isn't a driveline - transmission
 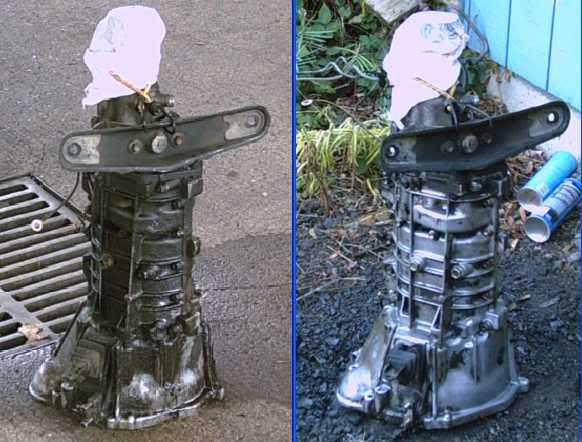 Both the AE86 and the AE71 came with Toyota's T50 5 speed transmission, so whats the big deal in the driveline you might be asking? For now the big deal is setting up the hydraulics for the driveline. In a later(still too come) post there is a LOT more change. The Ae71 comes with clutch fork access on the driverside of the bell, while the later GT-S used the passenger side of the bell. The factory switched sides because the engine went from the exhaust on the passenger side for the single cam engine to the exhaust on the driverside on the dual cam one, so Toyota switched sides. I now had a dual cam and so the exhaust, and clutch slave are on the same side 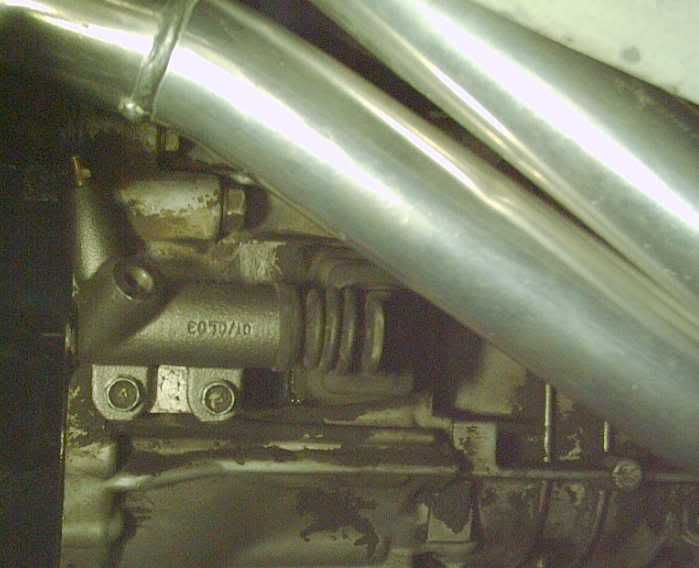 All I had to do was swap to a GT-S bell and change the plumbing to GT-S type... BUT.... the entire engine management wiring is now roughly in the area that the new clutch line would need to follow... not desirable. ... LESS desirable... a hydraulic line touching the exhaust! (similar to this)  Another full custom solution.... I retained the 4AC slave cylinder, but changed the clutch plumbing. Instead of crossing from the frame rail, I re-designed the lines. 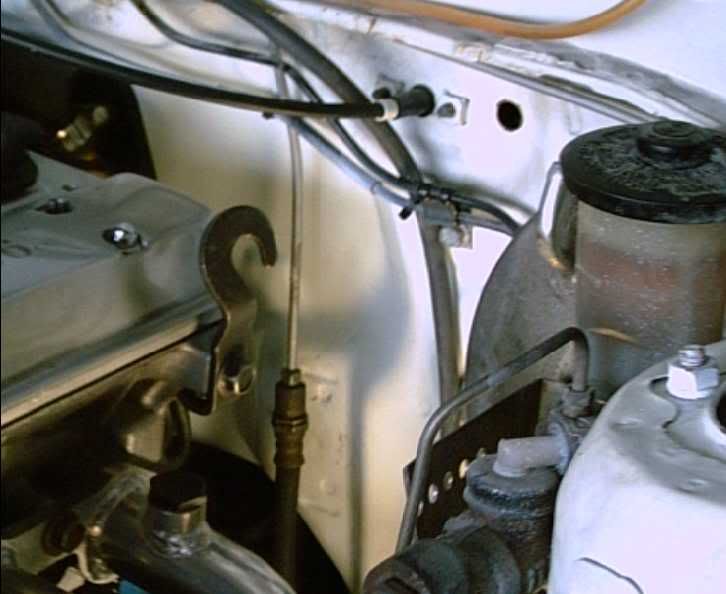 First I went and got new hardline and bent it similar to the GT-S line, but stopped it on the driverside, and dropped it straight down. Above photo shows the original soft line line attached to the new hard line. Once I had a hard line, I contacted Stuart @ TechnaFit. I asked him if he thought I could change the soft line from a straight thread in to a banjo type mount. He saw no reason I couldn't mount the soft line with a banjo bolt, and so I had him make me a custom soft line 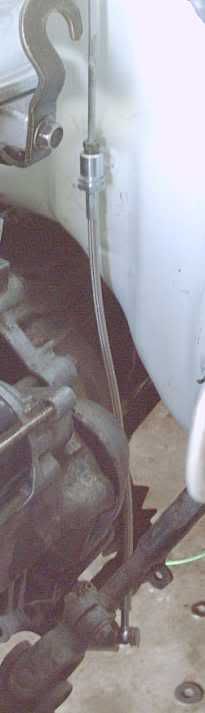 This is a great pic because it shows the line actually runs behind the bellhousing, and so is far away from interfering with anything.... Even down here... there is nearly 3" of room between the headers and the top of the banjo bolt 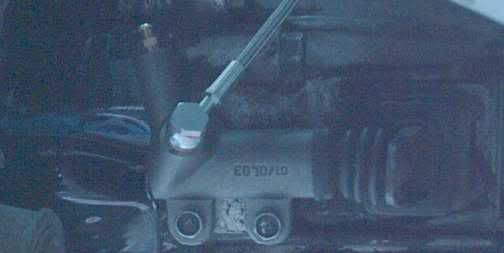 The rest is just getting the clutch installed and aligned... 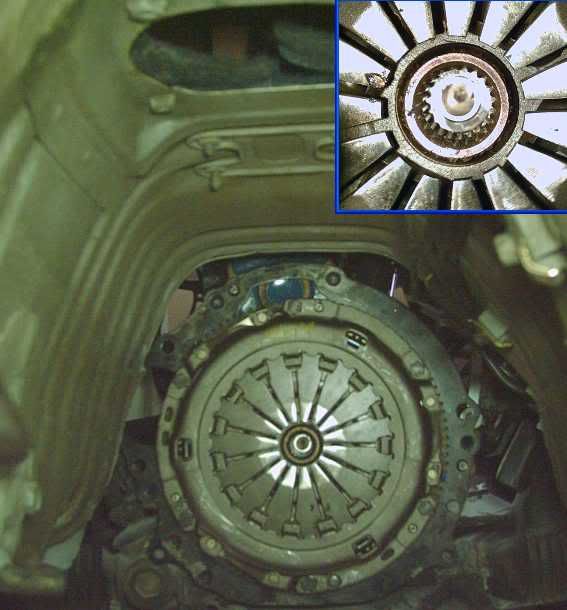 and install the transmission and driveshaft. More to come......
__________________
Information is POWER - LEARN the facts!
|
|
|
|
|
11-02-2013, 02:32 PM
|
#38 | |
|
dedicated enthusiast
Join Date: Oct 2009
Drives: Surreptitious(AE71), & Grunt(AE95)
Location: PDX
Posts: 85
Thanks: 2
Thanked 41 Times in 24 Posts
Mentioned: 0 Post(s)
|
Quote:
 ... and "shake" (on its way to the tuning shop)  Where she waits her turn among other cars waiting their turn on the dyno...  Finally.... she gets on the dyno....  More to come.......... PS - video to come 
__________________
Information is POWER - LEARN the facts!
|
|
|
|
|
|
11-03-2013, 11:20 AM
|
#39 |
|
Senior Member

Join Date: Mar 2013
Drives: Asphalt FRS <3
Location: Canada
Posts: 660
Thanks: 78
Thanked 142 Times in 102 Posts
Mentioned: 5 Post(s)
|
Sick build, i hope to be your age and still be messing with cars
__________________
|
|
|
|
| The Following User Says Thank You to Scalzo For This Useful Post: | oldeskewltoy (11-03-2013) |
|
11-03-2013, 05:50 PM
|
#40 | ||
|
dedicated enthusiast
Join Date: Oct 2009
Drives: Surreptitious(AE71), & Grunt(AE95)
Location: PDX
Posts: 85
Thanks: 2
Thanked 41 Times in 24 Posts
Mentioned: 0 Post(s)
|
Quote:
Quote:
4th gear pull... turn it up and enjoy  [ame]http://youtu.be/J3nNBXLOvc8[/ame] the dyno print out from that run.... 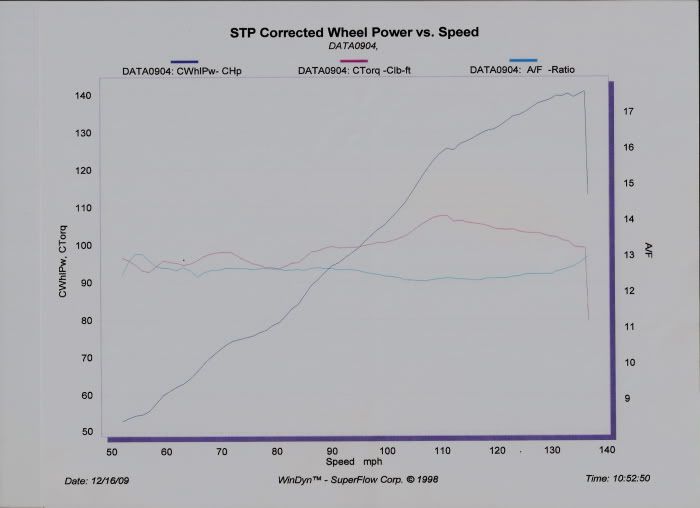 140whp 108#/ft of torque @ the rear wheels - translated to flywheel: 164hp 128#/ft, Stock 4AGE 115hp, 100#/ft Not bad but she gets better........... More to come....
__________________
Information is POWER - LEARN the facts!
|
||
|
|
|
|
11-05-2013, 04:52 PM
|
#41 | ||
|
dedicated enthusiast
Join Date: Oct 2009
Drives: Surreptitious(AE71), & Grunt(AE95)
Location: PDX
Posts: 85
Thanks: 2
Thanked 41 Times in 24 Posts
Mentioned: 0 Post(s)
|
140 whp isn't bad for 98 cubic inches
BUT there is a problem... not a BIG one... but a problem is still a problem. The engine has a vacuum leak. Somewhere in the system is a vacuum leak. The car comes home from that tuning experience, and I'm disappointed. Not with 140whp from less than an ideal circumstances.... BUT the circumstance itself - the vac leak I have a pow wow with a few friends... (most of them you have met already...) Jeff - shy guy, and Jesse. We scour all over the engine looking for a leak. 2 hours of looking and nothing  It can't be driven, it stalls, and so I employ another tuner I have the car trailered to him...  About a week later... I get a call that there still is a vacuum leak... but it idles... kinda, and it drives kinda... Jesse drives me up to the tuner... and he follows me home (about 3 hours). Surreptitious drives fair... only parts of the suspension have been upgraded, so some of it is 30 years old. Along with the fact that although the engine is running and driving, it is still FAR off the mark. Far off the mark or not... she NEEDS to go through emissions.... 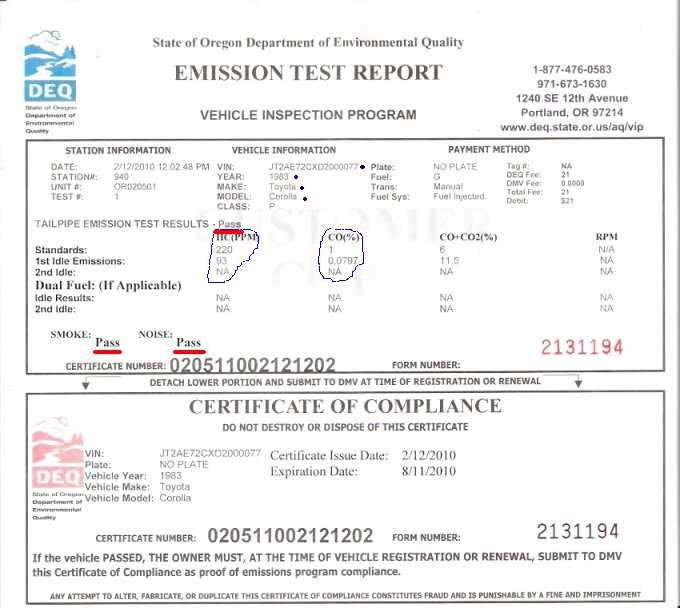 and she does! 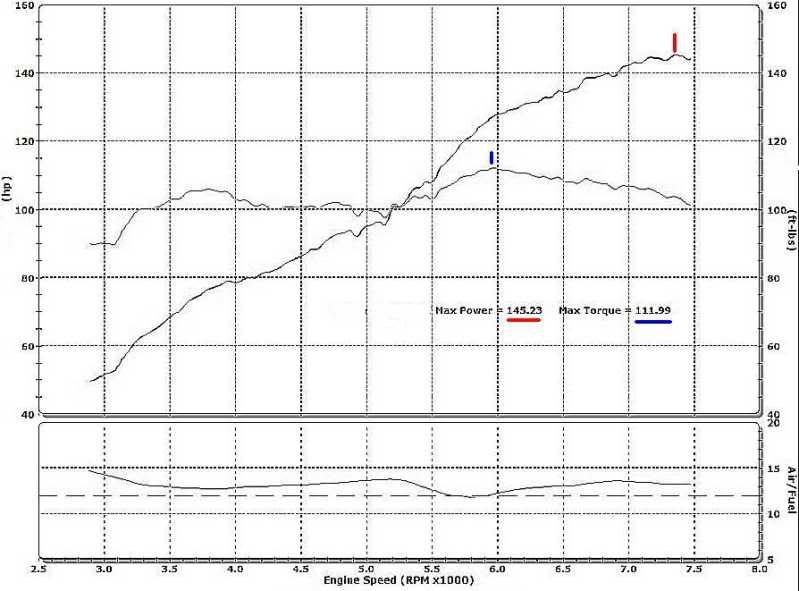 The second tuner manages 145whp, 112#/ft @ the wheels (or 170+hp and 135#/ft at the flywheel... remember stock 4AGE is 112hp and 100#/ft) Quote:
It is great that I managed to reach my goals for the engine... BUT the vacuum leak is still there Welcome to story lines converging...... I could go in to the alternative story line here, write a few chapters on my desire for a 6 speed... it goes back to 2006.... , and then come back... but for now I'll just touch upon it...Another friend, his name is Andrew aka "assassin10000", he is driving up from California to deliver a J160 6 speed I bought from him. Once he arrives, he delivers the 6 speed, and I show him my problem. We aren't looking at it for more than 15 min... I've recounted all the steps that all the different tuners, and friends have looked at.... and he removes the throttlebody to air filter hose, looks inside the T/B, and puts his finger over one of the drilled orifices in the T/B and all of a sudden... she gets smoother, and much more stable! What Andrew found was the vacuum leak. The original efi system used an air flow meter. Using an AFM requires there to be air drawing on the afm, even @ idle. Toyota did this by adding a bypass hole around the T/B. The NEW efi system uses manifold vacuum, a bypass around the throttle body is a vacuum leak  I removed the T/B, made a new gasket for it without the bypass hole. Once reassembled, her character got a lot better.... BUT her ignition map was built on vague-ness because of the vacuum leak. Now that the leak was gone, she did drive better... but she now needed a better ignition pattern to follow (aka ignition map). 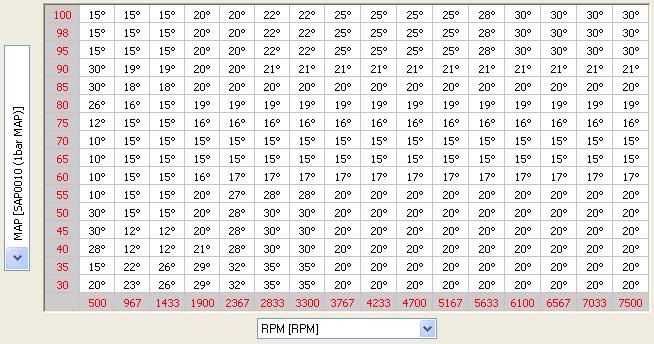 I had paid 2 tuners... so I was pretty much broke at this point, but encouraged because I could now drive the car. I leaned on my friend Marshall @ Jackson Autosport, and he sent me an ignition MAP to plug in and try to use... 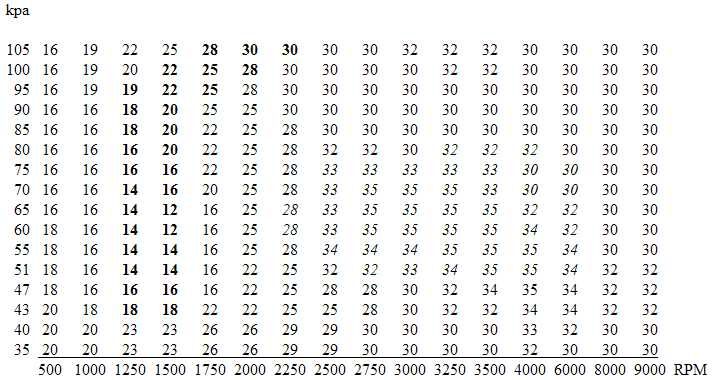 It was better... still a few hiccups, but I could drive and enjoy her  So... the car drives better, the map I've been given is adequate... Welcome a "new" friend... he is Brian.  Brian worked in the tech field(Yahoo in the mid 90s), had a 4AGE powered rally car tuned with MegaSquirt, and he was willing to help me drive tune Surreptitious. He showed me a few things, and gradually the ignition map improved. 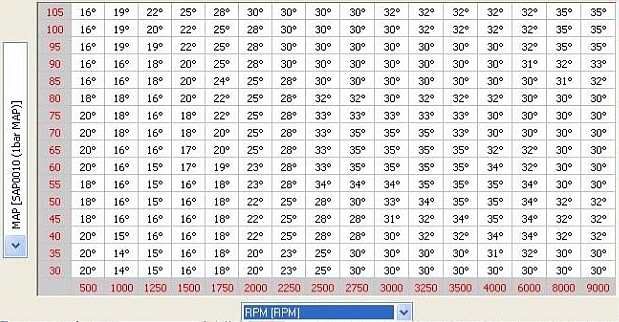 We did a lot of work in throttle transition areas, especially lower rpm areas trying to minimize cell conflicts (those nasty little cough/sputters at lower rpm) That is the ignition side of this... now for a little on the fuel side... The FJO system is self learning when it comes to fuel maps... you set the basic parameters, and then get the initial map set close... based on the settings and the injectors. Unless the two engines are literally identical, different engine will have slightly unique fuel map based on the engines need. The FJO system looks at the wideband oxygen sensor, looks at its basic parameters, and adjusts fuel based on the VE and need of the engine. More to come......
__________________
Information is POWER - LEARN the facts!
|
||
|
|
|
|
11-06-2013, 12:12 AM
|
#42 |
|
Senior Member

Join Date: Nov 2011
Drives: Firestorm 6MT
Location: Texas
Posts: 456
Thanks: 435
Thanked 115 Times in 94 Posts
Mentioned: 6 Post(s)
|
Awesome build!

|
|
|
|
|
|
|
|
|
|
 Similar Threads
|
||||
| Thread | Thread Starter | Forum | Replies | Last Post |
| Nissan 370Z thread | S2KtoFT86 | Other Vehicles & General Automotive Discussions | 116 | 04-07-2017 10:40 PM |
| Designed an FR-S keyboard layout | Mandy | Scion FR-S / Toyota 86 GT86 General Forum | 0 | 08-16-2013 02:53 AM |
| FRS T-shirt I designed | DeaconRoc | Miscellaneous | 0 | 06-26-2013 03:10 PM |
| Designed my shirt, with my car, lol | njccmd2002 | Scion FR-S / Toyota 86 GT86 General Forum | 9 | 04-14-2013 12:08 AM |
| Oldeskewltoy selling his AE86 | oldeskewltoy | Other Vehicles & General Automotive Discussions | 2 | 01-18-2010 02:26 PM |


 Surreptitious