


|
||||||
| Member's Car Journals Car journals by our members. |
 |
|
|
Thread Tools | Search this Thread |
 10-09-2013, 02:29 PM
|
#15 | |
|
dedicated enthusiast

Join Date: Oct 2009
Drives: Surreptitious(AE71), & Grunt(AE95)
Location: PDX
Posts: 85
Thanks: 2
Thanked 41 Times in 24 Posts
Mentioned: 0 Post(s)
|
Quote:
  This is going to be a LOOOOONG post....  When it comes to body work... I know all the process, and many of the tools... but body work is a total black art to me... quite a few people tell me my porting work is a black art... and to them it might be... but to me... the black art is being able to visualize another persons visualizations... and bring them to life..... Such a person is another one of my friends.... his name is David... (I'll show you his pic in a little bit....) I found David by looking through Craigslist in Portland. He had an advert up about body work... along with an email to David, I sent 5 more to other body shop, hotrod posters. Of the 6 emails... 5 got back in touch... My car... "sans engine" was not going to see them, so they came here... well 4 of the 5 did. David was the only one I connected with... who didn't want $8k+  David explained what he would do, listened to me when I told him that I wanted a clean - light - look.... We discussed the costs...  The fender mirror holes, the antenna hole were all closed, along with the trim holes along the edge of the hood. 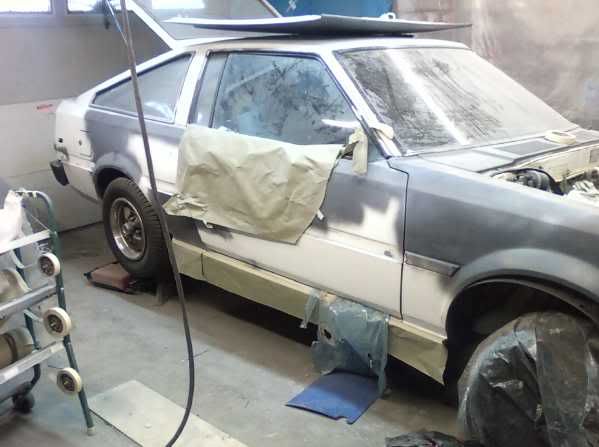 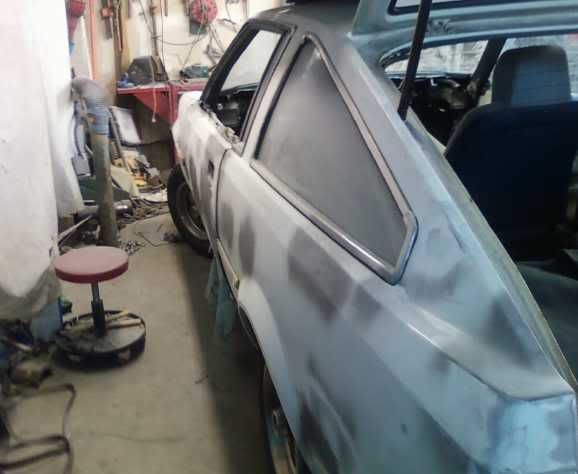 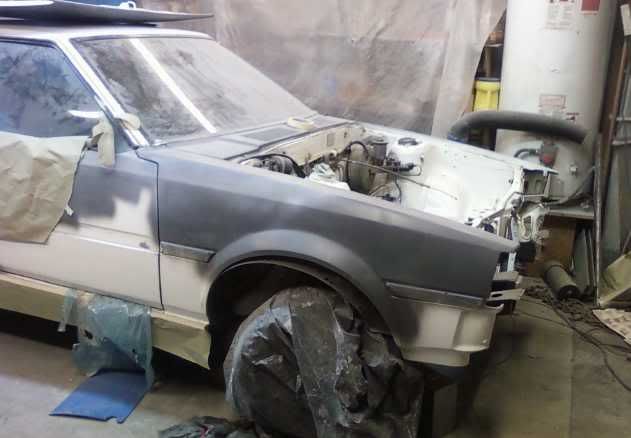 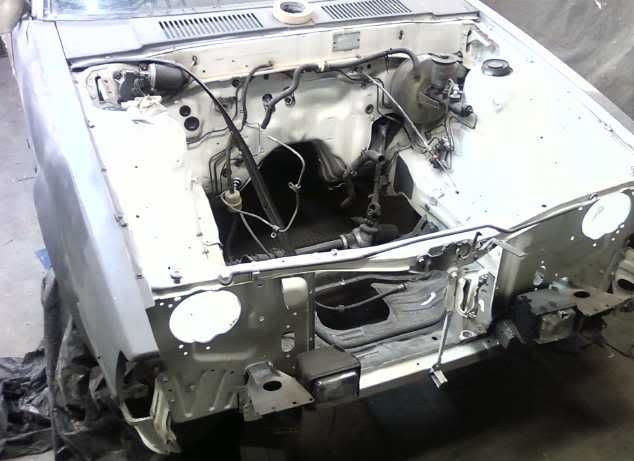 David builds perches for the fog lamps... note the now broken 30 year old vintage driving lamp  I can laugh about the broken fog lamp now... but back then.... where was I going to find a replacement??? Where else... the Netherlands.... huh.... wtf... the NETHERLANDS??? I'm a member of MANY forums... one of the AE86 forums I belong to is based in Europe... long story short... with my friends (gee more friends...  ) help I was able to find a set on sale in a Dutch sales forum.... ) help I was able to find a set on sale in a Dutch sales forum....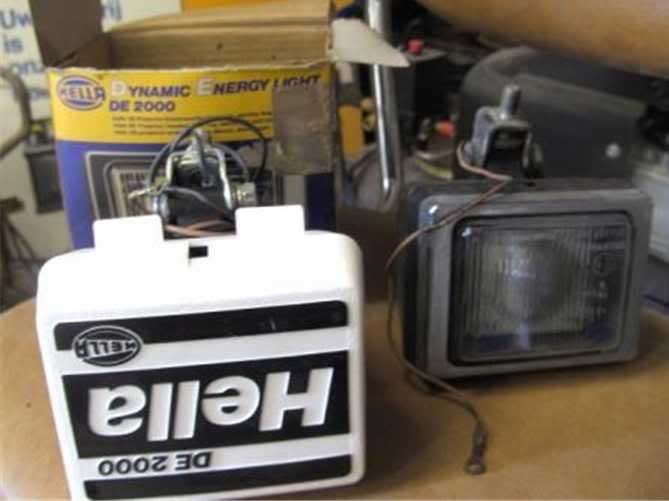 I know have a spare  So with the body getting ready for paint, David suggest Lexus Diamond White Pearl(051)... the idea... keep the car white... but jazz it up with a nice 21st century paint.... 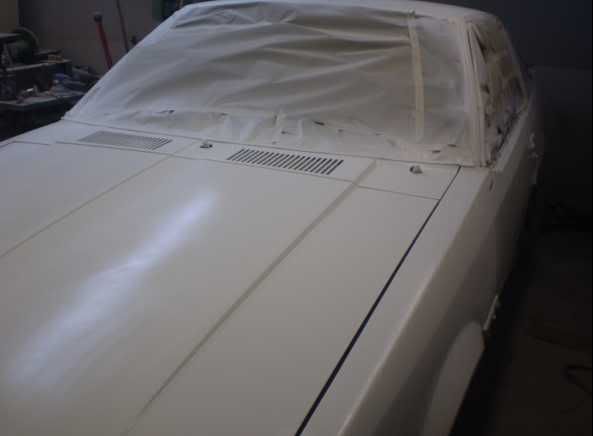 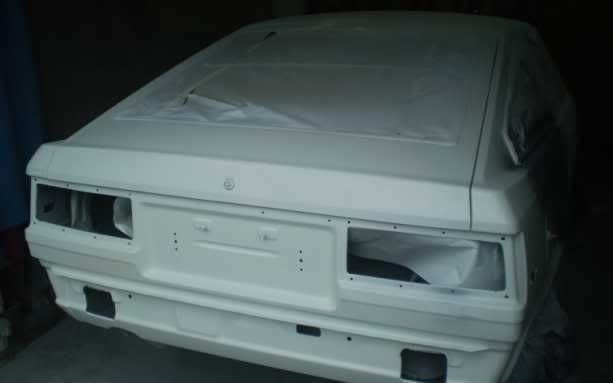 Next came the first truly custom part... from my imagination.... to reality... a shaped tube bumper.... part structure, part protection, part pure imagination  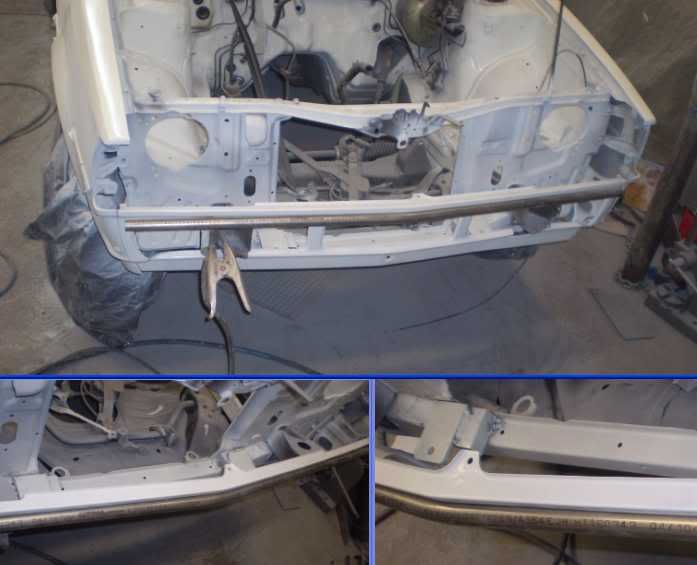 Early on when I was trying to figure out the front bumper... another friend... Jesse, suggested I begin the bumper by using the original bumpers mounts... so we drilled out the spot welds and dropped about 30#s from the very front of the car  They are being used to mount the new tube bumper They are being used to mount the new tube bumper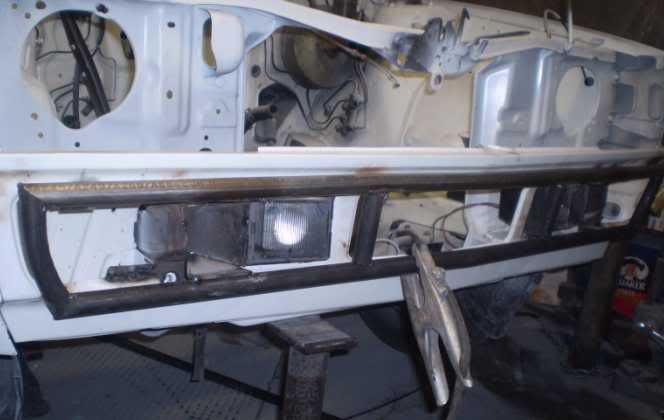 Then we went to fitting the FOHA.... 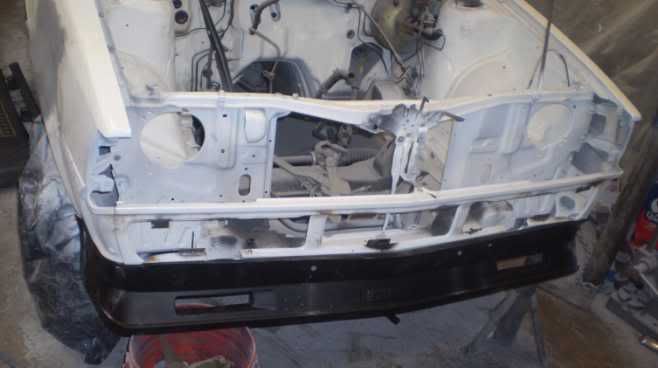 ...and once the FOHA was painted... and the raw bumper... 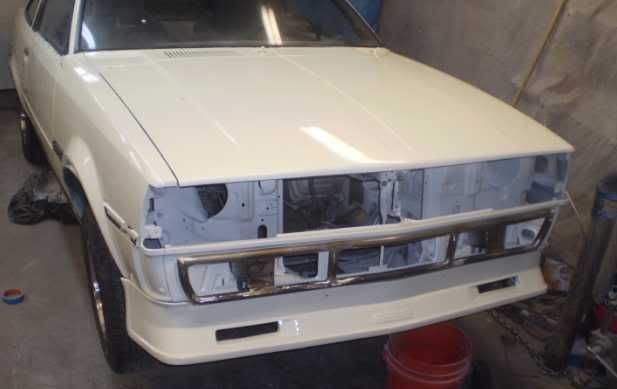 ... a bit more assembled... but still without an engine 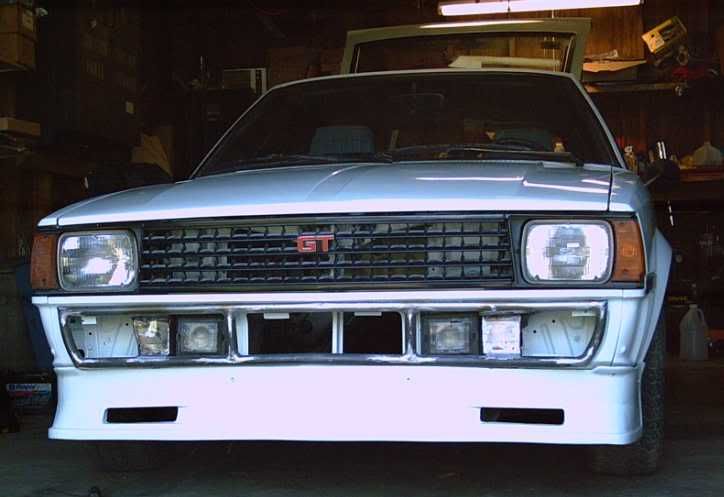 The idea... as I saw it... was to carry the lines of the headlamps down to the bumper by ending the bumper under the outer edge of each headlamp... with the fog lamps peaking from their secluded location... I think we did a good job........  More to come......
__________________
Information is POWER - LEARN the facts!
|
|

|

|
| The Following User Says Thank You to oldeskewltoy For This Useful Post: | kanundrum (10-09-2013) |
|
10-10-2013, 04:52 PM
|
#16 |
|
dedicated enthusiast
Join Date: Oct 2009
Drives: Surreptitious(AE71), & Grunt(AE95)
Location: PDX
Posts: 85
Thanks: 2
Thanked 41 Times in 24 Posts
Mentioned: 0 Post(s)
|
I'm not sure if you noticed.... in all of the body work shots there is something missing... there is no wiring!
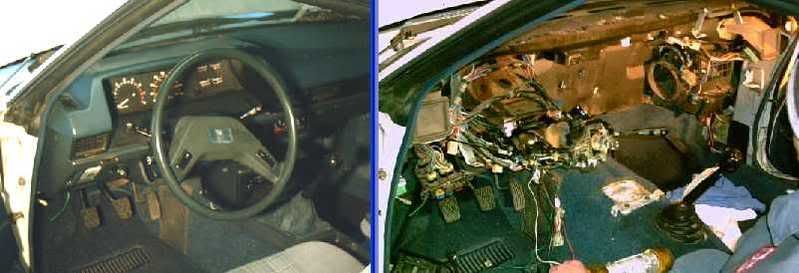 Early on I had decided that 30 year old wiring... relays... and previous owners... was too much. I removed almost all of the original wiring... 99%... the other 1% was the tail lamp pigtails, and the connectors to the instrument cluster. I replaced the harness with a 20 Mini circuit harness kit from EZ Wiring... half the cost of Painless  But that doesn't account for the engines wiring..... 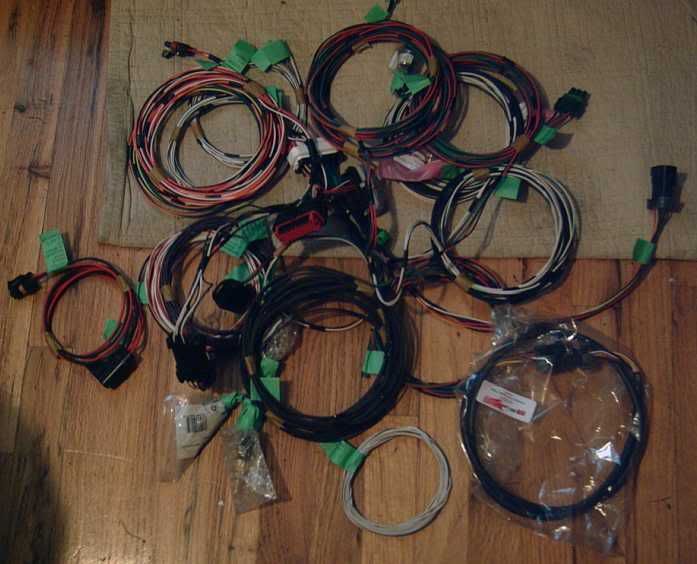  Have I told you that I'm not typically a patient person  So let me introduce to you another friend.... not sure he thinks so... but Mark is very good when it comes to wiring....  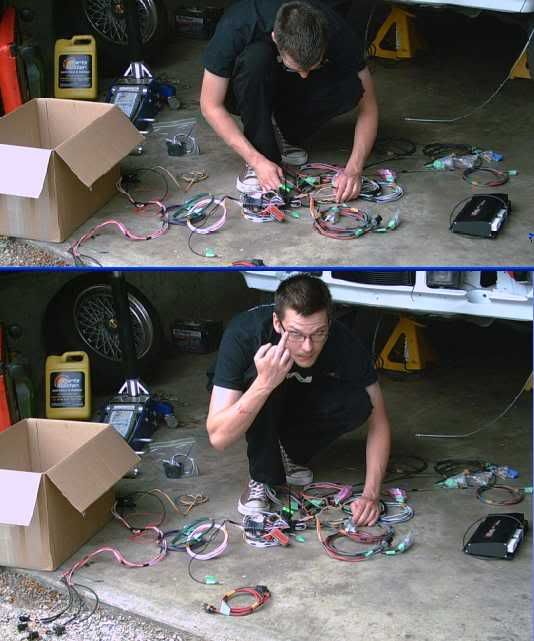 Above he is beginning to work with the engine management wiring, you can see the ECU on the right foreground. Below he is beginning to mount the EZ harness 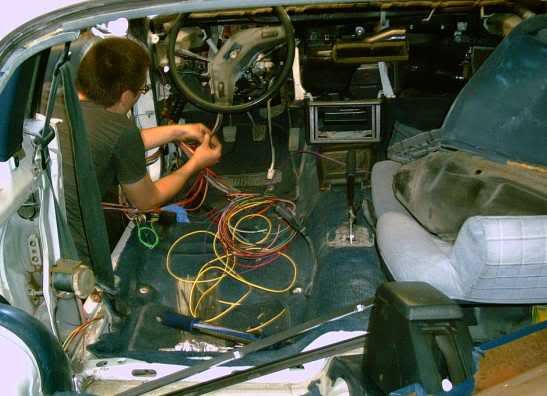 and as if you didn't notice in the first pic of this post... and the most recent pic... the dashboard is not in the car.... 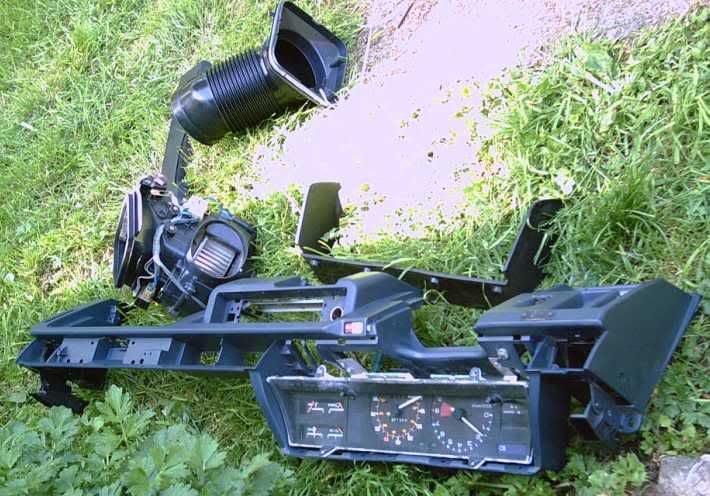 It too is being gone over, this time by me, to make sure that 30 years of use have been cleaned and re-sealed where needed 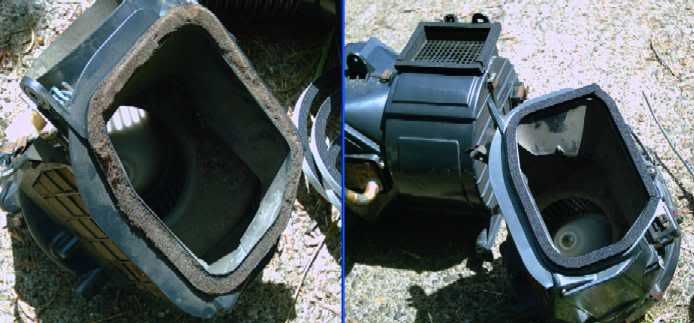 More to come......
__________________
Information is POWER - LEARN the facts!
|
|
|
|
|
10-10-2013, 05:09 PM
|
#17 |
|
dedicated enthusiast
Join Date: Oct 2009
Drives: Surreptitious(AE71), & Grunt(AE95)
Location: PDX
Posts: 85
Thanks: 2
Thanked 41 Times in 24 Posts
Mentioned: 0 Post(s)
|
At this point there is a lot happening. Mark is wiring the chassis with the engine, and transmission out of the car... but once the chassis is moderately wired the engine needs to go in so he can run the management wiring.
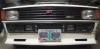
There is other work happening too.... additional custom work Custom #4(#1 is the bumper, 2 and 3 are the new wiring) Here is a before and after photo of the front end.... 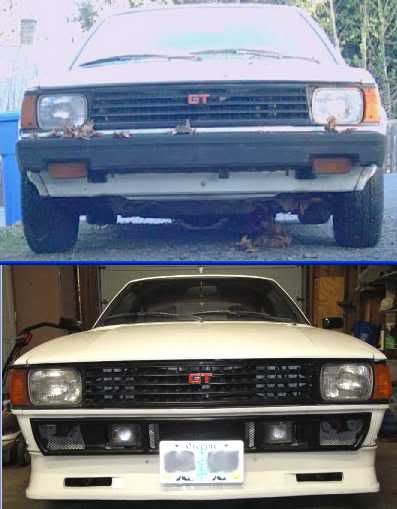 What is missing, that is NEEDED?? more to come...
__________________
Information is POWER - LEARN the facts!
|
|
|
|
|
10-11-2013, 03:32 PM
|
#18 | |
|
dedicated enthusiast
Join Date: Oct 2009
Drives: Surreptitious(AE71), & Grunt(AE95)
Location: PDX
Posts: 85
Thanks: 2
Thanked 41 Times in 24 Posts
Mentioned: 0 Post(s)
|
Quote:
To be able to use my new front end, I needed to make the parking lamps pull double duty so they could be both parking... and directional signals. There isn't a lot of room for a 2nd bulb... 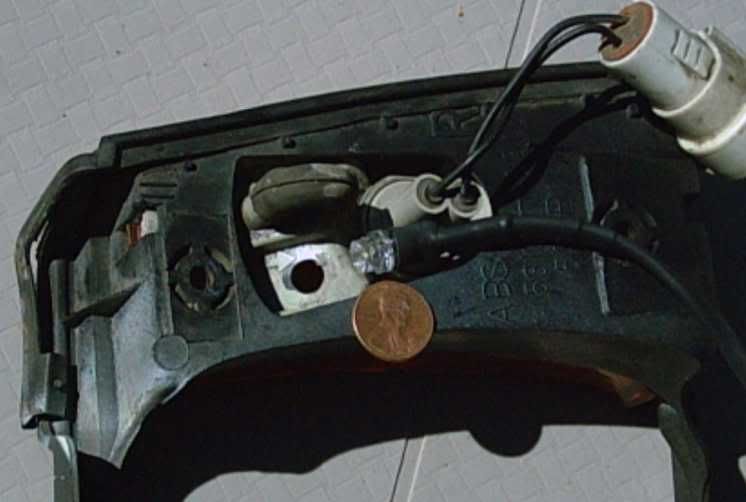 Having found a place on the back side to add a lamp I first try an LED. A single LED is just not bright enough, so off to find something brighter.... something with at least a few watts... 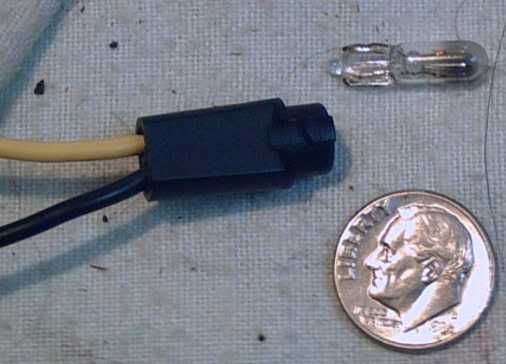 The only problem with the above bulb and mount was it was the only one I had..... .... so asking my friends over at www.hachiroku.net if anyone had any other lamps, the board owner "Delphi" aka Kenny, said that there were a pair of those used to light the wiper and headlamp switches on the AE86.... and sure enough he was right  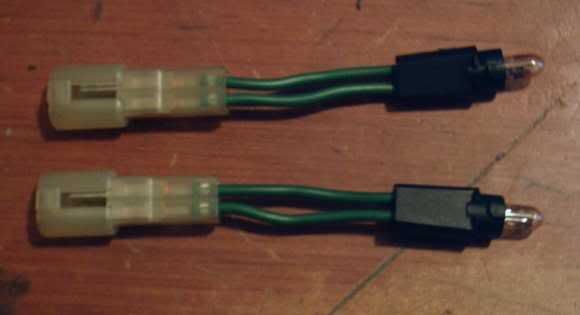 fitted... already cut away to provide pigtails... 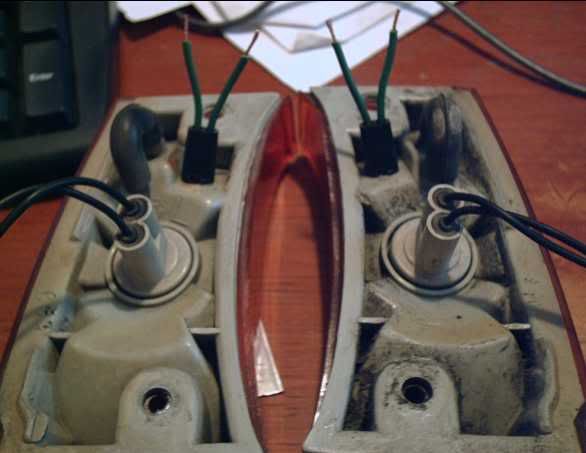 Now the wiring is sealed inside premium shrink tube (w/glue inside!) 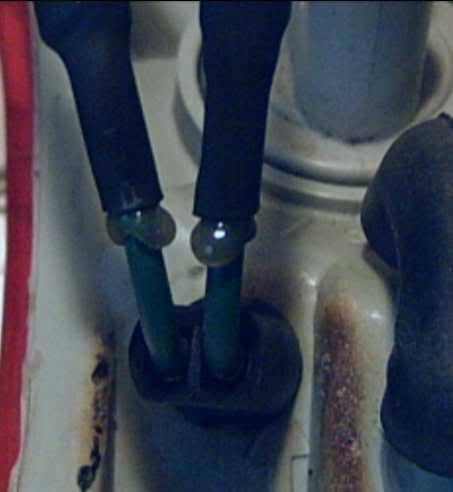 And the finished results........ 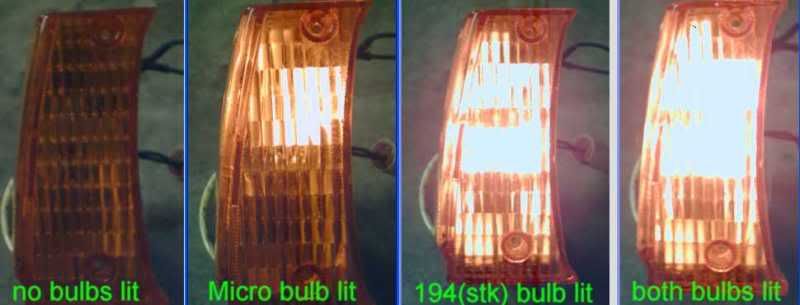 The micro bulb is my parking lamps, the 194 bulb is now the directional signal Not only have I found a way for the parking lamps to pull double duty... I've also increased the safety by now having my directional signals view-able from the side... as well as the front! Safer and improved looks at the same time.... In the next post I'll discuss the use of this...... 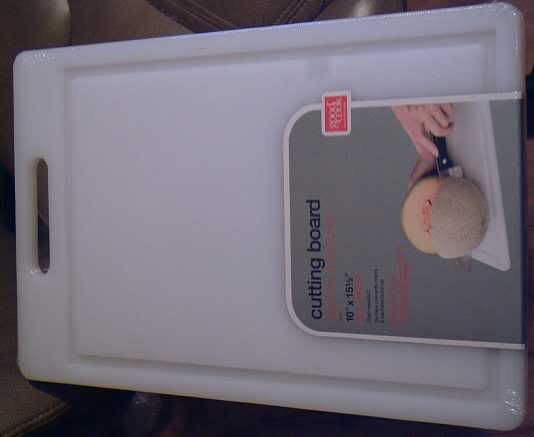 More to come....
__________________
Information is POWER - LEARN the facts!
|
|
|
|
|
| The Following User Says Thank You to oldeskewltoy For This Useful Post: | SkAsphalt (05-08-2014) |
|
10-11-2013, 09:21 PM
|
#19 |
|
Senior Member
Join Date: Jul 2013
Drives: 2013 BRZ
Location: Norcal
Posts: 1,592
Thanks: 1
Thanked 623 Times in 378 Posts
Mentioned: 15 Post(s)
|
awesome build!
|
|
|
|
|
10-11-2013, 11:21 PM
|
#20 |
|
Senior Member

Join Date: Jun 2012
Drives: ZC6, Junk of ALL sorts
Location: Ohio
Posts: 516
Thanks: 111
Thanked 288 Times in 171 Posts
Mentioned: 7 Post(s)
|
Nice build to follow.
Lovely reading. Keep updating.
__________________
# 1. Always know where your towel is.
ZC6-CBS, is home  |
|
|
|
|
10-13-2013, 07:54 PM
|
#21 | |
|
dedicated enthusiast
Join Date: Oct 2009
Drives: Surreptitious(AE71), & Grunt(AE95)
Location: PDX
Posts: 85
Thanks: 2
Thanked 41 Times in 24 Posts
Mentioned: 0 Post(s)
|
Now where was I...... oh thats right....
Quote:
 and as they are wired into the rest of the system.... 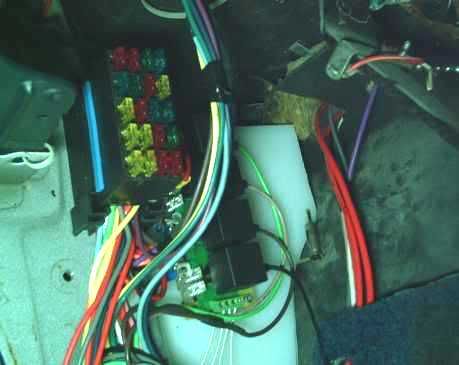 sorry for a short post... More to come....
__________________
Information is POWER - LEARN the facts!
|
|
|
|
|
| The Following User Says Thank You to oldeskewltoy For This Useful Post: | SkAsphalt (05-08-2014) |
|
10-14-2013, 05:55 AM
|
#22 |
|
Senior Member
Join Date: Oct 2013
Drives: 2021 Toyota Supra 2020 4Runner
Location: New Plymouth, ID
Posts: 701
Thanks: 1,396
Thanked 829 Times in 346 Posts
Mentioned: 9 Post(s)
|
@oldeskewltoy...
I had 2 AW-11 MR2s... I am pretty sure I read your builds on the MR2 forum...or the 4 AGE forum... I sadly sold both of my Dueces, but I miss them both...they just got to the point where every time I ran them hard, stuff would break and it was getting harder and harder to fix/replace things. Picked up a BRZ and I love it (only had it 2 days so far...but its fun) Anyway, subscribed...and I know you will do that Corolla well 
|
|
|
|
|
10-14-2013, 01:17 PM
|
#23 | |
|
dedicated enthusiast
Join Date: Oct 2009
Drives: Surreptitious(AE71), & Grunt(AE95)
Location: PDX
Posts: 85
Thanks: 2
Thanked 41 Times in 24 Posts
Mentioned: 0 Post(s)
|
Quote:
 The beauty of the FRS, and the BRZ is that all the parts are NEW... you begin at the beginning!!! In a lot of ways you are far and away beyond those from 30 years ago... when the AW11, and the AE86 were new... The Twins have the power to weight ratio only modified AE86s and AW11s have... you also have the mixture of both AW11 and AE86, when it comes to handling with the twins... so few mods are NEEDED to have fun in one of the twins. I kinda know this one... my wifes daily for the past 2 years has been a bone stock GT-S I've also owned and driven in various others... trust me... the Twins are 12/10ths of a stock GT-S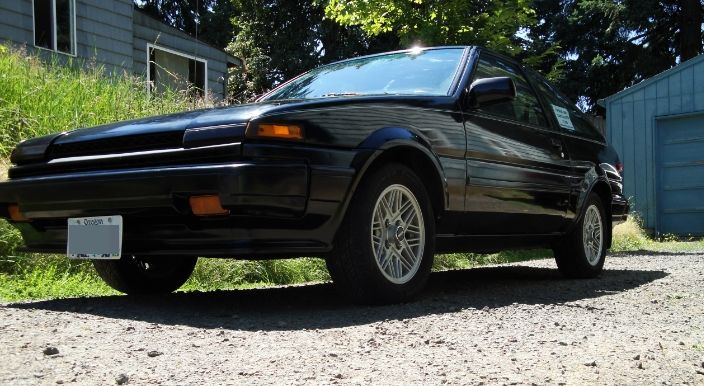 Hmmmm, have you yet enjoyed the trials and tribulations of Yahoo Japan? I've let you in on my excursion to Europe to find replacements for the Hella driving lamps, now let me share the story of the wheel search......... The wheel search begins in the winter 2008/2009. I have a friend.... (yep... another one, this one is named Jack aka "towat168") He told me that he had an account on YJ and that he bought and sold items from there often..... still does. The first set of wheels I found that I REALLY wanted.... I was outbid for.... SSR Air Stages... a staggered set no less  15x7 +15, and 15 x 7.5 zero 15x7 +15, and 15 x 7.5 zero 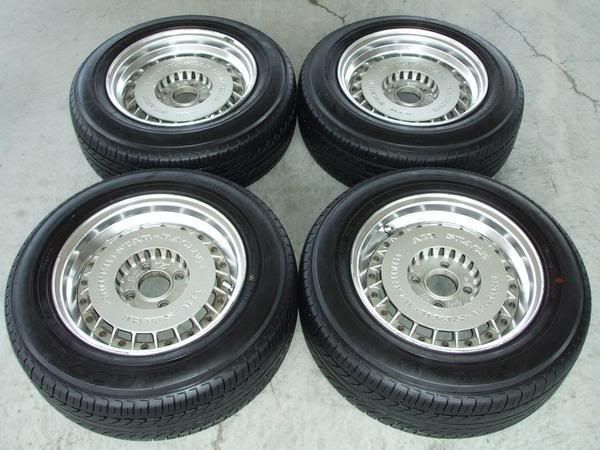 The bidding began @ 5000 yen... and my budget including freight was only $700 total... so @ 30000 yen I stopped. A side note... the EXACT SAME SET came up for sale @ one of the famous wheel sale sites... they were asking $1200 I felt like crap.... but in the end... they weren't to be.... keeping up on the search I came across 2 other sets of wheels I bid on that I was also out bid for.... making 3 failed attempts.... Air Stagess.\/................ TOM'S 15x7" +15 \/ .................. Linea finned 15 x 6.5" +20 \/ 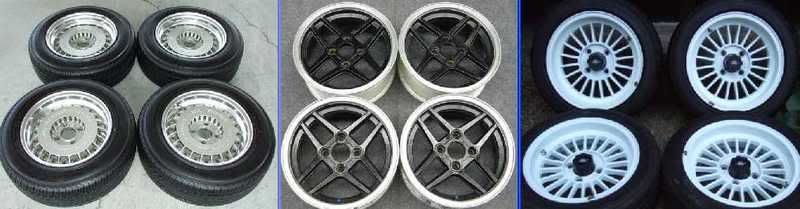 The Linea wheels got me thinking a matched wheel and car combo might look very nice.... and then a set of 5 spoke wheels came up in my search.... Trakyoto Drag 902  5 spoke wheels are a staple of the muscle/pony car era.... and although not staggered, this set was well sized for Surreptitious 15 x 6.5 +22... they are also only 15#s each ... and cost a total.... including freight and fees.... of $540.00 The additional fact that they looked like classic wheels like the Ronal R9... or the American Racing "Daytona" was just icing on the cake More to come.....
__________________
Information is POWER - LEARN the facts!
|
|
|
|
|
| The Following User Says Thank You to oldeskewltoy For This Useful Post: | SkAsphalt (05-08-2014) |
|
10-15-2013, 12:01 PM
|
#24 | |
|
dedicated enthusiast
Join Date: Oct 2009
Drives: Surreptitious(AE71), & Grunt(AE95)
Location: PDX
Posts: 85
Thanks: 2
Thanked 41 Times in 24 Posts
Mentioned: 0 Post(s)
|
Quote:
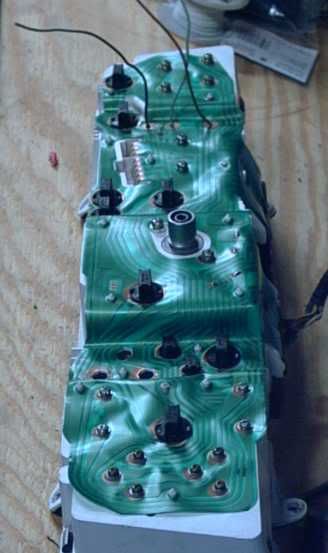
custom #5.... it has been in this thread for 5 days already... and no one saw it. (assumption) From my post on 10/10Anyone see it now??? Still no??? The E7 chassis cars, when equipped with a tach dash, has an 8000 rpm tach with a redline @ 6000.  Look again... my dash now has a 9000 rpm tach.... With a 4AGE engine capable of rpm levels ABOVE the 8000 rpm tach I had to do something so I could adequately monitor rpm. A member of Club4AG was swapping in FX-16 9000 rpm tachs into AE86s... so I disassembled both my cluster and an FX-16 cluster and I managed to fit the FX16 tachometer into the AE71 cluster.  The speedometer is another issue. Back in the olden days... the government pressed for reduced speeds. Part of this was a silly thing in the speedometer... limiting them to 85mph I did some experiments into fitting the FX-16 speedometer, but it, being mechanical, couldn't be modified(with my capabilities) to fit in the E7 dash... BUT.... there is an option.... I just haven't quite gone there yet.... and where is "there" you ask.... again it would be Europe... Europe didn't have such foolishness as an 85 mph speedo... they have 190+ kph (120 mph) speedos... 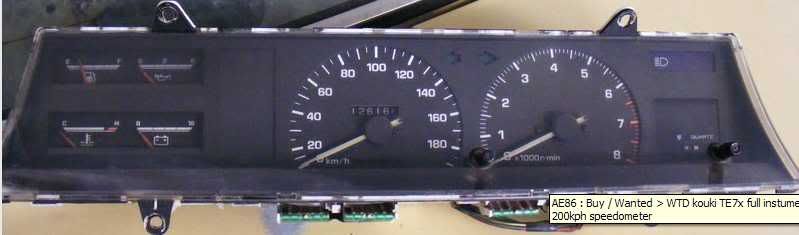 as of yet... this is still just an option, for now I retain the 85 mph speedometer.... oh the European cluster is not mirrored, because it is designed to fit right hand drive, the cluster is reversed to the USA lhd cluster. More to come......
__________________
Information is POWER - LEARN the facts!
|
|
|
|
|
| The Following User Says Thank You to oldeskewltoy For This Useful Post: | Tye300 (10-15-2013) |
|
10-15-2013, 12:28 PM
|
#25 | |
|
dedicated enthusiast
Join Date: Oct 2009
Drives: Surreptitious(AE71), & Grunt(AE95)
Location: PDX
Posts: 85
Thanks: 2
Thanked 41 Times in 24 Posts
Mentioned: 0 Post(s)
|
Quote:
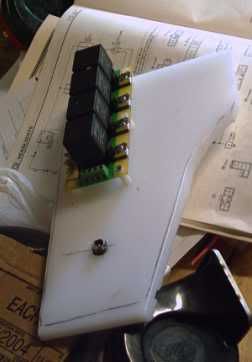
 and Mark preparing the new harness to adapt to the original cluster 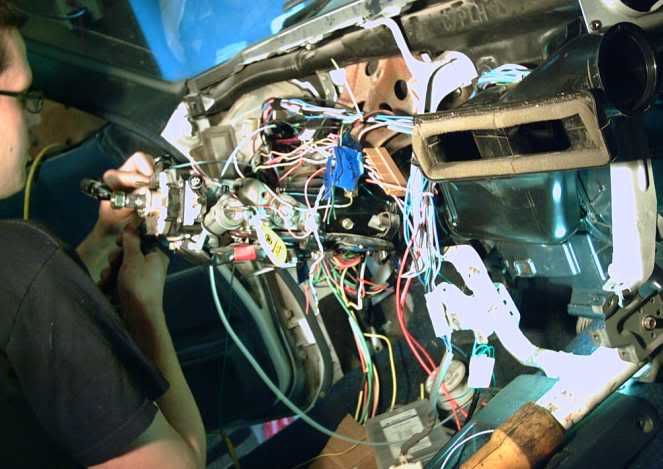 The cutting board was my idea.... and so was this... 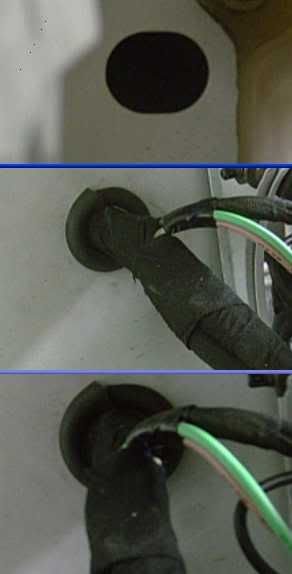 the grommet is made by slitting 1/8" vac hose, and then running the slit around the metal opening.... nice, clean, and avoids any inadvertent damage to the harness. Routing the harness around the car.... 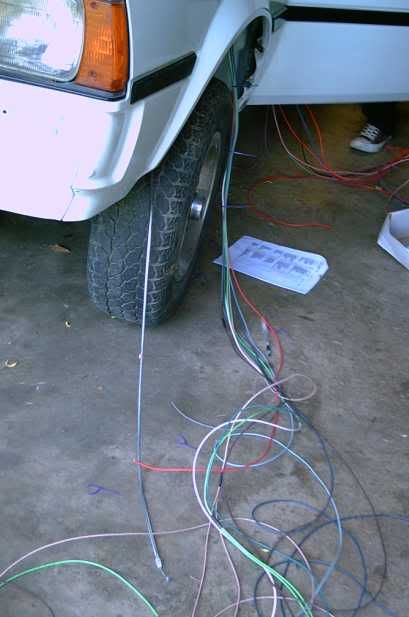 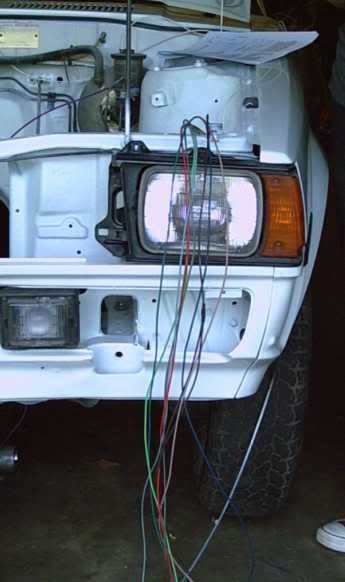 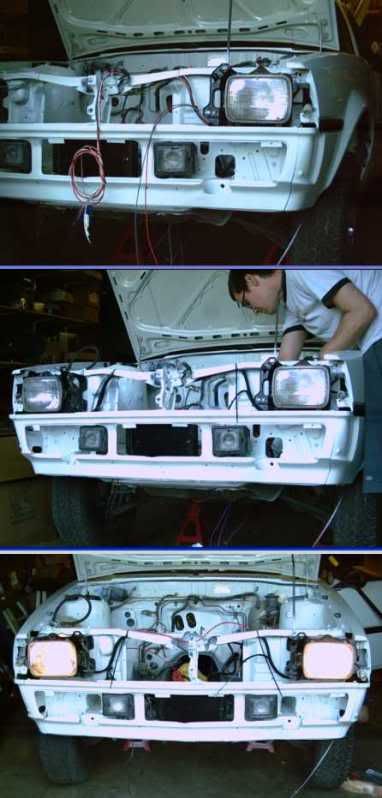 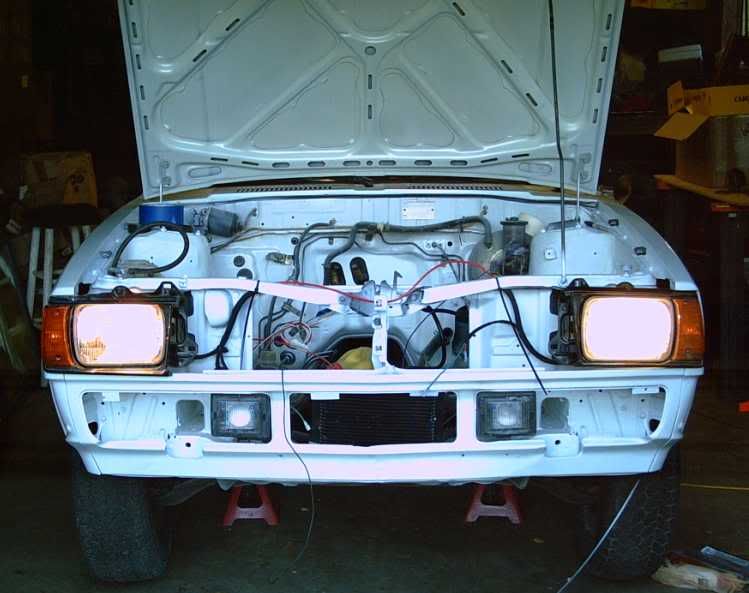 Once Mark had gotten most of the chassis wired... it was time to put the engine in..... 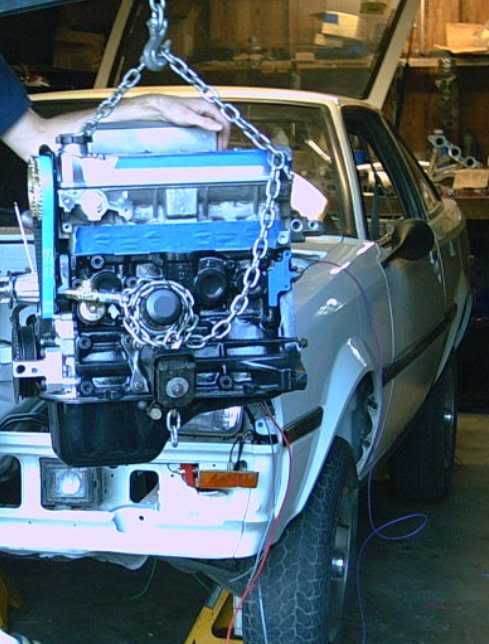 another friend... this one is a bit more shy  .... say "Hi" to Jeff (left arm in upper left) The engine went in with little effort... and fewer photos .... say "Hi" to Jeff (left arm in upper left) The engine went in with little effort... and fewer photos 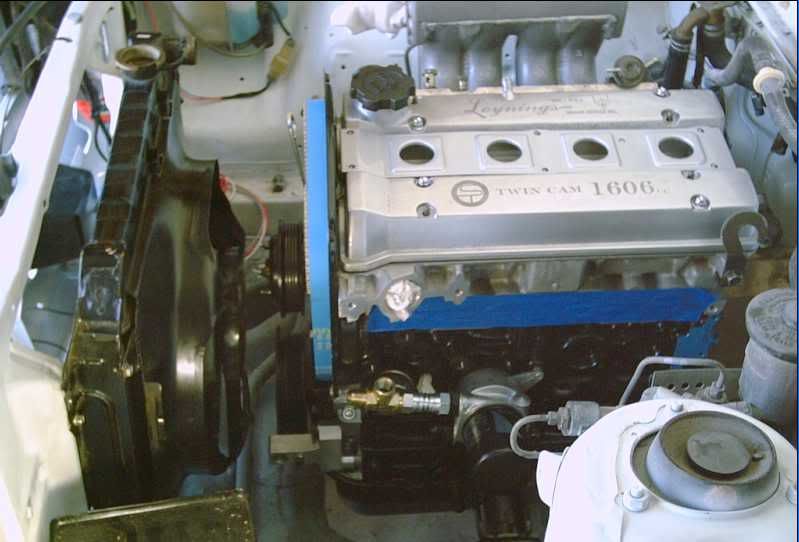 More to come.....
__________________
Information is POWER - LEARN the facts!
|
|
|
|
|
|
10-16-2013, 12:55 PM
|
#26 | |
|
dedicated enthusiast
Join Date: Oct 2009
Drives: Surreptitious(AE71), & Grunt(AE95)
Location: PDX
Posts: 85
Thanks: 2
Thanked 41 Times in 24 Posts
Mentioned: 0 Post(s)
|
Quote:
 That radiator IS from an AE71.... but not mine... see my car was always a stick shift car. Because of it being a stick shift it had a single row radiator... which Toyota in their infinite wisdom... required one type/version radiator support. 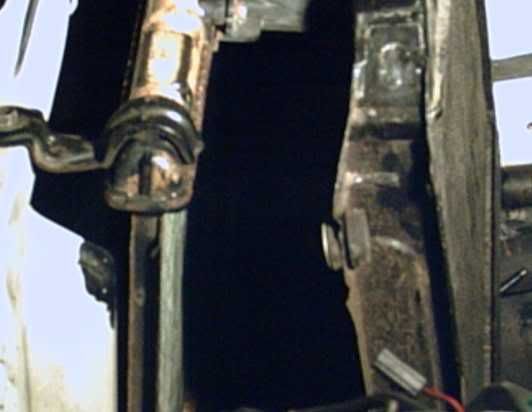 The AE71 radiator I'm using came from an AUTOMATIC equipped car. The automatic equipped cars used a dual row radiator to cope with the added heat of cooling the transmission, along with cooling the slightly higher loaded original engine - higher load placed on it by the auto transmission which always has some drag on the engine - even at idle - requiring additional cooling. And... as I alluded too in the paragraph above had its own raditor support I adapted the auto radiator to fit the stick shift car by creating 4 entirely new mounting points. Now my 4AGE should have more than adequate cooling... What is custom is the Sienna cooling fan... Yep Toyota Sienna minivan 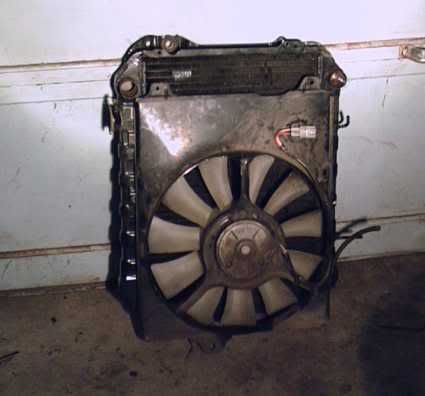 If you go back to the pic I quoted from you can see the little tweaks we needed to do to make a 1996 minvan fan, fit a 1983 automatic equipped Corolla radiator. 1) note the cut sections to clear the rad, and 2) the tiny spot welds used to relocate a few of the mounting tabs. That radiator... with a fan that can pull air enough to cool a modern minivan... we should be pretty much good to go for cooling More to come.....
__________________
Information is POWER - LEARN the facts!
|
|
|
|
|
|
10-16-2013, 02:46 PM
|
#27 | |
|
dedicated enthusiast
Join Date: Oct 2009
Drives: Surreptitious(AE71), & Grunt(AE95)
Location: PDX
Posts: 85
Thanks: 2
Thanked 41 Times in 24 Posts
Mentioned: 0 Post(s)
|
So with the cooling system well in hand and now requiring an electrical supply for that Sienna cooling fan... Mark begins to wire in the engine managment....
FJO Racing WAS a small company in Canada that built a mil spec management system known as the 341b. Quote:
Here are the specifications for the 341b version 2 - the biggest influence to my purchasing this unit was its all weather capabilities.... back in 2008 there were NOT as many middle range systems as there are today. Most management systems were either very pricey, or mega squirt... I wanted something far more reliable then the 2008 version of MS 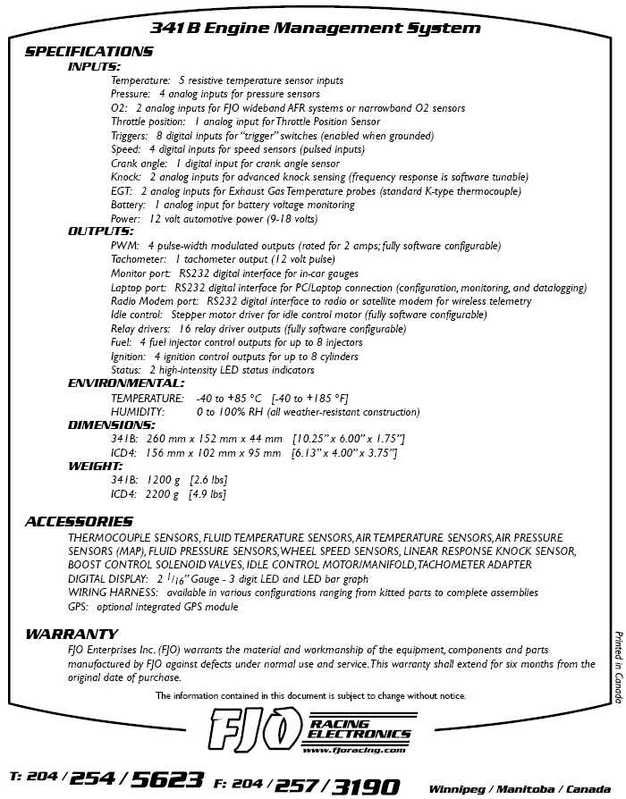 The 341B MIGHT even be capable to operate the Twins... I purchased the system from Jackson Autosport (also in Canada). Part of the deal on the purchase was Jackson was to supply the harness, and all the parts needed to run the new management 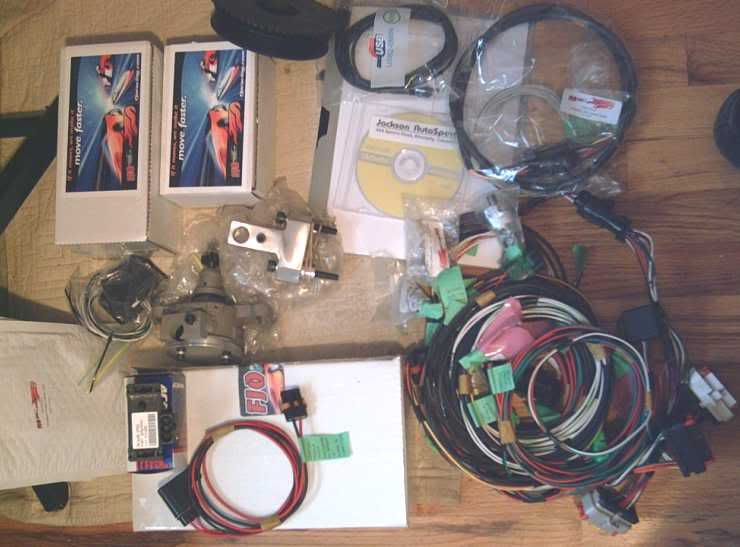 Things to note in the above photo.... the cam sensor mount(modified distributor), the crank sensor mount, and the OEM type crank pulley... but is single row... The single row crank pulley began life as a regular dual row, the outer row was machined off. The trigger wheel has a .1mm run out... pretty good to be that well centered. 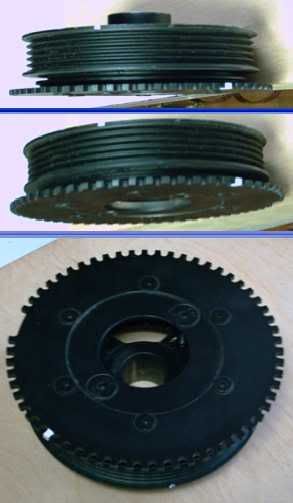 The system monitors both fuel and oil pressure and when programmed can shut the engine down if needed. Jackson Autosport also did a novel service for me... They built the harness in 2 halves. Each end properly pinned, with the only requirement was to install the harnesses and then cut wires to length and join. Note each wire end is labelled to ease assembly At first Mark was a little odd about this... but soon learned the method to Jacksons madness and the custom fitted harness went quickly. Mark had asked me if I wanted a "tucked" harness... I told him I wanted a harness that was neat and serviceable. As to those who think fitting 2 halves together might not be durable, or problem free, the internally glued heat shrink (seen on the turn signals) allows for a hermetically sealed connection with little chance of oxidation or decay over time. Part of the reason the harness was supplied as is was it had to do with where the ECU was going to be mounted. The AE71, being an old carbureted car originally, didn't have much more than a box to monitor emissions, the new ECU size was going to determine its location... and hence the reason for a 2 piece harness.... Where to mount a box that was 10 x 6 x 2??? Under the seat? What if it gets wet down there? In the glovebox? There isn't enough storage in this car as it is... unless I must use this space, I'd prefer not... besides I really don't want it in the box because that way the harness is flexing when the box is opened/closed... Finally... I found the PERFECT location... serviceable, away from most common forms of liquid intrusion and in a fixed location..... 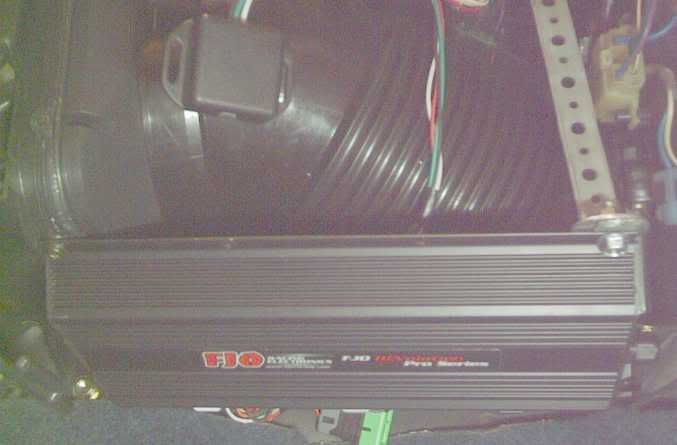 UNDER the heater duct work - using 2 large coarse threaded screws I put one end into the duct work joint, and the other end suspended from a mounting point higher up on the dash. As you can see... the passenger floor heater duct directs the flow below it, and so far it hasn't proven to be a problem with any passengers feet. 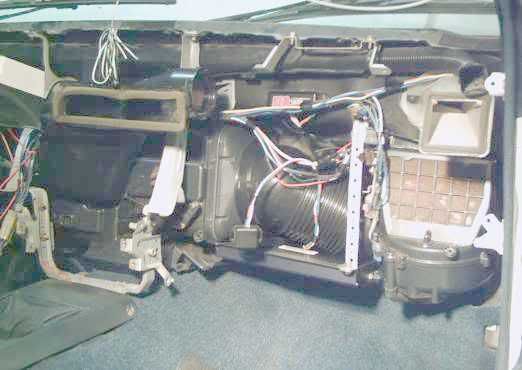 The access port is hanging in the foreground, while the low ohm injector driver is mounted higher up on the firewall. So with the ECUs location now determined, we could now run the harness and determine its final length. The original harness had fit through a small hole (about 1 1/2" diameter) The new harness might fit through that BEFORE joining... but after the fact it wasn't likely to come out as easily. Mark and I jointly decided the wiring was going to need new access through the firewall... All Corollas of the era were somewhat prepared for accessories, take A/C. Well, my car didn't have A/C... but the A/C holes were unused (see black plugs infirewall behind the manifold)  We removed the plugs and Dremel-ed out the metal between the 2 openings to make a larger opening so the new harness plugs would be able to pass through 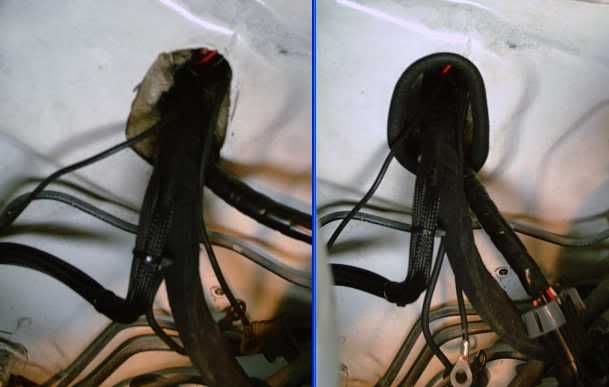 We now had access... but the cost was a big hole to fill in. I can't say I wasn't lucky building this car.... and here is where a bit of that luck paid off.... a young friend of mine (yep... more freinds ) dragged me out to one of the local pick and pull yards to look for some parts for his car. It had been a few years since I just walked around a boneyard... well as he was stripping something or other for his car... I was looking for a solution to my hole....  and low and behold.. an old Honda Civic showed me what I needed.... I'm pretty sure this came from a Civic that was a non A/C car, and that plug was there to fill the gap. It almost looks OEM More to come.....
__________________
Information is POWER - LEARN the facts!
|
|
|
|
|
|
10-17-2013, 01:43 PM
|
#28 |
|
dedicated enthusiast
Join Date: Oct 2009
Drives: Surreptitious(AE71), & Grunt(AE95)
Location: PDX
Posts: 85
Thanks: 2
Thanked 41 Times in 24 Posts
Mentioned: 0 Post(s)
|
The engine is in... the wiring is coming along well. Its time to begin to locate the other engine compartment components.
Along with running sequential injection, I'm also running a wasted spark ignition. For the unknowing... "wasted spark" refers to the fact that each spark plug "fires" twice per 4 stroke revolutions, once at the typical time - when the air fuel charge is compressed, BUT also when the exhaust valve is open and the piston is coming up to expel the exhaust charge. Since there usually is nothing happening at this time the system is called "wasted spark" Here are the massive coils... GM type... but reworked by FJO 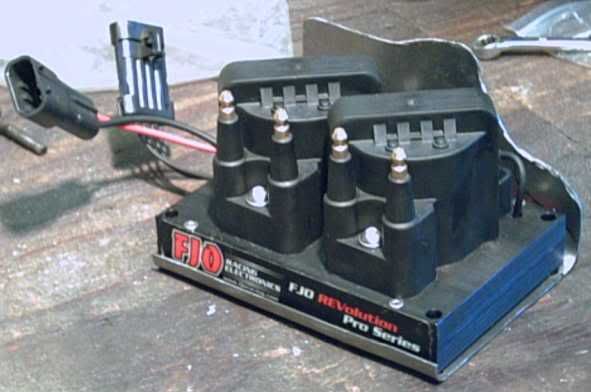 it is placed in the first version of my handmade coil mount... ORIGINALLY... I had planned to mount the coils where the wiring harness came through... 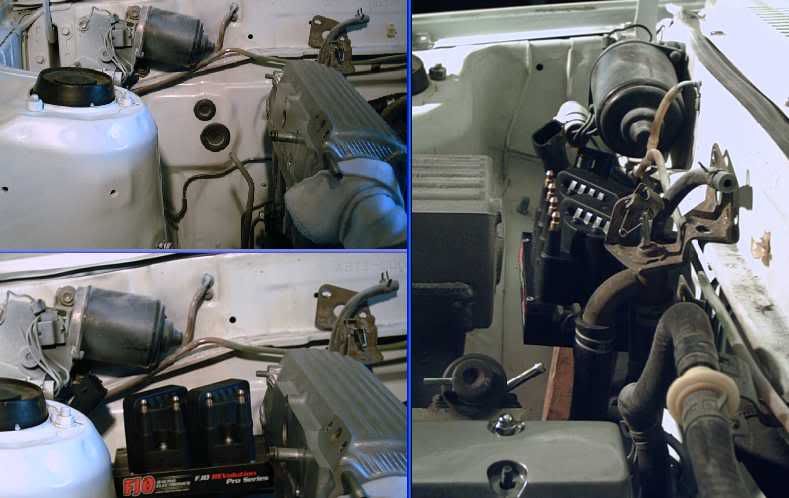 I'm glad I changed my mind... it is so perfect for the harness pass through.... 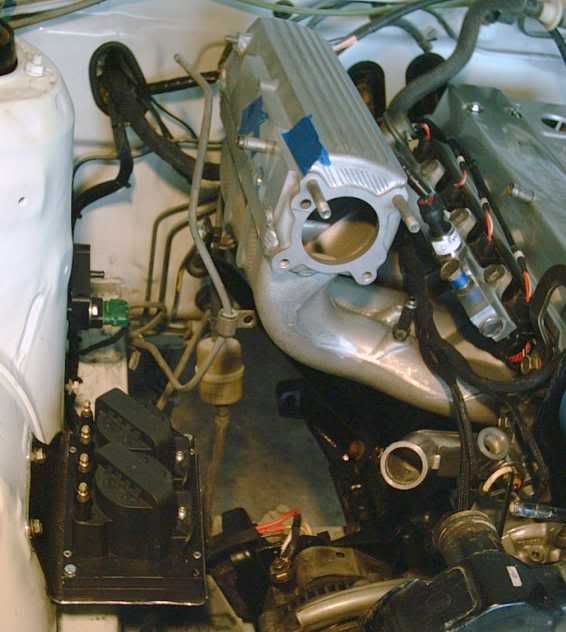 so with the harness pass through now using the original idea for the coil mount, I had to find another location for the coils. 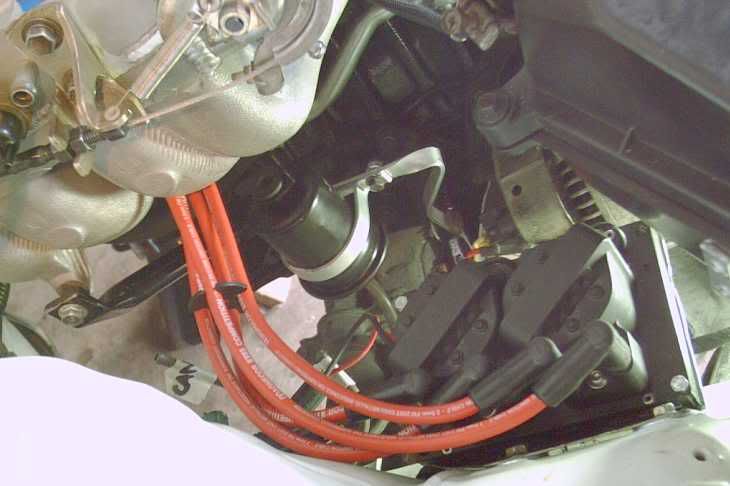 The intake side of the engine is substantially cooler then the exhaust side, this small fact lends itself to not only the coil location... but ALL vital bits are on the passenger side (intake side) note the mounted MAP sensor behind the coils, and the custom placement of the fuel filter. The ignition wires are Magnecor 8.5mm resistor wires, the loom holders are from SAAB. There is even room for the charcoal canister  What to do about air filtration? More friends... what else??? This one is Kris... he is also an AE86 guy... but he is also into off road stuff and had this V6 Ranger that he no longer used the original air box... The Ranger uses a 2.9 liter V6... so from an air volume POV I should be ok using it for my 1.6  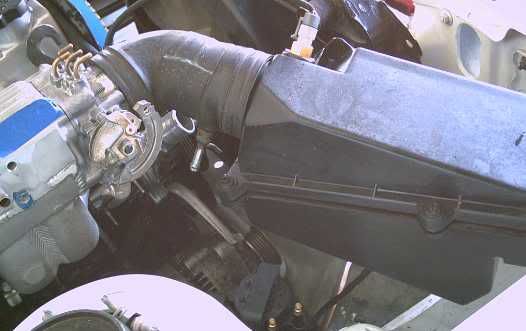 Not only does it fit neatly, but it also has a perfect location for the FJO air temp sensor. And with a little bit of Home Depot thrown-in... 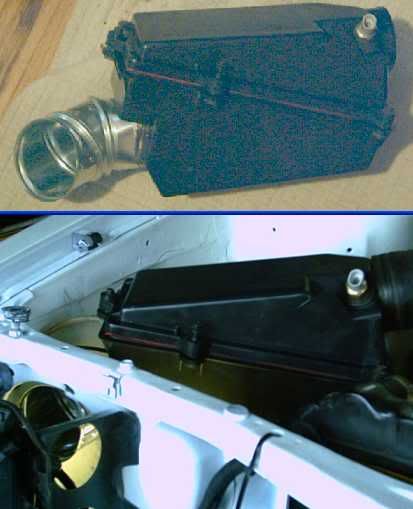 ....so the air box can collect the cooler air from directly behind the passenger headlamp. spark... MAP sensor... fuel.... and filtration.... More to come......
__________________
Information is POWER - LEARN the facts!
|
|
|
|
|
|
|
|
|
|
 Similar Threads
|
||||
| Thread | Thread Starter | Forum | Replies | Last Post |
| Nissan 370Z thread | S2KtoFT86 | Other Vehicles & General Automotive Discussions | 116 | 04-07-2017 10:40 PM |
| Designed an FR-S keyboard layout | Mandy | Scion FR-S / Toyota 86 GT86 General Forum | 0 | 08-16-2013 02:53 AM |
| FRS T-shirt I designed | DeaconRoc | Miscellaneous | 0 | 06-26-2013 03:10 PM |
| Designed my shirt, with my car, lol | njccmd2002 | Scion FR-S / Toyota 86 GT86 General Forum | 9 | 04-14-2013 12:08 AM |
| Oldeskewltoy selling his AE86 | oldeskewltoy | Other Vehicles & General Automotive Discussions | 2 | 01-18-2010 02:26 PM |


 Surreptitious
