


 06-16-2013, 12:54 AM
|
#239 |
|
Photo Specialist

Join Date: Feb 2012
Drives: 2013 Toyota 86 DGM 6MT
Location: Texas
Posts: 1,152
Thanks: 587
Thanked 1,805 Times in 420 Posts
Mentioned: 94 Post(s)
|
__________________
|

|

|
| The Following User Says Thank You to F1point4 For This Useful Post: | PERRIN_Chris (06-17-2013) |
|
06-16-2013, 04:16 AM
|
#240 | |
|
Banned
Join Date: Feb 2012
Drives: Mazda MX-6 Turbo, Toyota GTS86 37J
Location: Perth, Western Australia
Posts: 1,262
Thanks: 487
Thanked 743 Times in 413 Posts
Mentioned: 20 Post(s)
|
Quote:
|
|
|
|
|
|
06-16-2013, 09:55 AM
|
#241 |

Join Date: Sep 2012
Drives: 2013 Scion FR-S
Location: Houston, TX
Posts: 940
Thanks: 53
Thanked 696 Times in 284 Posts
Mentioned: 74 Post(s)
  |
Good post Victor. I definitely need to *look* into these.
Sent from my LG-E980 using Tapatalk 4 Beta |
|
|
|
|
06-16-2013, 07:30 PM
|
#242 |
|
Photo Specialist
Join Date: Feb 2012
Drives: 2013 Toyota 86 DGM 6MT
Location: Texas
Posts: 1,152
Thanks: 587
Thanked 1,805 Times in 420 Posts
Mentioned: 94 Post(s)
|
Something is coming
In preparation of installing an AFR gauge, I needed to add an O2 bung to my exhaust. I usually do all my mods myself, but I have no idea how to weld. After seeking recommendations from the Houston 86 facebook page, I chose to go with DD Performance Research. Dave was pretty helpful getting me setup over the phone. When I got there, the place, although remote, was clean and full of MR2s. Looked busy so it was a good sign for me. Overall I was impressed by the work done, their flexibility, and teaching me a whole bunch about cars in general and fabrication work. I had some other plans in mind which required custom brackets and they made them for me on the spot. Much better than I could have done with makeshift tools. For the uninformed, the bung for the wideband O2 sensor should go after the merge collector in the exhaust manifold (header) and before the any catalytic converters. Something tells me I'll be coming back in the future for fabwork. Onto pictures! Danbo is taking the opportunity to inspect the car while it's on the lift  20130614-DDPR-WidebangBung-063 by VictorN07, on Flickr He's trying to figure out where a bung would go  20130614-DDPR-WidebangBung-073 by VictorN07, on Flickr I was concerned about the bung location. Initially I was concerned there wasn't enough room on the front pipe in front of the cat, but the fabricator assured me it was plenty.  20130614-DDPR-WidebangBung-080 by VictorN07, on Flickr I know adding a bung isn't hard but I did learn a ton about proper tools and technique when doing this stuff.  20130614-DDPR-WidebangBung-085 by VictorN07, on Flickr The fabricator getting to work  20130614-DDPR-WidebangBung-103 by VictorN07, on Flickr Super clean work. Looks like it came from Perrin that way. This is a 2.5" catted front pipe from Perrin performance. Shoutout to @PERRIN_Chris  20130614-DDPR-WidebangBung-147 by VictorN07, on Flickr  20130614-DDPR-WidebangBung-131 by VictorN07, on Flickr The fabricator told me a good sign of welding is that the material doesn't go through to the other side. Had no idea so I took his word for it. Upon inspection that was the case so good job? haha. He was surprised I was so excited about a bung install  20130614-DDPR-WidebangBung-124 by VictorN07, on Flickr Before  20130614-DDPR-WidebangBung-052 by VictorN07, on Flickr After 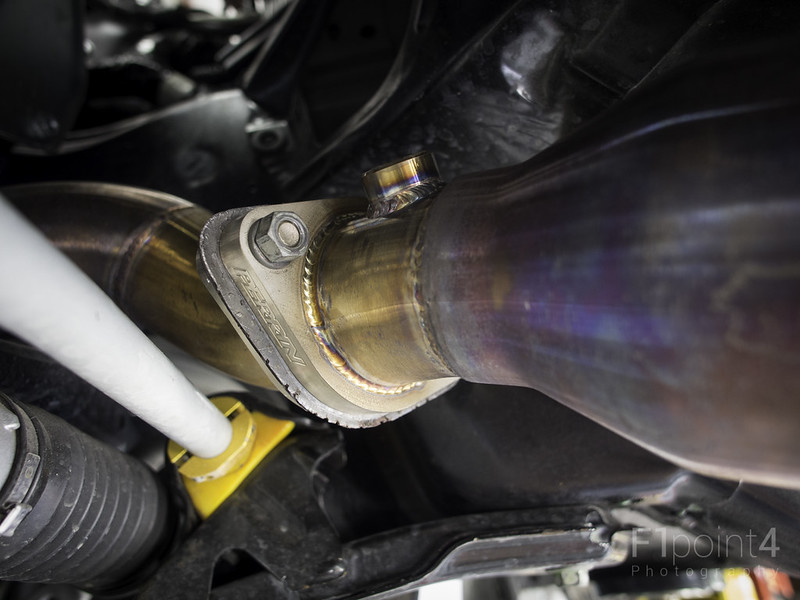 20130614-DDPR-WidebangBung-151 by VictorN07, on Flickr
__________________
|
|
|
|
| The Following 2 Users Say Thank You to F1point4 For This Useful Post: | PERRIN_Chris (06-17-2013), SkAsphalt (06-17-2013) |
|
06-16-2013, 08:20 PM
|
#243 |
|
Photo Specialist
Join Date: Feb 2012
Drives: 2013 Toyota 86 DGM 6MT
Location: Texas
Posts: 1,152
Thanks: 587
Thanked 1,805 Times in 420 Posts
Mentioned: 94 Post(s)
|
Tuning!
Well...tuning of the wiring inside my cabin. Since I purchased Lola I have added a few gadgets to the inside. Traditionally I've been a fan of using add-a-circuits to the stock fuse box, but it is getting crowded and adding a gauge to the car would make things messier. I decided to get a fuse block and clean up all my wiring because I believe in clean. Haha. It'll also make wiring the gauge a lot easier since I don't have to add a 5th add-a-circuit to my fusebox and add a 5th wire to the ground screw. Removing add a circuits also prevents my accessories from messing with the circuits i'm tapping into. I have four accessories I planned on wiring up Dashcam, Radar, AVO Throttle Controller, AEM Gauge This is no DIY, just pure information. Please note there are a lot of ways to achieve what I did. Let's go The foundation of my system. BlueSea Systems 5025 Fuse Block. The cover to the box can hold two spare fuses. A 15 amp fuse comes with it. The only thing I don't like is that the box is kinda big, and it uses the big ATO(?) fuses. I'd like if it was consistent but can't win them all. I also couldn't find a good fuse block on amazon so I kinda settled on this one. http://www.bluesea.com/products/5025..._Bus_and_Cover  20130614-ProjectCleanupElectricals-017 by VictorN07, on Flickr Cover off. It can support six circuits. Has a ground and positive bus. Supports 30A per circuit. I could add one of these under the hood for my lighting circuits  20130614-ProjectCleanupElectricals-022 by VictorN07, on Flickr Before pictures  20130614-ProjectCleanupElectricals-028 by VictorN07, on Flickr That connector on that white L plastic bracket has to move. Easy enough to unclip from the bottom.  20130614-ProjectCleanupElectricals-029 by VictorN07, on Flickr It moves to make room for my mounting circuit. I chose this area because 1) I didn't find a good spot on the passenger side 2) I didn't want to run a wire directly to my battery. I didn't need that kind of amperage. The accessories that I was hooking up to the block are switched by ignition so I didn't need an always hot connection to the battery 3) This was close to the stock fuses, so I can tap into it for power for the block 4) I wouldn't have to run a ton of new wiring, or move all my accessory wires  20130614-ProjectCleanupElectricals-032 by VictorN07, on Flickr Cluster of wires  20130614-ProjectCleanupElectricals-034 by VictorN07, on Flickr Fuse box cover off. You can see I have four add-a-circuits here. Getting busy under there  20130614-ProjectCleanupElectricals-039 by VictorN07, on Flickr  20130614-ProjectCleanupElectricals-050 by VictorN07, on Flickr I digress People have asked me how I mounted the hardwire for the radar. Here are two pictures. Not the cleanest, but it can't be seen and it works 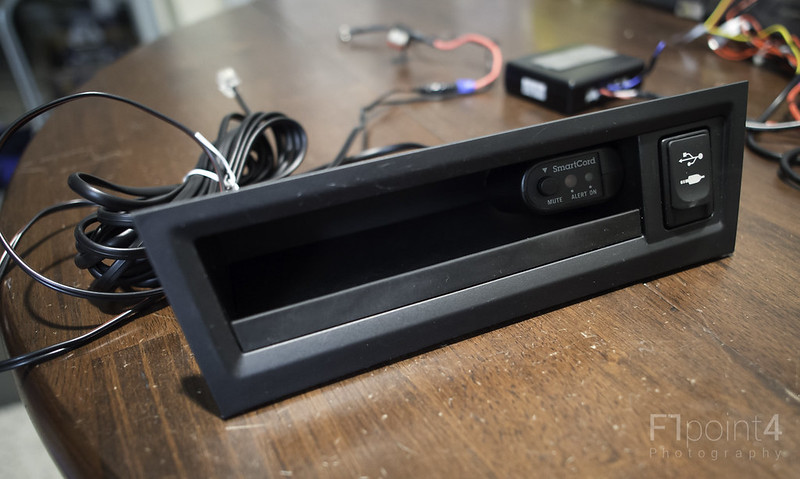 20130614-ProjectCleanupElectricals-055 by VictorN07, on Flickr 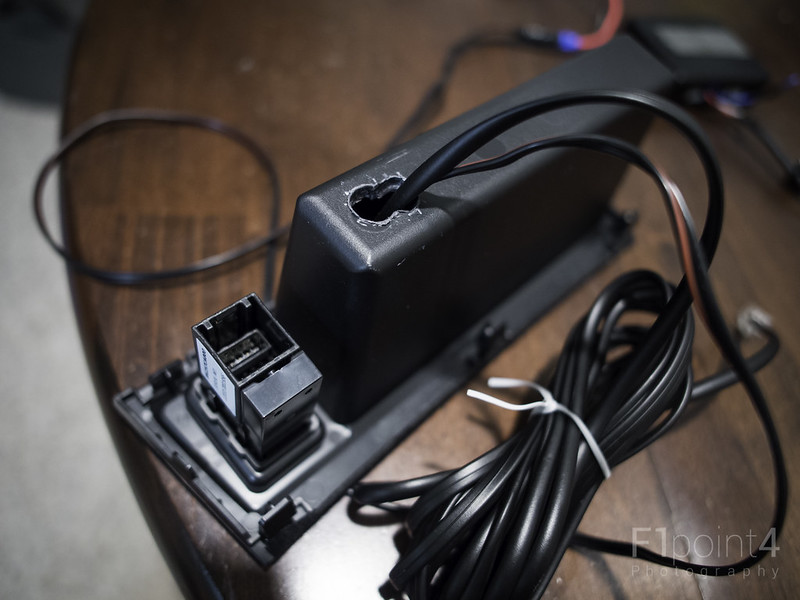 20130614-ProjectCleanupElectricals-060 by VictorN07, on Flickr Going to work Ground wire  20130614-ProjectCleanupElectricals-071 by VictorN07, on Flickr Positive wire - It will tap into the fusebox on a non system critical circuit - cigarette power plug. I just put moderate sized fuse in it. 10A. Plenty to support what I will be using it for 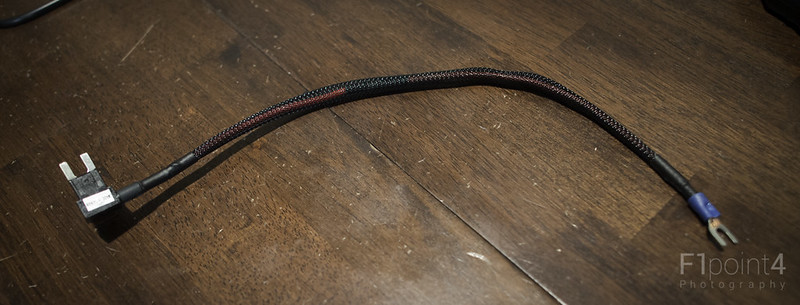 20130614-ProjectCleanupElectricals-073 by VictorN07, on Flickr Coming together  20130614-ProjectCleanupElectricals-077 by VictorN07, on Flickr Before of all my accessory wires.  20130614-ProjectCleanupElectricals-065 by VictorN07, on Flickr The after. I wrapped everything and shortened some wires.  20130614-ProjectCleanupElectricals-081 by VictorN07, on Flickr Danbo showing off  20130614-ProjectCleanupElectricals-083 by VictorN07, on Flickr Labeled cover  20130616-ProjectElectricalWrapup-001 by VictorN07, on Flickr Much better. The fuse block is taped on with 3M Red double sided tape  20130616-ProjectElectricalWrapup-005 by VictorN07, on Flickr I'm not totally finished with adding the gauge so I don't have final pictures of what everything looks like. What is there so far looks very very clean. Hope this gives people some ideas on keeping stuff neat under there.
__________________
Last edited by F1point4; 06-16-2013 at 10:24 PM. |
|
|
|
| The Following 5 Users Say Thank You to F1point4 For This Useful Post: | FutureFT86 (02-09-2018), L3P47 (06-24-2013), michaelneal9900 (03-11-2018), Pointmutation (09-09-2018), radroach (06-20-2013) |
|
06-16-2013, 08:42 PM
|
#244 |
|
Photo Specialist
Join Date: Feb 2012
Drives: 2013 Toyota 86 DGM 6MT
Location: Texas
Posts: 1,152
Thanks: 587
Thanked 1,805 Times in 420 Posts
Mentioned: 94 Post(s)
|
Coming together
I did the exhaust modification and wiring cleanup to support this mod. More information to come. AEM Wideband Failsafe gauge. Shows AFR and Boost in one gauge.  20130616-AEMWidebandFailsafeFinished-007 by VictorN07, on Flickr  20130616-AEMWidebandFailsafeFinished-019 by VictorN07, on Flickr
__________________
|
|
|
|
|
06-17-2013, 12:04 PM
|
#245 | |
|
Senior Member
Join Date: Apr 2012
Drives: 2014 Subaru BRZ
Location: Hillsboro, Oregon
Posts: 770
Thanks: 450
Thanked 536 Times in 316 Posts
Mentioned: 137 Post(s)
|
This little guy is hilarious! Who is he? Was he made by Amazon?
Quote:
|
|
|
|
|
| The Following User Says Thank You to PERRIN_Chris For This Useful Post: | F1point4 (06-17-2013) |
|
06-17-2013, 02:29 PM
|
#246 | |
|
Photo Specialist
Join Date: Feb 2012
Drives: 2013 Toyota 86 DGM 6MT
Location: Texas
Posts: 1,152
Thanks: 587
Thanked 1,805 Times in 420 Posts
Mentioned: 94 Post(s)
|
Quote:
http://f-bay.tumblr.com/post/5700962927/danbo
__________________
|
|
|
|
|
|
06-17-2013, 02:41 PM
|
#247 |
|
Senior Member

Join Date: May 2013
Drives: 2013 Raven FRS 6MT
Location: Bay Area, CA
Posts: 112
Thanks: 10
Thanked 19 Times in 19 Posts
Mentioned: 0 Post(s)
|
This is my favorite build. Your doing almost everything I wanna do with my frs. Great job.
|
|
|
|
| The Following User Says Thank You to velin86 For This Useful Post: | F1point4 (06-17-2013) |
|
06-17-2013, 03:07 PM
|
#248 | |
|
Senior Member

Join Date: Jan 2013
Drives: Asphalt Scion FR-S
Location: Los Angeles, CA
Posts: 499
Thanks: 274
Thanked 215 Times in 136 Posts
Mentioned: 10 Post(s)
|
Quote:
|
|
|
|
|
|
06-17-2013, 03:11 PM
|
#249 | |
|
Photo Specialist
Join Date: Feb 2012
Drives: 2013 Toyota 86 DGM 6MT
Location: Texas
Posts: 1,152
Thanks: 587
Thanked 1,805 Times in 420 Posts
Mentioned: 94 Post(s)
|
Quote:
Part Number: ATI 52/60-CONV
__________________
|
|
|
|
|
|
06-17-2013, 03:13 PM
|
#250 | |
|
Senior Member
Join Date: Jan 2013
Drives: Asphalt Scion FR-S
Location: Los Angeles, CA
Posts: 499
Thanks: 274
Thanked 215 Times in 136 Posts
Mentioned: 10 Post(s)
|
Quote:

__________________
|
|
|
|
|
| The Following User Says Thank You to JDKane527 For This Useful Post: | F1point4 (06-17-2013) |
|
06-17-2013, 10:00 PM
|
#251 |
|
Senior Member
Join Date: May 2013
Drives: 2013 Raven FRS 6MT
Location: Bay Area, CA
Posts: 112
Thanks: 10
Thanked 19 Times in 19 Posts
Mentioned: 0 Post(s)
|
Are you using the Perrin Transmission Support along with the Whiteline Gearbox one? Any Modification needed?
|
|
|
|
|
06-17-2013, 10:02 PM
|
#252 | |
|
Photo Specialist
Join Date: Feb 2012
Drives: 2013 Toyota 86 DGM 6MT
Location: Texas
Posts: 1,152
Thanks: 587
Thanked 1,805 Times in 420 Posts
Mentioned: 94 Post(s)
|
Quote:
I am not sure if either vendor made revisions to their products since my writing. Hope that helps!
__________________
|
|
|
|
|
|
|
|
|
|
|
 Similar Threads
|
||||
| Thread | Thread Starter | Forum | Replies | Last Post |
| Asphalt Scion FR-S | aznsensazian | FR-S & 86 Photos, Videos, Wallpapers, Gallery Forum | 21 | 03-17-2014 01:13 PM |
| Asphalt FR-S pics | Rob_g | CANADA | 24 | 09-03-2012 05:01 AM |
| Asphalt in the snow | Double4Free | Scion FR-S / Toyota 86 GT86 General Forum | 5 | 06-10-2012 01:56 PM |
| Asphalt 6MT FR-S | Symbiont | Southern California | 22 | 06-06-2012 07:47 AM |
| ant08 Asphalt MT | ant08 | Member's Car Journals | 3 | 06-04-2012 04:16 PM |


 Toyota 86 GTS
