


|
||||||
| Member's Car Journals Car journals by our members. |
 |
|
|
Thread Tools | Search this Thread |
 01-19-2014, 04:24 PM
|
#15 | |
|
Proud dad of 2 boys :)

Join Date: Jul 2013
Drives: Firestorm 6-MT
Location: F-TOWN, CT
Posts: 312
Thanks: 203
Thanked 313 Times in 138 Posts
Mentioned: 1 Post(s)
Tagged: 0 Thread(s)
|
Quote:
They don't hurt your eyes through the rear windshield, but directly in front of you, yes they do. Even has a warning not to do so. It is 2 12" LED strips with 9 SMD LED's each. |
|

|

|
| The Following 2 Users Say Thank You to hamzam For This Useful Post: | 2point0 (01-19-2014), ZionsWrath (04-08-2014) |
|
01-19-2014, 04:25 PM
|
#16 |
|
Proud dad of 2 boys :)
Join Date: Jul 2013
Drives: Firestorm 6-MT
Location: F-TOWN, CT
Posts: 312
Thanks: 203
Thanked 313 Times in 138 Posts
Mentioned: 1 Post(s)
Tagged: 0 Thread(s)
|
So, here are some pictures and videos of everything exhaust related
 1: Borla UEL Header upfront  2: Factory Midpipe, which has has the rear mounting plate cut off and moved back about 1 foot.  3: (CENTER) Apexi N1 Muffler, 3” Inlet, 4” Outlet. 3” (LEFT) Car Chemistry 2-Plate Exhaust Insert (TOP) Silencer  4: Car Chemistry Insert, Closeup  5: Car Chemistry Insert, Installed. That is the factory exhaust mounting plate. Which has been bored out to 3". It does not leak  6: Silencer, Closeup  7: Silencer, Installed  8: Ready to install, (w/o Silencer)  9. Muffler, Mounted  10. Muffler, Rear View  Videos coming up in a few minutes
|
|
|
|
| The Following User Says Thank You to hamzam For This Useful Post: | ZionsWrath (04-08-2014) |
|
01-19-2014, 05:07 PM
|
#17 |
|
Proud dad of 2 boys :)
Join Date: Jul 2013
Drives: Firestorm 6-MT
Location: F-TOWN, CT
Posts: 312
Thanks: 203
Thanked 313 Times in 138 Posts
Mentioned: 1 Post(s)
Tagged: 0 Thread(s)
|
Cold Start to Normal Idle
~5:00 video, nothing exciting. [ame]http://youtu.be/9I4pJJ7ILgo[/ame] |
|
|
|
| The Following User Says Thank You to hamzam For This Useful Post: | ZionsWrath (04-08-2014) |
|
01-19-2014, 05:10 PM
|
#18 |
|
Proud dad of 2 boys :)
Join Date: Jul 2013
Drives: Firestorm 6-MT
Location: F-TOWN, CT
Posts: 312
Thanks: 203
Thanked 313 Times in 138 Posts
Mentioned: 1 Post(s)
Tagged: 0 Thread(s)
|
Normal Startup + Incremental Rev's
[ame]http://youtu.be/DRt0_Eswg7o[/ame] |
|
|
|
| The Following User Says Thank You to hamzam For This Useful Post: | ZionsWrath (04-08-2014) |
|
01-19-2014, 06:53 PM
|
#19 |
|
Proud dad of 2 boys :)
Join Date: Jul 2013
Drives: Firestorm 6-MT
Location: F-TOWN, CT
Posts: 312
Thanks: 203
Thanked 313 Times in 138 Posts
Mentioned: 1 Post(s)
Tagged: 0 Thread(s)
|
Last video of the evening... a little Drift Action
[ame="https://www.youtube.com/watch?v=qKpOCDKU9IQ"]hamzam FRS Drift - YouTube[/ame] |
|
|
|
| The Following 2 Users Say Thank You to hamzam For This Useful Post: | 6-Shift (01-20-2014), ZionsWrath (04-08-2014) |
|
01-19-2014, 09:39 PM
|
#20 |
|
Senior Member

Join Date: Jun 2012
Drives: 13 CSB BRZ Ltd
Location: United States
Posts: 1,035
Thanks: 147
Thanked 530 Times in 286 Posts
Mentioned: 39 Post(s)
Tagged: 0 Thread(s)
|
Do you have any photos of the third brake light from inside the car?
What did you do with the rear deck? Sand it smooth and cover with something? |
|
|
|
| The Following User Says Thank You to Acree For This Useful Post: | ZionsWrath (04-08-2014) |
|
01-19-2014, 09:44 PM
|
#21 | |
|
Proud dad of 2 boys :)
Join Date: Jul 2013
Drives: Firestorm 6-MT
Location: F-TOWN, CT
Posts: 312
Thanks: 203
Thanked 313 Times in 138 Posts
Mentioned: 1 Post(s)
Tagged: 0 Thread(s)
|
Quote:
I will be using the factory 3rd brake light "shroud", cut in half, and extended, to cover around this new light. Currently, the rear half of my cabin glows a sinister red every time I brake, lol. The rear deck I am in the process of removing and just putting a new piece of felt over the holes. I have a subwoofer, so I don't mind the "vents". |
|
|
|
|
| The Following User Says Thank You to hamzam For This Useful Post: | ZionsWrath (04-08-2014) |
|
01-20-2014, 04:24 PM
|
#22 | |
|
Senior Member
Join Date: Jun 2012
Drives: 13 CSB BRZ Ltd
Location: United States
Posts: 1,035
Thanks: 147
Thanked 530 Times in 286 Posts
Mentioned: 39 Post(s)
Tagged: 0 Thread(s)
|
Quote:
|
|
|
|
|
| The Following User Says Thank You to Acree For This Useful Post: | ZionsWrath (04-08-2014) |
|
01-20-2014, 04:35 PM
|
#23 | |
|
Just a dude
Join Date: Mar 2013
Drives: Scion FR-S 2013
Location: Edson, Alberta, Canada
Posts: 3,289
Thanks: 1,185
Thanked 1,188 Times in 852 Posts
Mentioned: 34 Post(s)
Tagged: 0 Thread(s)
|
Quote:
I like this idea and been thinking the same. Once you are done could you please post some inside pics as well? The top led strip I assume just using some thin strips of 3M tape or...? 
__________________
|
|
|
|
|
| The Following User Says Thank You to OICU812 For This Useful Post: | ZionsWrath (04-08-2014) |
|
01-20-2014, 09:09 PM
|
#24 |
|
Proud dad of 2 boys :)
Join Date: Jul 2013
Drives: Firestorm 6-MT
Location: F-TOWN, CT
Posts: 312
Thanks: 203
Thanked 313 Times in 138 Posts
Mentioned: 1 Post(s)
Tagged: 0 Thread(s)
|
 So, I did the following in under an hour. Do it all at your own risk I did not have to disconnect my battery.1. Purchase SMD LED Light Bar w/ Red Diodes. Mine happened to be 2 12" pieces with 9 SMD LED's each. Let me reiterate: You do not want to purchase cheap/faint LED's and get rear ended by someone because they didn't know you were braking. 2. Unclip 3 retainers towards the rear of the Headliner. Let the headliner sag/drop down a bit. 3. Remove Rear-Right Passenger Airbag Cover. You will be snaking your wires, which will require this panel to be removed. Go in the trunk, towards the bottom of the deck shelf: on the right side you will see some exposed sheetmetal and a 3/4" hole. Grab a wire hanger, and slide it through that hole, you will see the other hand conveniently sticking out from behind the Airbag Cover. This is your route. 4. Fasten LED BAR to your board of choice. The board has to be thick such as cardboard. Fold the board so there are 2 sections: one for the bar, and a bigger section that will slide over the headliner. When the headliner pops back in place, it will hold your DIY contraption quite sturdily. But... DO NOT FASTEN THE HEADLINER JUST YET! Temporarily hold the LED bar in place, where you want it, using tape. [b]5. Enclose new LED Bar in a SHROUD.[b] I used the factory shroud, cut in half, and currently being fiberglassed to size . At the moment, there is tape around the LED Bar to prevent ambient red light from flowing into the cabin.6. Solder factory plug off of OEM 3rd Brake Light to new LED Bar. Straight forward. 7. Snake new end using existing route ie, TAPE IT TO THE HANGER AND PULL FROM THE TRUNK! Then pop Airbag Cover back in place. Pop headliner in place. 8. Plug in and drive safe. I will post pictures of mine in a few. Hopefully, you can get a headstart now
|
|
|
|
| The Following 2 Users Say Thank You to hamzam For This Useful Post: | Lonewolf (05-17-2014), ZionsWrath (04-08-2014) |
|
01-20-2014, 09:27 PM
|
#25 |
|
Proud dad of 2 boys :)
Join Date: Jul 2013
Drives: Firestorm 6-MT
Location: F-TOWN, CT
Posts: 312
Thanks: 203
Thanked 313 Times in 138 Posts
Mentioned: 1 Post(s)
Tagged: 0 Thread(s)
|
 Here's mine without any type of shroud, just as you would install it. |
|
|
|
| The Following User Says Thank You to hamzam For This Useful Post: | ZionsWrath (04-08-2014) |
|
04-08-2014, 12:46 AM
|
#26 |
|
Proud dad of 2 boys :)
Join Date: Jul 2013
Drives: Firestorm 6-MT
Location: F-TOWN, CT
Posts: 312
Thanks: 203
Thanked 313 Times in 138 Posts
Mentioned: 1 Post(s)
Tagged: 0 Thread(s)
|
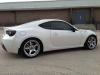
 It's been a while since I last updated my build... but work has not stopped on the car! Time to unleash the beast :P I always seem to be doing something or another so I updated the mods list as well... Not everything is covered in this post :X So...  Left off with the horns minus the grill.  For good reason! There was a lot of "sawwing" to be done. It took forever. But I was patient. So was my condenser.  In the meantime, over a rough winter, met up with Sklimo, very cool dude, his car is LOUD. It still echoes in my head.  ...but his car made it very apparent that I needed a drop. No matter how rough a winter.  One must "Seize the day"...  "So..."  "Oh, why not, throw in some fogs, you gotta take that bumper off for the grill anyway."  "You've been eyeing it for months! It's less than $20!"  Oh, how many times I've done this, I've lost count!  Alright, here we go....  Done!  Fogs work beautifully, and are surprisingly bright! Great for that blond spot at night right in front of you.  Yummy... Been driving around without a grill for like 2 months! Finally.  Ok. Let me just say... Incredible. First car I've done sway bars on. Haven't even put the springs on yet. The amount of increased grip. Wow. More understeer, but I can turn-in harder and faster. Car is FLAT.  Pic of rear sway... and DAT ASS! My tow-hook-cover came flying off somewhere.. So I had to improvise. Also, Rear-Diffuser installed as well as FT86SpeedFactory Exhaust Cover. It was metal. I was surprised, thought it'd be plastic!  I want to put a glass plate here just to see the shift action! Kartboy SS pics not taken, sorry! It's evident with reverse lockout, however.  ....and $6 for a new tow cover. That is where I stand today. Springs and Camber-Bolts... next weekend! |
|
|
|
| The Following 3 Users Say Thank You to hamzam For This Useful Post: |
|
04-12-2014, 10:51 AM
|
#27 |
|
Proud dad of 2 boys :)
Join Date: Jul 2013
Drives: Firestorm 6-MT
Location: F-TOWN, CT
Posts: 312
Thanks: 203
Thanked 313 Times in 138 Posts
Mentioned: 1 Post(s)
Tagged: 0 Thread(s)
|
 Got up early this morning   Time to finish up the shifting feel.. MTEC Shift Springs and tools.  ..all done! Very tight area to work. Now, with this (on top of Perrin rear shifter bushing, trans fluid swap, kartboy short shifter and white line positive shift kit, my choice MTEC drift shift knob) the gearbox feels like it is gated. Super precise gear selection once the springs went in... I am very impressed by the firm, crisp movement of the shifter I can cut through 6 gears (clutch disengaged) in 1 second, and I barely have to guide it. Wow... No way to shift into a "wrong" gear. |
|
|
|
| The Following User Says Thank You to hamzam For This Useful Post: | sklimo (05-08-2014) |
|
04-20-2014, 02:26 PM
|
#28 |
|
Proud dad of 2 boys :)
Join Date: Jul 2013
Drives: Firestorm 6-MT
Location: F-TOWN, CT
Posts: 312
Thanks: 203
Thanked 313 Times in 138 Posts
Mentioned: 1 Post(s)
Tagged: 0 Thread(s)
|
Went out and bought a spring compressor. $14.00 later...
 Front Shock/Strut Removed  close up... Thought I had pics of rear! But guess not :p Mounted Eibach Pro-Kit springs on afterwards ... All this being done yesterday afternoon. First time doing springs, easier than I thought! |
|
|
|
| The Following User Says Thank You to hamzam For This Useful Post: | sklimo (05-08-2014) |
|
|
|
|
| Thread Tools | Search this Thread |
|
|
 Similar Threads
|
||||
| Thread | Thread Starter | Forum | Replies | Last Post |
| My new ride! | Linseal | Off-Topic Lounge [WARNING: NO POLITICS] | 17 | 06-04-2013 03:23 PM |
| My new ride. | ScottKR | Southeast | 29 | 06-02-2013 05:45 PM |
| What's your other ride, winter ride etc. | wtout86 | Other Vehicles & General Automotive Discussions | 13 | 12-07-2012 12:36 AM |
| My Other Ride | pituala | Other Vehicles & General Automotive Discussions | 8 | 09-03-2012 11:48 PM |
| Just got to ride in a BRZ! (TD soon) | Draco-REX | BRZ First-Gen (2012+) General Topics | 49 | 03-30-2012 01:19 PM |


 2013 Scion FR-S


