


|
||||||
| Engine, Exhaust, Transmission Discuss the FR-S | 86 | BRZ engine, exhaust and drivetrain. |
 |
|
|
Thread Tools | Search this Thread |
 05-19-2014, 11:38 PM
|
#1 |
|
Member
Join Date: Mar 2014
Drives: 2015 FR-S
Location: east coast
Posts: 83
Thanks: 10
Thanked 51 Times in 26 Posts
Mentioned: 1 Post(s)
Tagged: 0 Thread(s)
|
My Top Speed catback is on and fine (EZ leak fix!)
I just mounted my new Top Speed catback, and everything's pretty much fine (see posts below). It was an easy job that took me an hour without help. Everything lines up well and the tips are close enough to perfect for me. There's just a very tiny leak at the slip joint into the muffler.
I did decide to polish off the blue, which was easy with Mother's Mag and Aluminum Polish. And I couldn't be happier. It's only slightly louder than stock, but it's very deep and totally without rasp or drone. At idle in the garage, it almost sounds like one of my old 283 Chevys with a mild street cam. Assuming it holds up and doesn't develop any problems, it's a bargain! Please forgive the quick and dirty phone pic of my quick and dirty car - it's late, I'm tired, and my wife's waiting up for me. 
Last edited by bluesman; 05-23-2014 at 06:47 PM. |

|

|
| The Following User Says Thank You to bluesman For This Useful Post: | JonAvalon (05-19-2014) |
|
05-19-2014, 11:50 PM
|
#2 |
|
Member
Join Date: May 2013
Drives: Scion FR-S
Location: Texas
Posts: 30
Thanks: 3
Thanked 1 Time in 1 Post
Mentioned: 0 Post(s)
Tagged: 0 Thread(s)
|
Thanks, I've been looking at this exact same exhaust. Did you go through a lot of trouble installing it? First exhaust install for me.
|
|
|
|
|
05-20-2014, 02:23 AM
|
#3 | |
|
Senior Member
Join Date: May 2013
Drives: 2013 FR-S, white, MT
Location: Puyallup, WA
Posts: 30,409
Thanks: 29,794
Thanked 32,812 Times in 16,830 Posts
Mentioned: 715 Post(s)
Tagged: 2 Thread(s)
|
Quote:
EEEEEEEEE.........GAD !!........ how OLD are you .......??  Glad you're happy with your new muffler ..... now, if it sounded like a 1956 Ford V-8 with dual exhausts and glass packs ..... i'd be jealous ......  humfrz |
|
|
|
|
|
05-20-2014, 10:27 AM
|
#4 | |
|
Member
Join Date: Mar 2014
Drives: 2015 FR-S
Location: east coast
Posts: 83
Thanks: 10
Thanked 51 Times in 26 Posts
Mentioned: 1 Post(s)
Tagged: 0 Thread(s)
|
Quote:
|
|
|
|
|
|
05-20-2014, 11:28 AM
|
#5 | |
|
Member
Join Date: Mar 2014
Drives: 2015 FR-S
Location: east coast
Posts: 83
Thanks: 10
Thanked 51 Times in 26 Posts
Mentioned: 1 Post(s)
Tagged: 0 Thread(s)
|
Quote:
Technically, it's easy to swap exhausts in an FRS/BRZ. Get the rear securely in the air on jackstands or ramps. I did it without raising the front, but it's a lot easier for a novice if you also put the front up on jackstands. The car has to be completely secure - you'll be pushing and pulling pretty hard to get the old system out of its mounts, and you can knock the car off flimsy or badly placed stands - this is one reason I like ramps at the working end. I know I shouldn't have to add this, but I've burned myself many times, so this is not at all condescending advice: LET IT COOL COMPLETELY BEFORE YOU START. While it's cooling, get a stable platform of some kind under the muffler so you have something on which to rest it while you work it off its mounts - a plastic milk crate's the perfect height for my ramps. And make sure it's not less than about 6 inches from the bottom of the muffler, or you won't be able to slide it out from under the car with the muffler on it. I put foot-long 2x4s on it so I can slide them out to lower the muffler on the crate if it won't clear. And lay out mats or towels long enough to protect the entire system while it sits on your garage floor. Concrete will scrape up the polished SS if you drag the parts on the bare floor. Once the car is cold, remove the 2 flange bolts at the muffler inlet and separate the joint - you may have to run a kitchen knife between the gasket and one flange to free it, depending on how old it is (mine's less than 2 months old). Pop the ends of the struts on the muffler out of the rubber hangers (more about this further down). I suggest that once you work the flanged tip of each hanger tube into its hole in the rubber hanger, push it halfway through and do the others in turn before fully removing any. The hardest part is getting the tip to enter the hanger hole, for which I and everyone else recommend lubing the tip, shaft and hole. I used a Teflon-containing spray applied through a thin tube tip - you don't have to get it all over everything, just the metal tube and its hole in the hanger. While you're at it, lube the hanger on the middle pipe now. After the tips are well within the hangers, you can push the hangers off completely one at a time. Do one side first and lower the muffler onto the crate, then do the other side and it's free. This sounds a lot easier than you'll think it is when you try it for the first time. You'll push and pull for a few minutes before questioning why you ever started this, because it will seem impossible to get the tip back through the hole in the rubber. But it will go if you push firmly on one side of the bottom of the rubber while firmly rocking the muffler or pipe down and back several times. This tips the metal tube relative to the hole in the rubber, and the edge of the flanged tip will suddenly slip into the hole a little bit. Keep pushing the rubber towards the tip with a thumb while rocking the muffler or pipe and pulling it gently the other way, and it will slip through the hanger. There's only one other hanger, and it holds up the middle tube. Put something under the front of this tube to catch and hold it close to its installed level before proceeding. Then remove the two spring-retained bolts in the flange at the front of this tube. The nuts are not captive, but unless they're corroded, you probably won't need a wrench on them to loosen the bolts because the spring pressure holds the nuts well enough. BUT...these nuts will fall off when you completely remove the bolts - so be ready to catch them or they'll roll away and end up someplace you'll never find. When you remove the second one, pull back on the pipe to get the flange off the tapered gasket onto which it seats. The front of the pipe will then fall down if you're not holding it, so lower it gently onto the support you've put beneath it. Now you can work the last hanger tube out of the rubber hanger the same way you did the others. You should have lubed the hanger when you did the rest. When it pops free, the tube's ready to be slid out from under the car. I think it's easiest to work from the rear end of that tube, rotating it counterclockwise and pulling it down ti get the hanger tip into the hole in the rubber. I hung the new muffler first. Pushing the hanger tubes into the rubber hangers is a lot easier than getting them out. My tips are well positioned, so spacing in the valence cutouts is perfect. Then put the band clamp over the small tube and slip it into the muffler inlet but do not tighten anything yet. Next you hang the pipe with the resonator. Use your wood blocks or whatever you put under the front of the old pipe to hold the new one close to its installed position while you slip the hanger rod into the rubber. The tip is not flanged on the TopSpeed pipe hanger - it's longer than necessary and bent down a little to allow for retention and mobility. After hanging it, slip the front flange over the outlet and replace the spring-loaded bolts. It takes a little finger pressure on the bolts to get them far enoughthrough the front flange to secure the nuts on them. Leave them finger tight for now. Put the gasket between the flanges at the muffler inlet pipe and use the supplied bolts to secure it finger tight. BTW, the hardware doesn't look like SS to me, so I used SS washers and will replace the bolts and nuts later. Everything aligned well for me, so I tightened everything up from front to back. Be careful with the band clamp - there's an hourglass-shaped spacer on the bolt between the insides of the ends, and it can slip off the splined part of the bolt and rotate into a bad position. Make sure the concave surfaces fit over the insides of the clamp before you start to tighten it, and rotate / realign it if they don't. You may have to remove the nut and withdraw the bolt enough to get the spacer off the splines so you can rotate it if it's not right. Then tighten the band clamp with a mm or two of muffler inlet pipe barely outside the front end of the clamp. Now you have the pleasure of checking for leaks. Start the car and look for condensation drops from joints. If there's a drop of water, it's not selaed and you have to make it right. More flanges are ruined by overtightening than by undertightening, so don't whack on that wrench. You can always tighten it a bit more if it's clearly loose. When tight, remove everything you left on the ground under the car, drop it, and you're done. |
|
|
|
|
| The Following 2 Users Say Thank You to bluesman For This Useful Post: | LittleMonster (05-23-2014), Wepeel (05-21-2014) |
|
05-20-2014, 11:36 AM
|
#6 |
|
Member
Join Date: Mar 2014
Drives: 2015 FR-S
Location: east coast
Posts: 83
Thanks: 10
Thanked 51 Times in 26 Posts
Mentioned: 1 Post(s)
Tagged: 0 Thread(s)
|
Trouble in River City
I was so tired last night that I didn't follow my own advice. I started it on ramps, and it sounded fine. I ran my fingers around the joints and felt no leaks. So I dropped it, drove around the neighborhood for a few minutes, then went to bed.
When I checked it this morning on my way out for work, I noticed water drops from the slip fitting into the muffler on cold start. I repositioned the band clamp and retightened it but it's definitely not completely sealed. I still don't hear it, but there's a tiny tiny leak there. I'll call Top Speed when they open and see what they want me to do. The band clamp doesn't go all the way around the pipe, so a better one may solve it easily - and there are some excellent SS band clamps out there for exhausts (for another $25). It sounds great - very deep and totally without an edge. There are several long underpasses on my drive to work, and I could hear my car even in heavy traffic - but it's not at all loud or annoying. In fact, it's barely but definitely there. As others have said, it's only slightly louder than stock, but it's a totally different sound now. I just talked to the guy at Top Speed who's done the most FRS installs. He's had the same problem with the slip joint, and we agreed that it's not the best design. He's cut the slits further into the pipe on a few to get them to seal and added more slits to others. But without any audible or palpable gas leak, I'm going to leave it alone and order a better band clamp (which I think will do the job). If the worst I end up with is a few drops of condensation on cold start, I'm not going to take it apart and cut on it, since there's no guarantee it will fix the problem. Welding it will make removal from the hangers much harder if I need to get it off. So it'll be fine like it is. I'd buy it again despite this, just because it looks and sounds so fine. Last edited by bluesman; 05-20-2014 at 01:01 PM. Reason: added followup after conversation with Top Speed |
|
|
|
|
05-20-2014, 12:34 PM
|
#7 |
|
Member
Join Date: Mar 2014
Drives: 2015 FR-S
Location: east coast
Posts: 83
Thanks: 10
Thanked 51 Times in 26 Posts
Mentioned: 1 Post(s)
Tagged: 0 Thread(s)
|
More pics
I thought I'd polished off all the "titanium" coloring from the tips. But in sunlight, you can still see the part that was treated. They must use a sequence of chemical dips, starting with the yellow-red that's visible at the transition from blue to SS - and whatever it is, surface polishing didn't remove it all. The view from the side shows it clearly, although it's not that visible in "real life".
  
|
|
|
|
|
05-20-2014, 08:05 PM
|
#8 |
|
Senior Member
Join Date: Jun 2013
Drives: 2013 Raven fr-s
Location: Southwest Florida
Posts: 450
Thanks: 193
Thanked 176 Times in 99 Posts
Mentioned: 3 Post(s)
Tagged: 0 Thread(s)
|
the slip joint on mine leaks as well (I have a Manzo, but I believe it is the exact same unit). I was suggested to try a better clamp possibly...
|
|
|
|
|
05-20-2014, 11:28 PM
|
#9 |
|
frstrm-frs
Join Date: Apr 2013
Drives: Red FR-S
Location: Memphis, TN
Posts: 58
Thanks: 2
Thanked 5 Times in 5 Posts
Mentioned: 1 Post(s)
Tagged: 0 Thread(s)
|
I have the same exact exhaust with their catless frontpipe/overpipe combo. The street catback is too quiet for my taste so i ended up cutting off the muffler and adding a Y-Pipe; now its ridiculously louder but tolerable at cruising speed and sounds amazing atleast in my opinion. But my point is I had the same problem from the muffler that is leaking where it connected from the muffler to the midpipe and no matter how many different ways I tried to install the clamp or piping, there was still an exhaust leak.
|
|
|
|
|
05-21-2014, 08:41 AM
|
#10 | |
|
Member
Join Date: Mar 2014
Drives: 2015 FR-S
Location: east coast
Posts: 83
Thanks: 10
Thanked 51 Times in 26 Posts
Mentioned: 1 Post(s)
Tagged: 0 Thread(s)
|
Quote:
I don't have any 2.5" SS tubing, but I'm pretty sure I have a piece of 1/8" wall aluminum tube that should be thick enough to do the job but not so thick that it won't tighten around the pipe. Just what I wanted to do over Memorial Day weekend - fix a problem with a cheap exhaust. It's a good thing I love this one! |
|
|
|
|
|
05-21-2014, 08:46 AM
|
#11 | |
|
Member
Join Date: Mar 2014
Drives: 2015 FR-S
Location: east coast
Posts: 83
Thanks: 10
Thanked 51 Times in 26 Posts
Mentioned: 1 Post(s)
Tagged: 0 Thread(s)
|
Quote:
"The enemy of good is better." |
|
|
|
|
|
05-21-2014, 12:21 PM
|
#12 | |
|
Proud of BOXER

Join Date: Dec 2012
Drives: Subaru Boxer
Location: Bay Area
Posts: 8,152
Thanks: 7,087
Thanked 6,872 Times in 3,680 Posts
Mentioned: 199 Post(s)
Tagged: 0 Thread(s)
|
How about just having a muffler shop weld that area instead of messing around with clamps? That's what I did with my exhaust that used band clamps, haven't had any leakage issues since.
__________________
 Quote:
|
|
|
|
|
|
05-21-2014, 01:27 PM
|
#13 | |
|
Member
Join Date: Mar 2014
Drives: 2015 FR-S
Location: east coast
Posts: 83
Thanks: 10
Thanked 51 Times in 26 Posts
Mentioned: 1 Post(s)
Tagged: 0 Thread(s)
|
Quote:
Welding will also make it impossible to rotate the muffler relative to the rest of the system, so any misalignment with the valence would be permanent. I just ordered a serious Walker SS band clamp (#33226 - $12 delivered from Amazon) that looks like it ought to do the job: 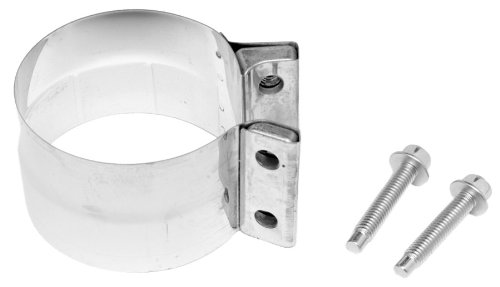 
|
|
|
|
|
| The Following 2 Users Say Thank You to bluesman For This Useful Post: | Basket Case (05-21-2014), Clipdat (05-21-2014) |
|
05-21-2014, 04:43 PM
|
#14 |
|
Senior Member
Join Date: Jun 2013
Drives: 2013 Raven fr-s
Location: Southwest Florida
Posts: 450
Thanks: 193
Thanked 176 Times in 99 Posts
Mentioned: 3 Post(s)
Tagged: 0 Thread(s)
|
Let us know if it works. I'll order the same clamp if it does.
|
|
|
|
|
|
|
|
|
|
 Similar Threads
|
||||
| Thread | Thread Starter | Forum | Replies | Last Post |
| Top Speed Pro 1 Catback Exhaust | DFW-FRS | Engine, Exhaust, Transmission | 0 | 03-16-2014 10:18 PM |
| Something fine... | Porsche | BRZ First-Gen (2012+) General Topics | 3 | 12-16-2013 02:45 AM |
| Something fine... | Porsche | Off-Topic Lounge [WARNING: NO POLITICS] | 2 | 12-13-2013 11:29 AM |
| Something fine... | Porsche | Off-Topic Lounge [WARNING: NO POLITICS] | 0 | 12-13-2013 11:14 AM |
| U.S. seeks $16.4 million fine against Toyota | Myka | Other Vehicles & General Automotive Discussions | 6 | 04-22-2010 07:43 PM |


